Managing photos in iCloud can be a seamless experience, especially when you want to keep your precious memories safe and accessible across all your Apple devices. However, users often encounter a common frustration: the seemingly elusive “select all” option when trying to manage photos, particularly on iCloud.com. If you’ve ever found yourself needing to download, delete, or organize a large number of photos in iCloud and wished for a quicker way to select them all, you’re not alone.
While iCloud Photos doesn’t offer a straightforward “select all” button like you might find in other platforms, there are several methods and workarounds you can use to efficiently select multiple photos for bulk actions. This guide will walk you through these techniques, ensuring you can manage your iCloud photo library effectively, whether you’re using a web browser or your computer.
Understanding the Challenge: Why No “Select All” Button?
The absence of a direct “select all” button in iCloud Photos, especially on the web interface, has been a long-standing point of contention for users. Many speculate that this design choice might be intentional, possibly aimed at encouraging users to stay within the Apple ecosystem and utilize iCloud storage rather than easily migrating photos to other services. While this is just speculation, the reality is that users are left searching for efficient ways to handle bulk photo selections.
This lack of a simple “select all” feature becomes particularly cumbersome when you need to:
- Download a large archive: Moving your photos to a local drive for backup or switching to another service.
- Delete numerous images: Cleaning up your iCloud storage or removing unwanted photos.
- Organize photos into albums: Batch-adding photos to specific albums for better categorization.
Fortunately, despite the missing button, there are viable methods to select multiple photos in iCloud, significantly speeding up the process compared to individually clicking each image.
Methods to Select Multiple Photos on iCloud
While a one-click “select all” isn’t available, here are the most effective techniques to select multiple photos in iCloud:
1. Using Shift-Click for Range Selection (Web Browser)
The most commonly suggested workaround involves using the Shift key on your keyboard while clicking photos on iCloud.com. This method, familiar to most computer users, allows you to select a range of photos:
- Open iCloud Photos in your web browser: Go to iCloud.com and log in with your Apple ID. Click on the “Photos” app.
- Select the first photo: Click on the first photo in the range you wish to select.
- Hold the Shift key: Press and hold the Shift key on your keyboard.
- Select the last photo: Scroll to the last photo in the range and click on it. This should select all photos between the first and last clicked images, inclusive.
 iCloud Photos Interface
- Perform your desired action: Once selected, you can download, delete, or add the selected photos to an album using the icons at the top of the iCloud Photos interface.
Limitations of Shift-Click:
- Not always reliable: Some users report that Shift-click selection doesn’t always work consistently across different browsers or operating systems.
- Visual confirmation needed: You need to visually confirm that all photos in the intended range are selected, as sometimes the selection can be erratic.
- Still manual for very large libraries: For libraries with thousands of photos, even range selection can be time-consuming if you need to select almost everything.
2. Selecting Photos by Date or Location (Web Browser)
Another less known but potentially faster method on iCloud.com leverages the organization of photos by date and location. This technique allows you to select all photos within a specific date or location group:
- Navigate to “Photos” view: In iCloud Photos on the web, ensure you are in the main “Photos” view (often accessible by clicking “Photos” in the sidebar, above “Albums”). This view groups photos by date and sometimes location.
- Locate the date/location group: Find the date or location heading that encompasses the photos you want to select.
- Hover and click the “+” icon: Hover your mouse cursor to the right of the date/location information. A plus (+) icon should appear. Click on this plus icon.
 iCloud Photos Plus Icon
- All photos in the group are selected: Clicking the plus icon will select all photos associated with that specific date or location grouping.
- Download or manage: The download icon (cloud with downward arrow) will become active, allowing you to download the selected batch. You can also delete or add to an album.
Advantages of Date/Location Selection:
- Faster for date-based organization: If your photos are well-organized by date, this method can be significantly faster than Shift-clicking for large date ranges.
- Useful for location-based management: If you want to manage photos from a specific trip or event grouped by location, this offers a quick selection.
Disadvantages of Date/Location Selection:
- Relies on iCloud’s grouping: Effectiveness depends on how iCloud has grouped your photos, which might not always align with your desired selection criteria.
- Less precise than range selection: You select entire date or location groups, which might include photos you don’t intend to select.
3. Downloading All Photos Using iCloud for Windows or macOS
For users who want to download all their iCloud photos to a computer, the most efficient method is to use the iCloud for Windows application or the iCloud Photos feature on macOS. These methods effectively “select all” for the purpose of downloading:
For Windows Users (iCloud for Windows):
- Download and install iCloud for Windows: Download iCloud for Windows from the Microsoft Store or Apple’s website and install it on your PC.
- Open iCloud for Windows and sign in: Launch the application and sign in with your Apple ID.
- Select “Photos” and Options: Next to “Photos,” click the “Options” button.
- Choose “Download new photos to my PC”: Ensure “iCloud Photo Library” is checked, and then select the option “Download new photos to my PC.” You can change the download location if desired.
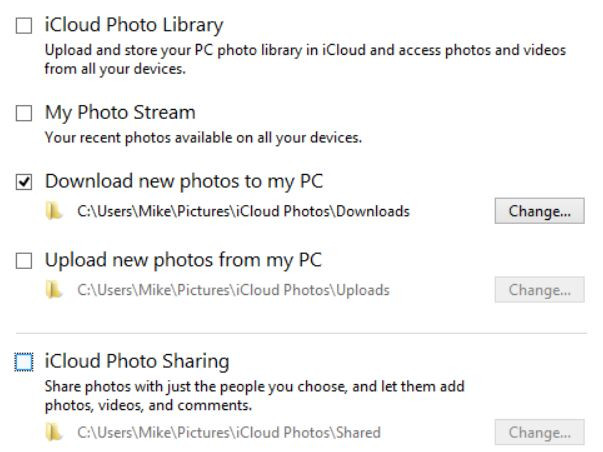 iCloud for Windows Photos Options
- Click “Done” and “Apply”: Click “Done” in the Options window, and then “Apply” in the main iCloud for Windows window. iCloud will begin downloading all your iCloud Photos to your PC.
For macOS Users (iCloud Photos):
- Enable iCloud Photos in Photos app: Open the “Photos” app on your Mac. Go to “Photos” in the menu bar, then “Settings” (or “Preferences” in older macOS versions).
- Ensure “iCloud Photos” is turned on: In the iCloud tab, make sure “iCloud Photos” is enabled.
- Choose “Download Originals to this Mac”: Select the option “Download Originals to this Mac.” This will download full-resolution versions of all your iCloud Photos to your Mac’s photo library.
Advantages of iCloud for Windows/macOS Download:
- Downloads all photos: This is the closest you get to a true “select all and download” function for your entire library.
- Automatic syncing (Windows/macOS): Once set up, iCloud for Windows or macOS Photos can automatically download new photos as they are added to iCloud.
- Local backup: Creates a complete local backup of your iCloud photo library on your computer.
Disadvantages of iCloud for Windows/macOS Download:
- Downloads everything: It downloads your entire iCloud Photo Library, not allowing for selective download of specific photos.
- Requires desktop app: This method is only applicable if you have access to a Windows PC or Mac and are willing to use the respective iCloud applications.
- Storage space needed: You need sufficient storage space on your computer to accommodate your entire iCloud Photo Library.
Tips for Efficient iCloud Photo Management
While waiting for Apple to potentially introduce a “select all” feature, here are some tips to manage your iCloud Photos more efficiently:
- Organize into Albums: Proactively organize your photos into albums as you take them. This makes it easier to manage photos in batches later, as you can select and download or manage entire albums.
- Regularly Review and Delete: Make it a habit to periodically review your iCloud Photos and delete unwanted images. This prevents your library from becoming overwhelmingly large and difficult to manage.
- Utilize iCloud Shared Albums: For sharing photos, use iCloud Shared Albums. This can help keep your main library focused and potentially reduce the number of photos you need to manage in bulk.
- Consider Third-Party Tools (with caution): Some third-party applications claim to offer enhanced iCloud photo management, including bulk selection and download options. However, exercise caution when using third-party apps with your iCloud account, ensuring they are reputable and secure.
Conclusion: Managing Multiple Photos in iCloud is Possible
While the absence of a “select all” button in iCloud Photos is a noticeable inconvenience, it’s not an insurmountable obstacle. By utilizing the Shift-click range selection, date/location grouping selection on iCloud.com, or the full download capabilities of iCloud for Windows and macOS, you can effectively manage multiple photos and perform bulk actions.
Hopefully, future updates to iCloud Photos will incorporate a more direct “select all” option to streamline photo management further. In the meantime, these workarounds will empower you to take control of your iCloud Photo Library and efficiently handle your digital memories.