Managing your photos in iCloud can be a seamless experience, especially when you want to back up your precious memories or access them across your Apple devices. However, users often encounter a frustrating hurdle: the seemingly simple task of selecting all photos for bulk actions like downloading or deleting. If you’ve ever struggled with the lack of a straightforward “select all” button in iCloud Photos, you’re not alone. Many users have voiced their frustration over the time-consuming process of individually selecting hundreds or even thousands of photos.
Fortunately, while Apple might not offer a prominent “select all” button, there are effective methods and workarounds to help you manage your iCloud photo library in bulk. This guide will walk you through proven techniques to select and manage all your photos in iCloud, ensuring you can efficiently handle your digital memories. Whether you’re looking to download everything to your computer, move your photos to another service, or simply organize your library, we’ve got you covered.
Understanding the Challenge of Selecting All Photos in iCloud
Before diving into solutions, it’s important to understand why directly selecting all photos in iCloud isn’t as intuitive as it might seem. The design of iCloud Photos, particularly on the web interface at iCloud.com, prioritizes visual browsing and individual photo management. This design choice, while user-friendly for casual viewing, becomes cumbersome when dealing with large photo libraries.
Users have long pointed out the absence of a “select all” feature, especially when compared to other cloud storage services like Google Drive or Dropbox, which offer robust bulk selection tools. This limitation can be particularly annoying when you need to download all your photos, perhaps as a backup or before switching to a different platform. The manual selection process can be incredibly time-consuming and tedious, leading to user frustration and the search for more efficient alternatives.
Effective Methods to Select and Manage All Your iCloud Photos
While a one-click “select all” button might be missing, there are several practical methods you can employ to select and manage your photos in iCloud in bulk. These methods utilize different platforms and features to streamline the process, depending on your specific needs and what devices you have access to.
Method 1: Downloading All Originals via iCloud for Windows or macOS
The most comprehensive and efficient way to “select all” and download your iCloud photos is by using the iCloud for Windows application on a PC or the built-in iCloud Photos feature on a Mac. This method ensures you download the original, full-resolution versions of all your photos and videos stored in iCloud.
For Windows Users:
-
Download and Install iCloud for Windows: If you haven’t already, download iCloud for Windows from the official Apple website.
-
Open iCloud for Windows and Sign In: Launch the application and sign in with your Apple ID credentials.
-
Select Photos Options: Next to “Photos,” click the “Options” button.
Alt Text: iCloud for Windows application showing the Options button next to Photos.
-
Choose “iCloud Photo Library” and “Download new photos to my PC”: In the Photos Options window, ensure “iCloud Photo Library” is checked. Then, select the option “Download new photos to my PC.” Alternatively, you can choose to “Keep originals in iCloud and download to my PC” if you want to keep local copies and save space on your computer.
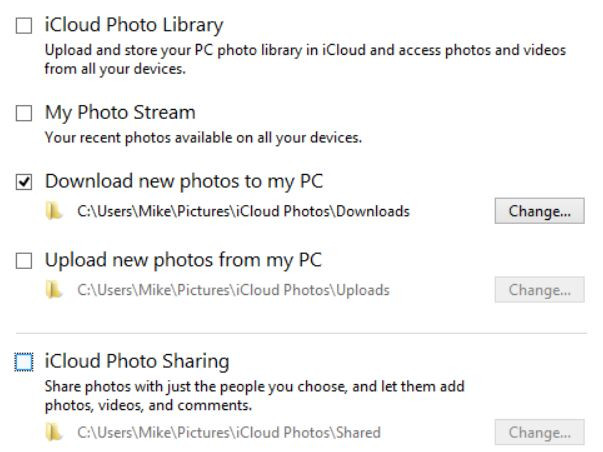 iCloud for Windows Download Photos Option
 -
Apply Changes: Click “Done” and then “Apply” in the main iCloud for Windows window.
iCloud for Windows will now automatically download all your iCloud Photos to your PC. You can find them in File Explorer under “iCloud Photos”. This effectively “selects all” your photos for download, ensuring you have a local backup of your entire iCloud Photo Library.
For macOS Users:
If you are using a Mac, the process is even more integrated:
- Open Photos App: Launch the Photos application on your Mac.
- Enable iCloud Photos: Go to Photos > Settings (or Photos > Preferences in older macOS versions) > iCloud. Make sure “iCloud Photos” is checked.
- Download Originals to this Mac: Select “Download Originals to this Mac.” This option ensures that full-resolution versions of your photos are downloaded and stored on your Mac.
The Photos app on your Mac will then sync with iCloud and download all your photos to your local library. This method is ideal for users who want a complete local copy of their iCloud Photo Library on their Mac.
Method 2: Utilizing Date-Based Selection on iCloud.com (Workaround)
While iCloud.com doesn’t have a “select all” button in the traditional sense, it offers a date-based grouping of your photos. This feature can be cleverly used as a workaround to select photos in larger chunks, speeding up the selection process compared to individual clicking.
-
Access iCloud.com and Navigate to Photos: Open your web browser and go to iCloud.com. Sign in with your Apple ID and navigate to the “Photos” app.
-
Switch to “Photos” View: In the left sidebar, click on “Photos” to view your library organized by dates and locations. This view groups photos into sections based on when and where they were taken.
 iCloud Photos Date Grouping
 -
Hover and Select Date Ranges: Hover your mouse to the right of a date or location grouping. A “+” icon or a “Share” icon might appear. Clicking on the “+” icon (as seen in some user experiences) or the “Share” icon can sometimes select all photos within that date range.
-
Download Selected Photos: Once a group of photos is selected (indicated by a checkmark or highlight), the download icon (cloud with a down arrow) in the top right corner will become active. Click it to download the selected photos.
This method is not a true “select all,” but it allows you to select photos in larger batches based on date ranges, which is significantly faster than selecting each photo individually, especially for downloading photos directly from the web interface.
Method 3: Exploring Third-Party Applications (Use with Caution)
While not officially endorsed by Apple, some third-party applications claim to offer enhanced management capabilities for iCloud Photos, potentially including bulk selection and download options. However, it is crucial to exercise caution when using third-party apps with your iCloud account. Always research the app’s reputation, security practices, and user reviews before granting access to your iCloud data.
As of now, there isn’t a widely recognized and trusted third-party application specifically designed to “select all” photos in iCloud. It’s generally recommended to stick to official Apple methods or the date-based workaround for security and reliability.
Method 4: Providing Feedback to Apple
If you find the lack of a “select all” feature in iCloud Photos to be a significant inconvenience, consider providing direct feedback to Apple. Apple values user feedback and often incorporates user suggestions into future updates.
You can submit your feedback through the official Apple Feedback page: Feedback – iCloud – Apple. By voicing your need for a “select all” feature, you contribute to the ongoing improvement of iCloud Photos for all users.
Conclusion: Managing Your iCloud Photos Efficiently
While selecting all photos in iCloud might not be as straightforward as users would like, the methods outlined above offer practical solutions for managing your photo library in bulk. Utilizing iCloud for Windows or macOS to download originals provides the most comprehensive approach for creating a local backup of your entire collection. The date-based selection workaround on iCloud.com offers a faster alternative for web-based management.
By understanding these methods, you can overcome the limitations and efficiently handle your iCloud photos, whether you’re backing them up, organizing them, or transferring them to another service. Remember to always prioritize secure and reliable methods, and consider providing feedback to Apple to advocate for future improvements in iCloud Photos functionality.