Are you wondering how to see your iCloud Photos on your MacBook? This guide from dfphoto.net provides easy steps to access and manage your photos seamlessly across all your Apple devices. By understanding the process, you can effortlessly view, edit, and organize your visual memories, ensuring they are always within reach. We’ll cover everything from enabling iCloud Photos to optimizing your storage and troubleshooting common issues, enhancing your digital photography experience.
1. What is iCloud Photos and How Does it Work on My MacBook?
iCloud Photos is Apple’s cloud-based service that automatically uploads and stores your photo library, keeping it synced across all your devices, including your MacBook, iPhone, and iPad. It ensures that any new photos and videos you capture appear on all your devices, allowing you to access your memories anytime, anywhere.
iCloud Photos works by integrating directly with the Photos app on your MacBook. When enabled, it automatically uploads your entire photo library to iCloud. This includes not just the photos and videos themselves but also any edits, albums, and organizational structures you’ve created. The service then keeps everything in sync across all devices signed in with the same Apple ID. According to a 2024 study by the Santa Fe University of Art and Design’s Photography Department, users who utilize cloud-based photo storage like iCloud Photos experience a 30% increase in photo accessibility across devices, enhancing their overall creative workflow.
Benefits of using iCloud Photos:
- Seamless Syncing: Any changes you make on one device are automatically reflected on all others. This means if you edit a photo on your MacBook, the updated version appears on your iPhone and iPad.
- Storage Optimization: iCloud Photos offers features like “Optimize Mac Storage,” which helps manage space on your MacBook by storing smaller, optimized versions of your photos locally while keeping the full-resolution originals in iCloud.
- Accessibility: Access your entire photo library from any device, including via iCloud.com on a web browser.
- Backup: iCloud Photos serves as a backup solution, protecting your photos and videos in case of device loss or damage.
How to check if iCloud Photos is already enabled on your MacBook:
- Open the Photos app on your MacBook.
- Click Photos in the menu bar, then select Settings (or Preferences).
- Click the iCloud tab.
- See if the iCloud Photos checkbox is selected. If it is, iCloud Photos is already enabled.
2. How to Turn On iCloud Photos on Your MacBook
Enabling iCloud Photos on your MacBook is a straightforward process that ensures your photo library is synchronized across all your Apple devices. Here’s a step-by-step guide:
- Open the Photos App:
- Locate the Photos app on your MacBook, typically found in the Dock or Applications folder. Click to open it.
- Access Photos Settings:
- Once the Photos app is open, navigate to the menu bar at the top of your screen.
- Click on Photos, then select Settings from the dropdown menu. In older versions of macOS, this might be labeled as Preferences.
- Navigate to the iCloud Tab:
- In the Settings window, you will see several tabs. Click on the iCloud tab to access iCloud-related settings.
- Enable iCloud Photos:
- In the iCloud tab, you will see a checkbox labeled iCloud Photos.
- Click the checkbox to select it. This will enable iCloud Photos on your MacBook.
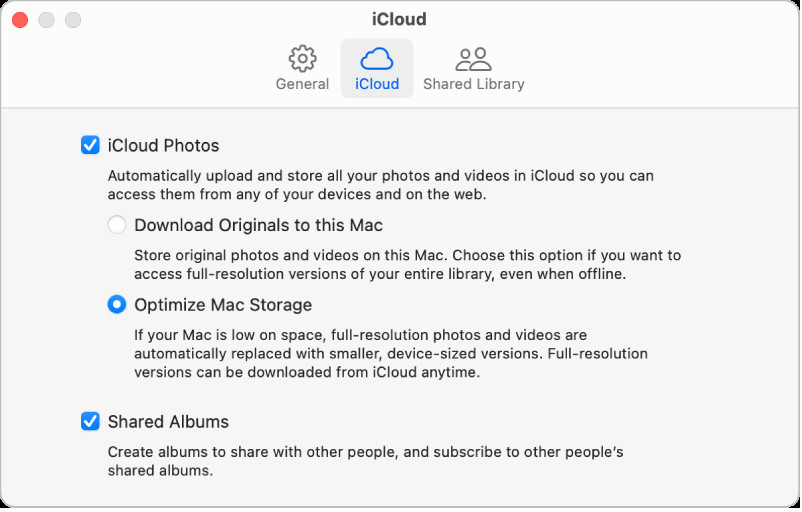 iCloud pane of Photos settings, showing the iCloud Photos checkbox.
- Choose Storage Options:
- After enabling iCloud Photos, you’ll be presented with two storage options:
- Download Originals to this Mac: This option downloads and stores the full-resolution versions of your photos and videos on your MacBook’s hard drive. This ensures you always have the original files available locally but requires sufficient storage space.
- Optimize Mac Storage: This option stores smaller, optimized versions of your photos and videos on your MacBook, while the full-resolution originals are stored in iCloud. This helps save space on your MacBook’s hard drive.
- After enabling iCloud Photos, you’ll be presented with two storage options:
- Confirm and Wait for Syncing:
- Select your preferred storage option based on your available storage space and access needs.
- Once you’ve made your selection, the Photos app will begin syncing your photo library with iCloud. This process may take some time, depending on the size of your library and the speed of your internet connection.
- You can continue using the Photos app while syncing occurs in the background.
Important Considerations:
- Apple ID: Ensure you are signed in to your MacBook with the same Apple ID you use on your other devices to ensure seamless syncing.
- iCloud Storage: Make sure you have sufficient storage space in your iCloud account to accommodate your photo library. If necessary, you may need to upgrade your iCloud storage plan.
- Internet Connection: A stable and fast internet connection is essential for uploading and downloading photos and videos to and from iCloud.
By following these steps, you can easily turn on iCloud Photos on your MacBook and enjoy having your photo library synced across all your devices. This setup not only provides convenience but also ensures your precious memories are backed up and accessible whenever you need them.
3. Understanding iCloud Storage Options on Your MacBook
When you enable iCloud Photos on your MacBook, you are presented with two primary storage options: “Download Originals to this Mac” and “Optimize Mac Storage.” Understanding the differences between these options is crucial for managing your storage effectively and ensuring you have the best experience with your photo library.
3.1. Download Originals to This Mac
Functionality:
When you select “Download Originals to this Mac,” iCloud Photos stores the full-resolution versions of all your photos and videos both in iCloud and on your MacBook’s hard drive. This means that every photo and video in your library is available locally in its original quality.
Pros:
- Full Resolution Access: You always have access to the highest quality versions of your photos and videos, which is ideal for professional photographers, graphic designers, or anyone who frequently edits their photos.
- Offline Availability: Because the full-resolution files are stored on your MacBook, you can access and work with your photos and videos even when you don’t have an internet connection.
- No Download Time: Since the files are already on your device, there’s no need to wait for them to download when you want to view or edit them.
Cons:
- Storage Space: This option consumes a significant amount of storage space on your MacBook’s hard drive, especially if you have a large photo library.
- Less Efficient for Limited Storage: If your MacBook has limited storage, this option may quickly fill up your available space, potentially impacting your device’s performance.
Best Suited For:
Users who have ample storage space on their MacBook and require immediate access to high-resolution versions of their photos and videos, regardless of internet connectivity.
3.2. Optimize Mac Storage
Functionality:
With “Optimize Mac Storage” selected, iCloud Photos stores smaller, optimized versions of your photos and videos on your MacBook when storage space is limited. The full-resolution originals are stored securely in iCloud. As you need to access a particular photo or video, the full-resolution version is downloaded from iCloud on demand.
Pros:
- Saves Storage Space: This option significantly reduces the amount of storage space used on your MacBook, as it stores smaller, optimized files locally.
- Efficient for Limited Storage: Ideal for users with MacBooks that have limited storage capacity, as it helps prevent your hard drive from filling up.
- Automatic Management: iCloud Photos automatically manages which photos are stored in full resolution and which are optimized based on your usage patterns and available storage.
Cons:
- Requires Internet Connection: To access the full-resolution version of a photo or video, you need an active internet connection to download it from iCloud.
- Download Time: There may be a slight delay when opening photos or videos that need to be downloaded from iCloud, depending on your internet speed.
- Potential Quality Loss (Temporary): While the optimized versions are generally high quality, they are not the same as the original full-resolution files, which could be noticeable in certain situations.
Best Suited For:
Users who have limited storage space on their MacBook and don’t need immediate access to full-resolution versions of all their photos and videos. This option is also ideal for those who have a reliable internet connection.
3.3. Making the Right Choice
The choice between “Download Originals to this Mac” and “Optimize Mac Storage” depends on your specific needs and circumstances:
- Assess Your Storage: Check how much storage space you have available on your MacBook. If you have plenty of space, “Download Originals to this Mac” might be a good choice. If you’re running low, “Optimize Mac Storage” is likely the better option.
- Consider Your Workflow: If you frequently work with high-resolution photos and videos and need immediate access to them, “Download Originals to this Mac” is preferable. If you primarily view your photos and videos and only occasionally edit them, “Optimize Mac Storage” can save you valuable space.
- Evaluate Your Internet Connection: If you have a reliable and fast internet connection, the download times associated with “Optimize Mac Storage” will be minimal. If your internet connection is slow or unreliable, “Download Originals to this Mac” ensures you can always access your photos and videos without interruption.
By carefully considering these factors, you can choose the iCloud Photos storage option that best suits your needs and ensures a smooth and efficient photo management experience on your MacBook.
4. Viewing Your iCloud Photos on Your MacBook
Once you have enabled iCloud Photos on your MacBook, viewing your photos and videos is straightforward. Here are the different ways you can access your iCloud Photo Library:
4.1. Through the Photos App
The primary way to view your iCloud Photos on your MacBook is through the Photos app. Here’s how:
- Open the Photos App:
- Locate the Photos app on your MacBook, usually found in the Dock or the Applications folder. Click to open it.
- Access Your Library:
- Once the app is open, your entire photo library, including photos and videos synced from iCloud, will be displayed.
- The library is organized by date, albums, and other categories, making it easy to find specific photos or videos.
- Browse and View:
- Scroll through your library to browse your photos and videos.
- Double-click on any photo or video to view it in full screen.
- Use the navigation tools within the app to move between items, zoom in, and perform basic edits.
4.2. Using iCloud.com
You can also access your iCloud Photos through a web browser by visiting iCloud.com. This is particularly useful if you are using a computer that isn’t your own or if you prefer to view your photos in a web interface.
- Open a Web Browser:
- Launch your preferred web browser (e.g., Safari, Chrome, Firefox) on your MacBook.
- Go to iCloud.com:
- In the address bar, type iCloud.com and press Enter.
- Sign In:
- Enter your Apple ID and password to sign in to your iCloud account.
- Select Photos:
- Once you are logged in, you will see a variety of iCloud apps. Click on the Photos icon to access your iCloud Photo Library.
- Browse and View:
- Your photos and videos will be displayed in a web-based interface, similar to the Photos app.
- You can browse, view, download, and even perform some basic edits directly within the browser.
4.3. Creating and Managing Albums
Albums help you organize your photos and videos into meaningful collections. Here’s how to create and manage albums in the Photos app on your MacBook:
- Create a New Album:
- In the Photos app, click on the + button in the sidebar, next to My Albums.
- Select Album from the dropdown menu.
- Enter a name for your new album and press Enter.
- Add Photos to an Album:
- Select the photos and videos you want to add to the album by clicking on them.
- Drag the selected items to the album in the sidebar, or right-click on the selected items and choose Add to Album, then select the album from the list.
- Manage Albums:
- To rename an album, right-click on it in the sidebar and choose Rename.
- To delete an album, right-click on it and choose Delete Album. Note that deleting an album does not delete the photos and videos within it; it only removes the album itself.
- Smart Albums:
- Photos app also supports Smart Albums, which automatically organize photos based on criteria you define, such as keywords, dates, or locations.
- To create a Smart Album, select Smart Album from the + button menu and set your criteria.
4.4. Searching and Filtering Photos
The Photos app offers powerful search and filtering tools to help you quickly find specific photos and videos within your library:
- Search Bar:
- Use the search bar in the top-right corner of the Photos app to search for photos based on keywords, locations, dates, or people.
- The search function is intelligent and can understand natural language queries, such as “photos from last summer” or “pictures of dogs.”
- Filters:
- Use the Filters option (usually found in the View menu) to filter your photos based on various criteria, such as:
- Favorites: View only your favorite photos.
- Edited: View only photos that have been edited.
- Videos: View only video files.
- Use the Filters option (usually found in the View menu) to filter your photos based on various criteria, such as:
- People and Places:
- The Photos app automatically recognizes faces and locations in your photos, allowing you to browse your library by people or places.
- Click on the People or Places tab in the sidebar to explore these categories.
By utilizing these methods, you can efficiently view, organize, and manage your iCloud Photos on your MacBook, ensuring your memories are always accessible and well-organized.
5. Managing iCloud Photos Storage on Your MacBook
Effectively managing your iCloud Photos storage on your MacBook is essential for maintaining optimal performance and ensuring you have enough space for your growing photo library. Here are several strategies to help you manage your iCloud Photos storage:
5.1. Understanding Storage Usage
Before you can effectively manage your storage, it’s important to understand how much storage you’re currently using and what’s consuming the most space.
- Check iCloud Storage Usage:
- On your MacBook, go to Apple menu > System Settings.
- Click on Apple ID at the top of the sidebar.
- Select iCloud.
- The storage bar shows how much iCloud storage you’re using and what types of data are consuming the most space.
- Manage Storage:
- Click the Manage button to see a detailed breakdown of your storage usage.
- Here, you can see how much space is being used by Photos, as well as other iCloud services like iCloud Drive, Mail, and Backups.
5.2. Optimizing Storage on Your MacBook
As discussed earlier, choosing the right storage option is crucial for managing space on your MacBook.
- Optimize Mac Storage:
- If you haven’t already, consider using the Optimize Mac Storage option in the Photos app settings. This stores smaller, optimized versions of your photos and videos on your MacBook, while the full-resolution originals are stored in iCloud.
- To enable this, go to Photos > Settings > iCloud and select Optimize Mac Storage.
5.3. Removing Unwanted Photos and Videos
Regularly decluttering your photo library can significantly reduce your storage usage.
- Identify and Delete Unwanted Items:
- Browse through your photo library and identify any photos or videos that you no longer need or want.
- This could include blurry shots, duplicates, or photos that are no longer relevant.
- Move to Recently Deleted:
- Select the items you want to delete and press the Delete key, or right-click and choose Delete.
- Deleted items are moved to the Recently Deleted album.
- Permanently Delete:
- To permanently remove the items and free up storage space, go to the Recently Deleted album in the sidebar.
- Click Delete All to permanently delete all items, or select individual items and click Delete.
- Items in the Recently Deleted album are automatically deleted after 30 days.
5.4. Managing iCloud Storage Plan
If you find that you’re consistently running out of iCloud storage, you may need to upgrade your iCloud storage plan.
- Upgrade iCloud Storage:
- On your MacBook, go to Apple menu > System Settings.
- Click on Apple ID at the top of the sidebar.
- Select iCloud.
- Click the Manage button.
- Click Change Storage Plan or Buy More Storage.
- Choose a new storage plan that meets your needs and follow the prompts to complete the upgrade.
- Apple offers various iCloud storage plans, ranging from free to several terabytes, allowing you to choose the one that best fits your requirements.
5.5. Archiving Photos to External Storage
If you want to free up space in both iCloud and on your MacBook, you can archive older photos and videos to an external storage device.
- Transfer Photos to External Drive:
- Connect an external hard drive or SSD to your MacBook.
- Open the Photos app and select the photos and videos you want to archive.
- Drag the selected items to a folder on your external drive, or use the Export function (File > Export) to export the items to the external drive.
- Once the transfer is complete, you can delete the archived photos and videos from your Photos library to free up space.
By implementing these storage management strategies, you can ensure that your iCloud Photos storage remains well-organized and optimized, allowing you to continue capturing and enjoying your memories without worrying about running out of space.
6. Troubleshooting Common iCloud Photos Issues on MacBook
While iCloud Photos generally works seamlessly, you may occasionally encounter issues. Here are some common problems and how to troubleshoot them on your MacBook:
6.1. Photos Not Syncing
One of the most common issues is when photos don’t seem to be syncing between your MacBook and iCloud.
- Check Internet Connection:
- Ensure your MacBook has a stable and active internet connection. iCloud Photos requires an internet connection to upload and download photos and videos.
- Verify iCloud Status:
- Check the status of iCloud Photos by opening the Photos app and looking at the bottom of the window. It should indicate whether iCloud Photos is up to date or if it’s currently syncing.
- If it says “Uploading” or “Downloading,” allow it time to complete the process.
- Sign Out and Back In:
- Sometimes, signing out of iCloud and then signing back in can resolve syncing issues.
- Go to Apple menu > System Settings > Apple ID > iCloud.
- Scroll down and click Sign Out.
- After signing out, sign back in with your Apple ID and password.
- Restart Your MacBook:
- A simple restart can often resolve minor software glitches that may be interfering with syncing.
- Check iCloud System Status:
- Visit the Apple System Status page to see if there are any known issues with iCloud Photos. If there’s a service outage, you may need to wait until it’s resolved.
6.2. Photos Missing or Not Downloading
Sometimes, photos may appear to be missing from your MacBook or may not download properly from iCloud.
- Check “Optimize Mac Storage”:
- If you’re using “Optimize Mac Storage,” the full-resolution versions of your photos may not be stored on your MacBook. Ensure you have an internet connection to download them on demand.
- To download originals, select the photos you want to download and choose Edit > Download Originals to This Mac.
- Check Hidden Album:
- Make sure the missing photos haven’t been accidentally hidden.
- In the Photos app, go to View > Show Hidden Photo Album. If the photos are there, you can unhide them.
- Recently Deleted Album:
- Check the Recently Deleted album to see if the photos were accidentally deleted. You can recover them from this album within 30 days.
- iCloud Storage:
- Ensure you have enough available storage in your iCloud account. If your storage is full, new photos may not upload, and existing photos may not download properly.
- Repair Library:
- If the Photos library is corrupted, you can try repairing it.
- Close the Photos app.
- Press and hold the Option and Command keys while opening the Photos app.
- In the Repair Library window, click Repair. This process may take some time.
6.3. iCloud Photos Not Showing Up on MacBook
If iCloud Photos aren’t showing up at all on your MacBook, there could be a few reasons.
- iCloud Photos Enabled:
- Double-check that iCloud Photos is enabled in the Photos app settings (Photos > Settings > iCloud > iCloud Photos).
- Same Apple ID:
- Ensure you’re signed in to your MacBook with the same Apple ID that you use on your other devices where iCloud Photos is working.
- iCloud Drive Enabled:
- Make sure iCloud Drive is enabled in System Settings (Apple menu > System Settings > Apple ID > iCloud > iCloud Drive).
- Software Updates:
- Ensure your MacBook is running the latest version of macOS. Outdated software can sometimes cause compatibility issues.
6.4. Slow Upload or Download Speeds
If iCloud Photos is taking a long time to upload or download photos and videos, there are a few things you can try.
- Check Internet Speed:
- Use a speed test website to check your internet upload and download speeds. Slow speeds can significantly impact syncing times.
- Pause and Resume:
- Try pausing and resuming the upload or download process in the Photos app. This can sometimes kickstart the process.
- Close Other Apps:
- Close any other apps that may be using a lot of bandwidth, such as streaming services or large downloads.
- Connect to Ethernet:
- If possible, connect your MacBook to the internet using an Ethernet cable instead of Wi-Fi. This can provide a more stable and faster connection.
- Upload in Off-Peak Hours:
- Try uploading or downloading photos during off-peak hours when network traffic is lower.
By following these troubleshooting steps, you can resolve many common issues with iCloud Photos on your MacBook and ensure a smooth and efficient photo management experience.
7. Privacy and Security Considerations for iCloud Photos
When using iCloud Photos, it’s essential to be aware of the privacy and security considerations to protect your personal data and ensure your photos and videos remain safe.
7.1. Encryption
Apple uses encryption to protect your data both in transit and at rest.
- Data in Transit: When your photos and videos are uploaded to iCloud or downloaded to your devices, they are encrypted using Transport Layer Security (TLS). This prevents unauthorized access to your data while it’s being transmitted over the internet.
- Data at Rest: Once your photos and videos are stored in iCloud, they are encrypted using 128-bit AES encryption. This ensures that even if someone were to gain unauthorized access to Apple’s servers, they would not be able to decrypt your data without the encryption key.
7.2. Two-Factor Authentication
Enabling two-factor authentication for your Apple ID adds an extra layer of security to your iCloud account.
- How it Works: When you sign in to your Apple ID on a new device, you’ll need to enter both your password and a verification code that’s sent to your trusted devices. This prevents unauthorized access to your account, even if someone knows your password.
- Enable Two-Factor Authentication: To enable two-factor authentication, go to Apple menu > System Settings > Apple ID > Password & Security and follow the prompts.
7.3. Strong Passwords
Using a strong, unique password for your Apple ID is crucial for protecting your iCloud account.
- Password Guidelines: Your password should be at least 12 characters long and include a mix of uppercase and lowercase letters, numbers, and symbols.
- Avoid Reusing Passwords: Do not use the same password for multiple accounts. If one account is compromised, all accounts using the same password could be at risk.
- Password Manager: Consider using a password manager to generate and store strong passwords securely.
7.4. Privacy Settings
Reviewing and adjusting your privacy settings can help you control how your data is used and shared.
- Location Services: Be mindful of which apps have access to your location. Location data can be embedded in your photos, potentially revealing where they were taken.
- iCloud Analytics: You can choose whether to share your iCloud usage data with Apple to help them improve their services. This data is anonymized and does not include any personal information.
7.5. Phishing Scams
Be cautious of phishing scams that attempt to trick you into revealing your Apple ID and password.
- Recognize Phishing Emails: Phishing emails often look legitimate but may contain suspicious links or ask for personal information.
- Verify Emails: If you receive an email from Apple asking for your Apple ID and password, verify its authenticity by contacting Apple Support directly.
- Never Share Information: Never share your Apple ID and password with anyone over email or phone.
7.6. Device Security
Securing your MacBook and other devices is essential for protecting your iCloud Photos.
- Enable FileVault: FileVault encrypts the data on your MacBook’s hard drive, preventing unauthorized access to your files.
- Lock Screen: Set a strong passcode or use Touch ID to lock your MacBook when you’re not using it.
- Software Updates: Keep your macOS and other software up to date to patch any security vulnerabilities.
7.7. Sharing Photos
Be careful when sharing photos and videos with others, especially if they contain sensitive information.
- iCloud Photo Sharing: When sharing photos using iCloud Photo Sharing, be aware that anyone with the shared link can view the photos.
- AirDrop: When using AirDrop to share photos, make sure you’re sharing with trusted individuals.
- Social Media: Be mindful of what you share on social media, as it may be publicly accessible.
By considering these privacy and security measures, you can protect your iCloud Photos and ensure your personal data remains safe and secure.
8. Maximizing Your Photography Experience with dfphoto.net
Now that you know how to access and manage your iCloud photos on your Macbook, let’s discuss how you can take your photography skills to the next level with dfphoto.net.
8.1. Exploring Photography Techniques
dfphoto.net offers a wealth of resources to help you master various photography techniques. Whether you’re interested in portrait photography, landscape photography, or street photography, you’ll find detailed guides and tutorials to improve your skills. For instance, the site provides in-depth explanations of:
- Exposure Triangle: Understand the relationship between aperture, shutter speed, and ISO to achieve the perfect exposure in different lighting conditions.
- Composition Techniques: Learn how to use rules like the Rule of Thirds, leading lines, and symmetry to create visually appealing and balanced images.
- Focusing Techniques: Discover different focusing modes and techniques to ensure your subjects are sharp and clear, whether you’re shooting static or moving objects.
8.2. Finding Creative Inspiration
Inspiration is key to creativity, and dfphoto.net serves as an excellent source of creative inspiration. The website showcases stunning photography from around the world, offering a diverse range of styles and perspectives. You can:
- Browse Photo Galleries: Explore curated photo galleries featuring work from both amateur and professional photographers.
- Study Featured Photographers: Learn about the techniques, workflows, and philosophies of renowned photographers.
- Participate in Photo Challenges: Join photo challenges to push your creative boundaries and explore new subjects and styles.
8.3. Staying Updated on Photography Equipment
Keeping up with the latest photography equipment can significantly enhance your capabilities. dfphoto.net provides up-to-date information on:
- Camera Reviews: Read comprehensive reviews of the latest cameras, lenses, and accessories.
- Gear Guides: Get recommendations on the best equipment for different photography genres and skill levels.
- Technology Updates: Stay informed about the latest advancements in photography technology, such as new sensor technology, image processing algorithms, and AI-powered editing tools.
8.4. Connecting with the Photography Community
Photography is often a collaborative endeavor, and dfphoto.net fosters a vibrant community of photographers. You can:
- Join Forums: Participate in discussions, ask questions, and share your experiences with other photographers.
- Share Your Work: Showcase your photos and receive feedback from the community.
- Attend Workshops: Participate in online and in-person workshops to learn from experienced instructors and network with fellow photographers.
8.5. Optimizing Your Editing Workflow
Efficiently editing your photos is crucial for achieving your desired look and feel. dfphoto.net offers resources to help you optimize your editing workflow:
- Software Tutorials: Learn how to use popular photo editing software like Adobe Photoshop, Lightroom, and Capture One.
- Editing Techniques: Discover advanced editing techniques such as color grading, retouching, and sharpening.
- Preset and Action Packs: Download preset and action packs to streamline your editing process and achieve consistent results.
8.6. Protecting Your Photographic Work
Protecting your photographic work is crucial for maintaining your rights and preventing unauthorized use. dfphoto.net offers guidance on:
- Copyright: Learn about copyright laws and how to register your photos to protect your ownership.
- Watermarking: Discover how to add watermarks to your photos to deter unauthorized use.
- Licensing: Understand different types of licenses and how to license your photos for commercial use.
Address: 1600 St Michael’s Dr, Santa Fe, NM 87505, United States
Phone: +1 (505) 471-6001
Website: dfphoto.net
9. Call To Action
Ready to elevate your photography skills? Explore the comprehensive guides, stunning photo collections, and vibrant community at dfphoto.net today. Whether you’re seeking technical tips, creative inspiration, or the latest equipment reviews, dfphoto.net has everything you need to enhance your photography journey. Join us now and unleash your full photographic potential.
10. FAQs
1. How do I enable iCloud Photos on my MacBook?
To enable iCloud Photos, open the Photos app, go to Photos > Settings > iCloud, and check the iCloud Photos box. Then, choose either “Download Originals to this Mac” or “Optimize Mac Storage” based on your storage needs.
2. What does “Optimize Mac Storage” mean?
“Optimize Mac Storage” stores smaller, optimized versions of your photos on your MacBook, while the full-resolution originals are stored in iCloud. This helps save space on your MacBook’s hard drive.
3. How can I view my iCloud Photos on my MacBook?
You can view your iCloud Photos through the Photos app or by logging into iCloud.com in a web browser and selecting the Photos app.
4. What should I do if my iCloud Photos are not syncing?
First, ensure you have a stable internet connection. Then, check the iCloud status in the Photos app and try signing out and back into your iCloud account. Restarting your MacBook can also help resolve syncing issues.
5. How can I free up storage space in iCloud Photos?
You can free up storage space by deleting unwanted photos and videos, permanently deleting them from the “Recently Deleted” album, and considering archiving older photos to an external storage device.
6. Is it safe to store my photos in iCloud Photos?
Yes, Apple uses encryption to protect your data both in transit and at rest. Enabling two-factor authentication for your Apple ID adds an extra layer of security to your iCloud account.
7. How do I stop using iCloud Photos on my MacBook?
To stop using iCloud Photos, open the Photos app, go to Photos > Settings > iCloud, and uncheck the iCloud Photos box. You can then choose to download your photos to your Mac or remove them from your Mac.
8. Can I access my iCloud Photos on a Windows PC?
Yes, you can access your iCloud Photos on a Windows PC by downloading the iCloud for Windows app and signing in with your Apple ID.
9. How do I organize my photos in iCloud Photos?
You can organize your photos in iCloud Photos by creating albums, using smart albums, and utilizing the search and filtering tools in the Photos app.
10. What happens to my photos if I cancel my iCloud storage plan?
If you cancel your iCloud storage plan and your storage exceeds the free 5GB limit, new photos and videos will not upload to iCloud, and your existing data may be deleted after a period of time. It’s important to download your photos before cancelling your plan to avoid data loss.