As you navigate the digital world on your smartphone, moments arise when you want to preserve what’s on your screen. Whether it’s a cherished photo, an engaging social media post, or important information, taking a screenshot is the perfect solution. Think of it as capturing a snapshot of your screen, allowing you to save and share exactly what you see, including photos.
Fortunately, capturing a screenshot, also known as a screen grab, is a straightforward process on both iPhones and Android devices. While saving a photo directly is often possible by pressing and holding the image, screenshotting becomes invaluable when you need to capture something that isn’t directly downloadable, or to capture a photo within a larger context on your screen.
This guide will walk you through the simple steps to screenshot a photo and anything else on your iPhone or Android device. We’ll cover the standard methods and what to do after you’ve captured your screen, ensuring you master this essential smartphone skill.
Screenshotting Photos on iPhones
The method for taking a screenshot on an iPhone varies slightly depending on the model. Here’s How To Screenshot A Photo on different iPhone versions:
iPhones with Face ID (No Home Button)
For iPhone models like iPhone X, XS, XR, 11, 12, 13, and newer, which utilize Face ID and lack a Home button, follow these steps to screenshot a photo or anything on your screen:
- Simultaneously press and hold the Power button (on the right side) and the Volume Up button (on the left side). Make sure to press them at the same time and release quickly.
- You’ll see a brief screen flash, and you’ll likely hear a camera shutter sound, confirming that a screenshot has been taken.
- A thumbnail preview of the screenshot will briefly appear in the lower-left corner of your screen. Tap this thumbnail if you want to immediately view, edit, or share your screenshot.
If you tap the thumbnail, you’ll be taken to a screen where you can:
- Markup and Edit: Use the built-in tools to draw, write, or highlight directly on the screenshot.
- Share: Tap the share icon (a box with an upward arrow) to send your screenshot via messages, email, social media, or save it to cloud services.
- Delete: If you don’t want to keep the screenshot, tap the trash can icon to delete it.
If you don’t interact with the thumbnail, it will automatically save. You can find your screenshot photo in the Photos app under Albums > Screenshots.
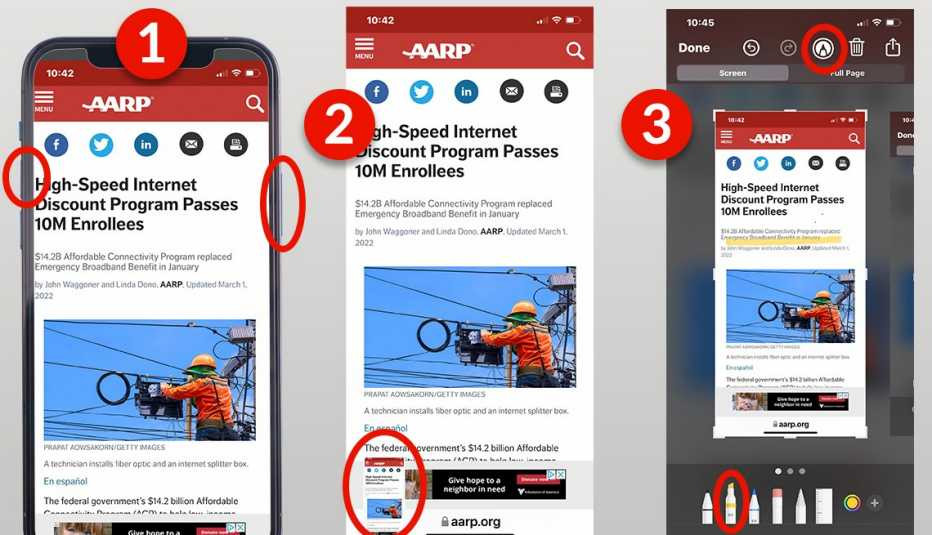 Steps to screenshot a photo on iPhone with button combinations for different models.
iPhones with Home Button (Side Button)
For iPhone models like iPhone 6, 7, 8, and the 2nd generation iPhone SE, which have a Home button and a Side button (Power button on the right side):
- Press and hold the Side button and the Home button simultaneously.
- Quickly release both buttons after you see the screen flash and hear the shutter sound.
- Follow the same steps as above to access the thumbnail preview for viewing, editing, and sharing. The screenshot will also be saved to the Screenshots album in your Photos app.
iPhones with Home Button (Top Button)
For older iPhone models like the original iPhone SE and earlier, which have a Home button and a Top button (Power button on the top):
- Press and hold the Top button and the Home button at the same time.
- Release both buttons quickly.
- The screenshot process is the same, with the thumbnail preview appearing for further actions and the saved image located in the Screenshots album.
Screenshotting Photos on Android Devices
Taking a screenshot on Android phones, such as Samsung Galaxy, Google Pixel, and other brands, is also generally simple, although the exact method can have slight variations depending on the manufacturer and Android version.
Standard Android Screenshot Method
The most common method for taking a screenshot on most Android phones is:
- Locate the Power button and the Volume Down button. On most modern Android phones, both buttons are located on the right side of the device.
- Press and hold the Power button and the Volume Down button at the same time.
- Hold them for a brief moment, then release. You should see a screen flash, and often an animation or sound will indicate that a screenshot has been captured.
- A screenshot notification may appear at the top of the screen, and in many cases, a thumbnail preview will briefly appear, offering options to share or edit immediately.
 Guide on how to screenshot photos on Android phones using power and volume down buttons.
Similar to iPhones, after taking a screenshot on Android, you can typically:
- Edit: Use built-in editing tools to crop, draw, or annotate your screenshot.
- Share: Easily share your screenshot through various apps and platforms.
- Find your screenshots: Screenshots are usually saved in the Gallery app or Photos app in a dedicated Screenshots folder.
While the power button and volume down button combination is the most universal method, some Android phones may offer alternative methods, such as gesture-based screenshots or using the Google Assistant. However, for most users, the button combination will be the primary and easiest way to screenshot a photo or anything on their Android screen.
Conclusion
Mastering the art of screenshotting photos and other content on your smartphone is incredibly useful. Whether you’re using an iPhone or an Android device, the process is generally quick and easy, allowing you to capture and share anything on your screen. With these simple steps, you can now confidently screenshot photos, messages, web pages, and more, preserving digital moments as needed.