Chromebooks have evolved from basic, budget-friendly laptops into versatile devices capable of handling a wide array of tasks. Their increasing popularity is undeniable, even surpassing Macs in sales at times. As Chromebooks become primary computers for many, the need to perform everyday tasks like scanning photos becomes essential. If you’re wondering how to bring your physical photo albums into the digital age using your Chromebook, you’re in the right place. This guide will walk you through the simple steps to scan your photos directly onto your Chromebook.
In April 2021, Google made scanning on Chromebooks significantly easier by introducing native scanning capabilities. This update streamlined the process of transferring physical documents and, importantly, photos to your Chromebook. Assuming you have your Chromebook and scanner ready – whether connected via Wi-Fi or USB – let’s begin digitizing your cherished photo prints.
- First, place the photo you wish to scan onto your scanner bed. Ensure it’s positioned correctly for optimal scanning.
 Chromebook Home Screen showing the Everything Button
- Activate the Everything Button on your Chromebook, typically located between the Tab and Shift keys, or alternatively, click the search button in the launcher.
 Chromebook Scan App in the app launcher after searching for scan
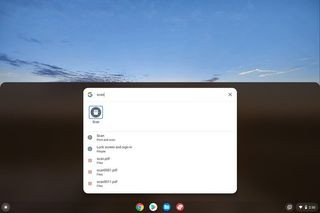
- In the search bar that appears, type “scan.” From the search results, select the Scan icon to launch the Chromebook’s built-in scanning application.
 Chromebook Scan App interface showing scanner selection dropdown
-
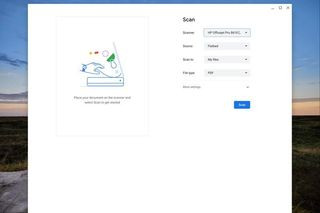
A drop-down menu will present available scanners. Choose your scanner from this menu. Make sure your scanner is turned on and connected to the same Wi-Fi network as your Chromebook, or properly connected via USB.
-
If your scanner offers different scanning input options, utilize the Source drop-down menu to select the appropriate source for your photos, such as a flatbed or document feeder if applicable.
-
The scanned photo file is, by default, saved to your “My files” folder. To alter this destination, use the Scan to menu to choose a different folder within your Chromebook’s file system, or directly to Google Drive for cloud storage.
 Chromebook Scan App interface showing file type and more settings options
-
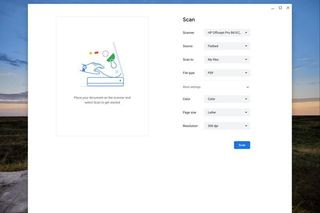
Determine the desired file format for your digitized photo using the File type menu. For photos, common choices include JPG for general use and smaller file sizes, or PNG for higher quality and lossless compression, which is beneficial for preserving photo detail.
-
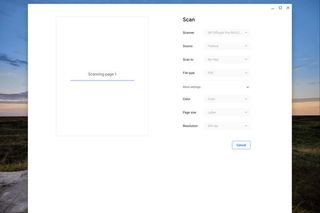
For more control over the scan quality, click More settings. This expands options to adjust color mode (Color, Black and White, Grayscale), page size (though often less relevant for photo scanning), and importantly, resolution (DPI). For photos, a resolution of 300 DPI is generally recommended for good print quality and detail. For archival purposes or enlargements, 600 DPI or higher might be considered.
 Chromebook Scan App interface showing the scan button ready to initiate photo scanning
- Once you’ve configured your settings to your satisfaction, click the Scan button to initiate the photo scanning process.
 Chromebook Scan App interface showing scan complete and done button
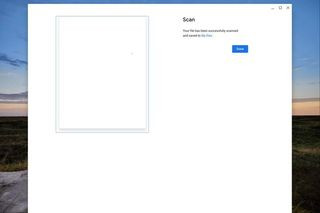
- After the scan is complete, the Scan app will display a preview. Click Done to finalize the scan and save the digital photo to your chosen location.
With your photos now scanned and saved on your Chromebook, you have numerous options. You can upload them to Google Photos for easy organization, sharing, and even basic editing. You can also attach them to emails, incorporate them into presentations, or use a variety of photo editing apps available for Chromebooks to enhance and retouch your newly digitized memories.
The uniformity of ChromeOS ensures this scanning process remains consistent across different Chromebook models. Whether you are using a high-performance Chromebook like the Lenovo Chromebook Duet 5 or a more affordable option, the steps to scan your photos remain the same. This ease of use makes Chromebooks a convenient tool for digitizing your photo collection and preserving your precious moments for years to come.