Digitizing your printed photos is a wonderful way to preserve memories and share them with family and friends. While professional scanners have long been considered the gold standard for photo digitization, smartphone camera technology has advanced significantly. This raises the question: can you achieve high-quality photo scans using just your phone? As someone who has always leaned towards dedicated scanning equipment, I decided to put phone scanning apps to the test. I downloaded and rigorously evaluated ten of the top-rated photo scanning apps to see how they truly compare.
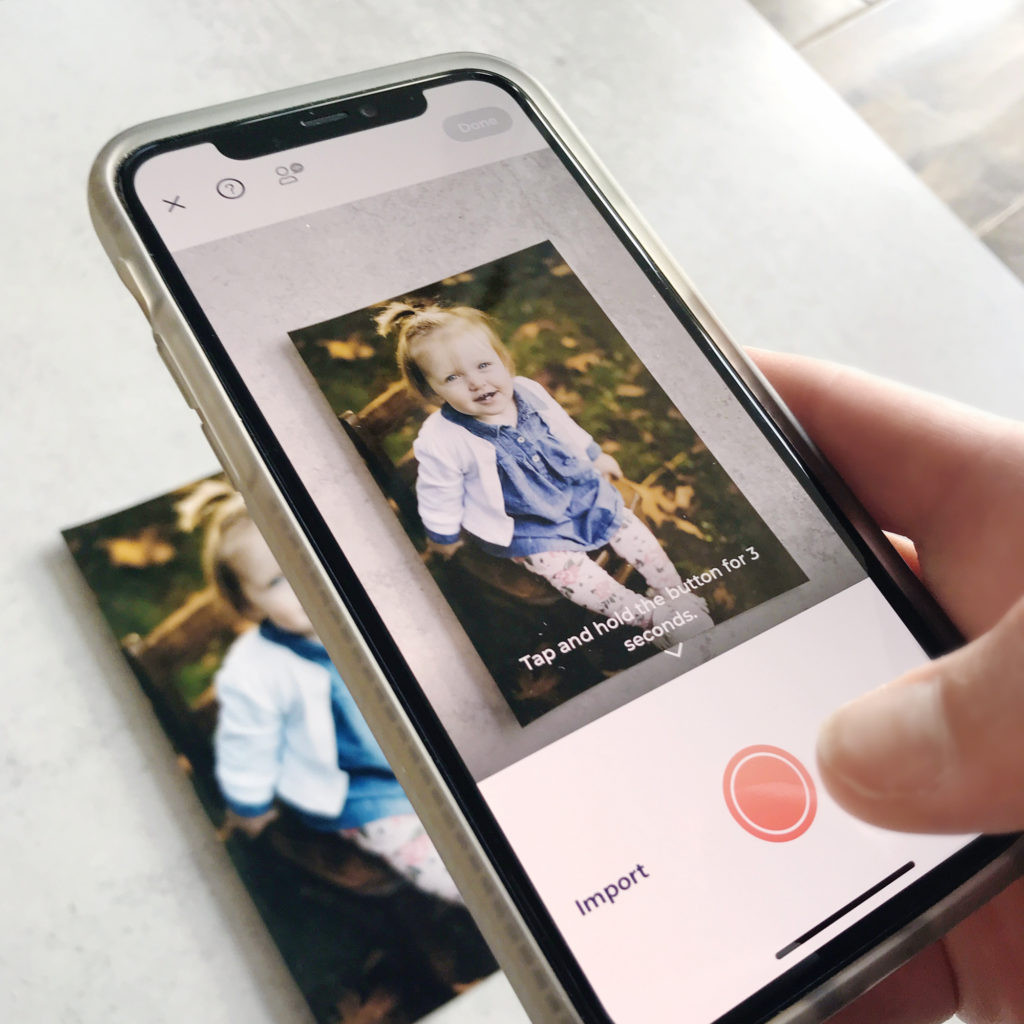 Close-up of phone scanning photos, highlighting the convenience and accessibility of the process.
The results were eye-opening. Not all photo scanning apps are created equal, and the quality of your scans depends heavily on your technique. Before diving into the app comparisons, let’s explore essential tips to ensure you get the best possible results when scanning photos with your phone. Mastering these techniques is key to unlocking the potential of phone scanning.
Essential Tips for Scanning Photos with Your Phone
The quality of your phone camera is a significant factor, but your environment and scanning habits play equally crucial roles. Optimal lighting and careful preparation can dramatically improve your scan quality, often making the difference between a mediocre and a fantastic digital image. Here are essential tips to elevate your phone photo scanning:
1. Clean Your Camera Lens: The Golden Rule
This might seem incredibly obvious, but it is by far the most impactful step you can take. A smudged or dusty lens can severely degrade image clarity and color accuracy. Before you even open a scanning app, take a moment to gently wipe your phone’s camera lens with a soft, microfiber cloth. You’ll be amazed at the difference this simple action makes.
To illustrate, consider the following example. Both photos below were scanned using the same app, in the exact same lighting conditions. The only variable? A quick lens wipe. The improvement in clarity and color speaks for itself.
 Side-by-side comparison showing the dramatic improvement in scan quality after cleaning the phone camera lens.
2. Harness Natural Light: Your Best Ally
Lighting is paramount in photography, and photo scanning is no exception. Natural light, particularly indirect daylight, is your best friend when scanning photos. Aim to scan during daylight hours and position yourself near a window or door where natural light is abundant but not directly shining onto your photos.
Avoid artificial indoor lighting and especially your phone’s flash. These light sources often create harsh glare and unwanted shadows, which can ruin your scans. Indirect natural daylight provides soft, even illumination, minimizing glare and enhancing the true colors of your photographs.
3. Choose a Plain, Neutral Background: For Easy Cropping
The automatic cropping features in photo scanning apps rely on detecting the edges of your photos. A plain, neutral background makes this process significantly easier and more accurate. Opt for a white, gray, or light beige surface as your backdrop.
Steer clear of backgrounds with bold colors like green, blue, yellow, or red. These vibrant colors can interfere with your phone camera’s white balance, potentially casting unwanted color tints onto your scanned images. A neutral background ensures accurate color reproduction and clean, precise cropping.
Photo Scanning App Comparison: Finding the Best Option for You
To truly understand the landscape of phone photo scanning, I conducted a side-by-side comparison of several popular apps. All scans were performed using the same phone, in the same location, and under identical lighting conditions on the same day. I was genuinely surprised by the wide range of results, highlighting the importance of choosing the right app.
A key factor to consider is the file size and resulting image quality. Scans from these apps typically ranged from 1-2MB in size, significantly smaller than the 9-10MB files produced by a dedicated flatbed scanner. What does this mean for you? If your goal is to print or significantly enlarge your digitized photos, a traditional scanner remains the superior choice for preserving maximum detail. However, if you’re primarily digitizing photos for social media sharing, creating digital photo albums, or simply for digital safekeeping, a scanning app can be a convenient and effective solution.
Here’s a breakdown of some of the apps I tested:
-
Photomyne (Subscription-based: $9.99/month, $39.99/5 years): Photomyne stood out as a top performer. Its automatic photo detection and accurate cropping were consistently impressive, and the scanning process was remarkably fast. While the app is free to download, exporting scans to your camera roll requires a paid subscription, a crucial feature for most users. Photomyne’s killer feature is its ability to scan multiple photos simultaneously. If you have albums full of photos, you can scan an entire album page, and Photomyne intelligently crops each photo individually – a massive time-saver. Pro Tip: By default, Photomyne applies a ‘restore’ filter to every scan. If you prefer to preserve the original look of your photos, disable this feature in the app settings.
-
Unfade (One-time purchase: $4.99): Unfade was another highly impressive app. It mirrored Photomyne in speed, ease of use, and accuracy. A major advantage of Unfade is its one-time purchase model, as opposed to a recurring subscription. You can scan up to 20 photos for free to test it out. Unlimited scanning is available for $4.99, and an upgraded version with editing features, including a ‘magic restore’ tool, is available for $9.99. The main drawback is that Unfade is currently only available for iOS devices.
-
PhotoScan by Google Photos (Free): Being a free app from Google, PhotoScan comes highly recommended by many. It employs a unique scanning process, requiring you to take four photos of each print, which it then merges to reduce glare and improve image quality. However, in my tests, PhotoScan didn’t quite live up to the hype. The final file sizes were comparable to other apps, and surprisingly, it was the only app that exhibited noticeable glare in the final scanned image. Furthermore, taking four photos per scan significantly slows down the process. In terms of accuracy, cropping was inconsistent, and in one instance, it strangely distorted a photo, widening the subject’s face. Based on my experience, I wouldn’t recommend PhotoScan.
-
PicScanner (Paid: $3.99): PicScanner is an inexpensive and user-friendly app. However, I found the color accuracy and cropping of the final images to be less precise compared to Photomyne and Unfade. Overall, PicScanner didn’t impress me as much as the top contenders.
-
PicScanner Gold (Paid: $7.99): PicScanner Gold is the upgraded version, promising higher resolutions and enhanced editing capabilities. While one scan did produce a 10MB file, another scan of a similar photo resulted in only a 1MB file, indicating inconsistency in performance. Like its standard version, PicScanner Gold didn’t stand out in terms of overall quality or reliability.
Check out the Side-by-Side Results:
To visually demonstrate the differences, here are side-by-side comparisons of scans from various apps using two different photos:
Photo #1 (30-year-old, slightly faded print):
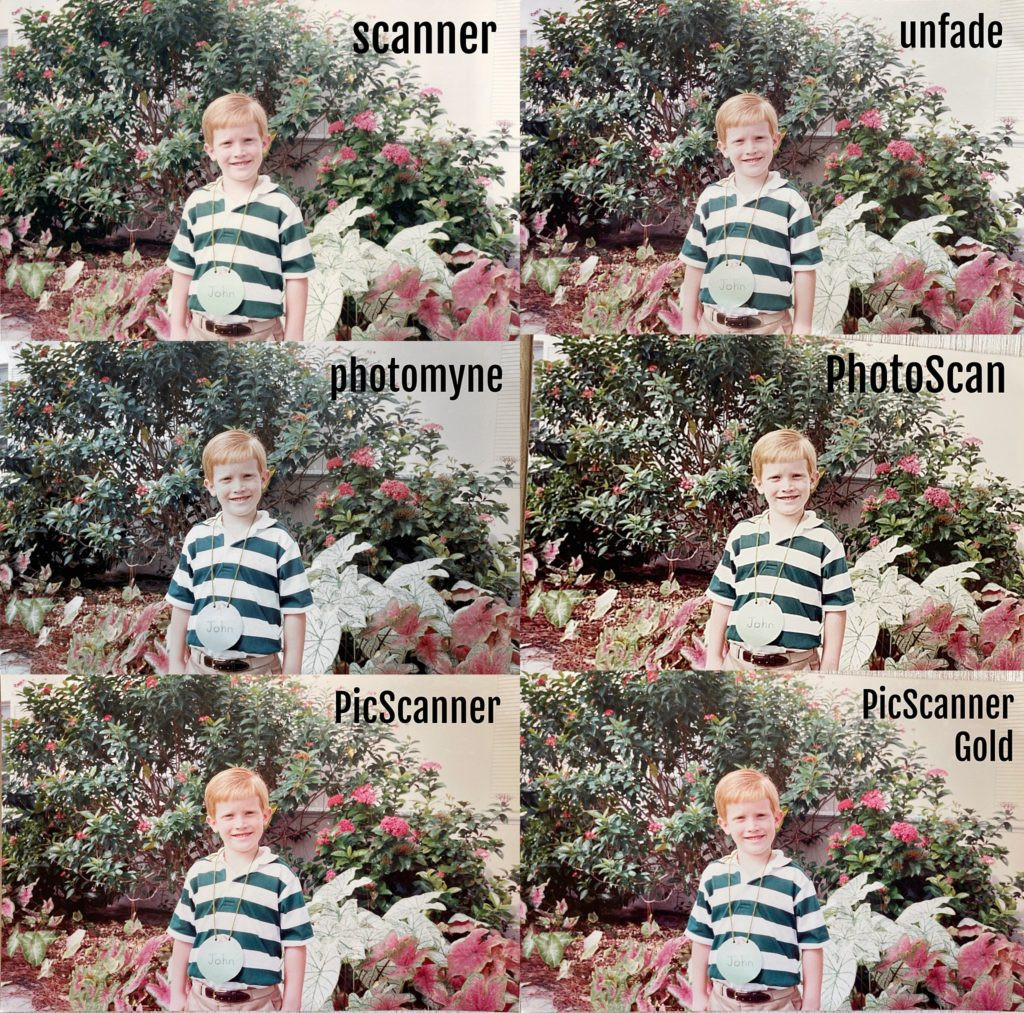 Comparison of scanned photos from different apps, showing variations in quality for an older, faded print.
Photo #2 (5-year-old print):
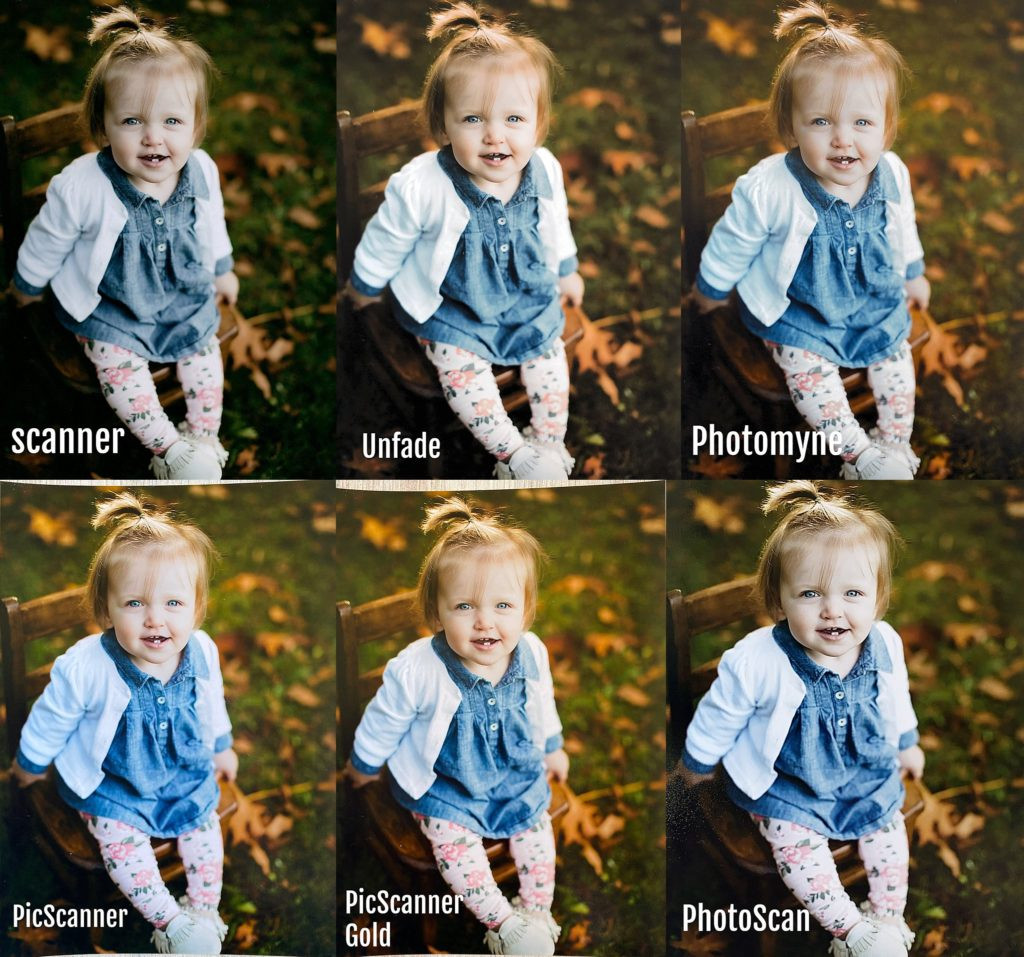 Comparison of scanned photos from different apps, showing variations in quality for a newer print.
The Results: Top Picks for Phone Photo Scanning
After extensive testing, Photomyne and Unfade emerged as the clear winners. Both apps were remarkably easy to use and consistently delivered more accurate results in terms of cropping and color reproduction compared to the other apps tested.
Photomyne’s standout advantage is its ability to scan multiple photos at once and its availability on both iPhone and Android platforms, making it a versatile choice for large photo digitization projects. Unfade shines with its one-time payment model, appealing to users who prefer to avoid subscriptions, although it is currently limited to iPhone users.
Both Photomyne and Unfade offer free trial versions, allowing you to test them out and determine which app best suits your needs and preferences. I highly recommend trying both to see which aligns better with your workflow.
Other Apps Evaluated: Considerations and Caveats
-
Photo4Album Scanner (Paid: $2.99): Despite multiple attempts, Photo4Album Scanner consistently crashed when trying to export photos to the camera roll, rendering it unreliable and not recommended.
-
Family Search (Free): While the app description mentions photo scanning, the only photo-related feature I could find was the standard phone camera function. It doesn’t appear to offer dedicated photo scanning capabilities.
-
CamScanner (Free): Primarily designed for document scanning, CamScanner has also faced malware concerns. Due to its primary focus and security questions, I opted not to include it in the core photo scanning app tests.
-
Genius Scan (Free): Similar to CamScanner, Genius Scan is geared towards document scanning and was therefore not included in this photo-focused comparison.
-
Shoebox (Discontinued): Shoebox was mentioned in several online articles as a photo scanning app, but it is no longer available, making it an outdated option.
Conclusion: Choosing the Right Approach to Scan Your Photos
Phone scanning apps offer a convenient and increasingly capable way to digitize your printed photo collection. While they may not match the absolute image quality of a high-end flatbed scanner for critical archival purposes or large prints, apps like Photomyne and Unfade provide excellent results for everyday digitization needs, especially for sharing and digital preservation.
Ultimately, the best approach depends on your specific goals and the size of your project. For quick and convenient digitization for social media or digital albums, phone scanning apps are a fantastic tool. For professional-quality archival scans or for creating large prints, investing in a dedicated photo scanner might still be the preferred route.
For further information on dedicated scanners, you can explore this blog post about my favorite photo scanners. And if you’re embarking on a larger photo organization project, my Organizing Old Photos online course offers step-by-step guidance and tutorials to help you manage and preserve your precious photo memories.