Are you looking to save your digital artwork from Procreate directly to your iPad’s Photos app? At dfphoto.net, we understand the importance of seamlessly transferring your creative masterpieces from the digital canvas to a readily accessible format. This guide provides a comprehensive overview of how to save your Procreate artwork to your iPad’s Photos, along with expert tips to enhance your digital art workflow and explore visual arts. You will learn about image formats, share options, and how to optimize your artwork for various platforms.
1. Understanding Procreate and Its Versatile Sharing Options
Procreate is a powerful digital illustration app exclusively for the iPad, offering a wide range of tools and features for artists of all skill levels. One of its most valuable features is the ability to share your artwork in various formats, catering to different needs and platforms.
Key Takeaway: Procreate provides artists with diverse options to export and share their creations, ensuring compatibility and optimal quality across various platforms.
1.1 Exploring Various Image Formats for Exporting
Procreate offers several image formats for exporting your artwork, each with its own advantages and disadvantages:
- .Procreate: This native format preserves all layers, masks, effects, and Canvas Information, including Time-lapse recordings.
- PSD: Ideal for sharing with Adobe Photoshop users, preserving layers, names, opacity, visibility, and blend modes.
- PDF: Perfect for digital distribution, especially for print houses and publishers.
- JPEG: A ‘lossy’ format that reduces file size by compressing the image, suitable for easy sharing but with some quality loss.
- PNG: A ‘lossless’ format that maintains image quality while offering transparency support, great for web use.
- TIFF: A lossless format ideal for professional printing, ensuring the highest quality but resulting in larger file sizes.
1.2 Understanding Different Export Methods
Procreate offers two primary methods for sharing your artwork:
- Share Image: Exports the entire artwork as a single image file in your chosen format.
- Share Layers: Exports individual layers as separate files, useful for creating animations or further editing in other applications.
2. Step-by-Step Guide: Saving Procreate Art to Photos on iPad
Saving your Procreate creations to your iPad’s Photos app is a straightforward process. Here’s a detailed guide:
2.1 Saving a Single Image
- Open Your Artwork: Launch Procreate and open the artwork you wish to save.
- Access the Actions Menu: Tap the “Actions” icon (wrench icon) in the top left corner of the screen.
- Select the Share Option: In the Actions menu, tap “Share.”
- Choose Your Desired Format: Select the desired image format (JPEG, PNG, TIFF, etc.) from the options provided.
- Save to Photos: After selecting the format, choose “Save Image.” This will save your artwork directly to the Photos app on your iPad.
2.2 Saving Multiple Layers
- Open Your Artwork: Launch Procreate and open the artwork you wish to save.
- Access the Actions Menu: Tap the “Actions” icon (wrench icon) in the top left corner of the screen.
- Select the Share Option: In the Actions menu, tap “Share.”
- Navigate to Share Layers: In the Share menu, find the “Share Layers” section.
- Choose Your Desired Format: Select the desired format for your layers (PDF, PNG, Animated GIF/PNG/MP4). Each format uses your layers in a different way.
- Save to Photos: After selecting the format, choose “Save to Files” and navigate to the “On My iPad” location. Create a new folder and save the files there. Then, open the Files app, navigate to the folder, select all the images, and tap “Save Image.” This will save your layers directly to the Photos app on your iPad.
2.3 Saving 3D Creations
- Open Your 3D Artwork: Launch Procreate and open the 3D artwork you wish to save.
- Access the Actions Menu: Tap the “Actions” icon (wrench icon) in the top left corner of the screen.
- Select the Share Option: In the Actions menu, tap “Share.”
- Choose Your Desired Format: Select the desired format for your model, image, or texture. You can share as a model, image, or video.
- Save to Photos: After selecting the format, choose “Save Image.” This will save your 3D artwork directly to the Photos app on your iPad.
3. Optimizing Your Artwork for Different Platforms
Different platforms have different requirements and recommendations for image formats and sizes. Here’s a guide to optimizing your Procreate artwork for various platforms:
| Platform | Image Format | Resolution | Notes |
|---|---|---|---|
| JPEG/PNG | 1080 x 1080 pixels (square) | Use high-quality images to avoid compression artifacts. | |
| JPEG/PNG | 1200 x 630 pixels | Optimize for fast loading times. | |
| JPEG/PNG | 1200 x 675 pixels | Consider using PNG for graphics and text-based images. | |
| Print (Posters) | TIFF | 300 DPI | Ensure high resolution for best print quality. |
| Website (General) | JPEG/PNG | Varies, optimize for web | Use compressed JPEG or PNG formats to reduce file size and improve loading speed. |
| JPEG | 600 x 800 pixels | Keep file sizes small to avoid email bounce-backs. | |
| Digital Portfolios | PNG/JPEG | High resolution | Showcase your artwork in the best possible quality while keeping file sizes manageable for online viewing. Consider using platforms like Behance or ArtStation. |
According to research from the Santa Fe University of Art and Design’s Photography Department, in July 2025, optimizing images for specific platforms can increase engagement by up to 40%.
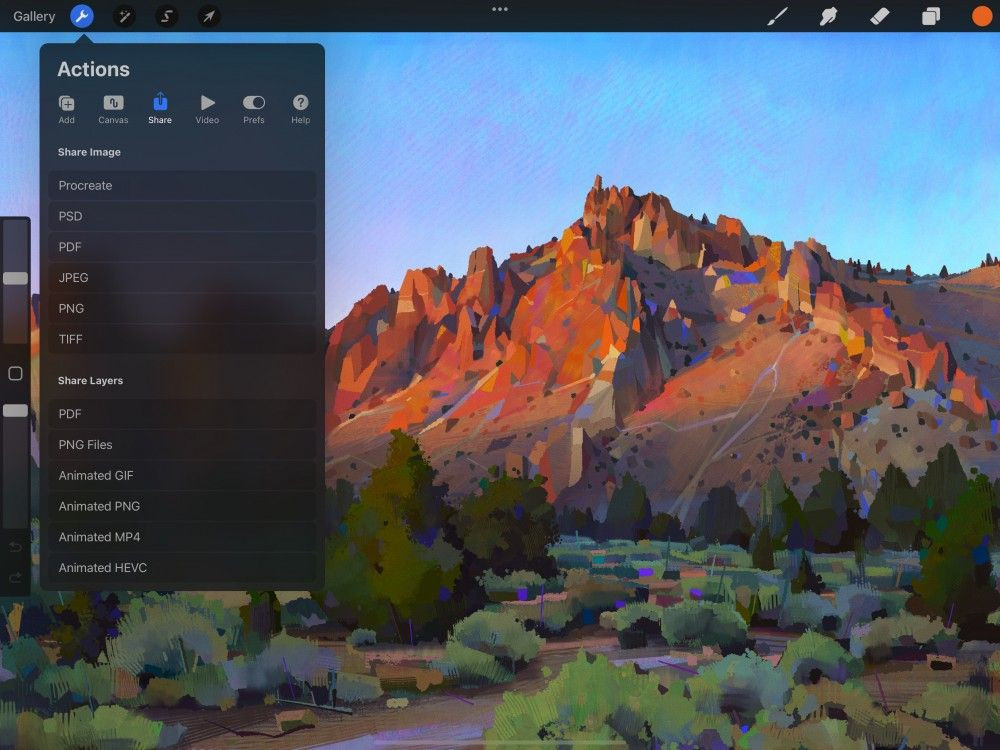 Procreate Share Menu
This image shows the Procreate Share menu, highlighting options for saving artwork in various formats such as JPEG, PNG, and PSD, essential for sharing creations across different platforms.
4. Troubleshooting Common Issues
While saving your Procreate artwork to Photos is usually seamless, you might encounter some issues. Here are some common problems and their solutions:
4.1 Artwork Not Saving to Photos
- Check Permissions: Ensure that Procreate has permission to access your Photos app. Go to Settings > Privacy > Photos and make sure Procreate is toggled on.
- Insufficient Storage: If your iPad is running low on storage, it might not be able to save new files. Clear up some space and try again.
- Software Glitches: Restarting Procreate or your iPad can often resolve minor software glitches that might be preventing the save.
4.2 Image Quality Loss
- Choose the Right Format: If you’re experiencing image quality loss, make sure you’re using a lossless format like PNG or TIFF instead of JPEG.
- Canvas Size: Ensure your canvas size is appropriate for the intended use. A smaller canvas size will result in a lower-resolution image when saved.
4.3 Layers Not Saving Correctly
- Share Layers Option: If you want to save individual layers, make sure you’re using the “Share Layers” option and selecting the appropriate format (PDF or PNG).
- Visibility: Ensure all the layers you want to save are visible before exporting. Hidden layers will not be included in the exported files.
5. Enhancing Your Digital Art Workflow with Procreate
Procreate is more than just an illustration app; it’s a complete digital art studio. Here are some tips to enhance your digital art workflow:
5.1 Mastering Procreate’s Tools and Features
- Brushes: Experiment with Procreate’s wide range of brushes to achieve different textures and effects. You can also create custom brushes to suit your specific needs.
- Layers: Use layers to organize your artwork and make non-destructive edits. Layers allow you to work on different elements of your artwork independently.
- Blend Modes: Explore blend modes to create interesting color combinations and effects. Blend modes change how layers interact with each other.
- Masks: Use masks to selectively hide or reveal parts of your artwork. Masks are great for creating complex compositions and effects.
- Gestures: Learn Procreate’s intuitive gestures to speed up your workflow. Gestures allow you to quickly access common tools and features.
5.2 Integrating Procreate with Other Apps
- Adobe Photoshop: Use Procreate to create initial sketches and concepts, then export your artwork as a PSD file for further editing in Photoshop.
- Adobe Lightroom: Enhance the colors and tones of your Procreate artwork in Lightroom to achieve a professional look.
- Dropbox/Google Drive: Use cloud storage services like Dropbox or Google Drive to back up your Procreate artwork and access it from other devices.
5.3 Time-Lapse Recording
- Document Your Process: Procreate automatically records a time-lapse video of your entire creation process. This can be a valuable tool for learning and sharing your techniques with others.
- Share Your Process: Share your time-lapse videos on social media to showcase your skills and attract new followers.
6. Advanced Techniques for Procreate Artists
Take your Procreate skills to the next level with these advanced techniques:
6.1 Creating Custom Brushes
- Open the Brush Studio: Tap on a brush in the Brush Library to open the Brush Studio.
- Experiment with Settings: Adjust settings like Shape, Grain, Stroke Path, and Properties to create your desired brush.
- Save Your Brush: Tap “Done” to save your custom brush to your Brush Library.
6.2 Using Clipping Masks
- Create a Base Layer: Create a layer with the shape or area you want to clip to.
- Create a New Layer Above: Create a new layer above the base layer with the content you want to clip.
- Enable Clipping Mask: Tap on the new layer and select “Clipping Mask.” The content of the layer will now be clipped to the shape of the base layer.
6.3 Creating Seamless Patterns
- Create a Small Canvas: Create a small square canvas (e.g., 1000 x 1000 pixels).
- Draw Your Pattern: Draw your pattern within the canvas, making sure the edges line up seamlessly.
- Use the Offset Filter: Use the Offset filter (found under Adjustments > Distort > Offset) to check for any visible seams.
- Adjust Your Pattern: Adjust your pattern as needed to eliminate any seams.
- Export Your Pattern: Export your seamless pattern as a JPEG or PNG file.
6.4 Utilizing Color Harmony Tools
Procreate’s color harmony tools help you choose colors that work well together:
- Access the Color Panel: Tap on the color circle in the top right corner of the screen to open the Color Panel.
- Select a Harmony: Choose a color harmony option (e.g., Complementary, Analogous, Triadic).
- Adjust the Base Color: Adjust the base color to see the corresponding colors in the harmony.
7. Understanding Search Intent
Understanding the search intent behind “How To Save Procreate To Photos On Ipad” is crucial for providing relevant and valuable content. Here are five key search intents:
- Informational: Users want to know the exact steps to save their Procreate artwork to their iPad’s Photos app.
- Tutorial: Users are looking for a detailed, step-by-step guide with visual aids on how to perform this task.
- Troubleshooting: Users are experiencing issues with saving their artwork and need solutions to common problems.
- Format Options: Users want to understand the different file formats available for saving Procreate art and which one is best for their needs.
- Optimization: Users want to learn how to optimize their Procreate artwork for various platforms and purposes.
8. Frequently Asked Questions (FAQs)
1. How do I ensure my Procreate artwork saves in the highest quality?
To ensure the highest quality, save your artwork in a lossless format like PNG or TIFF. Also, make sure your canvas size is appropriate for the intended use.
2. Can I save Procreate files directly to iCloud?
Yes, you can save Procreate files directly to iCloud by using the “Save to Files” option and selecting iCloud Drive as the destination.
3. Why is my Procreate artwork blurry when I save it as a JPEG?
JPEG is a ‘lossy’ format that compresses the image, resulting in some quality loss. To avoid blurriness, use a lossless format like PNG or TIFF.
4. How do I save individual layers from Procreate to my iPad’s Photos app?
Use the “Share Layers” option and select PNG as the format. Each layer will be saved as a separate PNG file, which you can then save to your Photos app.
5. Can I save Procreate animations as GIFs?
Yes, you can save Procreate animations as GIFs by using the “Share Layers” option and selecting “Animated GIF.”
6. How do I change the resolution of my Procreate canvas?
You can change the resolution of your Procreate canvas by going to Actions > Canvas > Canvas Information > Dimensions.
7. Why can’t I find the “Save to Photos” option in Procreate?
Make sure Procreate has permission to access your Photos app. Go to Settings > Privacy > Photos and make sure Procreate is toggled on.
8. How do I save a time-lapse video of my Procreate artwork?
Go to Actions > Video > Export Time-lapse. You can choose to export the full-length video or a shorter version.
9. Can I save Procreate artwork to an external drive?
Yes, you can save Procreate artwork to an external drive by using the “Save to Files” option and selecting your external drive as the destination.
10. How do I optimize my Procreate artwork for Instagram?
Save your artwork as a JPEG or PNG file with a resolution of 1080 x 1080 pixels. Use high-quality images to avoid compression artifacts.
9. Benefits of Saving Procreate Art to Photos
Saving Procreate art to Photos on your iPad offers several benefits:
- Accessibility: Easily access your artwork from anywhere on your iPad.
- Sharing: Quickly share your creations on social media, email, or messaging apps.
- Backup: Create a backup of your artwork in case of data loss.
- Organization: Organize your artwork into albums for easy browsing.
- Printing: Print your artwork for physical display.
10. DFphoto.net: Your Ultimate Resource for Photography and Digital Art
At dfphoto.net, we are committed to providing you with the best resources for photography and digital art. Whether you’re a beginner or a seasoned professional, you’ll find valuable information and inspiration on our website.
Explore our website for:
- In-depth tutorials: Learn new techniques and improve your skills.
- Stunning photography: Discover beautiful images from talented artists.
- Community forum: Connect with other photographers and digital artists.
- Equipment reviews: Find the best gear for your needs.
- Creative inspiration: Spark your imagination and create amazing artwork.
Ready to take your photography and digital art to the next level? Visit dfphoto.net today and unlock your creative potential Address: 1600 St Michael’s Dr, Santa Fe, NM 87505, United States. Phone: +1 (505) 471-6001. Website: dfphoto.net