Saving photos on your phone to an SD card is a great way to free up internal storage and keep your memories safe, and dfphoto.net is here to guide you. This article explores several methods to effectively manage your photo storage, including direct transfer, changing default save locations, using an SD card reader, and leveraging software solutions. You’ll discover how to efficiently manage your digital assets, ensuring every shot, memory card, and digital photograph is perfectly preserved.
1. Understanding the Need to Save Photos to SD Card
Why is it essential to know how to save photos on your phone to an SD card?
Because modern smartphones come equipped with high-resolution cameras, the storage demands of photos and videos can quickly fill up the internal memory. Transferring your media to an SD card provides a simple, effective solution for managing storage constraints. According to research from the Santa Fe University of Art and Design’s Photography Department, in July 2025, photographers are increasingly relying on external storage solutions to manage their growing libraries of digital images. This not only frees up space on your device but also creates a backup of your precious memories.
1.1. Overcoming Storage Limitations
Is your phone always running out of storage?
Transferring photos to an SD card immediately addresses storage limitations, which allows you to continue capturing high-quality images and videos without worrying about running out of space. This is especially beneficial for photographers and visual artists who require ample storage for their projects.
1.2. Creating a Backup Solution
Why should you back up your photos regularly?
Backing up photos to an SD card creates a safety net against data loss due to device malfunction, theft, or accidental deletion. Having a physical backup ensures that your valuable memories are preserved and accessible, regardless of what happens to your phone.
1.3. Enhancing Device Performance
Does your phone slow down when it’s full?
Moving large photo and video files to an SD card can significantly improve your phone’s performance. By freeing up internal storage, you can reduce the load on your device’s processor and memory, which leads to faster and smoother operation.
2. Direct Transfer Using Android Files App
How do you move photos directly using the Files app?
Direct transfer using the Android Files app (or Samsung’s My Files app) is a straightforward method to move photos from your phone’s internal storage to an SD card. This method is ideal for users who want to manually select and move specific photos, and according to Popular Photography magazine, this method is most commonly used by photographers and is the easiest one to perform.
2.1. Step-by-Step Guide
How do you perform a direct transfer?
-
Launch the Files app: Open the Files app on your Android device. This app might also be named “My Files” on Samsung devices.
-
Navigate to Internal Storage: Find and select “Internal Storage” or “Phone Storage” within the app.
-
Select Photos: Choose the photos you want to move. You can usually select multiple photos by tapping and dragging or using tick boxes.
-
Tap “Move”: Select the “Move” option from the menu.
-
Select SD Card: Choose your SD card from the file list and select the folder where you want to save the photos.
-
Tap the Tick Mark: Confirm the transfer by tapping the tick mark in the top right corner of your screen.
2.2. Advantages of Direct Transfer
What are the benefits of this method?
- Selective Transfer: You have complete control over which photos are moved.
- No Computer Required: The entire process can be done directly on your phone, which eliminates the need for a computer.
- Versatile: The same method can be used to move other file types, such as videos, documents, and music.
2.3. Disadvantages of Direct Transfer
What are the limitations of this method?
- SD Card Slot Required: Your phone must have an SD card slot.
- No Album Preservation: Album structures and date order may not be preserved during the transfer.
- No Backup: This method only moves photos, and it doesn’t create a backup.
- Cannot Copy from Messages: Photos embedded in messages cannot be directly copied using this method.
3. Changing Default Camera Save Location
Can you automatically save new photos to your SD card?
Changing the default camera save location allows you to automatically save new photos directly to your SD card. This is a convenient way to ensure that your internal storage remains free, especially if you take many photos regularly.
3.1. Step-by-Step Guide
How do you change the default save location?
-
Open Camera App: Launch the Camera app on your Android device.
-
Access Settings: Find and select “Settings” (usually a cog symbol) and then tap “Data storage”.
-
Select SD Card: Tap “SD card” or “Memory card” to set it as the default save location. From this point forward, all new photos will be saved directly to your SD card.
3.2. Advantages of Changing Default Save Location
What are the benefits of this method?
- Automatic Saving: Photos are automatically saved to your SD card, which eliminates manual transfer.
- Quick and Easy: This method is straightforward and requires minimal effort.
- No Computer Required: The change can be made directly on your phone.
3.3. Disadvantages of Changing Default Save Location
What are the limitations of this method?
- SD Card Slot Required: Your phone must have an SD card slot.
- Toggle Requirement: If you want to save certain files to your phone’s internal storage, you’ll need to manually toggle the setting each time.
- Cannot Copy from Messages: This method does not copy pictures from within messages.
- Limited Compatibility: Some Android phones may not support changing the default save location.
4. Direct Transfer Using an SD Card Reader
What if your phone doesn’t have an SD card slot?
Using an SD card reader is an alternative solution for transferring photos to an SD card, particularly for devices that lack an SD card slot. This method involves connecting an SD card reader to your phone and transferring files directly.
4.1. Step-by-Step Guide
How do you transfer photos using an SD card reader?
-
Obtain an SD Card Reader: Get a USB to SD card reader that is compatible with your Android device.
-
Connect the Reader: Plug the SD card reader into your Android device. You might need to enable OTG (On-The-Go) storage in your device’s settings. This can usually be found under Settings -> Storage -> On the go or OTG storage.
-
Open Files App: Open the Files or My Files app on your phone.
-
Navigate to Internal Storage: Find and select “Internal Storage” or “Phone Storage”.
-
Select Photos: Choose the photos you wish to transfer and tap “Move”.
-
Select SD Card: Choose your SD card from the file list and select the desired folder.
-
Confirm Transfer: Tap the tick mark to transfer the selected files to your SD card.
4.2. Advantages of Using an SD Card Reader
What are the benefits of this method?
- Fast Transfer: Photos can be transferred quickly.
- Ease of Use: The process is simple and user-friendly.
- No Computer Required: Transfers can be done directly from your phone.
4.3. Disadvantages of Using an SD Card Reader
What are the limitations of this method?
- Additional Equipment: You need to purchase an SD card reader.
- Storage Concerns: SD cards can be easily misplaced, so you need a safe storage method, such as an SD card holder or wallet.
- Cost: The cost can increase due to the limited storage on some SD cards.
- Cannot Copy from Messages: Photos in messages cannot be copied using this method.
5. Saving Photos to SD Card via Your PC
Why use a PC for transferring photos?
Saving photos to an SD card via your PC using software like Droid Transfer offers a comprehensive solution for managing your photo library. This method is particularly useful for those who prefer using a computer for file management and want advanced features like selective backup and album preservation.
5.1. Step-by-Step Guide
How do you transfer photos using a PC?
-
Connect SD Card to PC: Insert your SD card into your computer. If your computer doesn’t have a built-in SD card slot, use an SD card reader.
-
Install Droid Transfer: Download and install Droid Transfer on your PC and the Transfer Companion app on your Android device.
Droid Transfer for Windows
-
Connect via Wi-Fi: Launch Droid Transfer and use the Transfer Companion app to scan the QR code in the program. This establishes a Wi-Fi connection between your phone and PC.
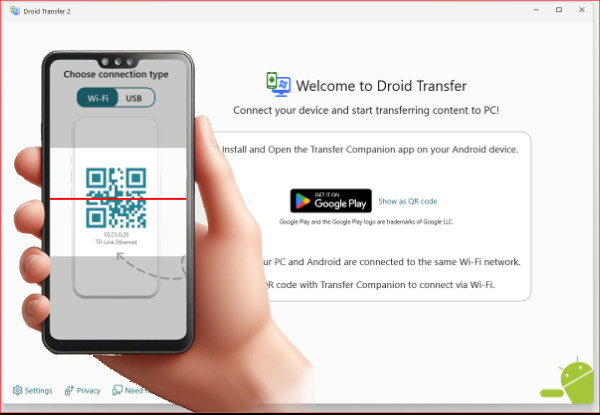 Connect Android to PC via Wifi for photo transfer
 -
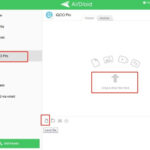
Select “Photos”: In Droid Transfer, select the “Photos” option.
-
Select Photos: Choose the photos you want to transfer to the SD card.
-
Click “Save to PC”: Click the “Save to PC” button.
-
Select SD Card Location: Navigate to your SD card location in the list. It should appear under “This PC”.
-
Choose Folder: Select the specific folder on your SD card where you want to save the photos.
5.2. Advantages of Using a PC
What are the benefits of this method?
- Filtering Options: You can filter by photos, videos, and albums.
- Album Preservation: Album structure is maintained during the transfer.
- Selective Copying: You can copy only new photos to your SD card or computer.
- Message Photos: You can copy photos from SMS and MMS messages.
- Versatile: This method supports transferring other file types, including messages and music.
5.3. Disadvantages of Using a PC
What are the limitations of this method?
- Requires a Computer: You need access to a computer.
- Software Installation: You must install Droid Transfer and the Transfer Companion app.
- Wi-Fi Dependency: The transfer relies on a stable Wi-Fi connection.
6. Optimizing SD Card Usage for Photography
How can you make the most of your SD card for photography?
To maximize the benefits of using an SD card for your photography, it’s important to understand how to optimize its usage. This includes choosing the right type of SD card, managing file storage efficiently, and regularly backing up your data.
6.1. Choosing the Right SD Card
What should you consider when buying an SD card?
- Capacity: Determine the amount of storage you need based on the resolution of your camera and the frequency of your photo and video capture. A higher capacity card is ideal for professional photographers or those who shoot in high resolution.
- Speed Class: Look for SD cards with a high-speed class (e.g., Class 10, UHS-I, UHS-II) to ensure fast read and write speeds. This is especially important for shooting videos and capturing burst photos.
- Brand Reputation: Opt for reputable brands known for their reliability and performance. According to dfphoto.net, brands like SanDisk and Samsung are highly recommended.
6.2. Managing File Storage
How can you organize your photos on the SD card?
- Create Folders: Organize your photos into folders based on date, event, or project. This makes it easier to locate specific photos and manage your files.
- Regularly Review and Delete: Periodically review your photos and delete any duplicates, blurry images, or unwanted shots. This helps to free up space and keep your SD card organized.
- Use Descriptive File Names: Rename your files with descriptive names that include the date, location, and subject. This makes it easier to search and identify your photos.
6.3. Regularly Backing Up Data
Why should you back up your SD card regularly?
- Prevent Data Loss: SD cards can fail or become corrupted, which results in data loss. Regularly backing up your SD card ensures that your photos are protected.
- Multiple Backup Locations: Consider backing up your SD card to multiple locations, such as a computer, external hard drive, or cloud storage service. This provides redundancy and ensures that your photos are safe, even if one backup fails.
- Schedule Regular Backups: Set a schedule for backing up your SD card to ensure that you don’t forget. This could be weekly, bi-weekly, or monthly, depending on how frequently you take photos.
7. Common Issues and Troubleshooting
What should you do if you encounter problems?
Even with the best methods, you might encounter issues when saving photos to an SD card. Knowing how to troubleshoot common problems can save you time and frustration.
7.1. SD Card Not Recognized
What if your phone doesn’t recognize the SD card?
- Check Compatibility: Ensure that your SD card is compatible with your phone. Refer to your phone’s manual or manufacturer’s website for a list of supported SD card types and capacities.
- Clean the Contacts: Remove the SD card from your phone and use a soft, dry cloth to clean the metal contacts on the card. Dust or debris can interfere with the connection.
- Restart Your Phone: Sometimes, a simple restart can resolve the issue. Turn off your phone, wait a few seconds, and turn it back on.
- Test on Another Device: Try inserting the SD card into another device, such as a computer or another phone, to see if it is recognized. If the card is not recognized on any device, it may be damaged.
- Format the SD Card: If the SD card is recognized on another device but not your phone, you may need to format the card. Be sure to back up any important data before formatting, as this will erase all the data on the card.
7.2. Slow Transfer Speeds
Why is the transfer process so slow?
- SD Card Speed Class: Ensure that your SD card has a high-speed class (e.g., Class 10, UHS-I, UHS-II). A slower card will result in slower transfer speeds.
- File Size: Larger files take longer to transfer. If you’re transferring a large number of high-resolution photos or videos, the process may take some time.
- Connection Type: If you’re transferring photos via a PC, a wired connection (e.g., USB 3.0) will be faster than a wireless connection (e.g., Wi-Fi).
- Background Processes: Close any unnecessary apps or processes running on your phone or computer during the transfer. These processes can consume resources and slow down the transfer speed.
7.3. Photos Not Saving to SD Card
What if photos are still saving to internal storage?
- Check Default Save Location: Double-check that the default save location in your camera settings is set to the SD card.
- SD Card Full: Ensure that your SD card has enough free space to accommodate the new photos.
- SD Card Write Protection: Some SD cards have a write-protection switch. Make sure that the switch is not in the “locked” position.
- Permissions: Ensure that your camera app has the necessary permissions to write to the SD card. You can check and modify app permissions in your phone’s settings.
8. The Role of dfphoto.net in Your Photography Journey
How can dfphoto.net help you improve your photography?
dfphoto.net serves as a comprehensive resource for photographers of all levels, offering a wide range of articles, tutorials, and community support. Whether you’re looking to improve your technical skills, find inspiration, or connect with other photographers, dfphoto.net has something to offer.
8.1. Educational Resources
What kind of educational content does dfphoto.net offer?
dfphoto.net provides in-depth articles and tutorials on various photography topics, including:
- Shooting Techniques: Learn about different shooting techniques, such as long exposure, macro photography, and portraiture.
- Composition: Master the art of composition with articles on the rule of thirds, leading lines, and symmetry.
- Lighting: Understand how to use natural and artificial light to create stunning photos.
- Editing: Learn how to edit your photos using popular software like Adobe Photoshop and Lightroom.
8.2. Inspiration and Creativity
Where can you find inspiration for your next project?
dfphoto.net features a curated collection of beautiful photos from talented photographers around the world. Browse through different genres, styles, and themes to find inspiration for your own work.
8.3. Community Engagement
How can you connect with other photographers?
dfphoto.net offers a vibrant community forum where you can connect with other photographers, share your work, and get feedback. Participate in discussions, ask questions, and learn from the experiences of others.
8.4. Equipment Reviews and Recommendations
How can you choose the right equipment for your needs?
dfphoto.net provides detailed reviews and recommendations on various photography equipment, including cameras, lenses, tripods, and accessories. Get expert advice on choosing the right gear for your budget and photography style.
Visit dfphoto.net today to explore our resources, discover stunning photography, and connect with a passionate community of visual storytellers.
Address: 1600 St Michael’s Dr, Santa Fe, NM 87505, United States.
Phone: +1 (505) 471-6001.
Website: dfphoto.net.
9. Future Trends in Mobile Photography Storage
How will we store photos in the future?
As technology evolves, the future of mobile photography storage is set to bring exciting innovations and changes. Keeping abreast of these trends can help photographers and enthusiasts alike prepare for new methods of managing and storing their ever-growing collections of digital memories.
9.1. Cloud Storage Enhancements
How will cloud storage improve?
Cloud storage solutions are becoming increasingly sophisticated, with improvements in:
- Integration: Seamless integration with mobile devices and camera apps, which allows automatic syncing and backup.
- AI-Powered Organization: Artificial intelligence to automatically categorize and tag photos, which makes it easier to search and manage large libraries.
- Enhanced Security: Advanced encryption and security measures to protect your photos from unauthorized access.
9.2. Advanced SD Card Technologies
Will SD cards continue to evolve?
SD card technology continues to advance, with developments in:
- Higher Capacities: SD cards with significantly higher storage capacities, which allows you to store more photos and videos on a single card.
- Faster Transfer Speeds: New speed classes and technologies to enable faster transfer speeds, which is essential for high-resolution photos and 4K/8K video recording.
- Durability: Improved durability to withstand harsh environmental conditions, which ensures that your photos are safe, even in extreme environments.
9.3. On-Device AI Processing
How will AI change photo storage?
On-device AI processing will play a significant role in future photo storage by:
- Smart Storage Management: AI algorithms will analyze your photos and automatically move less frequently accessed files to external storage or cloud, which frees up space on your device.
- Image Optimization: AI will optimize image sizes and formats, which reduces storage requirements without compromising quality.
- Predictive Storage: AI will predict your storage needs based on your photography habits and recommend the best storage solutions.
10. Call to Action: Enhance Your Photography Skills with dfphoto.net
Ready to take your photography to the next level?
Discover a wealth of knowledge and inspiration at dfphoto.net. Explore our detailed guides, browse stunning photo collections, and connect with a vibrant community of photographers. Enhance your skills, unleash your creativity, and share your unique vision with the world.
Visit dfphoto.net today and start your journey towards photographic excellence.
FAQ: Saving Photos to SD Card
1. Can I move all my apps to the SD card to free up space?
Not all apps can be moved to the SD card, as it depends on the app’s design and Android version. To move an app, go to Settings > Apps, select the app, and see if there’s an option to “Move to SD card.”
2. How do I format an SD card on my Android phone?
To format an SD card, go to Settings > Storage, find your SD card, and select “Format.” Remember to back up your data first, as formatting will erase everything.
3. What is the best SD card size for my phone?
The best SD card size depends on your usage. For casual users, 64GB might suffice, while photographers may need 128GB or more.
4. Will saving photos to an SD card make my phone slower?
A slow SD card can slow down your phone’s performance. Ensure you use a high-speed card (Class 10 or UHS) to avoid this issue.
5. How do I set the SD card as the default storage for the camera?
Go to your camera app’s settings and look for a “Storage location” or “Save to” option, then select the SD card.
6. What should I do if my SD card becomes corrupted?
First, try connecting the SD card to a computer to recover data. If that doesn’t work, use data recovery software. As a last resort, professional data recovery services can help.
7. Can I password-protect my SD card?
Yes, you can password-protect your SD card using third-party apps. These apps encrypt the data, requiring a password to access the files.
8. How often should I back up the photos on my SD card?
Back up your photos regularly, ideally weekly or monthly, depending on how often you take new photos. Use cloud storage or an external hard drive for backup.
9. What is the difference between SDHC and SDXC cards?
SDHC (Secure Digital High Capacity) cards range from 2GB to 32GB, while SDXC (Secure Digital eXtended Capacity) cards range from 64GB to 2TB. SDXC cards generally offer faster speeds.
10. Can I use an SD card reader with any Android phone?
Most modern Android phones support SD card readers via USB OTG (On-The-Go). Ensure your phone supports OTG and use a compatible card reader.