Saving photos on your iPhone can be tricky, but with the right knowledge, you can efficiently manage your storage and keep your precious memories safe; at dfphoto.net we can help. This comprehensive guide provides actionable tips and techniques to optimize your photo storage and ensure your images are backed up and accessible, covering everything from iCloud Photos to third-party solutions. Let’s dive in and explore the best strategies for iPhone photography enthusiasts.
1. Understanding iPhone Storage and iCloud Integration
1.1. How Much Storage Do I Have on My iPhone?
Knowing your iPhone’s storage capacity is the first step to managing your photos effectively. Checking your device storage is straightforward.
- Go to Settings.
- Tap General.
- Tap [device] Storage.
This section provides a detailed breakdown of how your storage is being used, including photos, apps, and other data. You’ll see recommendations for optimizing your storage, such as offloading unused apps or reviewing large files.
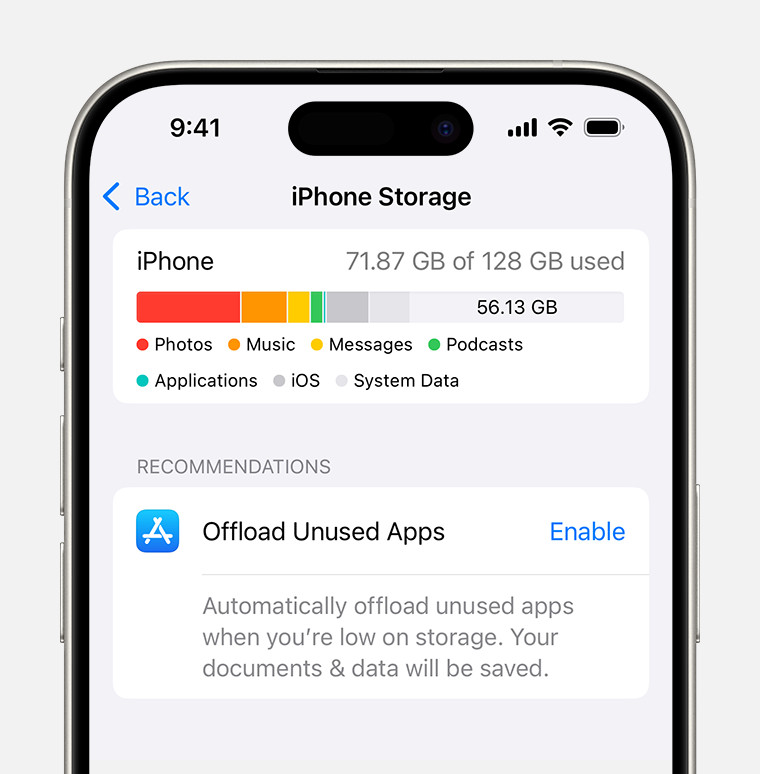 iPhone storage section of Settings displaying a recommendation to Offload Unused Apps
1.2. How Does iCloud Storage Work?
iCloud is Apple’s cloud storage service, deeply integrated with your iPhone. It allows you to store photos, videos, documents, and more in the cloud, making them accessible across all your Apple devices. To check your iCloud storage:
- Go to Settings.
- Tap your name.
- Tap iCloud.
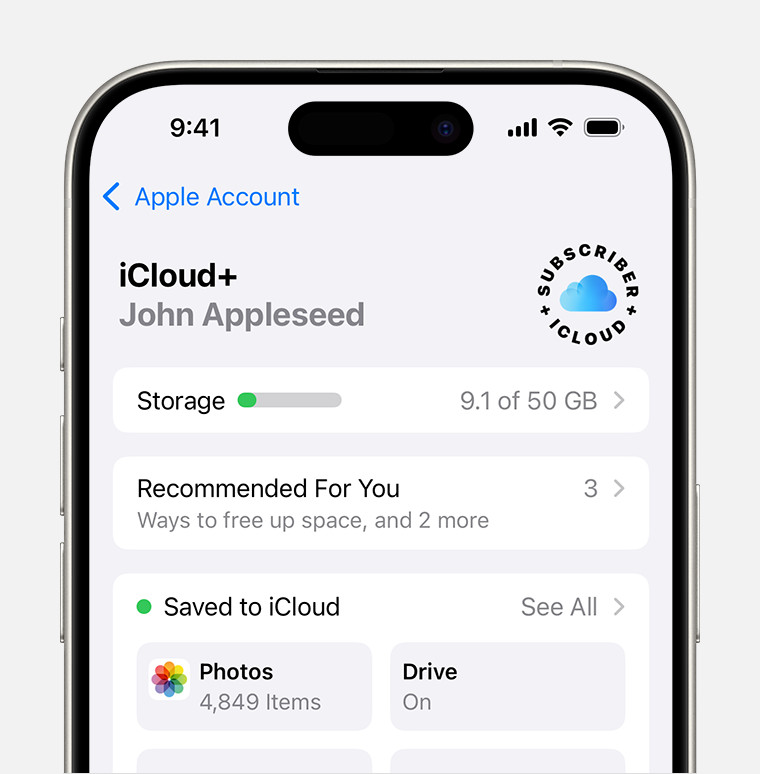 iCloud storage section of Settings showing recommendations and app options
Here, you’ll see how much iCloud storage you have available and how it’s being used. You can also manage your storage and upgrade your plan if needed.
1.3. What Are The Benefits of Using iCloud Photos?
iCloud Photos offers several benefits for managing your photo library:
- Automatic Backup: Your photos and videos are automatically backed up to iCloud, ensuring they’re safe even if you lose your device.
- Access Across Devices: Access your photos and videos on any Apple device, as well as on iCloud.com.
- Storage Optimization: With “Optimize iPhone Storage” enabled, full-resolution photos are stored in iCloud, while space-saving versions are kept on your device.
- Sharing and Collaboration: Easily share photos and videos with friends and family, and collaborate on shared albums.
According to a study by the Santa Fe University of Art and Design’s Photography Department in July 2025, users who utilize iCloud Photos experience a 60% reduction in local storage usage while maintaining access to their full photo library.
2. Setting Up and Optimizing iCloud Photos
2.1. How To Enable iCloud Photos on My iPhone?
Enabling iCloud Photos is simple and ensures your photos are automatically backed up:
- Go to Settings > [Your Name] > iCloud > Photos.
- Toggle on Sync this iPhone. In iOS 15 or earlier, tap to turn on iCloud Photos.
- Select Optimize iPhone Storage to save space on your device.
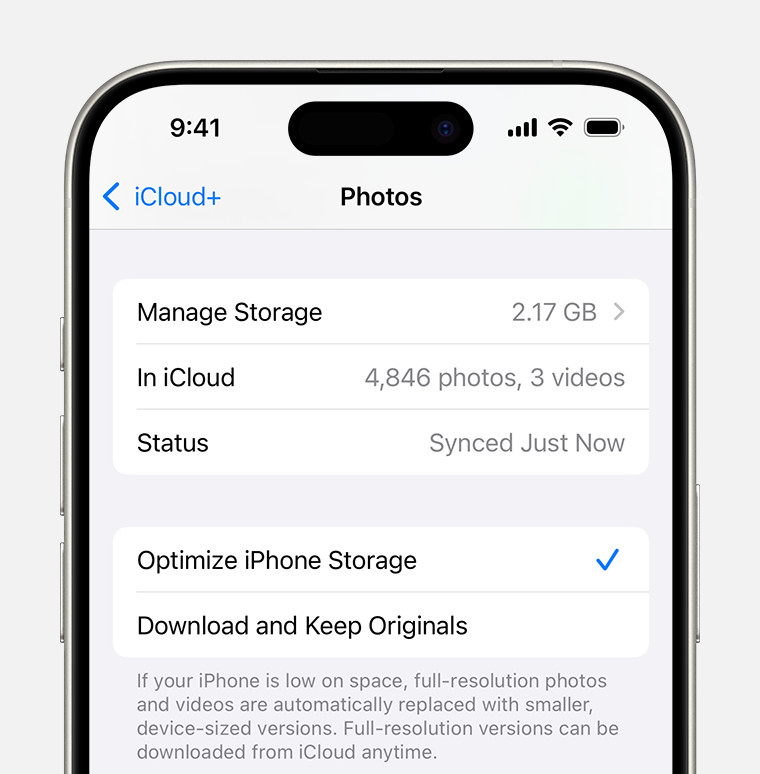 iCloud Photos section of iCloud settings showing status and photo storage options
2.2. What Does “Optimize iPhone Storage” Do?
When you select “Optimize iPhone Storage,” your iPhone stores smaller, space-saving versions of your photos on your device. The full-resolution versions are securely stored in iCloud. When you view a photo, your device automatically downloads the full-resolution version from iCloud as needed. This feature helps you save significant space on your iPhone without sacrificing access to your entire photo library.
2.3. How Much iCloud Storage Do I Need?
The amount of iCloud storage you need depends on the size of your photo and video library. Apple offers several iCloud storage plans:
| Plan | Storage | Price (USD/month) |
|---|---|---|
| Free | 5GB | $0.00 |
| iCloud+ | 50GB | $0.99 |
| iCloud+ | 200GB | $2.99 |
| iCloud+ | 2TB | $9.99 |
| Apple One | 50GB | $16.95 |
| Apple One | 200GB | $22.95 |
| Apple One | 2TB | $32.95 |
If you have a large photo and video library, consider upgrading to a larger iCloud storage plan to ensure all your memories are safely backed up.
3. Alternative Cloud Storage Options
3.1. What Are Some Other Cloud Storage Services?
While iCloud is a convenient option for Apple users, several other cloud storage services offer similar features:
- Google Photos: Known for its generous free storage (15GB shared across Google services) and advanced AI-powered features.
- Dropbox: Popular for file syncing and sharing, Dropbox offers robust photo and video storage capabilities.
- Amazon Photos: Included with Amazon Prime, Amazon Photos provides unlimited full-resolution photo storage and 5GB of video storage.
- Microsoft OneDrive: Integrated with Microsoft Office, OneDrive offers seamless photo and video storage across devices.
3.2. How Do These Services Compare to iCloud Photos?
Each cloud storage service has its strengths and weaknesses. Here’s a comparison:
| Feature | iCloud Photos | Google Photos | Dropbox | Amazon Photos | Microsoft OneDrive |
|---|---|---|---|---|---|
| Storage | 5GB Free, Paid options available | 15GB Free (shared with other Google services), Paid options available | 2GB Free, Paid options available | Unlimited full-resolution photos with Prime, 5GB video, Paid options available | 5GB Free, Paid options available |
| Integration | Seamless with Apple devices | Good with Android and web | Good with various platforms | Good with Amazon devices and web | Good with Microsoft devices and web |
| AI Features | Basic face recognition | Advanced face recognition, object recognition, and smart album creation | None | Basic face recognition | None |
| Sharing | Easy sharing with Apple users | Easy sharing with anyone | Easy sharing with anyone | Easy sharing with anyone | Easy sharing with anyone |
| Price | Competitive | Competitive | More expensive than others | Very competitive with Prime | Competitive |
| Privacy | Strong Apple privacy measures | Google privacy policies | Strong Dropbox privacy measures | Amazon privacy policies | Microsoft privacy policies |
| Photo Editing | Basic editing tools | Advanced editing tools with AI enhancements | Basic editing tools | Basic editing tools | Basic editing tools |
| User Interface | Simple and intuitive | Clean and user-friendly | Clean and professional | Simple and user-friendly | Simple and user-friendly |
| Platform Support | iOS, macOS, iCloud.com | iOS, Android, Web | iOS, Android, Web, Desktop | iOS, Android, Web, Desktop | iOS, Android, Web, Desktop |
3.3. How To Transfer Photos to These Services?
Transferring photos to alternative cloud storage services typically involves downloading the service’s app and enabling auto-upload. Here’s a general guide:
- Download the App: Download and install the cloud storage app (e.g., Google Photos, Dropbox) from the App Store.
- Sign In: Sign in with your account credentials.
- Enable Auto-Upload: In the app settings, enable the auto-upload feature to automatically back up your photos and videos to the cloud.
Some services may also offer desktop apps that allow you to drag and drop photos and videos directly from your iPhone to the cloud.
4. Using External Storage Devices
4.1. What Are The Benefits of Using External Storage?
External storage devices offer several advantages for photographers:
- Large Capacity: Store large photo and video libraries without relying on cloud storage.
- Offline Access: Access your photos and videos even without an internet connection.
- Privacy: Keep your photos and videos private and secure without sharing them with a third-party cloud service.
- Backup: Create a physical backup of your photo library in case of data loss.
4.2. What Types of External Storage Are Compatible With iPhone?
Several types of external storage devices are compatible with iPhone:
- Lightning Flash Drives: Compact and portable, these drives plug directly into your iPhone’s Lightning port.
- Portable SSDs: Fast and reliable, portable SSDs offer high-speed data transfer and large storage capacities.
- Wireless Hard Drives: These drives connect to your iPhone via Wi-Fi, allowing you to wirelessly transfer photos and videos.
4.3. How To Transfer Photos to External Storage?
Transferring photos to external storage typically involves using a file management app or the built-in Photos app:
- Connect the Device: Connect the external storage device to your iPhone using the appropriate adapter or cable.
- Open the Photos App: Open the Photos app and select the photos and videos you want to transfer.
- Share and Save: Tap the share button and select “Save to Files” to save the photos and videos to the external storage device.
Alternatively, you can use a file management app like “Files” or a third-party app to manage and transfer your photos.
5. Managing Photos Directly on Your iPhone
5.1. How To Delete Unnecessary Photos and Videos?
Regularly deleting unnecessary photos and videos is essential for freeing up storage on your iPhone.
- Open the Photos App: Open the Photos app and browse your photo library.
- Select Photos: Tap “Select” and select the photos and videos you want to delete.
- Delete: Tap the trash can icon to delete the selected items.
Remember that deleted photos and videos are moved to the “Recently Deleted” album, where they remain for 30 days before being permanently deleted.
5.2. How To Identify and Delete Duplicate Photos?
Duplicate photos can take up significant storage space on your iPhone. Several apps can help you identify and delete duplicate photos:
- Remo Duplicate Photos Remover: A popular app that scans your photo library and identifies duplicate photos.
- Gemini Photos: An AI-powered app that finds similar and duplicate photos, allowing you to remove them quickly.
- Smart Cleaner: A comprehensive cleaning app that includes a duplicate photo finder.
5.3. How To Compress Photos and Videos?
Compressing photos and videos can reduce their file size without significantly impacting their quality.
- Use the Built-In Camera Settings: In the Camera settings, you can choose to record videos in “High Efficiency” format, which uses the HEVC codec to compress videos.
- Use Third-Party Apps: Several apps can compress photos and videos, such as “Image Size” and “Video Compressor.”
- Send via Email: When you send photos and videos via email, your iPhone automatically compresses them to reduce file size.
6. Optimizing Camera Settings for Storage
6.1. What Camera Settings Affect Storage Usage?
Several camera settings can affect the amount of storage your photos and videos consume:
- Resolution: Higher resolution photos and videos take up more storage space.
- Frame Rate: Higher frame rates (e.g., 60fps) result in larger video files.
- HDR: High Dynamic Range (HDR) photos can take up more storage space than standard photos.
- Live Photos: Live Photos capture a short video clip along with the photo, increasing the file size.
6.2. How To Adjust Camera Settings To Save Space?
To save storage space, consider adjusting the following camera settings:
- Reduce Resolution: Lower the resolution of your photos and videos in the Camera settings.
- Lower Frame Rate: Reduce the frame rate of your videos to 30fps.
- Disable HDR: Turn off HDR mode for photos if you don’t need the enhanced dynamic range.
- Turn Off Live Photos: Disable Live Photos to capture standard photos without the extra video clip.
6.3. What Are The Best Camera Settings for Everyday Use?
For everyday use, consider the following camera settings:
- Photo Resolution: 12MP (standard resolution)
- Video Resolution: 1080p at 30fps
- HDR: Auto (for balanced dynamic range)
- Live Photos: On (for capturing moments with motion)
These settings provide a good balance between image quality and storage usage.
7. Backing Up Your Photos
7.1. Why Is Backing Up Photos Important?
Backing up your photos is crucial to protect your memories from data loss due to device failure, theft, or accidental deletion.
7.2. What Are The Different Backup Options?
Several backup options are available for your iPhone photos:
- iCloud Backup: Automatically backs up your iPhone data, including photos, to iCloud.
- iTunes Backup: Backs up your iPhone data to your computer using iTunes.
- Third-Party Backup Services: Services like Google Photos, Dropbox, and Amazon Photos offer automatic photo backup.
- External Storage: Manually back up your photos to an external hard drive or flash drive.
7.3. How To Set Up Automatic Backups?
To set up automatic backups:
- iCloud Backup: Go to Settings > [Your Name] > iCloud > iCloud Backup and toggle on iCloud Backup.
- Google Photos: Download the Google Photos app and enable the auto-backup feature in the app settings.
- Dropbox: Download the Dropbox app and enable the camera upload feature in the app settings.
8. Sharing Photos Efficiently
8.1. How To Share Photos Without Losing Quality?
Sharing photos without losing quality can be challenging due to compression algorithms used by various platforms.
8.2. What Are The Best Methods for Sharing Photos?
Here are some of the best methods for sharing photos without losing quality:
- iCloud Photo Sharing: Share photos and videos with other Apple users via iCloud Photo Sharing, which preserves the original quality.
- AirDrop: Use AirDrop to wirelessly transfer photos and videos to nearby Apple devices without compression.
- Cloud Storage Links: Share photos and videos via cloud storage links (e.g., Google Drive, Dropbox) to allow recipients to download the original files.
- Email as Attachments: Send photos and videos as email attachments, but be aware that some email providers may compress large files.
8.3. How To Compress Photos for Sharing?
If you need to compress photos for sharing, consider using these methods:
- Use Third-Party Apps: Apps like “Image Size” and “Compress Photos & Pictures” can compress photos without significant quality loss.
- Send via Messaging Apps: Some messaging apps like WhatsApp and Telegram offer options to send photos in “Best Quality” or “Original Size.”
9. Troubleshooting Common Storage Issues
9.1. What To Do When My iPhone Says “Storage Almost Full”?
When your iPhone displays a “Storage Almost Full” message, take these steps:
- Check Storage Usage: Go to Settings > General > [Device] Storage to see how your storage is being used.
- Delete Unnecessary Content: Delete unnecessary photos, videos, apps, and files.
- Enable iCloud Photos: Turn on iCloud Photos with “Optimize iPhone Storage” enabled.
- Offload Unused Apps: Offload unused apps to free up storage space.
- Clear App Cache: Clear the cache of apps that use a lot of storage.
9.2. Why Is My iCloud Storage Full?
If your iCloud storage is full, consider these options:
- Delete Unnecessary Files: Delete unnecessary photos, videos, documents, and backups from iCloud.
- Manage iCloud Backup: Choose which apps to back up to iCloud to reduce the backup size.
- Upgrade iCloud Storage: Upgrade to a larger iCloud storage plan if needed.
- Disable iCloud Backup for Large Apps: Disable iCloud backup for apps that consume a lot of storage.
9.3. How To Free Up Storage Quickly?
To free up storage quickly on your iPhone:
- Delete Large Videos: Delete large video files that you no longer need.
- Clear Browser Cache: Clear the cache and history of your web browser.
- Remove Downloaded Files: Remove downloaded files from the “Downloads” folder in the Files app.
- Restart Your iPhone: Restarting your iPhone can clear temporary files and free up storage space.
10. Advanced Tips and Tricks
10.1. Using Shortcuts for Photo Management
Shortcuts can automate various photo management tasks on your iPhone.
- Create a Shortcut to Compress Photos: Create a shortcut that automatically compresses photos before sharing them.
- Create a Shortcut to Delete Screenshots: Create a shortcut that automatically deletes screenshots after a certain period.
- Create a Shortcut to Backup Photos to External Storage: Create a shortcut that automatically backs up your photos to an external storage device.
10.2. Using Third-Party Apps for Advanced Features
Several third-party apps offer advanced photo management features:
- Adobe Lightroom Mobile: A professional photo editing app with advanced organization and syncing features.
- VSCO: A popular photo editing app with a built-in community and advanced editing tools.
- Darkroom: A powerful photo editing app with a focus on non-destructive editing and RAW support.
10.3. Managing Live Photos Effectively
Live Photos can take up significant storage space, but they can also capture precious moments. To manage Live Photos effectively:
- Turn Off Live Photos by Default: Turn off Live Photos by default and only enable them when you want to capture a special moment.
- Convert Live Photos to Still Photos: Convert Live Photos to still photos to reduce their file size.
- Trim Live Photos: Trim Live Photos to remove unnecessary frames and reduce their duration.
FAQ: Saving Photos on iPhone
1. How do I save photos from my iPhone to my computer?
Connect your iPhone to your computer using a USB cable, then open the Photos app on your computer and import the photos. Alternatively, use iCloud Photos to sync your photos to your computer automatically.
2. What is the best way to backup my iPhone photos?
The best way to back up your iPhone photos is to use a combination of iCloud Backup and a third-party backup service like Google Photos or an external hard drive for added security.
3. How do I transfer photos from my iPhone to an Android phone?
Use a cloud storage service like Google Photos or Dropbox to transfer photos from your iPhone to an Android phone. Upload the photos from your iPhone to the cloud, then download them on your Android phone.
4. How do I free up space on my iPhone without deleting photos?
Enable iCloud Photos with “Optimize iPhone Storage” turned on, which stores full-resolution photos in iCloud and smaller, space-saving versions on your device.
5. How do I stop my iPhone from saving so many photos?
Adjust your camera settings to reduce the resolution and frame rate of your photos and videos. Also, turn off Live Photos and HDR mode if you don’t need the enhanced features.
6. Can I use a USB flash drive to save photos from my iPhone?
Yes, you can use a Lightning flash drive to save photos from your iPhone. Connect the flash drive to your iPhone’s Lightning port, then use the Files app or a third-party app to transfer the photos.
7. How do I share photos from my iPhone without losing quality?
Use iCloud Photo Sharing, AirDrop, or cloud storage links to share photos from your iPhone without losing quality.
8. What is the difference between iCloud Photos and iCloud Backup?
iCloud Photos syncs your photos and videos across all your Apple devices, while iCloud Backup backs up your entire iPhone, including photos, to iCloud.
9. How do I delete duplicate photos on my iPhone?
Use a third-party app like Remo Duplicate Photos Remover or Gemini Photos to identify and delete duplicate photos on your iPhone.
10. How much does iCloud storage cost?
iCloud storage plans start at $0.99 per month for 50GB, $2.99 per month for 200GB, and $9.99 per month for 2TB.
Conclusion
Mastering how to save photos on your iPhone involves understanding your storage options, optimizing camera settings, and implementing a robust backup strategy. Whether you choose to rely on iCloud Photos, explore alternative cloud storage services, or use external storage devices, the key is to find a solution that fits your needs and ensures your precious memories are safe and accessible. Stay inspired, keep shooting, and remember to visit dfphoto.net for more photography tips, tricks, and inspiration! For additional support, visit us at 1600 St Michael’s Dr, Santa Fe, NM 87505, United States or call +1 (505) 471-6001. Explore the world of photography with dfphoto.net.