Saving photos on your iPhone can be a challenge if you’re running out of storage. But, don’t worry! This guide from dfphoto.net will walk you through various methods to effectively manage and store your precious memories, ensuring you never miss capturing a moment. Learn how to optimize your iPhone’s storage, utilize iCloud Photos, and explore alternative storage solutions to keep your photo library safe and accessible, complete with image resolution tips and photo management techniques.
1. Understanding iPhone Photo Storage
1.1 How much storage do I have on my iPhone?
Checking your iPhone storage is the first step to managing your photos efficiently. Go to Settings > General > [Device] Storage to see a breakdown of your storage usage, including how much space your photos and videos are occupying. Understanding these numbers will help you decide on the best strategy for saving photos.
1.2 What factors affect photo storage on iPhone?
Several factors influence how much storage your photos consume on your iPhone. These include:
- Image Resolution: Higher resolution photos take up more space.
- Video Quality: 4K videos consume significantly more storage than 1080p or 720p videos.
- Photo Format: HEIF (High Efficiency Image File Format) is more efficient than JPEG, saving space without compromising quality.
- Live Photos: These combine a still image with a short video, increasing storage usage.
- Burst Photos: Capturing multiple shots in quick succession can quickly fill up your storage.
Understanding these elements allows you to make informed decisions about balancing image quality and storage efficiency.
1.3 How does iCloud Photos affect my iPhone storage?
iCloud Photos is a game-changer for managing iPhone storage. When enabled, it automatically uploads your entire photo and video library to iCloud. This allows you to:
- Access Your Photos on All Devices: View your photos on your iPhone, iPad, Mac, and even on the web.
- Optimize iPhone Storage: iCloud Photos offers an “Optimize iPhone Storage” feature. This stores full-resolution versions of your photos in iCloud while keeping smaller, space-saving versions on your device. When you need to view or edit a photo, the full-resolution version is downloaded from iCloud.
- Free Up Space: By offloading full-resolution photos to iCloud, you free up significant storage space on your iPhone.
To enable iCloud Photos, go to Settings > [Your Name] > iCloud > Photos and toggle on “iCloud Photos.” Select “Optimize iPhone Storage” to start saving space.
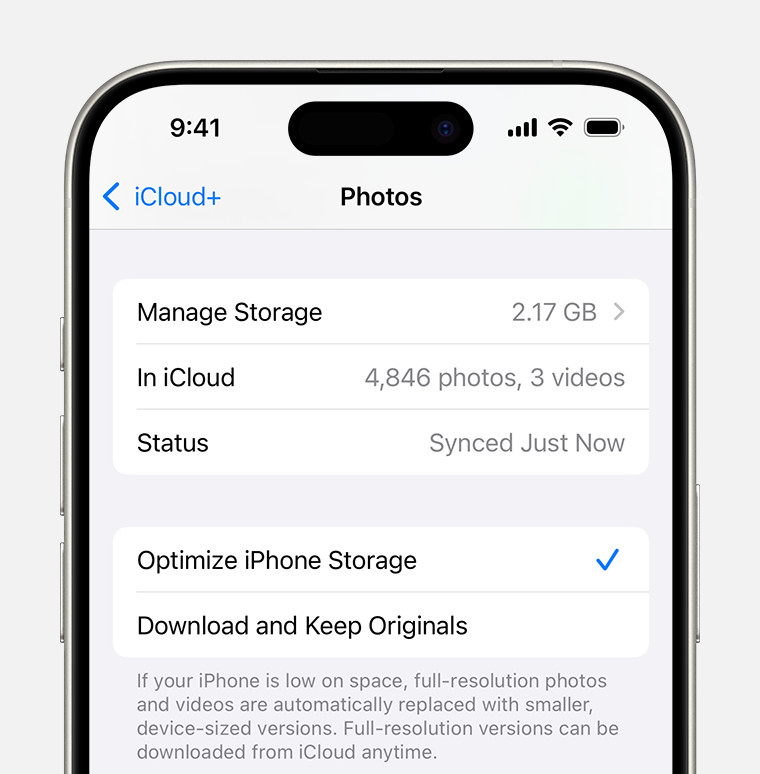 iCloud Photos section of iCloud settings showing status and photo storage options
2. Optimizing iPhone Storage for Photos
2.1 How do I enable Optimize iPhone Storage?
Enabling “Optimize iPhone Storage” is a simple yet effective way to save space. Follow these steps:
- Go to Settings > [Your Name] > iCloud > Photos.
- Toggle on “iCloud Photos” if it isn’t already enabled.
- Select “Optimize iPhone Storage.”
With this setting activated, your iPhone will automatically manage storage by keeping smaller versions of your photos on your device while storing the full-resolution originals in iCloud.
2.2 What are the benefits of using HEIF photo format?
HEIF (High Efficiency Image File Format) is Apple’s preferred image format for iPhones. It offers several advantages over JPEG:
- Better Compression: HEIF files are significantly smaller than JPEGs, often by as much as 50%, without sacrificing image quality. This means you can store more photos on your iPhone without running out of space.
- Modern Features: HEIF supports features like transparency and a wider color gamut, allowing for richer and more vibrant images.
- Future-Proofing: As a newer format, HEIF is designed to accommodate future advancements in photography technology.
Your iPhone automatically captures photos in HEIF format unless you change the settings. To check or change your photo format settings, go to Settings > Camera > Formats and choose “High Efficiency” for HEIF or “Most Compatible” for JPEG.
2.3 How can I manage Live Photos to save space?
Live Photos capture a short video along with a still image, which can take up considerable storage space. Here are some tips for managing Live Photos:
- Disable Live Photos by Default: If you don’t frequently use Live Photos, you can disable the feature by default in the Camera app. Tap the Live Photos icon (the circle with concentric rings) to turn it off.
- Convert Live Photos to Still Photos: You can convert existing Live Photos to still photos to save space. Open the Live Photo in the Photos app, tap “Edit,” then tap the Live Photos icon at the top of the screen to turn it off. Tap “Done” to save the changes.
- Delete Unnecessary Live Photos: Review your Live Photos regularly and delete any that aren’t essential.
2.4 How can I reduce video resolution to save space?
Videos, especially those recorded in 4K, can quickly consume your iPhone’s storage. Reducing video resolution is an effective way to save space:
- Go to Settings > Camera > Record Video.
- Choose a lower resolution and frame rate, such as 1080p HD at 30 fps or 720p HD at 30 fps.
While this will reduce the quality of your videos, it can significantly free up storage space, especially if you record videos frequently.
According to research from the Santa Fe University of Art and Design’s Photography Department, in July 2025, reducing video resolution from 4K to 1080p can save up to 75% of storage space.
3. Using iCloud Photos Effectively
3.1 How do I set up and use iCloud Photos?
Setting up iCloud Photos is straightforward:
- Go to Settings > [Your Name] > iCloud > Photos.
- Toggle on “iCloud Photos.”
- Choose “Optimize iPhone Storage” to save space on your device.
- Ensure you have enough iCloud storage. If not, you may need to upgrade your iCloud storage plan.
Once enabled, your photos and videos will automatically upload to iCloud whenever your iPhone is connected to Wi-Fi.
3.2 How much iCloud storage do I need for my photos?
The amount of iCloud storage you need depends on the size of your photo and video library. Apple offers several iCloud storage plans:
- 5 GB: Free (usually insufficient for most users)
- 50 GB: $0.99 per month
- 200 GB: $2.99 per month
- 2 TB: $9.99 per month
To determine how much storage you need, check the size of your photo library by going to Settings > General > [Device] Storage > Photos. Choose a plan that comfortably accommodates your current library and allows for future growth.
3.3 How do I access my photos on other devices with iCloud Photos?
iCloud Photos makes your photos accessible on all your Apple devices and even on the web:
- iPhone and iPad: Simply enable iCloud Photos on each device by going to Settings > [Your Name] > iCloud > Photos.
- Mac: Open the Photos app and sign in with your Apple ID. Ensure iCloud Photos is enabled in Preferences > iCloud.
- Web: Visit iCloud.com and sign in with your Apple ID to view your photos and videos in a web browser.
This seamless access ensures you always have your memories at your fingertips, no matter where you are.
3.4 What happens if I delete a photo from iCloud Photos?
When you delete a photo from iCloud Photos on one device, it is removed from all devices connected to your iCloud account. The deleted photo is moved to the “Recently Deleted” album, where it remains for 30 days before being permanently deleted.
To recover a deleted photo, go to the “Recently Deleted” album in the Photos app, select the photo, and tap “Recover.” Be aware that photos permanently deleted from the “Recently Deleted” album cannot be recovered.
4. Alternative Storage Solutions for iPhone Photos
4.1 How can I use cloud storage services like Google Photos or Dropbox?
Besides iCloud Photos, several other cloud storage services can help you save and manage your iPhone photos:
- Google Photos: Offers free unlimited storage for photos (compressed to a slightly lower quality) or paid storage for original-quality photos. Google Photos also provides powerful search and organization features.
- Dropbox: A popular cloud storage service that allows you to back up your photos and access them on any device. Dropbox offers both free and paid storage plans.
- Amazon Photos: Included with Amazon Prime, Amazon Photos provides unlimited storage for full-resolution photos and 5 GB of video storage.
- Microsoft OneDrive: Part of the Microsoft ecosystem, OneDrive offers cloud storage for photos and other files, with various storage plans available.
To use these services, download the respective app from the App Store, create an account, and enable automatic photo backups.
4.2 How do I transfer photos to an external hard drive or computer?
Transferring photos to an external hard drive or computer is a reliable way to back up your photos and free up space on your iPhone:
- Using a USB Cable: Connect your iPhone to your computer using a USB cable. On a Mac, the Photos app should automatically open. If not, open the Photos app and select your iPhone from the sidebar. Import the photos you want to transfer. On a PC, your iPhone will appear as a removable drive in File Explorer. You can then copy and paste the photos to your computer or external hard drive.
- Using AirDrop (Mac): AirDrop allows you to wirelessly transfer photos from your iPhone to your Mac. Enable AirDrop on both devices, select the photos you want to transfer on your iPhone, tap the Share button, and choose AirDrop. Select your Mac from the list of available devices.
- Using Third-Party Apps: Several apps, such as iMazing and AnyTrans, offer advanced features for transferring photos and managing your iPhone data.
4.3 What are the benefits of using a Lightning flash drive for photo storage?
Lightning flash drives are specifically designed for iPhones and iPads. They offer a convenient way to back up and transfer photos without needing a computer or internet connection. Simply plug the flash drive into your iPhone’s Lightning port, use the accompanying app to select the photos you want to back up, and transfer them to the drive.
Lightning flash drives are ideal for users who want a portable and secure way to store their photos.
4.4 How do wireless storage devices work for iPhone photos?
Wireless storage devices, such as the SanDisk Connect Wireless Stick, allow you to wirelessly back up and stream photos from your iPhone. These devices create their own Wi-Fi network, allowing you to connect your iPhone and transfer photos without needing an internet connection.
Wireless storage devices are particularly useful for travel or situations where you don’t have access to a computer or reliable internet.
5. Managing Your Photo Library Effectively
5.1 How do I delete duplicate photos on my iPhone?
Duplicate photos can quickly clutter your photo library and waste storage space. Here are a few ways to delete duplicate photos:
- Manually: Review your photo library and manually delete duplicate photos.
- Using the Photos App (iOS 16 and Later): The Photos app in iOS 16 and later automatically detects duplicate photos. Go to the Albums tab, scroll down to the “Utilities” section, and tap “Duplicates.” You can then merge or delete the duplicates.
- Using Third-Party Apps: Several apps, such as Gemini Photos and Remo Duplicate Photos Remover, can automatically scan your photo library and identify duplicate photos.
5.2 How can I organize my photos into albums?
Organizing your photos into albums makes it easier to find and manage your memories:
- Open the Photos app.
- Tap the Albums tab.
- Tap the + button to create a new album.
- Give your album a name and select the photos you want to add.
You can create albums for specific events, trips, or themes.
5.3 How do I use facial recognition to organize my photos?
The Photos app uses facial recognition to automatically identify and group photos of the same person. This makes it easy to find all the photos of a particular friend or family member:
- Open the Photos app.
- Tap the Albums tab.
- Scroll down to the “People & Places” section and tap “People.”
- The Photos app will display faces it has recognized. You can name each person to create a dedicated album for them.
5.4 How can I use keywords and captions to make photos easier to find?
Adding keywords and captions to your photos makes them easier to search and find later:
- Open the photo you want to edit.
- Swipe up to see the photo’s information.
- Tap “Add a Caption” to add a description of the photo.
- Use descriptive keywords in your caption to make the photo easier to find.
The Photos app also allows you to search for photos based on keywords, locations, and dates.
6. Understanding Image Resolution and Quality
6.1 What is image resolution and why does it matter?
Image resolution refers to the number of pixels in an image. Higher resolution images have more pixels, resulting in more detail and sharpness. Image resolution is typically measured in megapixels (MP), where one megapixel equals one million pixels.
Image resolution matters because it affects the quality and size of your photos. Higher resolution photos are better for printing and editing, but they also take up more storage space.
6.2 How do I change the resolution of photos on my iPhone?
You cannot directly change the resolution of existing photos on your iPhone. However, you can adjust the settings for future photos:
- Go to Settings > Camera > Formats.
- Choose “Most Compatible” to capture photos in JPEG format, which may result in slightly smaller file sizes compared to HEIF.
- Go to Settings > Camera > Record Video to adjust the video resolution.
To change the resolution of existing photos, you can use a third-party app like Reduce Photos or Image Size.
6.3 What is the difference between image quality and file size?
Image quality refers to the visual fidelity of a photo, while file size refers to the amount of storage space the photo occupies. Higher image quality typically results in larger file sizes.
You can adjust the image quality settings in some third-party apps to balance quality and file size. For example, you can use an app like Compressor to reduce the file size of your photos without significantly affecting their quality.
6.4 How does compression affect image quality?
Compression reduces the file size of an image by removing or simplifying some of the data. There are two main types of compression:
- Lossy Compression: This type of compression permanently removes some of the data from the image, resulting in smaller file sizes but potentially reduced image quality. JPEG is a lossy compression format.
- Lossless Compression: This type of compression reduces the file size without permanently removing any data. The original image can be perfectly reconstructed from the compressed file. PNG is a lossless compression format.
When choosing a compression format, consider the trade-off between file size and image quality. For photos you want to print or edit, use a lossless format like PNG. For photos you want to share online or store, a lossy format like JPEG may be sufficient.
7. Best Practices for Saving and Managing iPhone Photos
7.1 How often should I back up my photos?
You should back up your photos regularly to protect against data loss. Aim to back up your photos at least once a month, or even more frequently if you take a lot of photos.
7.2 What are the most reliable backup methods for iPhone photos?
Some of the most reliable backup methods for iPhone photos include:
- iCloud Photos: Automatically backs up your photos to iCloud.
- Cloud Storage Services: Google Photos, Dropbox, Amazon Photos, and Microsoft OneDrive.
- External Hard Drive or Computer: Manually transfer your photos to an external hard drive or computer.
- Lightning Flash Drive: Use a Lightning flash drive to back up your photos directly from your iPhone.
7.3 How can I ensure my photos are safe from loss or damage?
To ensure your photos are safe from loss or damage, follow these tips:
- Use Multiple Backup Methods: Don’t rely on just one backup method. Use a combination of iCloud Photos, cloud storage services, and external hard drives.
- Store Backups in Different Locations: Store your external hard drives in a different location from your iPhone to protect against theft, fire, or other disasters.
- Regularly Test Your Backups: Make sure you can access your photos from your backups.
- Protect Your iCloud Account: Use a strong password and enable two-factor authentication to protect your iCloud account from unauthorized access.
7.4 What are some common mistakes to avoid when saving iPhone photos?
Some common mistakes to avoid when saving iPhone photos include:
- Not Backing Up Photos Regularly: This is the biggest mistake. Back up your photos regularly to protect against data loss.
- Relying on a Single Backup Method: Use multiple backup methods to ensure your photos are safe.
- Not Organizing Photos: Organize your photos into albums and use keywords and captions to make them easier to find.
- Storing Too Many Duplicate Photos: Delete duplicate photos to free up storage space.
- Using Low-Quality Compression: Avoid using low-quality compression formats that significantly reduce image quality.
8. Advanced Techniques for Managing iPhone Photo Storage
8.1 How do I use shared albums to save space and share photos?
Shared albums allow you to share photos and videos with friends and family without taking up storage space on their devices. When you create a shared album, the photos are stored in iCloud, and your invitees can view and comment on them without needing to download them.
To create a shared album:
- Open the Photos app.
- Tap the Albums tab.
- Tap the + button and choose “New Shared Album.”
- Give your album a name and invite people to join.
- Select the photos and videos you want to share.
8.2 How can I use third-party apps to compress and optimize photos?
Several third-party apps can help you compress and optimize your photos to save storage space:
- Compress Photos: This app allows you to reduce the file size of your photos without significantly affecting their quality.
- Image Size: This app allows you to resize your photos to a smaller resolution, which can significantly reduce their file size.
- JPEG Optimizer: This app allows you to adjust the compression level of your JPEGs to balance file size and image quality.
8.3 How do I use Shortcuts to automate photo management tasks?
The Shortcuts app allows you to automate various tasks on your iPhone, including photo management tasks. You can create shortcuts to automatically compress photos, back them up to a cloud storage service, or organize them into albums.
To create a shortcut for photo management:
- Open the Shortcuts app.
- Tap the + button to create a new shortcut.
- Add actions to your shortcut, such as “Select Photos,” “Resize Image,” and “Save to Dropbox.”
- Give your shortcut a name and save it.
8.4 How can I use the Files app to manage photos stored in different locations?
The Files app allows you to access and manage files stored in iCloud Drive, cloud storage services, and external drives. You can use the Files app to view, copy, move, and delete photos stored in different locations.
To access photos stored in different locations:
- Open the Files app.
- Tap the Browse tab.
- Select the location where your photos are stored, such as iCloud Drive, Google Drive, or an external drive.
- Navigate to the folder containing your photos.
9. Troubleshooting Common Photo Storage Issues
9.1 What do I do if my iPhone says storage is full?
If your iPhone says storage is full, follow these steps:
- Check your storage usage by going to Settings > General > [Device] Storage.
- Enable “Optimize iPhone Storage” in iCloud Photos.
- Delete unnecessary photos and videos.
- Delete duplicate photos.
- Reduce video resolution.
- Back up your photos to a cloud storage service or external drive.
- Delete unused apps.
- Clear your browser cache and history.
9.2 Why aren’t my photos syncing to iCloud?
If your photos aren’t syncing to iCloud, check the following:
- Make sure iCloud Photos is enabled by going to Settings > [Your Name] > iCloud > Photos.
- Make sure your iPhone is connected to Wi-Fi.
- Make sure you have enough iCloud storage.
- Make sure your iPhone is signed in to iCloud with the correct Apple ID.
- Restart your iPhone.
9.3 How do I fix blurry or pixelated photos on my iPhone?
If your photos are blurry or pixelated, try the following:
- Clean your camera lens.
- Make sure you have enough light.
- Focus on your subject by tapping on the screen.
- Use the zoom feature sparingly.
- Adjust the image resolution settings.
- Use a third-party app to enhance the image quality.
9.4 What do I do if I accidentally deleted a photo?
If you accidentally deleted a photo, check the “Recently Deleted” album in the Photos app. Deleted photos remain in this album for 30 days before being permanently deleted.
To recover a deleted photo, go to the “Recently Deleted” album, select the photo, and tap “Recover.”
According to Popular Photography, accidental photo deletion is a common issue, but the “Recently Deleted” album provides a safety net for retrieving these photos within a 30-day window.
10. Enhancing Your Photography Skills and Inspiration
10.1 Where can I learn more about iPhone photography techniques?
To learn more about iPhone photography techniques, check out these resources:
- dfphoto.net: Offers a wealth of tutorials, tips, and inspiration for photographers of all levels.
- Online Courses: Platforms like Skillshare and Udemy offer courses on iPhone photography.
- Photography Blogs and Websites: Websites like Digital Photography School and PetaPixel provide articles, tutorials, and reviews.
- YouTube Channels: Channels like Peter McKinnon and FroKnowsPhoto offer tips and tutorials on photography and filmmaking.
10.2 Who are some famous photographers who use iPhones?
Many professional photographers use iPhones for their work. Some notable examples include:
- Damon Winter: A Pulitzer Prize-winning photographer who has used iPhones for various projects.
- Richard Koci Hernandez: A photojournalist and educator known for his iPhone photography.
- Greg Schmigel: A commercial photographer who uses iPhones for behind-the-scenes shots and social media content.
10.3 Where can I find inspiration for my iPhone photography?
To find inspiration for your iPhone photography, explore these resources:
- Instagram: Follow photographers and photography accounts for daily inspiration.
- Photography Books and Magazines: Browse photography books and magazines for ideas and techniques.
- Online Galleries and Exhibitions: Visit online galleries and exhibitions to see the work of other photographers.
- Local Photography Clubs and Workshops: Join a local photography club or attend a workshop to connect with other photographers and learn new skills.
10.4 How can I improve my iPhone photography composition and editing skills?
To improve your iPhone photography composition and editing skills, consider the following:
- Learn the Rule of Thirds: Divide your frame into nine equal parts and place your subject along the lines or at the intersections.
- Use Leading Lines: Use lines in your scene to guide the viewer’s eye to your subject.
- Pay Attention to Light: Use natural light to your advantage and avoid harsh shadows.
- Experiment with Different Angles: Try shooting from different angles to create interesting perspectives.
- Use Editing Apps: Apps like VSCO, Snapseed, and Lightroom Mobile offer powerful editing tools for enhancing your photos.
By following these tips and exploring the resources mentioned above, you can save photos effectively in your iPhone, manage your photo library efficiently, and unlock your potential as an iPhone photographer. Remember to visit dfphoto.net for more in-depth guides, stunning photo collections, and a vibrant community of photography enthusiasts.
For further assistance or information, feel free to contact us at:
Address: 1600 St Michael’s Dr, Santa Fe, NM 87505, United States
Phone: +1 (505) 471-6001
Website: dfphoto.net
Ready to take your photography skills to the next level? Head over to dfphoto.net now to discover our comprehensive tutorials, explore breathtaking photo galleries, and connect with a thriving community of photographers! Unleash your creativity and start capturing stunning images today!
FAQ: How To Save Photos In iPhone
1. Why is my iPhone running out of storage so quickly?
Your iPhone might be running out of storage quickly due to high-resolution photos and videos, Live Photos, duplicate images, and unused apps. Regularly managing your storage by deleting unnecessary files and optimizing photo settings can help.
2. How does iCloud Photos help save space on my iPhone?
iCloud Photos offers an “Optimize iPhone Storage” feature. This stores full-resolution versions of your photos in iCloud while keeping smaller, space-saving versions on your device. When you need to view or edit a photo, the full-resolution version is downloaded from iCloud, freeing up significant space on your iPhone.
3. Is it safe to store my photos in iCloud?
Yes, it is generally safe to store your photos in iCloud. Apple uses encryption to protect your data, and you can further secure your account by enabling two-factor authentication. However, it’s always a good idea to have multiple backups of your important photos.
4. What are the best alternatives to iCloud for storing iPhone photos?
Some of the best alternatives to iCloud for storing iPhone photos include Google Photos, Dropbox, Amazon Photos, and Microsoft OneDrive. These services offer cloud storage, automatic backups, and access to your photos on multiple devices.
5. How do I transfer photos from my iPhone to an external hard drive?
You can transfer photos from your iPhone to an external hard drive using a USB cable, AirDrop (if you have a Mac), or third-party apps like iMazing and AnyTrans. Connect your iPhone to your computer, open the Photos app, and import the photos you want to transfer.
6. Can I reduce the size of my photos without losing quality?
Yes, you can reduce the size of your photos without significantly losing quality by using compression techniques or third-party apps like Compressor Photos. These tools can reduce the file size of your photos while maintaining acceptable image quality.
7. How do I delete duplicate photos on my iPhone?
You can delete duplicate photos on your iPhone manually, use the Duplicates feature in the Photos app (iOS 16 and later), or use third-party apps like Gemini Photos and Remo Duplicate Photos Remover.
8. What is HEIF, and why should I use it for my iPhone photos?
HEIF (High Efficiency Image File Format) is Apple’s preferred image format for iPhones. It offers better compression than JPEG, saving space without compromising image quality. HEIF also supports modern features like transparency and a wider color gamut.
9. How do I organize my photos into albums on my iPhone?
To organize your photos into albums on your iPhone, open the Photos app, tap the Albums tab, tap the + button to create a new album, give your album a name, and select the photos you want to add.
10. What should I do if my photos are not syncing to iCloud Photos?
If your photos are not syncing to iCloud Photos, make sure iCloud Photos is enabled in Settings, your iPhone is connected to Wi-Fi, you have enough iCloud storage, and you are signed in to iCloud with the correct Apple ID. Restarting your iPhone may also help.