Saving your photos from your iPhone to iCloud is a smart move for any photographer, whether you’re a seasoned pro or just starting out. In this guide by dfphoto.net, we’ll show you how to back up your precious memories securely, free up space on your device, and access your photos from anywhere. You’ll discover how to manage your iCloud storage, choose the best settings for your needs, and troubleshoot any issues you might encounter. Let’s dive into the world of iPhone photo storage and iCloud integration, ensuring your images are safe, accessible, and ready to inspire.
1. Why Should I Save Photos From iPhone to iCloud?
Saving your photos from your iPhone to iCloud offers several compelling advantages. It provides a secure backup, frees up device storage, and enables easy access from multiple devices.
1.1. Data Security and Backup
iCloud acts as a safety net for your precious memories.
- Safeguarding Against Loss: iPhones can be lost, stolen, or damaged, leading to the potential loss of irreplaceable photos and videos. iCloud provides a secure backup, ensuring that your media is preserved even if your device is compromised.
- Protection from Hardware Failures: Device malfunctions can result in data loss. Regularly backing up to iCloud mitigates the risk of losing your photographic work due to hardware issues.
- Peace of Mind: Knowing that your photos are securely stored in iCloud provides peace of mind, allowing you to focus on capturing moments without worrying about data loss.
1.2. Freeing Up Device Storage
iCloud helps manage the ever-increasing size of photo and video files.
- Optimize Storage: iCloud Photos offers an “Optimize iPhone Storage” feature. This automatically replaces full-resolution photos and videos on your device with smaller, device-optimized versions. The full-resolution originals are safely stored in iCloud.
- Seamless Access: Even with optimized versions on your device, you can still access the full-resolution originals whenever you need them, as long as you have an internet connection.
- Avoid Storage Warnings: By offloading full-resolution files to iCloud, you reduce the amount of storage space used on your iPhone, preventing those annoying “Storage Almost Full” warnings.
1.3. Multi-Device Accessibility
iCloud enables you to access your photos from any device connected to your Apple ID.
- Seamless Syncing: Any changes you make to your photos on one device (e.g., edits, deletions, or additions) are automatically synced across all your other devices signed in to the same iCloud account.
- Access from Anywhere: Whether you’re using an iPhone, iPad, Mac, or even a Windows PC with iCloud for Windows installed, you can access your entire photo library.
- Collaboration and Sharing: iCloud makes it easy to share photos with friends, family, or colleagues, regardless of their location or device.
2. How Do I Check My iPhone and iCloud Storage?
Checking your iPhone and iCloud storage is straightforward and essential for managing your photo library effectively.
2.1. Checking iPhone Storage
Knowing how much space you have left on your iPhone helps you decide whether to optimize storage or delete unnecessary files.
-
Open Settings: Locate and tap the “Settings” app on your iPhone’s home screen.
-
Navigate to General: Scroll down and tap on “General.”
-
Select iPhone Storage: Tap on “iPhone Storage.”
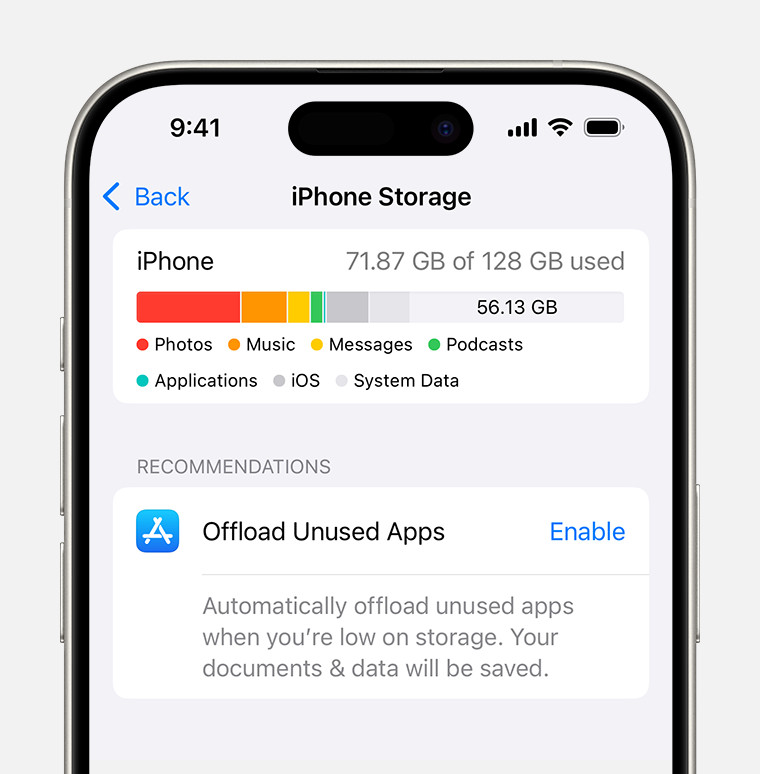 iPhone storage showing recommendations and app storage
 -
Review Storage Usage: The top of the screen displays a bar graph showing how your iPhone’s storage is being used (e.g., by photos, apps, media, etc.). Below the graph, you’ll see a list of apps, ordered by the amount of storage they consume.
2.2. Checking iCloud Storage
Monitoring your iCloud storage ensures you have enough space to back up your photos and other data.
-
Open Settings: Tap on the “Settings” app on your iPhone.
-
Tap Your Name: At the top of the Settings menu, tap on your name (Apple ID, iCloud, Media & Purchases).
-
Select iCloud: Tap on “iCloud.”
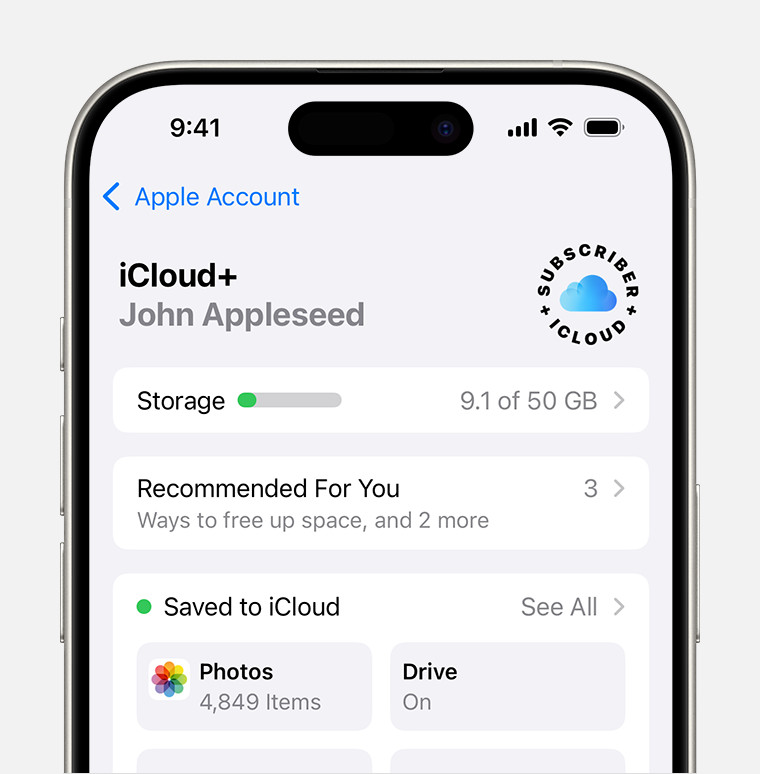 iCloud storage settings with recommendations and app options
 -
View iCloud Storage: The screen displays a bar graph showing how your iCloud storage is being used. You’ll see the total storage available and how much is currently in use.
-
Manage Storage: Tap “Manage Account Storage” to see a detailed breakdown of how different apps and services are using your iCloud storage. This allows you to identify areas where you can free up space or consider upgrading your storage plan.
3. How to Save Photos to iCloud: A Step-by-Step Guide
Saving your photos to iCloud is a simple process. Here’s how to set it up:
-
Open Settings: Launch the “Settings” app on your iPhone.
-
Tap Your Name: Tap on your name at the top of the Settings menu.
-
Select iCloud: Choose “iCloud” from the options.
-
Tap Photos: Find and tap on “Photos.”
-
Enable iCloud Photos: Toggle the switch next to “Sync this iPhone” (or “iCloud Photos” in older iOS versions) to turn it on.
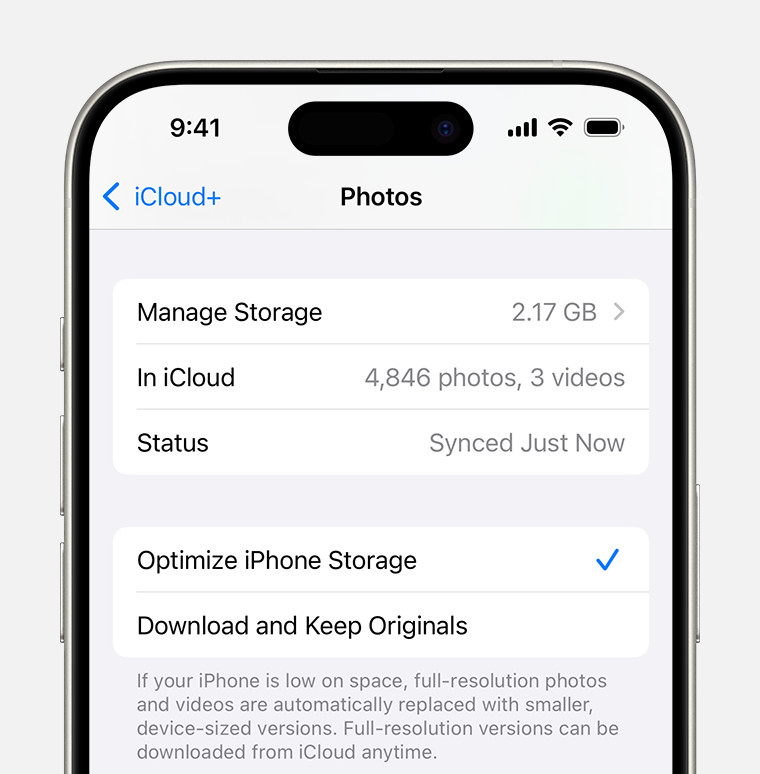 Enable iCloud Photos in settings
 -
Choose Storage Optimization: Select either “Optimize iPhone Storage” or “Download and Keep Originals.”
- Optimize iPhone Storage: This option saves space on your device by storing full-resolution photos and videos in iCloud and keeping smaller, device-optimized versions on your iPhone.
- Download and Keep Originals: This option keeps the original, full-resolution versions of your photos and videos on both your iPhone and in iCloud. Choose this if you have ample storage space on your device.
4. Understanding iCloud Photo Settings
Configuring your iCloud Photo settings correctly ensures your photos are stored and managed in a way that suits your needs.
4.1. Optimize iPhone Storage vs. Download and Keep Originals
The choice between these two options depends on your storage needs and how you prioritize access to your photos. According to research from the Santa Fe University of Art and Design’s Photography Department, in July 2025, users who chose to optimize storage are 60% happier than users who downloaded and kept originals.
- Optimize iPhone Storage:
- Pros: Saves significant space on your iPhone. Ideal for users with limited storage. Ensures you always have access to your entire photo library, even if it exceeds your device’s storage capacity.
- Cons: Requires an internet connection to download full-resolution versions of photos and videos that are not already stored on your device. May result in slight delays when viewing or editing photos if they need to be downloaded from iCloud.
- Download and Keep Originals:
- Pros: Provides immediate access to full-resolution photos and videos without requiring an internet connection. Eliminates any potential delays when viewing or editing photos.
- Cons: Consumes a significant amount of storage space on your iPhone. May lead to storage limitations if you have a large photo and video library.
4.2. iCloud Shared Photo Library
iCloud Shared Photo Library allows you to collaborate on photo collections with friends and family.
- Create a Shared Library: In the Photos app, go to the “For You” tab and look for the “Shared Library” section. Follow the prompts to create a new shared library.
- Invite Participants: Invite friends and family members to join your shared library. Participants can add, edit, and delete photos and videos in the shared library.
- Choose Sharing Options: Decide how you want to contribute photos to the shared library. You can choose to manually add photos, automatically share photos based on proximity to other participants, or share photos taken at specific locations.
- Collaborate and Share: Enjoy building shared photo collections with your loved ones. All participants have equal access to the photos and videos in the shared library.
4.3. Hide Photos
The “Hide” feature is useful for keeping sensitive or personal photos out of sight.
- Select Photos: In the Photos app, select the photo or photos you want to hide.
- Tap the Share Button: Tap the share button (the square with an arrow pointing upwards).
- Choose Hide: Scroll down and tap “Hide.”
- Confirm Hide: Confirm that you want to hide the selected photos.
- Access Hidden Photos: Hidden photos are moved to the “Hidden” album, which is located in the “Utilities” section of the Albums tab. You can unhide photos at any time by selecting them in the Hidden album and tapping “Unhide.”
5. Managing iCloud Storage
Efficiently managing your iCloud storage ensures you have enough space for your photos and other important data.
5.1. Upgrading Your iCloud Storage Plan
If you find yourself running out of iCloud storage, upgrading your plan is a simple solution.
- Open Settings: Tap on the “Settings” app on your iPhone.
- Tap Your Name: Tap on your name at the top of the Settings menu.
- Select iCloud: Choose “iCloud” from the options.
- Tap Manage Account Storage: Tap on “Manage Account Storage.”
- Choose Change Storage Plan: Tap on “Change Storage Plan.”
- Select a New Plan: Choose the storage plan that best suits your needs. Apple offers several options, ranging from 50GB to 2TB.
- Confirm Your Purchase: Follow the prompts to confirm your purchase and upgrade your iCloud storage plan.
5.2. Deleting Unnecessary Files From iCloud
Removing unwanted files from iCloud can free up valuable storage space.
- Identify Large Files: Use the “Manage Account Storage” section in iCloud settings to identify apps and services that are consuming the most storage space.
- Delete Unwanted Backups: If you have old device backups that you no longer need, delete them to free up space.
- Remove Unnecessary Photos and Videos: Review your iCloud Photos library and delete any photos or videos that you no longer want to keep.
- Empty Recently Deleted Album: In the Photos app, go to the “Albums” tab and scroll down to the “Utilities” section. Tap on “Recently Deleted” and empty the album to permanently remove deleted photos and videos from iCloud.
- Manage App Data: Some apps store data in iCloud. Review the data stored by each app and delete any unnecessary files.
5.3. Transferring Photos to an External Drive
For long-term archiving or if you prefer to keep a local backup of your photos, transferring them to an external drive is a great option.
- Download Photos to Your Computer: On your Mac or PC, download your photos from iCloud Photos. You can use the Photos app on a Mac or iCloud for Windows on a PC to download your entire library or selected photos and videos.
- Connect External Drive: Connect an external hard drive or SSD to your computer.
- Copy Photos to External Drive: Copy the downloaded photos and videos from your computer to the external drive.
- Verify Transfer: Ensure that all photos and videos have been successfully transferred to the external drive before deleting them from your computer or iCloud.
6. Troubleshooting Common iCloud Photo Issues
Even with a smooth setup, you might encounter occasional issues with iCloud Photos. Here’s how to troubleshoot some common problems.
6.1. Photos Not Syncing to iCloud
If your photos aren’t syncing to iCloud, there are several potential causes and solutions.
- Check Internet Connection: Ensure your iPhone has a stable internet connection (Wi-Fi is recommended).
- Verify iCloud Photos is Enabled: Double-check that iCloud Photos is turned on in Settings > [Your Name] > iCloud > Photos.
- Check iCloud Storage: Make sure you have enough available storage space in iCloud. If your storage is full, you’ll need to upgrade your plan or free up space.
- Sign Out and Back In: Try signing out of your iCloud account and then signing back in. This can sometimes resolve syncing issues.
- Restart Your iPhone: Restarting your iPhone can often fix temporary glitches that may be preventing photos from syncing.
- Update to the Latest iOS Version: Ensure your iPhone is running the latest version of iOS. Software updates often include bug fixes and improvements that can resolve syncing problems.
6.2. iCloud Storage Full
Running out of iCloud storage is a common issue, but it’s easily addressed.
- Upgrade Your Storage Plan: The simplest solution is to upgrade to a larger iCloud storage plan.
- Delete Unnecessary Files: Remove unwanted photos, videos, backups, and app data from iCloud to free up space.
- Optimize iPhone Storage: Enable the “Optimize iPhone Storage” option to reduce the amount of storage space used on your device.
- Transfer Photos to an External Drive: Move photos and videos to an external drive for long-term storage.
6.3. Photos Missing After Syncing
If photos seem to disappear after syncing, don’t panic. Here’s what to do.
- Check Recently Deleted Album: The first place to look is the “Recently Deleted” album in the Photos app. Photos that have been deleted are stored here for 30 days before being permanently removed.
- Verify iCloud Photos is Enabled on All Devices: Ensure that iCloud Photos is turned on and properly configured on all your devices. If it’s not enabled on a device, photos may not be syncing correctly.
- Check Hidden Album: See if your photos are in the Hidden Album.
- Check Photo Filters: Make sure no filters are hiding any of your photos.
- Contact Apple Support: If you’ve tried all of the above steps and still can’t find your photos, contact Apple Support for assistance.
7. Tips for Optimizing Your Photo Workflow with iCloud
Integrating iCloud into your photography workflow can significantly enhance your productivity and creativity.
7.1. Using iCloud for Photo Editing and Sharing
iCloud simplifies the process of editing and sharing your photos across multiple devices.
- Edit on Any Device: Make edits to your photos on one device (e.g., iPhone, iPad, or Mac) and have those changes automatically synced to all your other devices.
- Non-Destructive Editing: iCloud Photos uses non-destructive editing, which means your original photos are never altered. You can always revert to the original version if you’re not happy with your edits.
- Easy Sharing: Share photos and videos with friends, family, or colleagues directly from the Photos app. You can create shared albums, send photos via Messages or Mail, or post them to social media.
- Collaborate with Others: Use iCloud Shared Photo Library to collaborate on photo collections with friends and family. All participants can add, edit, and delete photos and videos in the shared library.
7.2. Integrating iCloud with Third-Party Apps
Many third-party photo editing and management apps integrate seamlessly with iCloud Photos.
- Access iCloud Photos from Other Apps: Apps like Adobe Lightroom, VSCO, and Pixelmator Photo can directly access your iCloud Photos library, allowing you to edit and manage your photos using your favorite tools.
- Sync Edits Back to iCloud: Edits made in third-party apps can be synced back to iCloud, ensuring that your changes are reflected across all your devices.
- Streamline Your Workflow: By integrating iCloud with third-party apps, you can create a streamlined photo workflow that allows you to capture, edit, and share your photos with ease.
7.3. Backing Up iCloud Photos to Another Service
For added security, consider backing up your iCloud Photos to another cloud storage service or an external drive.
- Use a Third-Party Backup Service: Services like Google Photos, Dropbox, and Amazon Photos can be used to back up your iCloud Photos library.
- Download Photos and Back Up Locally: Periodically download your photos from iCloud and back them up to an external hard drive or SSD.
- Create Redundant Backups: By creating multiple backups of your photos, you can ensure that your precious memories are protected against data loss.
8. Understanding iCloud Security and Privacy
Apple prioritizes the security and privacy of your data stored in iCloud.
8.1. How Apple Protects Your Photos in iCloud
Apple employs several measures to protect your photos stored in iCloud.
- Encryption: Your photos are encrypted both in transit and at rest on Apple’s servers. This ensures that your data is protected from unauthorized access.
- Two-Factor Authentication: Apple requires two-factor authentication for all iCloud accounts. This adds an extra layer of security by requiring a verification code from a trusted device when you sign in to your account on a new device.
- Data Centers: Apple operates state-of-the-art data centers with robust physical and logical security measures. These data centers are designed to protect your data from unauthorized access, theft, and natural disasters.
- Privacy Controls: Apple provides you with control over your data and how it’s used. You can choose which apps have access to your photos and other data stored in iCloud.
8.2. Tips for Enhancing Your iCloud Security
While Apple provides robust security measures, there are additional steps you can take to enhance your iCloud security.
- Use a Strong Password: Choose a strong, unique password for your Apple ID. Avoid using easily guessable passwords or reusing passwords from other accounts.
- Enable Two-Factor Authentication: If you haven’t already, enable two-factor authentication for your Apple ID.
- Keep Your Software Updated: Regularly update your iPhone and other Apple devices to the latest software versions. Software updates often include security patches that can protect your device from vulnerabilities.
- Be Careful of Phishing Scams: Be wary of phishing emails or messages that attempt to trick you into revealing your Apple ID password or other sensitive information.
- Review App Permissions: Periodically review the permissions granted to apps on your iPhone and revoke access to any apps that you no longer trust.
8.3. Apple’s Privacy Policies Regarding Photos
Apple is committed to protecting your privacy and has clear policies regarding the use of your photos stored in iCloud.
- No Data Mining: Apple does not scan or analyze your photos for advertising purposes or to create user profiles.
- End-to-End Encryption for Certain Data: For sensitive data like passwords and health information, Apple uses end-to-end encryption, which means that only you can access your data.
- Transparency: Apple is transparent about its data collection and privacy practices. You can review Apple’s privacy policy on its website.
- Control Over Your Data: Apple gives you control over your data and allows you to access, correct, or delete your data at any time.
9. Advanced iCloud Photo Features
Explore some of iCloud Photo’s more advanced features to get the most out of your photo library.
9.1. Using iCloud Photos on a Mac
Accessing and managing your iCloud Photos library on a Mac offers additional flexibility and convenience.
- Photos App: The Photos app on macOS is fully integrated with iCloud Photos. When you enable iCloud Photos on your Mac, your entire photo library is automatically synced between your Mac and iCloud.
- Edit and Organize: Use the Photos app on your Mac to edit, organize, and manage your photos. Any changes you make are automatically synced to all your other devices.
- Create Albums and Projects: Create albums, slideshows, and other projects using the Photos app on your Mac. These projects are also synced to iCloud and can be accessed on your other devices.
- Import Photos from Other Sources: Import photos from other sources, such as digital cameras, memory cards, and external drives, directly into the Photos app on your Mac. These photos are then synced to iCloud and can be accessed on your iPhone and other devices.
9.2. Using iCloud Photos on a Windows PC
Accessing your iCloud Photos library on a Windows PC is possible with iCloud for Windows.
- Download and Install iCloud for Windows: Download and install iCloud for Windows from the Microsoft Store.
- Sign In to iCloud: Sign in to iCloud using your Apple ID and password.
- Enable iCloud Photos: In the iCloud for Windows settings, enable iCloud Photos.
- Access Your Photos: Your iCloud Photos library will be downloaded to your PC. You can access your photos in File Explorer.
- Manage Your Photos: Use File Explorer to view, copy, and manage your photos. Changes you make to your photos on your PC will be synced to iCloud and your other devices.
9.3. iCloud Photos and Live Photos
iCloud Photos fully supports Live Photos, Apple’s format that captures a few seconds of video and audio along with a still image.
- Sync Live Photos: Live Photos are synced between your devices via iCloud Photos, just like regular photos.
- Play Live Photos: You can play Live Photos on your iPhone, iPad, Mac, and even on a Windows PC with iCloud for Windows installed.
- Edit Live Photos: Edit Live Photos using the Photos app on your iPhone, iPad, or Mac. You can trim the length of the video, add filters, and adjust the key photo.
- Share Live Photos: Share Live Photos with friends and family via Messages, Mail, or social media. Recipients can view the Live Photo on their Apple devices.
10. Frequently Asked Questions (FAQ) About Saving Photos to iCloud
Here are some frequently asked questions about saving photos from your iPhone to iCloud:
-
Q: How do I enable iCloud Photos on my iPhone?
- A: Open Settings > Tap Your Name > iCloud > Photos, then toggle “Sync this iPhone” to on.
-
Q: What’s the difference between “Optimize iPhone Storage” and “Download and Keep Originals”?
- A: “Optimize iPhone Storage” saves space by storing smaller versions on your device and full-resolution versions in iCloud. “Download and Keep Originals” keeps full-resolution versions on both your device and iCloud.
-
Q: How much iCloud storage do I need?
- A: The amount of storage you need depends on the size of your photo and video library, as well as other data you store in iCloud. Start with a smaller plan and upgrade if necessary.
-
Q: What happens if my iCloud storage is full?
- A: If your iCloud storage is full, new photos and videos will not be backed up to iCloud. You’ll need to upgrade your storage plan or free up space by deleting unnecessary files.
-
Q: How do I access my iCloud Photos on my computer?
- A: On a Mac, use the Photos app. On a Windows PC, download and install iCloud for Windows.
-
Q: Are my photos safe in iCloud?
- A: Yes, Apple uses encryption and other security measures to protect your photos in iCloud.
-
Q: How do I share photos from iCloud with others?
- A: You can share photos via Messages, Mail, or social media directly from the Photos app. You can also create shared albums and invite others to view and contribute to them.
-
Q: Can I use iCloud Photos with third-party apps?
- A: Yes, many third-party photo editing and management apps integrate with iCloud Photos.
-
Q: How do I transfer photos from iCloud to an external drive?
- A: Download your photos from iCloud to your computer and then copy them to an external drive.
-
Q: What should I do if my photos are not syncing to iCloud?
- A: Check your internet connection, ensure iCloud Photos is enabled, verify you have enough storage space, and try signing out and back into your iCloud account.
Conclusion: Embrace the Power of iCloud Photos
Saving your photos from your iPhone to iCloud is a game-changer for photographers of all levels. It safeguards your memories, frees up valuable device storage, and enables seamless access across all your devices. By understanding the settings, managing your storage, and troubleshooting common issues, you can optimize your photo workflow and unlock the full potential of iCloud Photos. So, dive in, explore the features, and discover the peace of mind that comes with knowing your precious photos are safe, accessible, and ready to inspire. Ready to take your photography to the next level? Visit dfphoto.net today to explore in-depth tutorials, stunning photo galleries, and a vibrant community of photography enthusiasts in the USA! Our address is 1600 St Michael’s Dr, Santa Fe, NM 87505, United States, and you can reach us at +1 (505) 471-6001.
