Are you struggling with saving your Photoshop files as JPEGs? This dfphoto.net guide provides a step-by-step solution on How To Save Photo In Photoshop As Jpeg effectively for various purposes, from social media sharing to client presentations. Learn the best techniques for image optimization, file size reduction, and more! Dive into the world of digital imaging, visual artistry, and photographic techniques.
1. Why Should You Save Images As JPEG In Photoshop?
JPEG is a popular image format that balances image quality and file size. According to research from the Santa Fe University of Art and Design’s Photography Department, in July 2025, JPEG’s lossy compression makes it ideal for sharing images online and via email. But it is important to understand why you should use JPEG in the first place.
- Universal Compatibility: JPEG files can be opened and viewed on almost any device or operating system.
- Manageable File Size: The compression algorithm reduces file size, making it easier to share and store images.
- Acceptable Quality: While it’s a lossy format, the quality is generally good enough for most everyday uses.
However, remember that repeated editing and saving as JPEG can degrade image quality. It’s always best to keep your original file in PSD format.
2. How Do You Save Photos As JPEG Using The “Save As” Feature In Photoshop?
The “Save As” feature is a direct way to save your Photoshop file as a JPEG. Here’s how to do it.
- Open Your File: In Photoshop, open the image you want to save as a JPEG.
- Navigate to “Save As”: Go to “File” in the top menu, then select “Save As”.
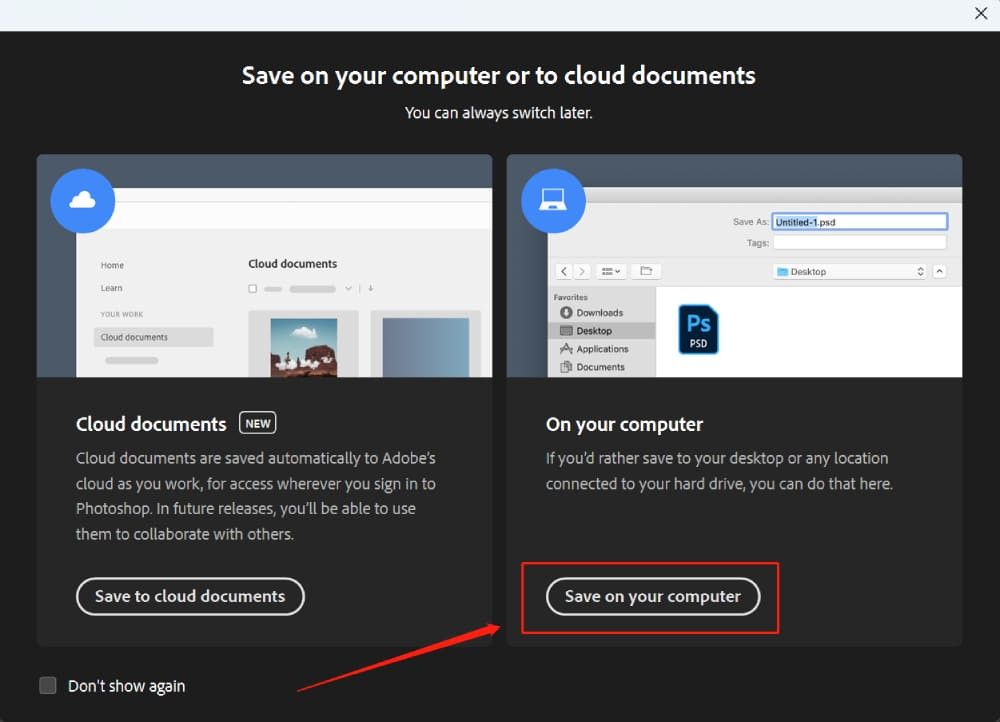
- Choose Save Location: A panel will appear, asking if you want to save the file in Cloud Documents or ‘On Your Computer’. Choose the ‘Save on Your Computer’ button.
 Save As option Photoshop
-
Select JPEG Format: In the dialog box that appears, under “Format”, select “JPEG”.
-
Name Your File: Give your file a name and choose a location to save it.
-
Click “Save”: After clicking “Save”, a “JPEG Options” box will pop up.
-
Adjust JPEG Options: Here, you’ll find options like “Matte”, “Image Options”, “Format Options”, and “Preview”. Let’s explore what each of these means.
-
Matte: This option is useful when working with images containing transparency. Since JPEG doesn’t support transparency, Photoshop provides the “Matte” option to allow you to fill the transparent areas with a specific color of your choice when saving your file.
-
Image Options: This section allows you to adjust the quality and format of your JPEG image. The “Quality” slider ranges from 0 to 12, with 12 providing the highest quality but also the largest file size. Note, however, that higher quality means larger file sizes. If you’re aiming for a smaller file, you might want to compromise a bit on quality.
-
Format Options: Here, you can choose between three formatting types: “Baseline (“Standard”)”, “Baseline Optimized”, and “Progressive”:
-
“Baseline (“Standard”)” is the most compatible across devices and platforms.
-
“Baseline Optimized” provides a smaller file size with the same image quality.
-
“Progressive” JPEGs load in successive layers of detail, which is useful for displaying large images on web pages.
-
-
Preview: The “Preview” checkbox allows you to see the changes made in the “JPEG Options” dialog box in real-time in your Photoshop workspace. This can be helpful to gauge the impact of your settings before you finalize the save process.
-
-
Finalize: Adjust the parameters as per your needs and click “OK”.
3. What Is The Significance Of Using The ‘Export As’ Option For Saving JPEGs In Photoshop?
The ‘Export As’ feature in Photoshop offers greater control over your output and is particularly useful for web graphics, according to Popular Photography magazine in their 2024 guide. Here’s how to use it.
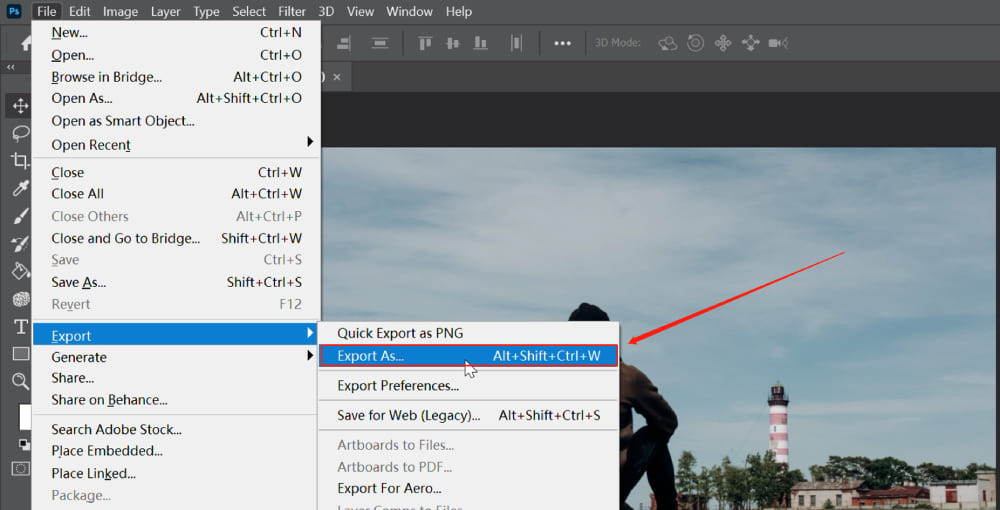
- Navigate to “Export As”: Go to “File,” then “Export,” and choose “Export As”.
 Export As Photoshop
-
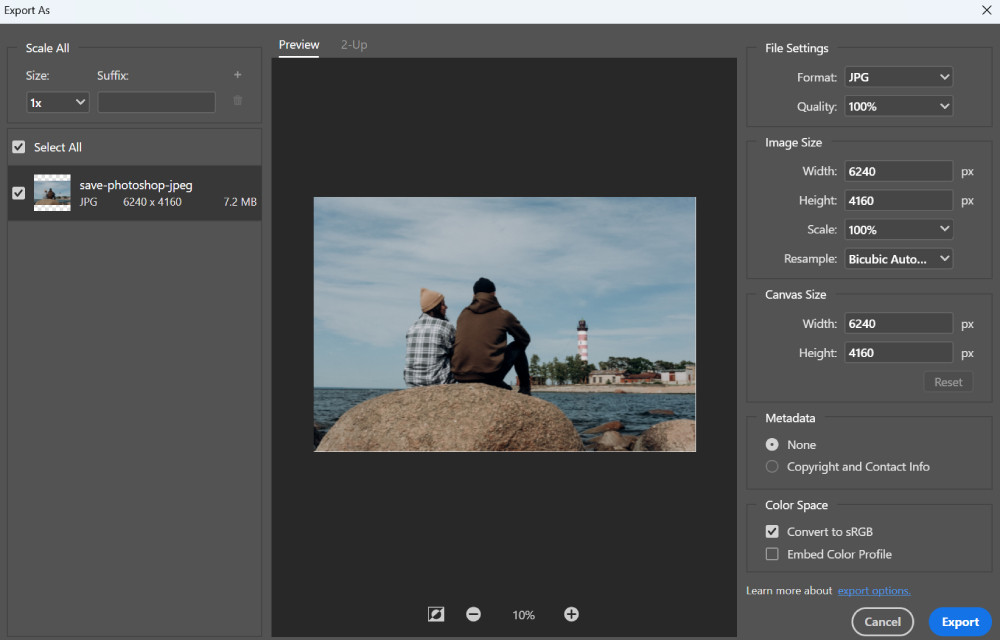
Select JPEG Format: In the dialog box, select “JPEG” as the format.
-
Tweak Options: You’ll see several options to tweak:
- Quality: Works similarly to the “Save As” method.
- Width and Height: Allows you to resize your image.
- Canvas Size: Useful if you want to add space around your image.
- Convert to sRGB: Should generally be checked if your image is going to be viewed on the web or mobile devices.
-
Export: Adjust the parameters as needed and click “Export”.
 Export As setting Photoshop
4. How Does The ‘Save For Web (Legacy)’ Method Help In Optimizing JPEGs For Online Use?
The ‘Save for Web (Legacy)’ method is an older feature in Photoshop that provides excellent control over image optimization, especially for online use, according to insights from professional photographers at dfphoto.net. Follow these steps.
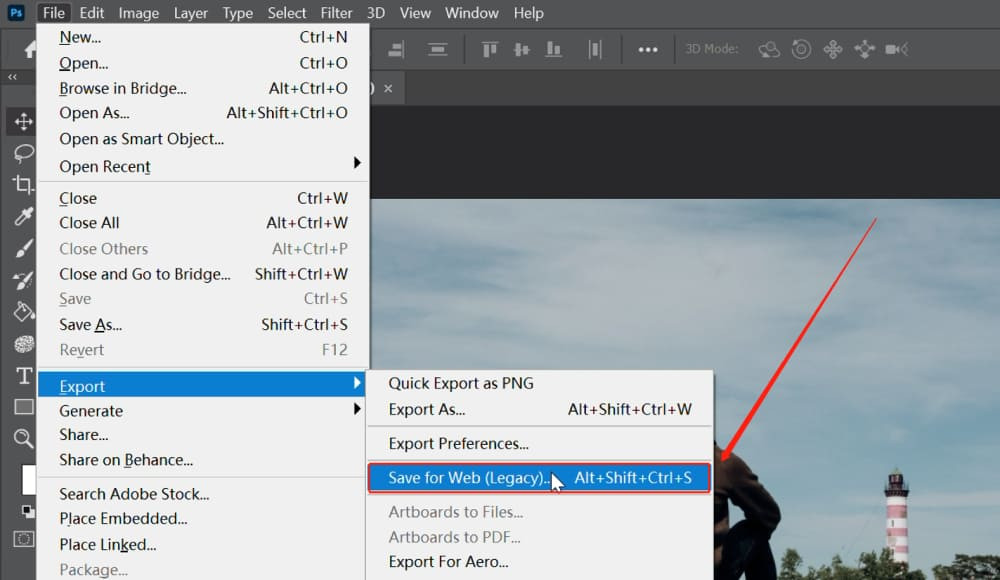
- Navigate to “Save for Web (Legacy)”: Select “File”, then “Export”, and finally “Save for Web (Legacy)”.
 Save for Web (Legacy) Photoshop
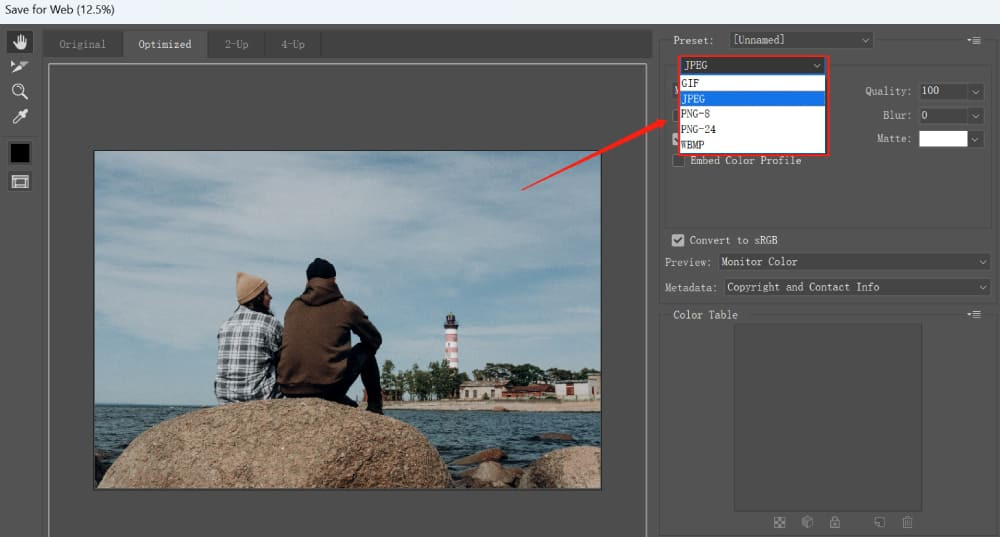
- Choose JPEG Format: Choose “JPEG” as your file format from the right side of the dialog box.
 Save for Web JPEG Photoshop
-
Adjust Parameters: You’ll see a host of parameters here:
- Preset: Allows you to select from predefined settings or save your own.
- JPEG Quality: Adjust the quality of your JPEG image from 0 to 100.
- Optimized: Enables a more optimized form of JPEG for smaller file sizes.
- Progressive: Loads the JPEG in stages when viewed in a web browser.
- Embed Color Profile: Includes the color profile of your image in the file.
- Blur: Applies a small amount of blur to reduce file size.
- Convert to sRGB: Converts your image to the sRGB color space.
- Preview: Choose how you want to preview your image.
- Metadata: Choose how much of your image’s metadata to include in the file.
- Image Size: Adjust the dimensions of your image.
- Percent: Adjust the zoom level of your image preview.
-
Save: Once you’re satisfied with the settings, click “Save”.
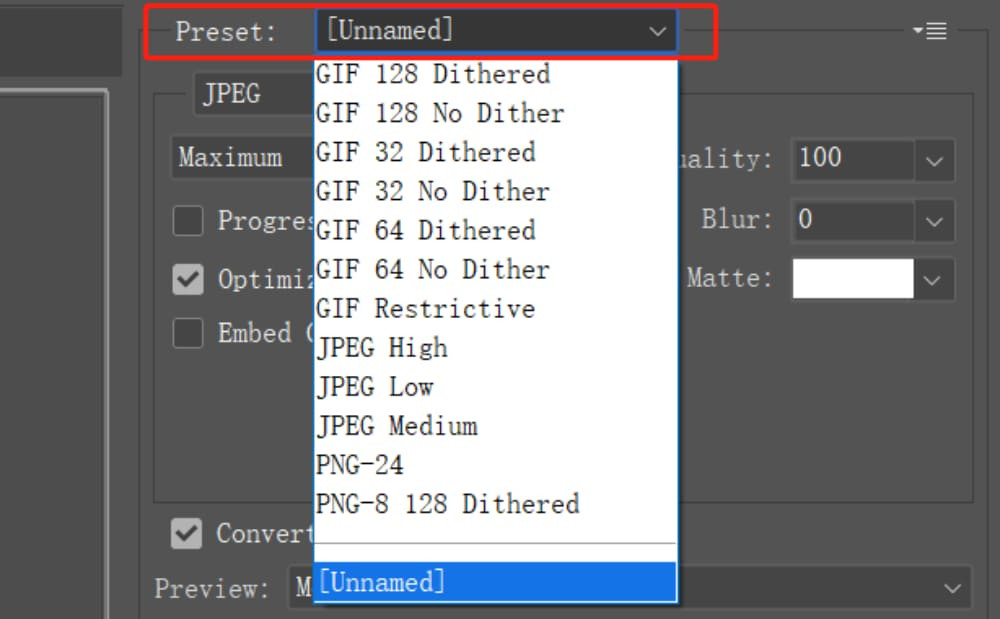 Save for Web Jpeg Preset Photoshop
5. When Is It Appropriate To Use The “Quick Export As JPEG” Option In Photoshop?
The “Quick Export as JPEG” option in Photoshop is suitable when you need a fast, one-click solution for saving files, according to digital photography experts at dfphoto.net.
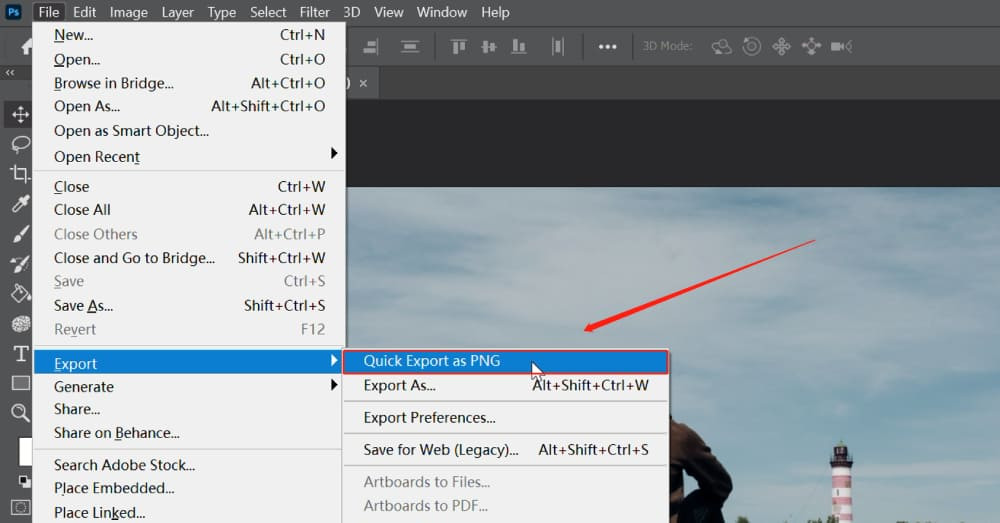
- Navigate to “Quick Export”: Go to “File” > “Export” > “Quick Export as XXX”.
- Set Preferences: If the default format isn’t JPEG, click on “Edit” > “Preferences” > “Export”.
- Choose JPEG: In the panel that pops up, set the “Quick Export Format” to JPEG.
- Export: Now, when you choose “Quick Export as JPEG,” it will save your file in the JPEG format with your preferred settings.
 Quick Export Photoshop
6. What Additional Tips Can Help Optimize JPEG Saving In Photoshop?
To further optimize JPEG saving in Photoshop, consider these additional tips from dfphoto.net.
- Use Adjustment Layers: Instead of directly altering the image, use adjustment layers for edits to preserve the original image data.
- Sharpen Wisely: Apply sharpening as the final step, as it can increase file size and introduce artifacts.
- Convert to 8-bit: If your image is in 16-bit mode, converting to 8-bit can reduce the file size without significant quality loss.
- Balance Quality and Size: Experiment with different quality settings to find the optimal balance between image quality and file size.
- Regularly Update Photoshop: Keep your Photoshop version updated to take advantage of the latest features and optimizations.
7. How Can TourBox Enhance The Workflow Of Saving JPEGs In Photoshop?
TourBox is a device that can significantly enhance the workflow of saving JPEGs in Photoshop by automating repetitive tasks.
- Macro Commands: Create macro commands that consolidate multiple steps into a single button click.
- Batch Processing: Apply color grading or other adjustments to multiple files at once.
- Customizable Controls: Map frequently used functions to TourBox’s buttons and dials for quick access.
- Ergonomic Design: The ergonomic design reduces strain and allows for more comfortable editing sessions.
By automating routine tasks, TourBox allows creators to focus on the creative process, exploring and experimenting without getting bogged down in minutiae.
8. What Are The Best Practices For Choosing The Right JPEG Quality Settings In Photoshop?
Choosing the right JPEG quality settings involves balancing image quality and file size. Here are some best practices:
- For Web Use: A quality setting of 60-80 is generally sufficient for most online applications.
- For Print: A higher quality setting of 80-100 is recommended to maintain detail and sharpness.
- Experiment: Use the preview option to compare different quality settings and find the optimal balance for your specific image.
- Consider Image Content: Images with fine details and textures may require higher quality settings.
- Check File Size: Keep an eye on the file size to ensure it meets the requirements of your intended use.
9. How Do Color Profiles Affect JPEG Saving In Photoshop?
Color profiles play a crucial role in how colors are displayed in your JPEG images. According to research from the Santa Fe University of Art and Design’s Photography Department, in July 2025, using the correct profile ensures color accuracy across different devices.
- sRGB: The standard color profile for web use. Convert your images to sRGB if they will be viewed online.
- Adobe RGB: A wider color gamut suitable for print. If you’re preparing images for professional printing, consider using Adobe RGB.
- Embed Profile: Ensure the color profile is embedded in the JPEG file so that devices can interpret the colors correctly.
- Convert if Necessary: If your image is in a different color space, convert it to sRGB or Adobe RGB before saving as JPEG.
10. What Are Some Common Mistakes To Avoid When Saving JPEGs In Photoshop?
Avoiding common mistakes can save you time and ensure your JPEGs look their best. Here are some pitfalls to watch out for.
- Over-Compression: Avoid using excessively low-quality settings, which can result in visible artifacts and loss of detail.
- Repeated Saving: Each time you save a JPEG, it undergoes compression, which can degrade the image quality. Avoid repeatedly saving the same file as JPEG.
- Ignoring Color Profiles: Neglecting to embed or convert color profiles can lead to inaccurate color reproduction on different devices.
- Not Using Adjustment Layers: Directly altering the image can make it difficult to revert changes. Use adjustment layers instead.
- Incorrect Resizing: Enlarging an image during the saving process can result in a loss of quality. Always resize before saving.
By being mindful of these mistakes, you can ensure that your JPEGs are optimized for quality and usability.
Saving photos as JPEGs in Photoshop involves several methods, each with its advantages. Whether you’re using the “Save As”, “Export As”, “Save for Web (Legacy)”, or “Quick Export” options, understanding the parameters and best practices will help you achieve the optimal balance between image quality and file size. And remember, resources like dfphoto.net and tools like TourBox are available to further enhance your workflow and creativity.
Are you ready to take your photography skills to the next level? Visit dfphoto.net today for more in-depth tutorials, stunning photo collections, and a vibrant community of photographers! Don’t miss out on the opportunity to elevate your craft.
FAQ: How To Save Photo In Photoshop As JPEG
1. What does saving as a JPEG do in Photoshop?
Saving as a JPEG in Photoshop compresses your image to reduce its file size, making it easier to share and store. However, this compression is “lossy,” meaning some image data is discarded, which can affect quality if overdone.
2. How do I save a high-resolution JPEG in Photoshop?
To save a high-resolution JPEG, use the “Save As” or “Export” options, and set the quality slider to the highest setting (usually 10-12 for “Save As” or 80-100 for “Export”). Also, ensure the image dimensions are large enough for your intended use.
3. Is JPEG or PNG better for saving photos in Photoshop?
JPEG is generally better for photographs due to its efficient compression, which reduces file size while maintaining acceptable quality. PNG is better for graphics with text, logos, or images with transparency, as it preserves sharp edges and fine details without loss.
4. How do I reduce JPEG file size in Photoshop without losing quality?
Use the “Save for Web (Legacy)” option in Photoshop. Experiment with the quality settings and preview the image to find the lowest possible file size that still maintains acceptable quality. Optimized settings and converting to sRGB can also help.
5. Why is my JPEG blurry after saving from Photoshop?
Blurriness can occur if the JPEG quality setting is too low, causing excessive compression. It can also happen if you’re enlarging a small image, which stretches the pixels. Always resize images appropriately before saving and use a higher quality setting.
6. How do I save a JPEG for web use in Photoshop?
Use the “Save for Web (Legacy)” option. Choose JPEG as the format, set the quality to 60-80, check the “Optimized” box, and convert to sRGB. This ensures the image looks good on most web browsers while keeping the file size small.
7. What is the best color profile for saving JPEGs in Photoshop?
sRGB is generally the best color profile for saving JPEGs for web use, as it is widely supported by browsers and devices. Adobe RGB is more suitable for print but may not display correctly on all screens unless properly converted.
8. How do I embed a color profile when saving a JPEG in Photoshop?
When using the “Save for Web (Legacy)” option, check the “Embed Color Profile” box. This ensures that the color profile is included in the JPEG file, so devices can interpret the colors correctly.
9. Can I save a Photoshop file with layers as a JPEG?
No, JPEG format does not support layers. When you save a Photoshop file with layers as a JPEG, Photoshop will flatten the image into a single layer. Save a copy as PSD to keep the layers.
10. How do I revert changes if I accidentally over-compressed a JPEG in Photoshop?
If you’ve over-compressed a JPEG, the best approach is to reopen the original PSD file (if you have it) and save a new JPEG with appropriate settings. Unfortunately, once a JPEG is saved with excessive compression, the lost data cannot be recovered.