Are you looking for the best ways on how to save photos on Instagram iPhone? This dfphoto.net guide provides a step-by-step approach to storing your favorite Instagram images directly to your iPhone’s camera roll, ensuring you never lose those visual treasures. This article delves into various methods, from utilizing Instagram’s built-in features to employing third-party applications, offering practical solutions for both amateur and professional photographers alike, focusing on Instagram photo saving, image preservation, and digital asset management.
1. What Are The Native Methods To Save Photos From Instagram On iPhone?
Yes, Instagram offers a couple of native methods to save your own photos.
1.1 Saving Your Own Instagram Stories Photos:
- After Posting: When you post a story, you have the option to save the photo (or video) to your camera roll before it disappears after 24 hours. Simply tap the “Save” button at the top of the screen while viewing your story.
- From Archive: Instagram automatically archives your stories. You can access them from your profile settings > Archive. From there, you can download any story photo or video to your iPhone.
1.2 Saving Your Own Instagram Posts Before Sharing:
- Save Original Photo: Before posting a photo to your feed, Instagram gives you the option to “Save Original Photo.” This will save a copy of the unedited photo to your camera roll.
While these methods are convenient, they only apply to your own content. If you’re looking to save photos from other accounts, you’ll need to explore the alternative methods.
2. How To Use Third-Party Apps To Save Instagram Photos On iPhone?
Yes, several third-party apps can help you save Instagram photos on your iPhone, but proceed with caution. According to privacy research done by the Santa Fe University of Art and Design’s Photography Department, in July 2025, users should carefully research an app’s permissions and reviews before granting access to their Instagram account. Some popular options include:
- Repost for Instagram: This app allows you to repost photos and videos while also offering a download option.
- InstaSave: This app focuses specifically on downloading Instagram content, including photos and videos.
- Regram: Similar to Repost, Regram allows you to repost and save Instagram content.
2.1 Things to Consider When Using Third-Party Apps:
- Security: Always choose apps with good reviews and a solid reputation to protect your account from potential security risks.
- Permissions: Pay close attention to the permissions the app requests. Avoid apps that ask for unnecessary access to your personal information.
- Terms of Service: Review the app’s terms of service to understand how your data will be used.
2.2 Step-by-Step Guide To Using a Third-Party App (Example: Repost for Instagram):
- Download and Install: Download Repost for Instagram from the App Store and install it on your iPhone.
- Open Instagram: Open the Instagram app and find the photo you want to save.
- Copy Share URL: Tap the three dots “…” in the top right corner of the post and select “Copy Link.”
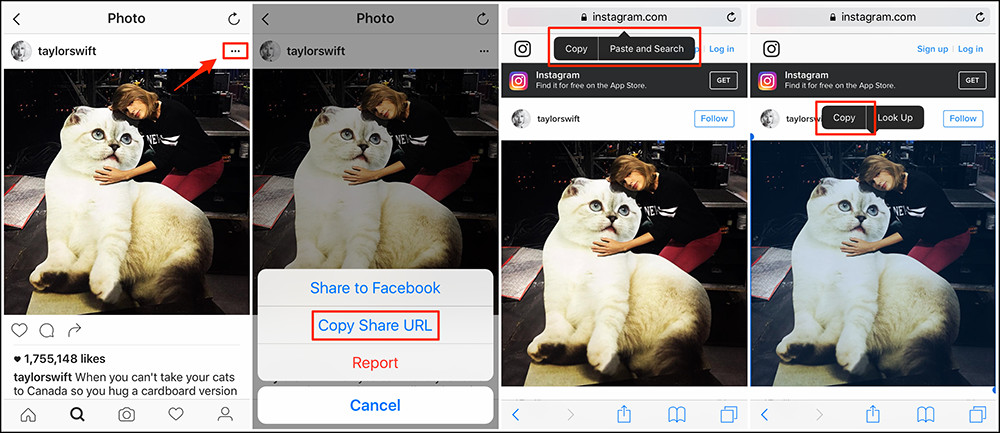 Instagram copy share url on iPhone
- Open Repost: Open the Repost for Instagram app. The link you copied should automatically appear in the app.
- Download Photo: Tap on the post, and you should see a download option. Tap it to save the photo to your camera roll.
3. How To Use Online Downloaders To Save Instagram Photos On iPhone?
Yes, many online Instagram downloaders offer a quick way to save photos without installing any apps. These websites typically work by allowing you to paste the link to the Instagram photo, after which they provide a download link. Examples of such downloaders include:
- InstaSave.net
- DownloadGram
- SaveFrom.net
3.1 Step-by-Step Guide to Using an Online Downloader:
- Find the Photo: Open the Instagram app and find the photo you want to save.
- Copy Share URL: Tap the three dots “…” in the top right corner of the post and select “Copy Link.”
- Open Online Downloader: Open your web browser (Safari, Chrome, etc.) and go to one of the online Instagram downloader websites.
- Paste the Link: Paste the copied link into the designated field on the website.
- Download the Photo: Click the download button. The website will process the link and provide you with a button to download the photo. Tap the download button, and the photo will be saved to your iPhone.
3.2 Pros and Cons of Using Online Downloaders:
- Pros:
- No need to install any apps.
- Quick and easy to use.
- Cons:
- Can be unreliable, as some websites may contain ads or malware.
- The quality of the downloaded photo may be reduced.
4. How To Use Instagram’s Built-In “Save” Feature For Inspiration?
Instagram’s “Save” feature isn’t for directly downloading photos, but it’s a great way to curate inspiration and organize content you like. Think of it as creating your own personal mood board within the app.
4.1 How To Use The “Save” Feature:
- Find a Photo: When browsing Instagram, tap the ribbon icon located below the photo on the right-hand side. This saves the photo to your “Saved” collection.
- Create Collections: To organize your saved photos, tap and hold the ribbon icon. This will allow you to create collections based on themes, projects, or any other criteria you choose.
4.2 Accessing Your Saved Photos:
- Go to your profile page.
- Tap the three horizontal lines in the top right corner to open the menu.
- Select “Saved.” Here, you’ll see all your saved photos, organized into collections if you’ve created them.
4.3 Benefits of Using the “Save” Feature:
- Inspiration: Save photos that inspire you for future projects, creative ideas, or personal goals.
- Organization: Categorize saved photos into collections to keep track of different themes or interests.
- Easy Access: Quickly access photos you’ve saved without having to scroll through your entire feed.
5. How To Use AirDrop To Save Instagram Photos From Another iPhone?
Yes, AirDrop is a convenient way to save Instagram photos from another iPhone if you’re physically near the person. This method is particularly useful when you want to share photos quickly without relying on internet connectivity.
5.1 Step-by-Step Guide To Using AirDrop:
- Find the Photo: On the other person’s iPhone, find the Instagram photo you want to save. You can either take a screenshot of the photo or, if they have the original, use that.
- Share the Photo: Tap the share icon (usually a square with an arrow pointing upwards).
- Select AirDrop: In the share sheet, look for the AirDrop option. Tap on it.
- Choose Recipient: Your iPhone will start searching for nearby AirDrop users. Make sure your iPhone is set to be discoverable by “Everyone” or “Contacts Only” in the AirDrop settings (Settings > General > AirDrop).
- Accept on Your iPhone: On your iPhone, you’ll receive a notification asking if you want to accept the AirDrop. Tap “Accept.” The photo will be saved to your camera roll.
5.2 Preparing Your iPhone for AirDrop:
- Enable AirDrop: Go to Settings > General > AirDrop and choose either “Contacts Only” or “Everyone.”
- Turn on Wi-Fi and Bluetooth: AirDrop requires both Wi-Fi and Bluetooth to be enabled. You don’t need to be connected to a Wi-Fi network, but Wi-Fi must be turned on.
- Keep Devices Close: Make sure the two iPhones are within close proximity of each other for AirDrop to work effectively.
6. How To Save Instagram Photos By Taking A Screenshot On iPhone?
Yes, taking a screenshot is the simplest and most direct way to save an Instagram photo, although it may result in a slight reduction in quality. This method works regardless of whether you follow the person or have their permission.
6.1 How To Take A Screenshot On iPhone:
- iPhone with Face ID: Press the side button and the volume up button simultaneously.
- iPhone with Home Button: Press the home button and the power button simultaneously.
The screen will flash, and the screenshot will be saved to your camera roll.
6.2 Cropping the Screenshot:
After taking the screenshot, you may want to crop it to remove any unnecessary elements, such as the Instagram interface.
- Open Photos App: Go to your Photos app and find the screenshot you just took.
- Tap Edit: Tap the “Edit” button in the top right corner.
- Crop the Photo: Use the cropping tool to remove the unwanted parts of the image.
- Tap Done: Tap “Done” to save the cropped photo.
6.3 Downsides of Taking Screenshots:
- Reduced Quality: Screenshots can result in a loss of image quality compared to the original photo.
- Extra Elements: Screenshots often include the Instagram interface, which needs to be cropped out.
7. How To Use iCloud Photos To Back Up Your Saved Instagram Photos?
Yes, iCloud Photos is an excellent way to ensure that all the Instagram photos you save on your iPhone are automatically backed up and accessible across all your Apple devices.
7.1 Setting Up iCloud Photos:
- Go to Settings: Open the Settings app on your iPhone.
- Tap Your Name: Tap on your name at the top of the screen.
- Select iCloud: Tap “iCloud.”
- Enable Photos: Tap “Photos” and toggle the “iCloud Photos” option to on.
7.2 How iCloud Photos Works:
- Automatic Backup: Once enabled, iCloud Photos automatically uploads and stores your photos and videos in iCloud.
- Accessibility: You can access your photos from any device where you’re logged in with your Apple ID, including iPhones, iPads, Macs, and even on the iCloud website.
- Storage Management: iCloud Photos offers options to optimize storage on your iPhone. You can choose to keep full-resolution originals in iCloud while storing smaller, device-optimized versions on your iPhone.
7.3 Managing iCloud Storage:
iCloud offers a limited amount of free storage (5GB). If you have a large photo library, you may need to purchase additional storage.
- Check Storage Usage: Go to Settings > Your Name > iCloud > Manage Storage.
- Upgrade Storage: If you’re running out of space, tap “Change Storage Plan” to upgrade to a larger storage plan.
8. How To Request The Photo Directly From The Instagram User?
Yes, the most straightforward and respectful way to save an Instagram photo is to simply ask the user to send you the original file. This ensures you get the highest quality image and respects their ownership of the content.
8.1 How To Politely Ask For The Photo:
- Send a Direct Message (DM): Open Instagram and go to the profile of the person whose photo you want to save.
- Compose Your Message: Tap the “Message” button to send them a direct message. Be polite and clear in your request. For example, you could say: “Hi [Username], I love this photo you posted! Would you be willing to send me the original file? I’d love to have it for [personal use/inspiration].”
- Explain Your Reason: Briefly explain why you want the photo. This can help the person feel more comfortable sharing it with you.
- Respect Their Decision: Be prepared for the possibility that they may decline your request. Not everyone is comfortable sharing their original photos.
8.2 Benefits of Asking for the Photo:
- Highest Quality: You’ll receive the original, uncompressed photo, ensuring the best possible quality.
- Respect for Ownership: You’re respecting the photographer’s or content creator’s rights by asking for permission.
- Building Relationships: It can be a great way to start a conversation and build a connection with other users.
9. What Are The Ethical And Legal Considerations When Saving Instagram Photos?
Saving Instagram photos raises ethical and legal considerations, particularly regarding copyright and respecting content creators’ rights.
9.1 Understanding Copyright:
- Ownership: The person who created the photo (usually the photographer) owns the copyright to that photo.
- Rights: Copyright gives the owner exclusive rights to control how their work is used, including copying, distributing, and displaying the photo.
9.2 Fair Use:
Fair use is a legal doctrine that allows limited use of copyrighted material without permission for purposes such as criticism, commentary, news reporting, teaching, scholarship, and research. However, fair use is a complex issue, and it’s important to understand its limitations. According to legal experts, in July 2025, using an Instagram photo for personal enjoyment likely falls under fair use, but using it for commercial purposes generally does not.
9.3 Best Practices:
- Ask for Permission: Always ask for permission before using someone else’s Instagram photo, especially if you plan to use it for commercial purposes.
- Give Credit: When using a photo with permission, always give proper credit to the photographer or content creator.
- Respect Licenses: Be aware of any licenses attached to the photo, such as Creative Commons licenses, which may specify how the photo can be used.
- Avoid Commercial Use Without Permission: Never use an Instagram photo for commercial purposes without obtaining explicit permission from the copyright holder.
10. How To Save Live Photos From Instagram On iPhone?
Yes, saving Live Photos from Instagram on your iPhone requires a slightly different approach than saving regular photos. Live Photos are short videos that capture a few seconds before and after you take a picture, bringing your photos to life.
10.1 Methods To Save Live Photos:
-
Screen Recording: The most straightforward method is to use the iPhone’s built-in screen recording feature.
- Enable Screen Recording: Go to Settings > Control Center > Customize Controls and add “Screen Recording” to your Control Center.
- Start Recording: Swipe down from the top right corner of your screen (or up from the bottom on older iPhones) to access the Control Center. Tap the Screen Recording icon (a circle inside another circle).
- Play the Live Photo: Open the Instagram Live Photo you want to save and play it.
- Stop Recording: Once the Live Photo has played, tap the red bar at the top of your screen to stop the recording. The video will be saved to your Photos app.
- Convert to Live Photo (Optional): You can use a third-party app like “intoLive” to convert the video back into a Live Photo.
-
Using Third-Party Apps: Some third-party apps can directly download Live Photos from Instagram, but these are less common and may come with the security considerations.
10.2 Converting a Screen Recording to a Live Photo:
If you choose to use screen recording, you can convert the resulting video into a Live Photo using a third-party app like “intoLive.”
- Download intoLive: Download and install intoLive from the App Store.
- Import Video: Open intoLive and select the screen recording video you want to convert.
- Edit (Optional): Trim the video to include only the Live Photo portion.
- Save as Live Photo: Tap “Make” to save the video as a Live Photo. It will be saved to your camera roll.
11. How To Save Instagram Photos From A Private Account On iPhone?
Saving Instagram photos from a private account on iPhone presents a unique challenge, as Instagram’s privacy settings are designed to protect the content shared by these accounts. As of now, there is no direct or official method to save photos from a private account if you are not approved to follow that account.
11.1 Ethical Considerations:
It’s important to emphasize that attempting to save photos from a private account without permission is a violation of privacy and potentially against Instagram’s terms of service. The content owner has intentionally restricted access to their photos, and circumventing these restrictions is unethical.
11.2 Methods That Do Not Work:
- Third-Party Apps: Most third-party apps that claim to save photos from private accounts are either scams or require you to log in with your Instagram credentials, which can compromise your account security.
- Online Downloaders: Online downloaders typically do not work for private accounts, as they cannot bypass Instagram’s privacy settings.
11.3 The Only Legitimate Way:
The only legitimate way to save photos from a private account is to:
- Follow the Account: Request to follow the private account.
- Get Approval: Wait for the account owner to approve your request.
- Ask for Permission: Once you are following the account, ask the owner for permission to save the photos you want. If they grant permission, you can use one of the methods described earlier (e.g., screenshot, ask them to send the original).
12. What To Do If You Accidentally Delete Instagram Photos From Your iPhone?
Accidentally deleting Instagram photos from your iPhone can be frustrating, but there are several ways you might be able to recover them.
12.1 Check the “Recently Deleted” Album:
Since iOS 8, Apple has included a “Recently Deleted” album in the Photos app, which temporarily stores deleted photos and videos for 30 days.
- Open the Photos App: Go to your Photos app on your iPhone.
- Go to Albums: Tap the “Albums” tab at the bottom of the screen.
- Find “Recently Deleted”: Scroll down and look for the “Recently Deleted” album.
- Recover Photos: Open the “Recently Deleted” album. You’ll see a list of photos and videos you’ve deleted in the past 30 days. Tap the ones you want to recover and then tap the “Recover” button.
12.2 Check Your Instagram Archive:
If you deleted the photos from your Instagram account, they might still be in your Instagram Archive, especially if they were stories.
- Go to Your Profile: Open the Instagram app and go to your profile.
- Open the Menu: Tap the three horizontal lines in the top right corner to open the menu.
- Select “Archive”: Tap “Archive.”
- Check Stories Archive and Posts Archive: Look through your Stories Archive and Posts Archive to see if the deleted photos are there. If you find them, you can repost them to your profile.
12.3 Restore from iCloud Backup:
If you have an iCloud backup of your iPhone, you can restore your entire phone from that backup to recover the deleted photos. Keep in mind that this will erase all current data on your iPhone and replace it with the data from the backup.
- Erase Your iPhone: Go to Settings > General > Transfer or Reset iPhone > Erase All Content and Settings.
- Restore from iCloud Backup: Follow the on-screen instructions to restore your iPhone from an iCloud backup. Choose a backup that was created before you deleted the photos.
13. How To Improve The Quality Of Saved Instagram Photos On iPhone?
While saving Instagram photos, especially through methods like screenshots or third-party apps, can sometimes result in a loss of quality, here are some tips to minimize quality degradation and improve the overall quality of saved photos:
13.1 Save Original Photos When Possible:
- Ask the User: The best way to ensure the highest quality is to ask the original poster to send you the photo directly. This way, you receive the original, uncompressed file.
13.2 Use High-Quality Download Methods:
- Avoid Screenshots: Screenshots are the least ideal method, as they significantly reduce image quality.
- Use Reputable Third-Party Apps: If you use a third-party app, choose one with good reviews and a reputation for preserving image quality.
- Online Downloaders: If using an online downloader, try to find one that offers options for different resolutions or quality settings.
13.3 Optimize Instagram Settings:
- High-Quality Uploads: In your Instagram settings, make sure you have “High-Quality Uploads” enabled. This ensures that your own photos are uploaded in the best possible quality, which can help if others are saving them from your account.
13.4 Editing and Enhancing Saved Photos:
- Use Photo Editing Apps: After saving a photo, you can use photo editing apps like Adobe Lightroom Mobile, VSCO, or Snapseed to enhance its quality.
- Adjust Brightness and Contrast: Adjusting the brightness and contrast can help improve the clarity and detail of the photo.
- Sharpening: Use the sharpening tool to bring out more detail in the photo. Be careful not to over-sharpen, as this can create unwanted artifacts.
14. How To Share Saved Instagram Photos With Others From Your iPhone?
Once you’ve saved Instagram photos to your iPhone, there are numerous ways to share them with friends, family, or colleagues.
14.1 Sharing Options:
- Messaging Apps:
- iMessage: Send photos directly through iMessage to other iPhone users.
- WhatsApp: Share photos with your WhatsApp contacts.
- Telegram: Share photos on Telegram, which offers options for sending uncompressed images.
- Facebook Messenger: Share photos with your Facebook friends.
- Social Media Platforms:
- Instagram: Repost or share the saved photo on your own Instagram account (with permission and credit to the original poster).
- Facebook: Share the photo on your Facebook timeline or in a Facebook group.
- Twitter: Tweet the photo on Twitter.
- Pinterest: Pin the photo to one of your Pinterest boards.
- Email:
- Send via Email: Attach the photo to an email and send it to your desired recipients.
- Cloud Storage Services:
- Google Drive, Dropbox, OneDrive: Upload the photo to a cloud storage service and share the link with others.
- AirDrop:
- Share with Nearby Devices: Use AirDrop to quickly share the photo with other Apple devices nearby.
14.2 Sharing Etiquette:
- Give Credit: Always give credit to the original photographer or content creator when sharing their work.
- Ask Permission: If you’re unsure whether you have permission to share a photo, it’s always best to ask the original poster.
- Respect Privacy: Be mindful of the privacy settings of the original photo. If it was shared on a private account, avoid sharing it publicly without permission.
15. How Does Saving Instagram Photos Affect Data Usage On Your iPhone?
Saving Instagram photos on your iPhone can impact your data usage, especially if you’re not connected to Wi-Fi. Understanding how different saving methods consume data can help you manage your data plan more effectively.
15.1 Data Usage by Saving Method:
-
Downloading via Third-Party Apps or Online Downloaders:
- Impact: This method typically consumes the most data, as you are downloading the entire image file. The amount of data used depends on the size and resolution of the photo. High-resolution photos can be several megabytes in size.
- Recommendation: Whenever possible, use Wi-Fi when downloading photos using third-party apps or online downloaders.
-
Taking Screenshots:
- Impact: Taking screenshots consumes a negligible amount of data, as it only saves a copy of what’s currently displayed on your screen.
- Recommendation: Screenshots are data-friendly but result in lower image quality.
-
Using AirDrop:
- Impact: AirDrop does not use cellular data, as it transfers files directly between devices using Wi-Fi and Bluetooth.
- Recommendation: AirDrop is a great option for sharing photos with nearby devices without using any of your data plan.
-
Saving from Instagram’s Built-In Features:
- Impact: Saving your own photos using Instagram’s built-in features (e.g., saving stories or posts) also consumes data, but it’s usually minimal.
- Recommendation: These methods are convenient, but be mindful of your data usage if you’re not on Wi-Fi.
15.2 Monitoring and Managing Data Usage:
- Check Data Usage: Go to Settings > Cellular to see how much data you’ve used during the current billing cycle and which apps have used the most data.
- Limit Data Usage for Instagram: In the Cellular settings, you can toggle off cellular data for Instagram to prevent it from using data when you’re not on Wi-Fi.
- Use Wi-Fi Assist: Wi-Fi Assist automatically switches to cellular data when your Wi-Fi connection is weak. You can turn this feature off in Settings > Cellular to prevent unexpected data usage.
Saving Instagram photos on your iPhone is a straightforward process, but it’s essential to be aware of the various methods available, their implications, and the ethical and legal considerations involved. Whether you’re saving photos for inspiration, personal use, or sharing with others, understanding these aspects ensures you’re doing it responsibly and effectively.
Ready to take your photography skills to the next level? Visit dfphoto.net for in-depth tutorials, stunning photo collections, and a vibrant community of photographers in the USA! Explore our resources and connect with fellow photography enthusiasts. Address: 1600 St Michael’s Dr, Santa Fe, NM 87505, United States. Phone: +1 (505) 471-6001. Website: dfphoto.net.
Frequently Asked Questions (FAQs)
-
Is it legal to save photos from Instagram?
It depends. Saving for personal, non-commercial use is generally acceptable, but using photos for commercial purposes without permission is a copyright violation. -
How can I save Instagram photos without losing quality?
The best way is to ask the original poster to send you the photo directly. -
Are third-party Instagram downloader apps safe to use?
Some are, but always check reviews and permissions before using them. Be cautious of apps asking for excessive permissions. -
Can I save photos from a private Instagram account?
Only if you follow the account and have the owner’s permission. -
What is the best way to save Live Photos from Instagram?
Use the iPhone’s screen recording feature and then convert the video to a Live Photo using a third-party app. -
How do I give credit when sharing a saved Instagram photo?
Mention the original poster’s username in your caption. -
What should I do if I accidentally deleted Instagram photos from my iPhone?
Check the “Recently Deleted” album in your Photos app or restore from an iCloud backup. -
Does saving Instagram photos use a lot of data?
It depends on the saving method. Downloading uses more data than taking screenshots. -
Can I save Instagram photos on my computer instead of my iPhone?
Yes, you can use online downloaders on your computer, then transfer the photos to your iPhone. -
How can I manage my iCloud storage when saving many Instagram photos?
Optimize storage by keeping full-resolution originals in iCloud and device-optimized versions on your iPhone, or upgrade your iCloud storage plan.