Saving your iPhone photos to iCloud is essential for safeguarding memories and freeing up device space. At dfphoto.net, we understand the importance of preserving your visual stories. This comprehensive guide will walk you through the process of backing up your precious photos and videos, ensuring they’re safe, accessible, and optimized, thereby enhancing your photography experience and helping you manage your iCloud storage. Let’s explore how to seamlessly integrate iCloud with your iPhone for photo storage.
1. Why Should I Save iPhone Photos to iCloud?
Saving your iPhone photos to iCloud offers several compelling advantages, making it an essential practice for iPhone users who value their memories and data.
1.1. Automatic Backup and Peace of Mind
iCloud provides automatic backups of your photos, ensuring they are safe even if your iPhone is lost, stolen, or damaged. This peace of mind is invaluable, knowing your precious memories are securely stored.
1.2. Access Photos on All Devices
When you save your iPhone photos to iCloud, you can access them on all your Apple devices—iPads, Macs, and even through the iCloud website on a PC. This seamless integration allows you to view, edit, and share your photos from anywhere, enhancing your productivity and convenience.
1.3. Free Up Space on Your iPhone
iCloud Photos offers an “Optimize iPhone Storage” feature. This feature automatically uploads full-resolution photos and videos to iCloud and keeps smaller, space-saving versions on your device. This significantly frees up storage space on your iPhone without sacrificing access to your entire photo library.
1.4. Enhanced Organization and Sharing
iCloud allows you to organize your photos into albums, create shared albums with friends and family, and easily share photos and videos via links. This enhances your ability to manage and share your visual content effectively.
1.5. Protection Against Data Loss
iCloud acts as a safeguard against data loss due to software issues, accidental deletion, or device malfunctions. Having a backup in iCloud ensures that your photos and videos are recoverable, providing an additional layer of security.
2. How Do I Enable iCloud Photos on My iPhone?
Enabling iCloud Photos on your iPhone is a straightforward process. Follow these steps to ensure your photos are automatically backed up to iCloud.
2.1. Open the Settings App
Start by opening the Settings app on your iPhone. This is the app with the gear icon, typically located on your home screen.
2.2. Tap on Your Name
At the top of the Settings menu, tap on your name. This will take you to your Apple ID settings.
2.3. Select iCloud
In the Apple ID settings, tap on “iCloud.” This will display your iCloud storage information and options.
2.4. Choose Photos
Within the iCloud settings, find and tap on “Photos.” This will open the iCloud Photos settings.
2.5. Turn On iCloud Photos
Toggle the switch next to “Sync this iPhone” (or “iCloud Photos” on older iOS versions) to the “on” position. This will enable iCloud Photos and start syncing your photos to iCloud.
2.6. Select Storage Optimization
Under the iCloud Photos settings, you’ll see two options: “Optimize iPhone Storage” and “Download and Keep Originals.” Choose “Optimize iPhone Storage” to save space on your device. This option automatically uploads full-resolution photos to iCloud and keeps smaller, space-saving versions on your iPhone.
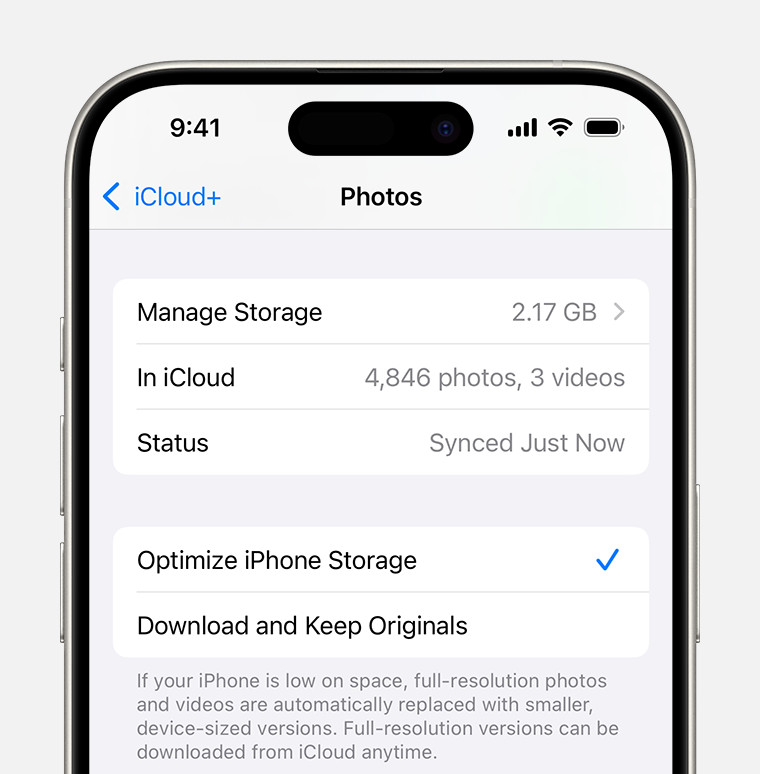 iCloud Photos section of iCloud settings showing status and photo storage options
2.7. Confirm and Wait
Once you’ve enabled iCloud Photos and selected your storage option, your iPhone will begin uploading your photos to iCloud. The time it takes to complete the upload depends on the size of your photo library and your internet connection speed. Ensure your iPhone is connected to Wi-Fi for a faster and more reliable upload.
3. What Are the iCloud Storage Plans and Pricing in the USA?
Understanding iCloud storage plans and pricing is crucial for managing your photo library effectively. Apple offers several iCloud storage plans in the USA to suit different needs.
3.1. Free 5GB Plan
Every Apple ID comes with 5GB of free iCloud storage. This may be sufficient for basic backups and syncing of documents, but it’s often inadequate for storing a large photo library.
3.2. 50GB Plan
The 50GB plan is an affordable option for individuals with a moderate amount of photos and videos. It costs $0.99 per month and provides ample space for most users.
3.3. 200GB Plan
The 200GB plan is ideal for families or individuals with extensive photo and video collections. It costs $2.99 per month and can be shared with up to five family members through Family Sharing.
3.4. 2TB Plan
The 2TB plan is designed for professional photographers or users with very large photo and video libraries. It costs $9.99 per month and can also be shared with family members.
3.5. Upgrading Your iCloud Storage Plan
You can easily upgrade your iCloud storage plan from your iPhone:
- Go to Settings.
- Tap on your name.
- Select iCloud.
- Tap “Manage Account Storage” or “Manage Storage.”
- Choose “Change Storage Plan” or “Upgrade.”
- Select the plan that suits your needs and follow the prompts to confirm your purchase.
3.6. Considerations for Choosing a Plan
When choosing an iCloud storage plan, consider the following:
- Current Storage Usage: Check how much storage you’re currently using to determine the best plan for your needs.
- Future Needs: Anticipate future photo and video storage needs, especially if you plan to take more photos or videos in the future.
- Family Sharing: If you want to share storage with family members, opt for the 200GB or 2TB plan.
- Budget: Consider your budget and choose a plan that offers sufficient storage without breaking the bank.
4. How Do I Manage My iCloud Storage Effectively?
Managing your iCloud storage effectively ensures you have enough space for your photos and other important data. Here are some tips to optimize your iCloud storage:
4.1. Delete Unnecessary Photos and Videos
Regularly review your photo library and delete any photos or videos you no longer need. This includes duplicates, blurry images, and unwanted screenshots.
4.2. Remove Large Attachments from Mail
Large email attachments can consume significant iCloud storage. Delete emails with large attachments that you no longer need.
4.3. Manage App Backups
Some apps back up large amounts of data to iCloud. Review your app backups and disable backups for apps that don’t require it.
To manage app backups:
- Go to Settings.
- Tap on your name.
- Select iCloud.
- Tap “Manage Account Storage” or “Manage Storage.”
- Choose “Backups.”
- Select your device.
- Toggle off the apps you don’t want to back up.
4.4. Use iCloud Drive Wisely
iCloud Drive stores documents, files, and folders in iCloud. Organize your files and delete any unnecessary documents to free up storage.
4.5. Optimize Photo Storage Settings
Ensure you’ve selected “Optimize iPhone Storage” in your iCloud Photos settings. This helps save space on your device by storing full-resolution photos in iCloud and keeping smaller versions on your iPhone.
4.6. Periodically Review Your Storage Usage
Regularly check your iCloud storage usage to identify areas where you can free up space. This helps you stay on top of your storage needs and avoid running out of space.
4.7. Consider External Storage Solutions
For long-term storage of large photo and video archives, consider using external hard drives or cloud storage services like Google Photos or Dropbox. This can supplement your iCloud storage and provide additional backup options.
5. What Are the Best Practices for Organizing Photos in iCloud?
Organizing your photos in iCloud ensures they are easy to find, manage, and share. Here are some best practices for organizing your photo library:
5.1. Create Albums
Use albums to group your photos by event, location, or theme. This makes it easier to find specific photos and share them with others.
To create an album:
- Open the Photos app.
- Tap the “Albums” tab.
- Tap the “+” button to create a new album.
- Give your album a name and add photos to it.
5.2. Use Smart Albums
Smart Albums automatically organize your photos based on criteria like date, location, or people. This can save you time and effort in organizing your photo library.
5.3. Add Captions and Keywords
Add captions and keywords to your photos to make them searchable. This helps you quickly find specific photos based on their content.
To add captions and keywords:
- Open a photo.
- Swipe up to see the photo’s information.
- Add a caption and keywords to the photo.
5.4. Use Facial Recognition
iCloud Photos uses facial recognition to identify people in your photos. Label the faces to easily find photos of specific people.
To use facial recognition:
- Open the Photos app.
- Tap the “Albums” tab.
- Scroll down to “People & Places” and tap “People.”
- Label the faces in your photos.
5.5. Create Shared Albums
Create shared albums to share photos and videos with friends and family. This allows everyone to view, comment on, and add photos to the album.
To create a shared album:
- Open the Photos app.
- Tap the “Albums” tab.
- Tap the “+” button and choose “New Shared Album.”
- Give your album a name and invite people to join.
5.6. Regularly Review and Clean Up
Regularly review your photo library and clean up any unnecessary photos, duplicates, or poorly organized albums. This helps keep your photo library manageable and easy to navigate.
6. How Can I Troubleshoot Common iCloud Photos Issues?
While iCloud Photos is generally reliable, you may encounter occasional issues. Here are some common problems and how to troubleshoot them:
6.1. Photos Not Syncing to iCloud
If your photos are not syncing to iCloud, try the following:
- Check Your Internet Connection: Ensure your iPhone is connected to a stable Wi-Fi network.
- Verify iCloud Photos is Enabled: Go to Settings > [Your Name] > iCloud > Photos and make sure “Sync this iPhone” is turned on.
- Check iCloud Storage: Ensure you have enough available storage in iCloud.
- Restart Your iPhone: Restarting your iPhone can resolve many syncing issues.
- Update to the Latest iOS Version: Ensure your iPhone is running the latest version of iOS.
6.2. iCloud Storage Full
If your iCloud storage is full, you can either upgrade your storage plan or free up space by deleting unnecessary photos, videos, and other data.
6.3. Photos Missing from iCloud
If photos are missing from iCloud, check the “Recently Deleted” album in the Photos app. Photos in this album can be recovered within 30 days. If the photos are not in the “Recently Deleted” album, they may have been permanently deleted.
6.4. Slow Upload or Download Speeds
Slow upload or download speeds can be caused by a poor internet connection or a large photo library. Try the following:
- Use a Faster Internet Connection: Connect to a faster Wi-Fi network.
- Upload During Off-Peak Hours: Upload your photos during off-peak hours when internet traffic is lower.
- Pause and Resume Uploads: Pause and resume the upload process to refresh the connection.
6.5. iCloud Photos Not Showing on Other Devices
If your iCloud Photos are not showing on other devices, ensure that iCloud Photos is enabled on all devices and that you are signed in with the same Apple ID.
6.6. Contact Apple Support
If you’ve tried these troubleshooting steps and are still experiencing issues, contact Apple Support for further assistance.
7. How to optimize iPhone photos for sharing and storing?
Optimizing iPhone photos for sharing and storing involves adjusting settings and using techniques to balance image quality with file size. This ensures your photos look great while remaining manageable and efficient to store and share.
7.1. Adjust Camera Settings
Optimize your iPhone camera settings to strike a balance between image quality and file size.
High Efficiency vs. Most Compatible
Go to Settings > Camera > Formats.
Choose High Efficiency for HEIF/HEVC formats, which offer better compression and smaller file sizes while maintaining image quality. If you need maximum compatibility with older devices, choose Most Compatible, but be aware this results in larger JPEG files.
HDR (High Dynamic Range)
In Settings > Camera, enable Smart HDR to automatically enhance the dynamic range of your photos. HDR photos can sometimes be larger, but the improved quality often makes it worth it.
7.2. Use iCloud Photos Efficiently
iCloud Photos provides options to optimize storage and sharing of your photos.
Optimize iPhone Storage
Enable Optimize iPhone Storage in Settings > [Your Name] > iCloud > Photos. This setting automatically uploads full-resolution photos and videos to iCloud and keeps smaller, device-optimized versions on your iPhone.
Download and Keep Originals
If you prefer to keep full-resolution photos on your device, choose Download and Keep Originals. However, be mindful of your device’s storage capacity.
7.3. Resize Photos Before Sharing
Consider resizing your photos before sharing them, especially if you’re sending them via email or uploading them to social media.
Using Third-Party Apps
Use apps like Image Size, Resize Me!, or Desqueeze to quickly resize photos on your iPhone. These apps allow you to specify the desired dimensions or file size.
Using Built-In Mail App
When emailing photos, the Mail app provides options to resize the image before sending it. Choose a smaller size to reduce the file size of the email.
7.4. Compress Photos
Compressing photos reduces their file size without significantly impacting their visual quality.
Online Compression Tools
Use online tools like TinyPNG or JPEG Optimizer to compress photos directly from your web browser. These tools use algorithms to reduce file size while preserving image quality.
Third-Party Compression Apps
Apps like Compressor or Photo Resizer offer more advanced compression options and batch processing capabilities.
7.5. Convert to JPEG
If your photos are in a format like PNG, consider converting them to JPEG, as JPEG generally offers better compression for photos.
Using Online Converters
Use online converters like CloudConvert or Zamzar to convert photos from PNG to JPEG.
Using Third-Party Apps
Apps like Image Converter or Media Converter can convert photos between various formats directly on your iPhone.
7.6. Use Shared Albums Strategically
iCloud Shared Albums optimize photos for sharing, reducing their file size while maintaining acceptable quality.
Create Shared Albums
Create shared albums for sharing photos with friends and family. Shared Albums automatically optimize photos for viewing on different devices.
Limit Shared Album Size
Be mindful of the number of photos you add to shared albums, as larger albums can consume more iCloud storage.
7.7. Optimize Live Photos
Live Photos capture a few seconds of video along with the still image, resulting in larger file sizes.
Turn Off Live Photos
Disable Live Photos for static subjects or scenes where the motion isn’t necessary.
Edit Live Photos
Trim Live Photos to reduce the length of the video portion, thereby reducing the file size.
7.8. Use Third-Party Cloud Storage
Consider using third-party cloud storage services like Google Photos, Dropbox, or OneDrive, which offer options to compress and optimize photos for storage.
Google Photos
Google Photos offers free unlimited storage for photos that are compressed to “High Quality,” which is usually sufficient for most users.
Dropbox and OneDrive
Dropbox and OneDrive offer options to compress photos when uploading them to the cloud.
7.9. Regularly Clear Out Unnecessary Photos and Videos
Regularly review your photo library and delete any unnecessary photos, videos, and screenshots. This helps keep your photo library manageable and frees up storage space.
Use Smart Albums
Use Smart Albums in the Photos app to quickly identify and delete duplicate photos, blurry images, and unwanted screenshots.
Review Recently Deleted
Check the Recently Deleted album in the Photos app and permanently delete any items you no longer need.
8. Understanding iCloud Photo Library vs. My Photo Stream
Understanding the differences between iCloud Photo Library and My Photo Stream is crucial for managing your photos effectively. Both services sync photos across your Apple devices, but they work in different ways.
8.1. iCloud Photo Library
iCloud Photo Library is a comprehensive photo syncing service that stores all your photos and videos in iCloud.
Storage
iCloud Photo Library uses your iCloud storage quota. This means that the photos and videos you store in iCloud Photo Library count towards your total iCloud storage limit, which is 5GB for free accounts and can be upgraded to larger plans.
Syncing
iCloud Photo Library syncs all your photos and videos across all your Apple devices, including iPhones, iPads, and Macs. Any changes you make to your photos on one device, such as edits, deletions, or organization into albums, are automatically synced to all your other devices.
Optimization
iCloud Photo Library offers an “Optimize iPhone Storage” feature, which stores full-resolution photos and videos in iCloud and keeps smaller, device-optimized versions on your iPhone. This helps save space on your device while still allowing you to access your entire photo library.
Backup
iCloud Photo Library serves as a backup for your photos and videos, ensuring that they are safe even if your device is lost, stolen, or damaged.
8.2. My Photo Stream
My Photo Stream is a more basic photo syncing service that automatically uploads your most recent photos to iCloud and pushes them to your other devices.
Storage
My Photo Stream does not use your iCloud storage quota. Photos uploaded to My Photo Stream do not count towards your iCloud storage limit.
Syncing
My Photo Stream syncs your most recent photos (up to 1,000 photos from the past 30 days) across your Apple devices. However, it does not sync videos or Live Photos.
Optimization
My Photo Stream does not offer any storage optimization features. Photos are stored in their original resolution on all your devices.
Backup
My Photo Stream is not a backup service. Photos are only stored in iCloud temporarily (for 30 days) and are not guaranteed to be permanently stored.
8.3. Key Differences
Here’s a table summarizing the key differences between iCloud Photo Library and My Photo Stream:
| Feature | iCloud Photo Library | My Photo Stream |
|---|---|---|
| Storage | Uses iCloud storage quota | Does not use iCloud storage quota |
| Syncing | All photos and videos | Recent photos only (up to 1,000) |
| Videos | Supported | Not supported |
| Live Photos | Supported | Not supported |
| Optimization | Offers storage optimization | No storage optimization |
| Backup | Serves as a backup | Not a backup service |
8.4. Recommendation
For most users, iCloud Photo Library is the recommended option, as it offers a more comprehensive and reliable way to sync and back up your photos and videos. My Photo Stream can be useful for users who want a basic photo syncing service without using their iCloud storage quota, but it is important to note that it does not sync videos or Live Photos and is not a backup service.
9. How to Use Shared Albums in iCloud Photos?
Shared Albums in iCloud Photos provide a fantastic way to share photos and videos with friends and family. Here’s how to use them effectively:
9.1. Creating a Shared Album
- Open the Photos App: Launch the Photos app on your iPhone or iPad.
- Go to Albums: Tap the “Albums” tab at the bottom of the screen.
- Create New Album: Tap the “+” button in the upper-left corner and select “New Shared Album.”
- Name Your Album: Give your shared album a descriptive name.
- Invite People: Enter the names or email addresses of the people you want to invite to the album. You can invite contacts directly from your address book.
- Tap Create: Once you’ve added all the invitees, tap “Create.”
9.2. Adding Photos and Videos to a Shared Album
- Select Photos: Open the Photos app and select the photos and videos you want to add to the shared album.
- Tap Share: Tap the Share button (the square with an arrow pointing up).
- Choose Shared Album: Scroll through the share options and tap “Shared Albums.”
- Select Album: Choose the shared album you want to add the selected media to.
- Post Comment (Optional): Add a comment to the photos or videos.
- Tap Post: Tap “Post” to add the media to the shared album.
9.3. Viewing Shared Albums
- Open the Photos App: Launch the Photos app on your iPhone or iPad.
- Go to Albums: Tap the “Albums” tab at the bottom of the screen.
- Scroll to Shared Albums: Scroll down to the “Shared Albums” section.
- Select Album: Tap the shared album you want to view.
9.4. Inviting More People
- Open the Photos App: Launch the Photos app on your iPhone or iPad.
- Go to Albums: Tap the “Albums” tab at the bottom of the screen.
- Scroll to Shared Albums: Scroll down to the “Shared Albums” section.
- Select Album: Tap the shared album you want to manage.
- Tap People: Tap the “People” icon at the bottom of the screen.
- Invite People: Tap “Invite People” and enter the names or email addresses of the new invitees.
- Tap Add: Tap “Add” to send the invitations.
9.5. Managing Notifications
- Open the Settings App: Launch the Settings app on your iPhone or iPad.
- Tap Notifications: Scroll down and tap “Notifications.”
- Scroll to Photos: Find and tap “Photos.”
- Customize Notifications: Customize the notification settings for shared albums, such as enabling or disabling alerts, sounds, and badges.
9.6. Tips for Using Shared Albums
- Name Albums Clearly: Use descriptive names for your shared albums so invitees know what to expect.
- Moderate Content: As the album creator, you can remove inappropriate content posted by others.
- Use Comments: Encourage participants to add comments to photos and videos to create a more interactive experience.
- Respect Privacy: Be mindful of the privacy of others when sharing photos and videos.
- Use Wi-Fi: When adding large numbers of photos or videos, use a Wi-Fi connection to avoid using excessive cellular data.
10. How to Transfer Photos from iPhone to iCloud Drive?
Transferring photos from your iPhone to iCloud Drive can be useful for organizing files, sharing them more broadly, or simply having an additional backup. Here’s how to do it:
10.1. Using the Files App
The Files app is the most straightforward way to transfer photos to iCloud Drive.
- Open the Photos App: Launch the Photos app on your iPhone.
- Select Photos: Select the photos you want to transfer to iCloud Drive.
- Tap Share: Tap the Share button (the square with an arrow pointing up).
- Choose Save to Files: Scroll through the share options and tap “Save to Files.”
- Select iCloud Drive Location: Choose a folder in iCloud Drive where you want to save the photos. You can create a new folder if needed.
- Tap Save: Tap “Save” to transfer the photos to iCloud Drive.
10.2. Using the iCloud Website
You can also transfer photos to iCloud Drive using the iCloud website on a computer.
- Open a Web Browser: On your computer, open a web browser and go to iCloud.com.
- Sign In: Sign in with your Apple ID and password.
- Open Photos: Click the “Photos” icon.
- Select Photos: Select the photos you want to download.
- Download Photos: Click the download button (the cloud with a downward arrow) to download the selected photos to your computer.
- Open iCloud Drive: Go back to the main iCloud page and click the “iCloud Drive” icon.
- Upload Photos: Drag and drop the downloaded photos from your computer into the desired folder in iCloud Drive. Alternatively, click the upload button (the cloud with an upward arrow) and select the photos from your computer.
10.3. Using Third-Party Apps
Several third-party apps can help you transfer photos to iCloud Drive more efficiently.
- Download a File Manager App: Download a file manager app from the App Store, such as “Documents by Readdle” or “File Manager.”
- Open the App: Launch the file manager app.
- Connect to iCloud Drive: Connect the app to your iCloud Drive account.
- Select Photos: Use the app to select the photos you want to transfer from your Photos app.
- Transfer to iCloud Drive: Use the app’s file management features to transfer the photos to a folder in iCloud Drive.
10.4. Creating a New Folder in iCloud Drive
- Open the Files App: Launch the Files app on your iPhone.
- Browse iCloud Drive: Tap “Browse” at the bottom of the screen and select “iCloud Drive.”
- Create New Folder: Tap the “…” button in the upper-right corner and select “New Folder.”
- Name the Folder: Give the new folder a descriptive name.
- Tap Done: Tap “Done” to create the new folder.
10.5. Accessing Photos in iCloud Drive
- Open the Files App: Launch the Files app on your iPhone.
- Browse iCloud Drive: Tap “Browse” at the bottom of the screen and select “iCloud Drive.”
- Navigate to Folder: Navigate to the folder where you saved the photos.
- View Photos: Tap the photos to view them.
10.6. Tips for Transferring Photos
- Use Wi-Fi: Use a Wi-Fi connection to avoid using excessive cellular data when transferring large numbers of photos.
- Organize Folders: Organize your photos into folders in iCloud Drive to make them easier to find and manage.
- Check Storage: Ensure you have enough available storage in iCloud Drive before transferring photos.
- Verify Transfer: After transferring photos, verify that they have been successfully uploaded to iCloud Drive.
- Use Batch Transfer: When transferring a large number of photos, use batch transfer options to speed up the process.
At dfphoto.net, we believe in making photography accessible and enjoyable for everyone. Understanding How To Save Iphone Photos To Icloud is a key step in managing your visual content and ensuring its safety.
Address: 1600 St Michael’s Dr, Santa Fe, NM 87505, United States.
Phone: +1 (505) 471-6001.
Website: dfphoto.net.
Visit dfphoto.net to explore more photography tips, view stunning images, and connect with a thriving community of photography enthusiasts. Discover tutorials, gear reviews, and inspiring content to fuel your passion for photography.
FAQ: Saving iPhone Photos to iCloud
1. How do I check if my iPhone photos are being saved to iCloud?
Go to Settings > [Your Name] > iCloud > Photos. Ensure “Sync this iPhone” is turned on. If it’s on, your photos are being saved to iCloud.
2. What happens if my iCloud storage is full?
If your iCloud storage is full, new photos and videos will not be backed up to iCloud. You’ll need to either upgrade your storage plan or free up space by deleting unnecessary items.
3. Can I access my iCloud photos on a non-Apple device?
Yes, you can access your iCloud photos on a non-Apple device by visiting iCloud.com and signing in with your Apple ID.
4. How do I delete photos from iCloud to free up storage?
Open the Photos app, select the photos you want to delete, and tap the trash icon. Then, go to the “Recently Deleted” album and permanently delete the photos to free up storage.
5. Is it safe to store my photos in iCloud?
Yes, iCloud uses encryption to protect your data. However, it’s always a good idea to use a strong password and enable two-factor authentication for added security.
6. How long does it take to upload photos to iCloud?
The time it takes to upload photos to iCloud depends on the size of your photo library and your internet connection speed. Ensure your iPhone is connected to Wi-Fi for a faster upload.
7. What is the difference between “Optimize iPhone Storage” and “Download and Keep Originals”?
“Optimize iPhone Storage” saves space on your device by storing full-resolution photos in iCloud and keeping smaller versions on your iPhone. “Download and Keep Originals” keeps full-resolution photos on both your iPhone and in iCloud, which consumes more device storage.
8. Can I share my iCloud storage with my family?
Yes, you can share the 200GB and 2TB iCloud storage plans with up to five family members through Family Sharing.
9. What happens to my photos if I cancel my iCloud subscription?
If you cancel your iCloud subscription, you will have a limited time to download your photos before they are removed from iCloud. Ensure you have a backup of your photos before canceling your subscription.
10. How do I turn off iCloud Photos if I no longer want to use it?
Go to Settings > [Your Name] > iCloud > Photos and toggle the switch next to “Sync this iPhone” to the “off” position. Note that this will stop syncing your photos to iCloud, but your photos will remain in iCloud unless you manually delete them.