Whether you’re archiving cherished family memories, compiling inspiration for a creative project, or grabbing essential visuals for a presentation, knowing how to save photos on your Mac is a fundamental skill. Fortunately, macOS offers multiple straightforward ways to capture and store images from almost any source, be it a website, social media, or even a document.
In fact, there are three primary methods to save photos on your Mac, each providing a slightly different approach and level of control. Understanding these methods will empower you to efficiently manage and organize your visual content. Let’s explore these techniques to ensure you can save any photo you need, exactly where you want it on your Mac.
Method 1: The Classic Right-Click to Save
For many online images, the right-click (or Control-click) method is the most versatile and commonly used way to save them on a Mac. This technique gives you the most control over the saving process, allowing you to rename the file and choose its precise destination folder. Remember, on a Mac trackpad, a two-finger tap acts as a right-click. If you are using a mouse without a right-click button, holding down the Control key while clicking achieves the same result.
Step-by-step guide to right-clicking and saving:
- Right-click directly on the photo you wish to save. A context menu will appear, offering various options related to the image.
 Right-click menu showing "Save Image As…" option
-
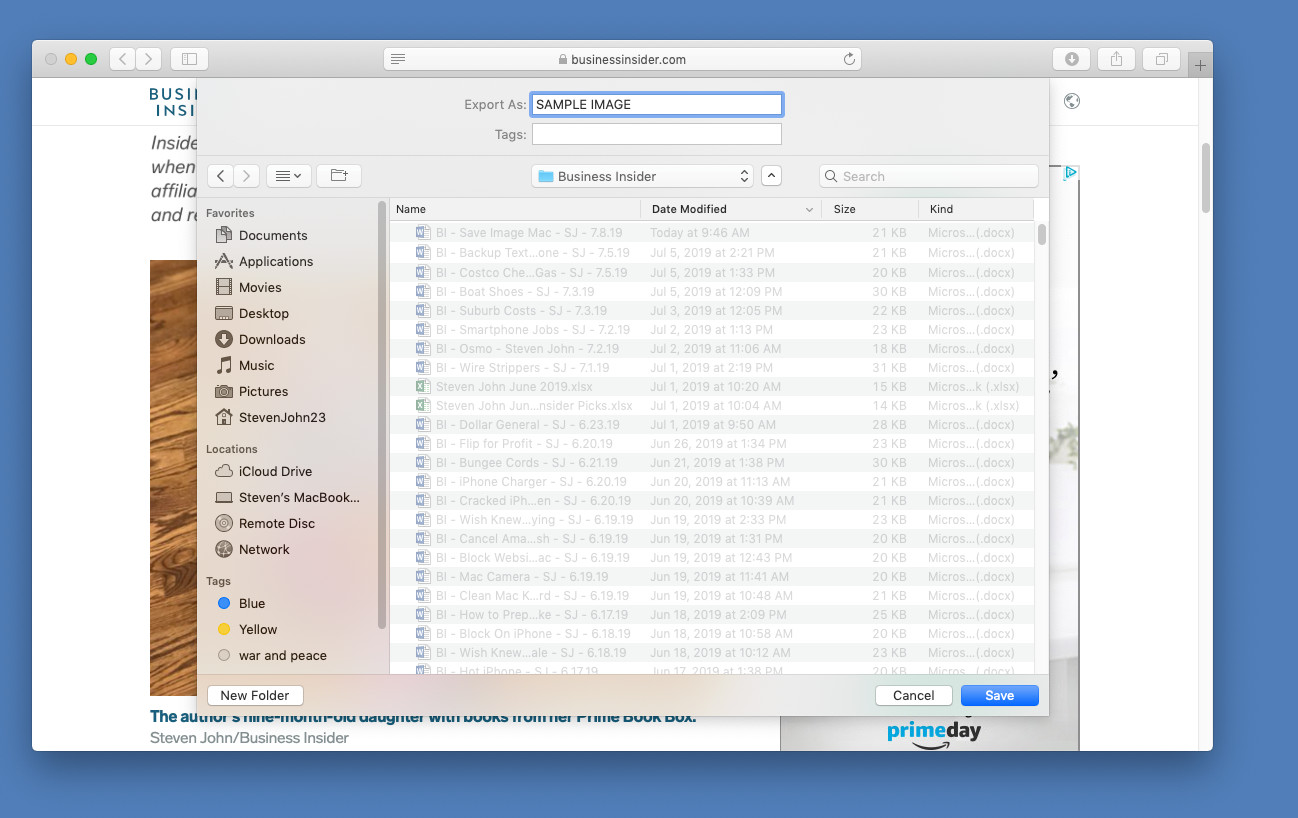
From the dropdown menu, select “Save Image As…”. This will open a Finder window, prompting you to specify the file name and save location.
-
In the Finder window, enter your desired file name for the photo. This is an excellent opportunity to give the image a descriptive name for easy identification later.
-
Choose the location where you want to save the photo. You can select any folder on your Mac, such as your Desktop, Downloads folder, Pictures library, or a custom folder you’ve created.
-
Click the blue “Save” button to finalize the process. The photo will now be saved to your chosen location with the filename you specified.
 Finder window for saving image, showing file name and save button
Method 2: Quick Drag-and-Drop Saving
If speed and simplicity are your priorities, the drag-and-drop method offers the fastest way to save a photo on your Mac. While it sacrifices the file renaming step of the right-click method, it’s incredibly efficient for quickly grabbing images and placing them directly into a desired location.
Simple steps for drag-and-drop saving:
-
Click and hold your left mouse button (or trackpad) directly on the photo you intend to save.
-
Drag the photo while holding the mouse button. As you drag, you can move your cursor to your desired destination. This could be your desktop, an open folder window, a folder in your Dock, or even directly into an application like Pages or Microsoft Word.
-
Release the mouse button when you hover over your chosen destination. A green circle with a “+” symbol will appear as you drag over valid drop locations, indicating that you can release the image. Upon releasing, the photo will be instantly saved to that location, typically with its default filename.
Method 3: Capture Anything with Screenshots
The screenshot method, also known as screen capture, is a powerful technique for saving photos on a Mac, particularly when dealing with images that are otherwise difficult to download directly. This is especially useful for saving photos from platforms like Instagram, or even extracting images from protected PDFs or videos. By capturing what’s displayed on your screen, you can save virtually any image you see.
Two primary screenshot options for saving photos:
-
Capture a specific portion of the screen: Press and hold the “Command + Shift + 4” keys simultaneously. Your cursor will transform into a crosshair. Click and drag to draw a rectangle around the specific photo or area you want to capture. Once you release the mouse button, a screenshot of the selected area will be saved as a file.
-
Capture the entire screen: Press and hold the “Command + Shift + 3” keys together. This will instantly capture a screenshot of your entire monitor display.
In both screenshot methods, the captured image file is automatically saved to your Mac’s desktop by default. You can then easily move and rename the screenshot file as needed to organize your saved photos.
By mastering these three methods – right-clicking, drag-and-drop, and screenshotting – you’ll be well-equipped to save any photo you encounter on your Mac, ensuring you can collect and manage your visual content with ease and efficiency.