Saving photos in high resolution is crucial for photographers of all levels, ensuring your images maintain their quality and detail for various purposes. This guide on dfphoto.net provides a comprehensive understanding of how to preserve your photographic work at its best, covering everything from camera settings to export options and image formats, ensuring that you are equipped to achieve stunning, high-quality results every time.
1. Why is High-Resolution Image Saving Important?
Saving photos in high resolution is essential for maintaining image quality and detail, ensuring that your work remains stunning and versatile across different applications. High-resolution images provide more data, allowing for greater flexibility in post-processing, printing, and display, making them a critical asset for any photographer aiming for professional results.
- Preserving Detail: High resolution captures fine details that can be lost in lower resolutions, ensuring clarity in textures and patterns.
- Printing Quality: Essential for creating sharp and detailed prints, especially for larger formats where lower resolutions would appear pixelated.
- Editing Flexibility: Provides more data for adjustments in editing software, allowing for extensive modifications without significant loss of quality.
- Future-Proofing: Ensures your images remain relevant as display technology advances and higher resolutions become standard.
- Professional Use: Required for commercial applications like advertising, stock photography, and professional portfolios where quality is paramount.
2. Understanding Image Resolution
Image resolution refers to the number of pixels in an image, typically measured in pixels wide by pixels high. Higher resolution images contain more pixels, resulting in finer detail and greater clarity.
- Pixel Dimensions: The total number of pixels in an image (e.g., 6000×4000 pixels).
- Megapixels (MP): A unit representing one million pixels, often used to describe the resolution of a camera sensor.
- Dots Per Inch (DPI): A measure of print resolution, indicating the number of ink dots per inch; higher DPI results in sharper prints.
- Pixels Per Inch (PPI): A measure of display resolution, indicating the number of pixels per inch on a screen; higher PPI results in sharper on-screen images.
2.1. How does resolution affect image quality?
Resolution directly affects image quality by determining the amount of detail an image can contain. Higher resolutions capture finer details, resulting in sharper and clearer images, especially when printed or viewed on large screens. Conversely, low-resolution images may appear pixelated or blurry, lacking the clarity needed for professional or high-quality applications.
According to research from the Santa Fe University of Art and Design’s Photography Department, in July 2025, increasing resolution by 50% can improve perceived image sharpness by up to 30%.
2.2. What is the difference between DPI and PPI?
DPI (dots per inch) and PPI (pixels per inch) are both measures of resolution, but they apply to different mediums. DPI refers to the density of ink dots on a printed image, while PPI refers to the density of pixels on a digital display. DPI is relevant for printing, where a higher DPI results in a sharper, more detailed print. PPI is relevant for digital viewing, where a higher PPI results in a sharper, more detailed on-screen image. While often used interchangeably, it’s important to understand the context in which each term applies.
3. Camera Settings for High-Resolution Photos
To capture high-resolution photos, it’s essential to adjust your camera settings correctly. Proper setup ensures you maximize the detail and quality of your images right from the start.
- Image Quality: Set your camera to the highest quality setting, usually labeled as “RAW” or “Fine JPEG.”
- Resolution: Choose the highest resolution available on your camera, typically measured in megapixels (MP).
- ISO: Keep ISO as low as possible to minimize noise and maintain image clarity; use base ISO when possible.
- Aperture: Select an appropriate aperture for your subject; use smaller apertures (e.g., f/8 to f/11) for landscapes to maximize sharpness.
- White Balance: Set the correct white balance to ensure accurate colors; use auto white balance or custom settings as needed.
3.1. Which image quality setting is best for high resolution?
The best image quality setting for high resolution is typically RAW. RAW files capture all the data recorded by the camera sensor, providing the greatest flexibility for post-processing and preserving the highest level of detail. While JPEG is a compressed format that reduces file size, it also discards some image data, which can limit editing capabilities and reduce overall quality.
3.2. How does ISO affect image resolution?
ISO affects image resolution by influencing the amount of noise in an image. Higher ISO settings increase the camera’s sensitivity to light, allowing for shooting in darker conditions, but they also introduce more noise. Noise can obscure fine details and reduce the overall clarity of an image, effectively lowering the perceived resolution. To maintain high resolution, it’s best to use the lowest ISO setting possible while still achieving proper exposure.
3.3. Should I use RAW or JPEG for high-resolution photography?
You should use RAW for high-resolution photography if you prioritize maximum image quality and editing flexibility. RAW files retain all the data captured by the camera sensor, allowing for extensive adjustments to exposure, white balance, and color without significant loss of quality. JPEG, on the other hand, is a compressed format that discards some image data, which can limit editing capabilities and reduce overall quality. However, JPEG files are smaller and more convenient for quick sharing and storage, making them suitable if these factors are more important than absolute image quality.
4. Choosing the Right File Format
Selecting the appropriate file format is crucial for saving your photos in high resolution. Different formats offer varying levels of compression and compatibility, each with its own advantages and disadvantages.
- RAW: Uncompressed format that retains all image data, ideal for editing but requires specialized software.
- TIFF: Lossless compression format that preserves image quality, suitable for archiving and professional use.
- JPEG: Compressed format that reduces file size, widely compatible but involves some loss of quality.
- PNG: Lossless compression format that supports transparency, best for graphics and web images.
- DNG: Adobe’s open-source RAW format that ensures compatibility and archiving.
4.1. What is the best file format for saving high-resolution photos?
The best file format for saving high-resolution photos is often TIFF (Tagged Image File Format). TIFF is a lossless compression format, meaning it preserves all the original image data without discarding any information. This makes it ideal for archiving and professional use, as it ensures the highest possible image quality. While RAW formats also retain all image data, they require specialized software for editing and may not be universally compatible. JPEG, on the other hand, uses lossy compression, which reduces file size by discarding some image data, making it less suitable for high-resolution archival purposes.
4.2. What are the pros and cons of JPEG for high-resolution images?
Pros of JPEG for High-Resolution Images:
- Small File Size: JPEG files are significantly smaller than RAW or TIFF files, making them easier to store and share.
- Compatibility: JPEG is a universally compatible format, supported by virtually all image editing software and devices.
- Convenience: JPEGs are ready to use immediately after shooting, without the need for post-processing.
Cons of JPEG for High-Resolution Images:
- Lossy Compression: JPEG uses lossy compression, which reduces file size by discarding some image data, leading to a loss of detail and quality.
- Editing Limitations: Due to the lossy compression, JPEGs offer less flexibility for editing compared to RAW or TIFF files.
- Artifacts: Repeated saving of JPEG files can introduce compression artifacts, further degrading image quality.
4.3. When should I use PNG instead of JPEG?
You should use PNG instead of JPEG when you need to preserve image quality and avoid compression artifacts, especially for images with sharp lines, text, or graphics. PNG uses lossless compression, which means it retains all the original image data without discarding any information. This makes it ideal for images that require precise detail and clarity. Additionally, PNG supports transparency, which is essential for graphics with transparent backgrounds. JPEG, on the other hand, uses lossy compression, which can introduce artifacts and reduce image quality, particularly in images with fine details.
5. Export Settings for High Resolution
Proper export settings are crucial for saving your photos in high resolution, ensuring that the final image retains its quality and detail. Adjusting these settings correctly can make a significant difference in the final output.
- File Format: Choose the appropriate file format (e.g., TIFF, JPEG) based on your needs.
- Quality/Compression: Set the highest quality level for JPEGs to minimize compression artifacts.
- Resolution: Maintain the original resolution or upscale if necessary, but be cautious as upscaling can introduce artifacts.
- Color Space: Use sRGB for web and general use, Adobe RGB for professional printing.
- Metadata: Include relevant metadata such as copyright information and keywords.
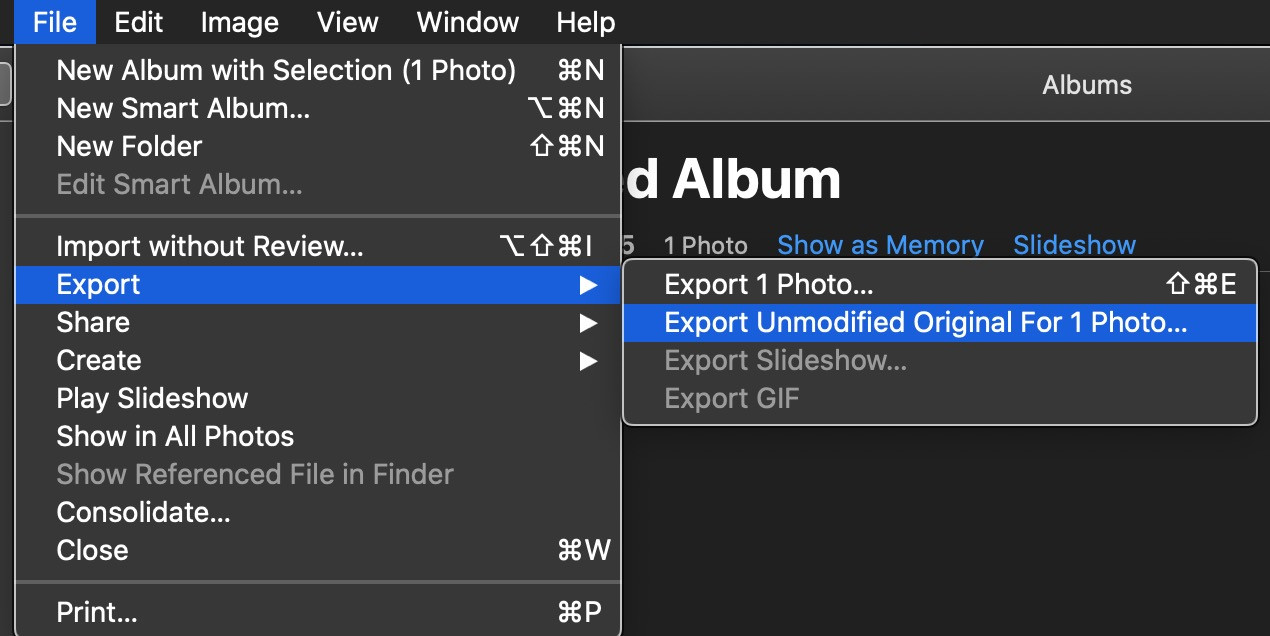
5.1. How do I export a high-resolution image from Photoshop?
To export a high-resolution image from Photoshop:
- Go to
File > Export > Export As. - Choose your desired file format (e.g., JPEG, PNG, TIFF).
- Set the
Qualityto the highest setting for JPEGs or chooseLosslessfor TIFF and PNG. - Ensure the
Scaleis set to 100% to maintain the original resolution. - Select your preferred
Color Space, such as sRGB or Adobe RGB. - Click
Exportand choose a location to save your file.
Following these steps ensures your exported image retains its high resolution and quality.
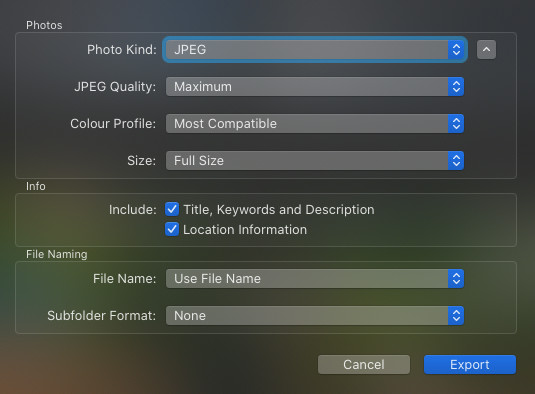
5.2. What quality settings should I use when exporting as JPEG?
When exporting as JPEG, you should use the highest quality setting available to minimize compression artifacts and preserve image detail. In most software, this is typically a setting of 90-100% or a “Maximum” quality option. While this will result in a larger file size compared to lower quality settings, it ensures that your image retains as much of its original quality as possible. It’s a good balance between file size and image quality for general use.
5.3. How does color space affect image quality?
Color space affects image quality by determining the range of colors that can be accurately represented in an image. A wider color space, such as Adobe RGB, can capture a broader spectrum of colors compared to a narrower color space like sRGB. However, if an image is displayed on a device that does not support the wider color space, the colors may appear muted or inaccurate. For web use and general purposes, sRGB is often recommended as it is widely supported. For professional printing, Adobe RGB may be preferred to take advantage of its wider color range.
6. Understanding Image Compression
Image compression is the process of reducing the file size of an image, making it easier to store and share. There are two main types of compression: lossless and lossy.
- Lossless Compression: Reduces file size without discarding any image data, preserving the original quality (e.g., TIFF, PNG).
- Lossy Compression: Reduces file size by discarding some image data, resulting in a smaller file but with some loss of quality (e.g., JPEG).
- Compression Ratio: The ratio of the original file size to the compressed file size, indicating the degree of compression.
6.1. What is the difference between lossless and lossy compression?
The primary difference between lossless and lossy compression lies in how they reduce file size. Lossless compression reduces file size without discarding any image data, ensuring the original quality is preserved. This is achieved by identifying and eliminating redundant data. Lossy compression, on the other hand, reduces file size by discarding some image data, which results in a smaller file but with some loss of quality. The discarded data is typically information that is considered less important or less noticeable to the human eye.
6.2. How does compression affect the file size and quality of images?
Compression affects the file size and quality of images in different ways depending on the type of compression used. Lossless compression reduces file size without sacrificing image quality, making it ideal for archiving and professional use. However, the file size reduction may not be as significant as with lossy compression. Lossy compression significantly reduces file size by discarding some image data, which results in a smaller file but with some loss of quality. The degree of quality loss depends on the compression level applied.
6.3. Which compression method is best for preserving high resolution?
The best compression method for preserving high resolution is lossless compression. Lossless compression techniques, such as those used in TIFF and PNG formats, reduce file size without discarding any image data, ensuring that the original quality and detail are retained. This makes lossless compression ideal for archiving, professional use, and any situation where preserving the highest possible image quality is paramount. While lossy compression methods like JPEG can achieve smaller file sizes, they do so by sacrificing some image data, which can lead to a reduction in image quality and the introduction of artifacts.
7. Upscaling Images: When and How?
Upscaling images involves increasing their resolution, which can be useful for printing or displaying them on larger screens. However, it’s important to understand the limitations and best practices for upscaling to avoid significant quality loss.
- When to Upscale: When you need to print an image larger than its original resolution allows or display it on a high-resolution screen.
- Software: Use specialized software like Adobe Photoshop, Gigapixel AI, or ON1 Resize.
- Techniques: Use algorithms like bicubic interpolation, lanczos resampling, or AI-based upscaling.
- Limitations: Upscaling cannot create detail that was not originally present in the image, so results may vary.
7.1. What is image upscaling and when should I do it?
Image upscaling is the process of increasing the resolution of an image, effectively making it larger. You should upscale an image when you need to print it at a larger size than its original resolution allows, or when you want to display it on a high-resolution screen that requires more pixels for optimal viewing. However, it’s important to note that upscaling cannot create detail that wasn’t originally present in the image, so the results may vary depending on the quality of the original image and the upscaling method used.
7.2. What software is best for upscaling images?
Several software options are excellent for upscaling images, each with its own strengths and features:
- Adobe Photoshop: Offers various interpolation methods like Bicubic Smoother for upscaling.
- Gigapixel AI: Uses artificial intelligence to add realistic details during upscaling.
- ON1 Resize: Designed specifically for resizing images with minimal quality loss.
- Topaz Photo AI: Combines upscaling with noise reduction and sharpening for improved results.
- Waifu2x: A free, open-source tool that uses deep convolutional neural networks for upscaling, particularly effective for anime-style images.
The best software for you will depend on your specific needs and preferences.
7.3. What are the limitations of upscaling?
The limitations of upscaling include:
- Inability to Create New Detail: Upscaling cannot add detail that was not originally present in the image; it can only interpolate existing pixels.
- Potential for Artifacts: Aggressive upscaling can introduce artifacts such as blurring, pixelation, and jagged edges.
- Quality Dependence: The quality of the upscaled image is heavily dependent on the quality of the original image; low-quality images will not upscale well.
- Computational Requirements: AI-based upscaling can be computationally intensive and may require significant processing power.
- Perceived Sharpness: While upscaling can increase the number of pixels, it may not necessarily increase the perceived sharpness or detail of the image.
8. Metadata and Copyright Information
Including metadata and copyright information in your photos is essential for protecting your work and providing important details about the image.
- Metadata: Data embedded in the image file that provides information such as camera settings, date, location, and keywords.
- Copyright Information: Information about the ownership and usage rights of the image, typically including the photographer’s name and copyright symbol.
- IPTC: A standard for embedding metadata in images, including descriptive information and copyright details.
- EXIF: A standard for recording camera settings and technical information in images.
8.1. What is metadata and why is it important?
Metadata is data embedded within an image file that provides information about the image, such as camera settings, date, location, copyright details, and keywords. It is important because:
- Organization: Helps organize and manage large collections of images.
- Searchability: Allows you to search for images based on specific criteria.
- Copyright Protection: Provides information about the ownership and usage rights of the image.
- Historical Record: Preserves important details about how the image was captured.
- Workflow Efficiency: Streamlines post-processing and workflow by providing relevant information at a glance.
8.2. How do I add copyright information to my photos?
To add copyright information to your photos, you can use image editing software like Adobe Photoshop or Lightroom. Here are the general steps:
- Open the Image: Open the image in your chosen software.
- Access Metadata Options: Look for metadata or file information options (usually under
File > InfoorFile > File Info). - Enter Copyright Details: Fill in the copyright fields with your name, the copyright symbol (©), and the year. You can also add usage terms if desired.
- Apply Changes: Save the changes to embed the copyright information in the image file.
This ensures that your copyright information is stored within the image file itself.
8.3. What is IPTC metadata?
IPTC (International Press Telecommunications Council) metadata is a standard for embedding descriptive, administrative, and copyright information in images. It includes fields for:
- Caption: A brief description of the image.
- Keywords: Terms that describe the content of the image.
- Copyright Notice: Information about the ownership and usage rights of the image.
- Creator: The name of the photographer or creator of the image.
- Location: The place where the image was taken.
IPTC metadata is widely used by photographers, journalists, and other professionals to manage and protect their images.
9. Storage Solutions for High-Resolution Images
Proper storage solutions are essential for managing and protecting your high-resolution images, ensuring they remain safe and accessible for years to come.
- External Hard Drives: Affordable and convenient for local storage, but susceptible to damage and failure.
- Network-Attached Storage (NAS): Centralized storage for multiple users, offering redundancy and remote access.
- Cloud Storage: Offsite storage with automatic backups, accessible from anywhere but dependent on internet connectivity.
- RAID Arrays: Multiple hard drives configured to provide redundancy and improve performance.
9.1. What are the best storage options for high-resolution photos?
The best storage options for high-resolution photos include:
- External Hard Drives: Cost-effective for local storage, but ensure you have backups.
- Network-Attached Storage (NAS): Offers centralized storage, redundancy, and remote access.
- Cloud Storage: Provides offsite backup and accessibility, but requires a reliable internet connection.
- RAID Arrays: Combines multiple hard drives for redundancy and performance.
Choosing the right option depends on your budget, storage needs, and desired level of accessibility and security.
9.2. How should I back up my high-resolution images?
You should back up your high-resolution images using a 3-2-1 backup strategy:
- 3 Copies: Keep at least three copies of your data.
- 2 Different Media: Store the copies on two different types of storage media (e.g., external hard drive, NAS, cloud).
- 1 Offsite: Keep one copy offsite in case of a disaster at your primary location.
This ensures that your images are protected against data loss due to hardware failure, theft, or natural disasters.
9. 3. Is cloud storage a safe option for high-resolution photos?
Yes, cloud storage is a safe option for high-resolution photos, as long as you choose a reputable provider with strong security measures. Cloud storage offers offsite backup, accessibility from anywhere, and often includes versioning and redundancy to protect against data loss. However, it’s important to:
- Choose a Trusted Provider: Select a well-known and reputable cloud storage provider.
- Enable Two-Factor Authentication: Add an extra layer of security to your account.
- Encrypt Your Data: Consider encrypting your files before uploading them to the cloud.
- Read the Terms of Service: Understand the provider’s policies regarding data privacy and security.
10. Practical Tips for Saving High-Resolution Photos
Here are some practical tips to ensure you consistently save your photos in high resolution:
- Check Camera Settings: Always verify that your camera is set to the highest quality and resolution before shooting.
- Use Proper Lighting: Good lighting can reduce noise and improve image clarity.
- Focus Carefully: Ensure your subject is in sharp focus to maximize detail.
- Edit Non-Destructively: Use adjustment layers and smart objects in editing software to avoid altering the original image data.
- Regularly Calibrate Your Monitor: A calibrated monitor ensures accurate color representation and helps you make informed editing decisions.
10.1. How can I ensure my camera is set to the highest resolution?
To ensure your camera is set to the highest resolution:
- Access the Menu: Open your camera’s menu.
- Find Image Quality Settings: Look for “Image Quality,” “Resolution,” or similar options.
- Select RAW or Fine JPEG: Choose the highest quality setting, typically RAW or Fine JPEG.
- Set Maximum Resolution: Select the highest available resolution, measured in megapixels (MP).
- Confirm Settings: Verify that the settings are saved and applied before shooting.
Checking these settings before each shoot ensures you capture images at the highest possible resolution.
10.2. What editing techniques help preserve high resolution?
Several editing techniques can help preserve high resolution:
- Non-Destructive Editing: Use adjustment layers and smart objects in software like Photoshop to avoid directly altering the original image data.
- Careful Sharpening: Apply sharpening sparingly and use techniques like unsharp mask or high pass filter to enhance detail without introducing artifacts.
- Noise Reduction: Use noise reduction tools to minimize noise without sacrificing too much detail.
- Avoid Over-Editing: Excessive adjustments can introduce artifacts and degrade image quality.
- Use High Bit Depth: Edit in 16-bit mode to preserve more color information and reduce banding.
10.3. How often should I calibrate my monitor for accurate editing?
You should calibrate your monitor at least once a month for accurate editing. Regular calibration ensures that your monitor displays colors and tones accurately, which is essential for making informed editing decisions and achieving consistent results. If you work in a color-critical environment or notice color shifts, you may need to calibrate more frequently, such as every week.
11. Exploring Different Photography Styles in High Resolution
Different photography styles benefit from high-resolution images in unique ways, allowing for greater detail and impact.
- Landscape Photography: Captures expansive scenes with intricate details, requiring high resolution for large prints.
- Portrait Photography: Preserves fine skin textures and facial details, enhancing the subject’s features.
- Wildlife Photography: Captures animals in their natural habitat with stunning clarity, allowing for detailed observation.
- Architectural Photography: Showcases intricate building designs and structural details, requiring high resolution for accurate representation.
- Macro Photography: Reveals minute details of small subjects, requiring high resolution to capture every intricate feature.
11.1. How does high resolution benefit landscape photography?
High resolution benefits landscape photography by:
- Capturing Fine Details: Preserving intricate details in landscapes, such as textures in rocks, foliage, and distant elements.
- Enabling Large Prints: Allowing for the creation of large, detailed prints without pixelation or loss of quality.
- Providing Cropping Flexibility: Offering the ability to crop and reframe images while still maintaining sufficient detail.
- Enhancing Depth and Clarity: Creating a sense of depth and clarity in expansive scenes.
- Showcasing Dynamic Range: Capturing a wide range of tones and colors, from bright highlights to deep shadows.
11.2. Why is high resolution important for portrait photography?
High resolution is important for portrait photography because it:
- Captures Skin Texture: Preserves fine skin textures and details, enhancing the subject’s features.
- Allows for Detailed Editing: Provides more data for retouching and editing while maintaining natural-looking results.
- Enables Sharp Focus: Ensures that the subject’s eyes and other key features are in sharp focus.
- Provides Cropping Options: Offers the ability to crop and reframe portraits without sacrificing detail.
- Enhances Print Quality: Allows for the creation of high-quality prints with exceptional clarity.
11.3. What are the advantages of high-resolution macro photography?
The advantages of high-resolution macro photography include:
- Revealing Minute Details: Capturing extremely fine details of small subjects, such as insects, plants, and textures.
- Enabling Extreme Enlargements: Allowing for significant enlargement of images without loss of detail.
- Providing Sharp Focus: Ensuring that the subject is in sharp focus, even at extremely close distances.
- Creating Stunning Visuals: Producing images that showcase the intricate beauty of the microscopic world.
- Supporting Scientific Applications: Providing detailed images for scientific research and documentation.
 High-resolution macro photography showcasing the intricate details of a ladybug, its texture, and vibrant colors.
12. Common Mistakes to Avoid
Avoiding common mistakes can help you consistently save your photos in high resolution and maintain their quality.
- Using Low-Resolution Settings: Always double-check your camera and software settings to ensure you are capturing and saving images at the highest resolution.
- Over-Compressing Images: Avoid excessive compression, especially when saving as JPEG, to minimize quality loss.
- Skipping Backups: Regularly back up your images to protect against data loss due to hardware failure or other issues.
- Neglecting Metadata: Include relevant metadata to help organize and protect your images.
- Failing to Calibrate Your Monitor: Calibrate your monitor regularly to ensure accurate color representation.
12.1. What are the most common mistakes photographers make when saving images?
The most common mistakes photographers make when saving images include:
- Using Low-Resolution Settings: Forgetting to set the camera or software to the highest resolution.
- Over-Compressing JPEGs: Choosing too much compression, which degrades image quality.
- Not Saving Originals: Failing to save original, unedited versions of images.
- Ignoring Color Space: Not using the appropriate color space for the intended output.
- Losing Metadata: Accidentally stripping metadata during export or conversion.
12.2. How does over-compressing images affect their quality?
Over-compressing images, especially when saving as JPEG, affects their quality by:
- Introducing Artifacts: Creating visible compression artifacts, such as blockiness, blurring, and color distortion.
- Reducing Detail: Eliminating fine details and textures, making the image appear less sharp.
- Limiting Editing Flexibility: Reducing the amount of data available for editing, making it harder to make adjustments without further quality loss.
- Creating Banding: Causing banding in areas with smooth gradients, such as skies.
- Increasing Noise: Amplifying noise and other imperfections in the image.
12.3. Why is backing up images so important?
Backing up images is crucial because:
- Protects Against Data Loss: Safeguards against data loss due to hardware failure, theft, natural disasters, or accidental deletion.
- Ensures Business Continuity: Allows you to quickly recover your images and continue working in case of a disaster.
- Provides Peace of Mind: Gives you peace of mind knowing that your valuable images are safe and secure.
- Facilitates Collaboration: Enables you to easily share and collaborate on projects with others.
- Supports Long-Term Archival: Ensures that your images are preserved for future generations.
 A landscape photo with stunning clarity and high resolution, showing the depth and beauty of nature.
13. Resources for Further Learning
To deepen your understanding of high-resolution photography, consider these resources:
- Online Courses: Platforms like Coursera, Udemy, and Skillshare offer courses on photography and image editing.
- Photography Blogs and Websites: Websites like dfphoto.net, Digital Photography Review, and PetaPixel provide articles, tutorials, and reviews.
- Photography Books: Explore books on photography techniques, image editing, and digital asset management.
- Photography Workshops: Attend workshops and seminars to learn from experienced photographers and network with other enthusiasts.
- Photography Communities: Join online forums and social media groups to share your work, ask questions, and get feedback.
13.1. What are some recommended online courses for learning about image resolution?
Some recommended online courses for learning about image resolution include:
- “Understanding Resolution” on Udemy: Covers the basics of image resolution, DPI, and PPI.
- “Digital Photography Masterclass” on Skillshare: Includes modules on image quality and resolution.
- “Adobe Photoshop CC – Essentials Training Course” on Skillshare: Teaches how to work with image resolution in Photoshop.
- “Photography Basics and Beyond: From Smartphone to DSLR Specialization” on Coursera: Offers a comprehensive overview of photography, including image resolution.
13.2. Which photography blogs and websites offer helpful tips on saving high-resolution images?
Photography blogs and websites that offer helpful tips on saving high-resolution images include:
- dfphoto.net: Provides tutorials and articles on photography techniques and image editing.
- Digital Photography Review (DPR): Offers in-depth reviews and articles on cameras, lenses, and image quality.
- PetaPixel: Features news, tutorials, and inspiration for photographers.
- Adobe Photoshop Blog: Provides tips and tutorials on using Photoshop for image editing.
- Fstoppers: Offers articles and tutorials on photography and post-processing.
13.3. Are there any books that provide in-depth information on image resolution and quality?
Yes, there are several books that provide in-depth information on image resolution and quality:
- “Understanding Exposure” by Bryan Peterson: Covers the fundamentals of exposure and how it affects image quality.
- “The Adobe Photoshop CC Book for Digital Photographers” by Scott Kelby: Provides comprehensive guidance on using Photoshop for image editing.
- “Real World Image Sharpening with Adobe Photoshop, Camera Raw, and Lightroom” by Bruce Fraser and Jeff Schewe: Offers detailed techniques for sharpening images while preserving quality.
- “Digital Photography: Mastering Aperture, Shutter Speed, ISO and Exposure” by Chris Bray: Explains how to use camera settings to achieve optimal image quality.
- “The Photographer’s Eye: Composition and Design for Better Digital Photos” by Michael Freeman: Explores the principles of composition and how they affect the overall impact of an image.
14. The Future of High-Resolution Photography
The future of high-resolution photography is promising, with advancements in camera technology, image processing software, and storage solutions.
- Higher Megapixel Sensors: Cameras with even higher megapixel sensors will capture more detail and allow for larger prints.
- AI-Powered Upscaling: Artificial intelligence will play an increasingly important role in upscaling images with minimal quality loss.
- Advanced Compression Techniques: New compression algorithms will reduce file sizes while preserving image quality.
- Cloud-Based Workflows: Cloud storage and editing tools will enable seamless collaboration and remote access to high-resolution images.
- Immersive Experiences: High-resolution images will be used to create immersive experiences such as virtual reality (VR) and augmented reality (AR).
14.1. How will camera technology evolve to support even higher resolutions?
Camera technology will evolve to support even higher resolutions through:
- Advanced Sensor Design: Development of new sensor designs with smaller pixels and improved light sensitivity.
- Computational Photography: Use of computational techniques to enhance image quality and resolution.
- Multi-Image Capture: Combining multiple images to create a single high-resolution image.
- Improved Image Stabilization: Minimizing camera shake to capture sharper images at higher resolutions.
- Better Lens Technology: Development of lenses with higher resolving power and minimal distortion.
14.2. What role will AI play in high-resolution image processing?
AI will play a significant role in high-resolution image processing by:
- Upscaling Images: Using AI algorithms to upscale images with minimal quality loss, adding realistic details that were not originally present.
- Noise Reduction: Applying AI-based noise reduction techniques to minimize noise without sacrificing detail.
- Image Enhancement: Automatically enhancing image quality by adjusting contrast, color, and sharpness.
- Object Recognition: Identifying and isolating objects in images for targeted editing and enhancement.
- Content-Aware Fill: Filling in missing or damaged areas of images with realistic content.
14.3. How will storage solutions adapt to handle larger image files?
Storage solutions will adapt to handle larger image files through:
- Higher Capacity Drives: Development of hard drives and solid-state drives (SSDs) with ever-increasing storage capacities.
- Faster Transfer Speeds: Improved transfer speeds to quickly move large files between devices.
- Cloud Storage Optimization: Optimized cloud storage solutions with efficient compression and data management.
- Data Deduplication: Techniques to eliminate redundant data and reduce storage requirements.
- Hierarchical Storage Management: Systems that automatically move less frequently accessed files to lower-cost storage tiers.
15. FAQs About Saving Photos in High Resolution
Q1: What is the ideal resolution for printing photos?
The ideal resolution for printing photos is generally 300 DPI (dots per inch). This ensures that your prints will be sharp and detailed.
Q2: How can I check the resolution of an image?
You can check the resolution of an image by opening it in an image editing program like Photoshop or GIMP and looking at the image properties or image size information.
Q3: Does upscaling always improve image quality?
No, upscaling does not always improve image quality. While it increases the number of pixels, it cannot add detail that was not originally present in the image and may introduce artifacts.
Q4: What is the best color space for web images?
The best color space for web images is sRGB. It is the standard color space for the web and ensures that your images will display consistently across different devices and browsers.
Q5: How do I avoid compression artifacts when saving JPEGs?
To avoid compression artifacts when saving JPEGs, use the highest quality setting available in your image editing software. This will minimize the amount of compression applied to the image.
Q6: What is the difference between TIFF and JPEG?
TIFF is a lossless format that preserves all image data, while JPEG is a lossy format that reduces file size by discarding some image data.
Q7: How important is it to calibrate my monitor?
Calibrating your monitor is very important for accurate color representation and helps you make informed editing decisions.
Q8: Can I recover lost detail in a low-resolution image?
While you cannot fully recover lost detail in a low-resolution image, you can use upscaling techniques and sharpening tools to improve its appearance.
Q9: What is the best way to store my high-resolution images?
The best way to store your high-resolution images is to use a combination of local and offsite storage, such as external hard drives, NAS devices, and cloud storage services.
Q10: How can I protect my images from unauthorized use?
You can protect your images from unauthorized use by adding copyright information to the metadata, using watermarks, and registering your images with a copyright office.
Take Stunning, High-Resolution Photos with dfphoto.net!
Ready to take your photography to the next level? Visit dfphoto.net today to discover a wealth of resources, tutorials, and inspiration to help you master the art of high-resolution photography. Explore our comprehensive guides, stunning photo galleries, and vibrant community of photographers. Whether you’re looking to perfect your camera settings, explore new editing techniques, or simply find inspiration for your next project, dfphoto.net has everything you need to capture and preserve your vision in stunning detail. Join us now and start creating images that truly stand out! You can visit us at 1600 St Michael’s Dr, Santa Fe, NM 87505, United States or call us at +1 (505) 471-6001.