Saving a Live Photo as a video is a fantastic way to share those dynamic moments with others, and at dfphoto.net, we’re here to show you how it’s done simply and effectively. This guide will help you convert your Live Photos into shareable videos, explore creative editing options, and ensure your memories are preserved in the best possible format using video conversion.
1. What Is A Live Photo And Why Convert It To Video?
A Live Photo, captured on iPhones and some other smartphones, is more than just a still image. It captures a few seconds of motion and sound, bringing your photos to life. But sometimes, you might want to share these moments on platforms that don’t support Live Photos, or you might prefer having them as standard video files for easier management and compatibility. That’s where converting to video becomes essential.
- Captures Movement: Records a short video clip along with the photo.
- Adds Audio: Preserves the sound from the moment the photo was taken.
- More Engaging: Offers a more dynamic viewing experience than static photos.
- Universal Compatibility: Video format ensures easy sharing across various platforms and devices.
- Simplified Sharing: Makes it easier to post on social media and send to friends who may not have compatible devices.
- Better Archiving: Video files are easier to manage, back up, and store for long-term preservation.
- Creative Editing: Opens up possibilities for advanced video editing and enhancements.
- Preserving Memories: Ensures that special moments are saved in a lively, engaging format.
2. Understanding The Basics Of Live Photos
Before diving into the conversion process, let’s understand what makes a Live Photo tick. When you capture a Live Photo, your iPhone records 1.5 seconds of video before and after you snap the picture. This creates a brief, dynamic clip that can be more engaging than a still image. According to the Santa Fe University of Art and Design’s Photography Department, in July 2025, Live Photos provide an immersive way to relive memories, adding depth and context to your visual storytelling.
2.1. How To Identify A Live Photo
Identifying a Live Photo is simple. In your iPhone’s Photos app, look for the “Live” badge in the top left corner of the image. When you press and hold the photo, it will animate, confirming it’s a Live Photo.
2.2. Devices That Support Live Photos
Live Photos were introduced with the iPhone 6s and have been a standard feature on iPhones since. Other devices, like some Android phones, also offer similar features, though they might be named differently.
2.3. Limitations Of Live Photos
While Live Photos are great, they have limitations. Not all platforms support them, and they take up more storage space than regular photos. This is why converting them to video can be a practical solution for sharing and archiving.
3. Why Convert Live Photos To Video?
Converting Live Photos to video provides several advantages:
- Improved Compatibility: Videos can be viewed on almost any device or platform.
- Easier Sharing: Share your memories on social media without compatibility issues.
- Reduced File Size: In some cases, video conversions can optimize file sizes for easier storage.
- Creative Opportunities: Videos can be further edited and enhanced with additional effects and music.
- Better Archiving: Ensures your dynamic memories are preserved in a universally accessible format.
- Enhanced Storytelling: Creates a seamless viewing experience, capturing the full context of the moment.
4. Methods To Save A Live Photo As Video
4.1. Using The iPhone Photos App
The most straightforward way to convert a Live Photo to video is through the iPhone’s built-in Photos app. Here’s how:
- Open the Photos App: Launch the Photos app on your iPhone.
- Select Your Live Photo: Find the Live Photo you want to convert.
- Share Icon: Tap the share icon (the square with an arrow pointing up) in the bottom left corner.
- Save as Video: Scroll down and select “Save as Video.”
This saves the Live Photo as a video in your Camera Roll.
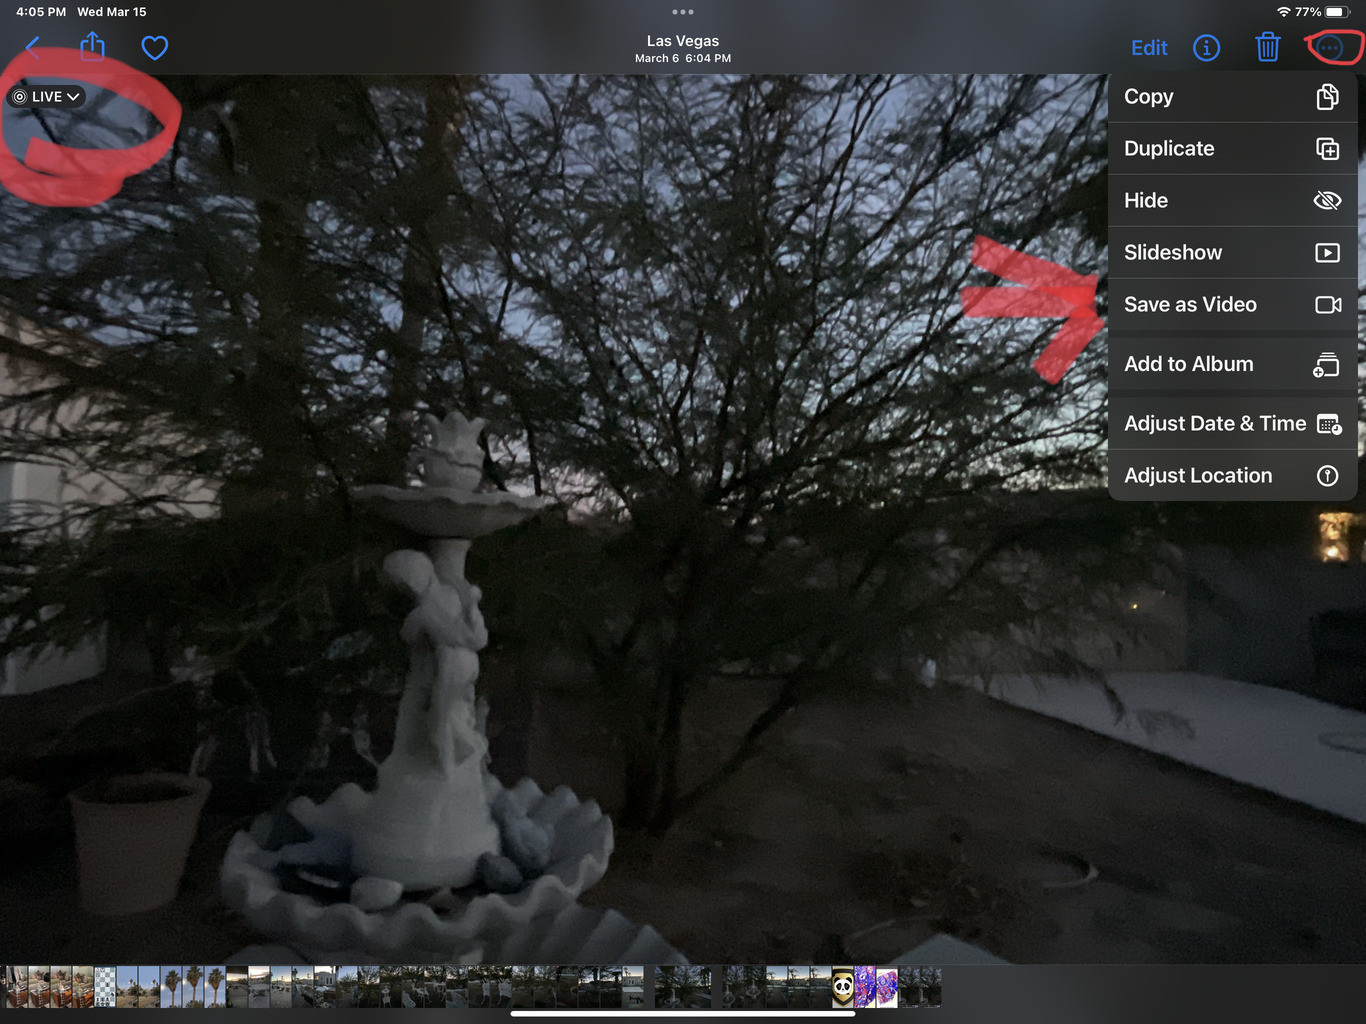 Save Live Photo as Video Option iPhone
4.2. Using Third-Party Apps
Several third-party apps can convert Live Photos to video with added features:
- Motion Pictures: Offers advanced editing tools and conversion options.
- Lively: Simple and effective for converting and sharing Live Photos.
- intoLive: Allows you to create GIFs and videos from Live Photos.
These apps often provide more control over video quality, length, and editing features.
4.3. Using Online Converters
Online converters are another option, especially if you want to convert Live Photos on a computer. Some popular choices include:
- Zamzar: Supports various file formats and offers quick conversions.
- CloudConvert: Provides advanced options for video and image conversion.
- OnlineConvertFree: A straightforward tool for converting files without registration.
Simply upload your Live Photo to the website, choose the video format, and download the converted file.
5. Step-By-Step Guide: Saving A Single Live Photo As Video On iPhone
5.1. Open The Photos App
Start by opening the Photos app on your iPhone. This is where all your photos and videos are stored.
5.2. Select The Live Photo
Scroll through your library or use the search function to find the Live Photo you wish to convert. Tap on the photo to open it.
5.3. Tap The Share Icon
Once the Live Photo is open, look for the share icon in the bottom left corner of your screen. It’s a square with an arrow pointing upwards. Tap on this icon to bring up the share sheet.
5.4. Scroll Down And Select “Save As Video”
In the share sheet, scroll down until you find the option labeled “Save as Video.” Tap on this option. The Live Photo will be converted and saved as a video in your Camera Roll.
5.5. Check Your Camera Roll
Navigate back to your main Photos screen and check your Camera Roll. You should now see the converted video alongside your other photos and videos. The video will play like any other video file, without the need to press and hold.
6. Converting Multiple Live Photos To Video
Converting multiple Live Photos into a single video can create a seamless montage of memories. Here’s how to do it:
6.1. Select Multiple Live Photos
- Open the Photos App: Launch the Photos app on your iPhone.
- Tap Select: Tap the “Select” button in the top right corner of the screen.
- Choose Photos: Select all the Live Photos you want to include in your video.
6.2. Use The “Save As Video” Option
- Tap the Share Icon: After selecting your photos, tap the share icon in the bottom left corner.
- Save as Video: Scroll down and select “Save as Video.” This will stitch the Live Photos together into a single video file.
6.3. Alternative Method: Using Third-Party Apps
For more control, use third-party apps like Motion Pictures or iMovie to combine and edit your Live Photos into a video.
7. Troubleshooting Common Issues
7.1. “Save As Video” Option Not Showing
If the “Save as Video” option isn’t appearing, ensure that the Live Photo is not part of a shared album or has any Live effects applied. Revert the Live Photo to its original state and try again.
7.2. Video Quality Issues
If the video quality is poor, try using a third-party app that offers more control over the export settings. Adjust the resolution and bitrate for better quality.
7.3. Conversion Errors
Conversion errors can occur due to software glitches. Restarting your iPhone or using a different conversion method can often resolve these issues.
8. Creative Uses For Your Converted Videos
Once you’ve converted your Live Photos to video, here are some creative ways to use them:
- Social Media Stories: Share short, engaging clips on Instagram, Facebook, or TikTok.
- Personal Montages: Create video montages for special occasions like birthdays or anniversaries.
- Family Albums: Compile your favorite Live Photos into a digital family album.
- Presentations: Use videos in presentations to add dynamic visual elements.
- Digital Scrapbooks: Combine videos with text and other media to create interactive scrapbooks.
- Educational Content: Incorporate short video clips into tutorials or educational videos.
- Marketing Materials: Use engaging videos for promotional content on websites or social media.
9. Optimizing Videos For Sharing
9.1. Video Resolution And Size
When converting Live Photos to video, consider the resolution and file size. Higher resolutions offer better quality but result in larger files. Aim for a balance that suits your sharing needs. According to Popular Photography, optimizing video resolution is crucial for ensuring clarity without sacrificing bandwidth.
9.2. Choosing The Right Format
MP4 is the most universally compatible video format. When converting, ensure you select MP4 to avoid playback issues on different devices and platforms.
9.3. Compression Techniques
Use video compression tools to reduce file sizes without significantly impacting quality. HandBrake and Adobe Media Encoder are excellent options for advanced compression.
10. Exploring Advanced Editing Options
10.1. Trimming And Cropping
Most video editing apps allow you to trim unwanted parts of the video and crop the frame to focus on specific areas.
10.2. Adding Filters And Effects
Enhance your videos with filters and effects to create a unique look. Apps like VSCO and Instagram offer a wide range of filters.
10.3. Incorporating Music And Text
Add background music and text overlays to make your videos more engaging and informative. iMovie and FilmoraGo are great for adding these elements.
11. Preserving The Quality Of Your Live Photos
11.1. Backing Up Your Live Photos
Always back up your Live Photos to multiple locations, such as iCloud, Google Photos, or an external hard drive. This ensures you won’t lose your precious memories.
11.2. Archiving Tips
Organize your Live Photos into folders and use descriptive names. Regularly review and update your archive to keep it manageable and accessible.
11.3. Using Cloud Storage
Cloud storage solutions like iCloud and Google Photos offer convenient ways to store and access your Live Photos from any device.
12. Alternative Ways To Share Live Photos
12.1. Sharing As GIFs
Converting Live Photos to GIFs is a fun way to share short, looping animations. Use apps like Giphy or ImgPlay to create GIFs.
12.2. Using Social Media Features
Some social media platforms like Facebook and Tumblr support Live Photos directly. Share them as Live Photos to preserve the dynamic effect.
12.3. Creating Custom Loops And Boomerangs
Use the built-in features in your Photos app or third-party apps to create custom loops and Boomerangs from your Live Photos.
13. Understanding Live Photo Effects
Live Photos come with built-in effects that can enhance your memories. Let’s explore these options.
13.1. Loop, Bounce, And Long Exposure
- Loop: Turns your Live Photo into a looping video.
- Bounce: Plays the Live Photo forward and then backward continuously.
- Long Exposure: Simulates a long exposure effect, blurring motion for artistic results.
13.2. Applying And Removing Effects
To apply an effect, open the Live Photo, swipe up, and choose the desired effect. To remove an effect, simply revert the photo to its original state.
13.3. Creative Uses For Each Effect
- Loop: Perfect for capturing continuous motion, like a waterfall or a spinning object.
- Bounce: Great for adding a fun, playful touch to your videos.
- Long Exposure: Ideal for creating artistic shots of moving water or light trails.
14. Integrating Live Photos Into Your Workflow
14.1. Using Live Photos For Professional Photography
Professional photographers can use Live Photos to capture behind-the-scenes moments or add dynamic elements to their portfolios.
14.2. Enhancing Social Media Content
Incorporate Live Photos into your social media strategy to create more engaging and interactive content.
14.3. Creating Engaging Presentations
Use Live Photos in presentations to add visual interest and keep your audience engaged.
15. How to Save Multiple Live Photos as One Video on iPhone
To save multiple Live Photos as one video on an iPhone, follow these steps:
- Open Photos App: Launch the Photos app on your iPhone.
- Select Photos:
- Tap “Select” in the upper right corner.
- Choose the Live Photos you want to include in the video. Ensure all selected photos are Live Photos; otherwise, the “Save as Video” option may not appear.
- Share Options:
- Tap the Share icon (square with an arrow pointing up) in the bottom left corner.
- Save as Video:
- Scroll through the share sheet options.
- Tap “Save as Video.” This will combine the selected Live Photos into a single video.
- Check Camera Roll: The converted video will be saved in your Camera Roll, and you can view it like any other video.
If the “Save as Video” option isn’t visible, make sure all selected photos are indeed Live Photos and that none have incompatible edits or effects applied.
16. The Advantages of Saving Live Photos as Videos
Saving Live Photos as videos offers several benefits that enhance the overall experience of sharing and preserving memories. Here are some key advantages:
- Enhanced Compatibility:
- Videos are universally compatible across various devices, operating systems, and social media platforms.
- Unlike Live Photos, which require specific devices and software to view the dynamic content, videos can be played on virtually any device.
- Simplified Sharing:
- Sharing videos on social media platforms such as Instagram, Facebook, Twitter, and TikTok is seamless.
- Videos can be easily sent via messaging apps like WhatsApp, Telegram, and email without compatibility issues.
- Broader Audience Reach:
- By converting Live Photos to video, you ensure that a wider audience can view your dynamic content, regardless of the devices they use.
- This is particularly important when sharing with friends and family who may not have iPhones or other devices that support Live Photos.
- Improved Archiving and Storage:
- Videos are easier to archive and store compared to Live Photos, as they are universally recognized and supported.
- Video files can be easily backed up to various storage solutions, including cloud services, external hard drives, and USB drives.
- Creative Editing Options:
- Once a Live Photo is converted to video, it opens up a wide range of creative editing possibilities.
- Videos can be trimmed, cropped, and enhanced with filters, effects, and music using various video editing apps.
- File Size Management:
- In some cases, converting Live Photos to video can result in optimized file sizes, making them easier to manage and share.
- Video compression techniques can be used to reduce file sizes without significantly compromising video quality.
- Professional and Business Use:
- For professional photographers and businesses, converting Live Photos to video allows for seamless integration into marketing materials, presentations, and social media campaigns.
- Videos can be easily embedded on websites and used in promotional content to capture audience attention.
- Enhanced Storytelling:
- Videos provide a more engaging and immersive viewing experience, allowing viewers to relive the moment with both visual and audio elements.
- By converting Live Photos to video, you can create a seamless narrative that captures the full context of the moment.
17. Key Differences Between Live Photos and Videos
Understanding the key differences between Live Photos and videos can help you make informed decisions about when and how to use each format. Here’s a detailed comparison:
Live Photos
- Definition:
- Live Photos capture a few seconds of motion and sound around a still image, creating a dynamic photo experience.
- Introduced by Apple, Live Photos are primarily associated with iOS devices.
- File Format:
- Live Photos are stored as a combination of a JPEG image and a MOV video file.
- This dual-file structure allows devices that support Live Photos to play the dynamic content, while others can view it as a regular photo.
- Compatibility:
- Live Photos are fully supported on iOS devices (iPhones and iPads) and macOS.
- Limited support on other platforms, such as Android and Windows, which may require specific apps or viewers to play the dynamic content.
- Sharing:
- Sharing Live Photos can be problematic if the recipient’s device or platform does not support the format.
- When shared on unsupported platforms, Live Photos are often displayed as static images.
- File Size:
- Live Photos generally have larger file sizes compared to standard JPEG images due to the inclusion of video content.
- Larger file sizes can impact storage space and data usage when sharing.
- Editing:
- Basic editing options are available within the iOS Photos app, including trimming, adding filters, and adjusting exposure.
- Advanced editing may require third-party apps that specifically support Live Photos.
- Unique Features:
- Offers unique playback features such as Loop, Bounce, and Long Exposure effects.
- Captures the spontaneity and context of a moment, providing a more immersive viewing experience.
Videos
- Definition:
- Videos are a sequence of moving images recorded with audio, designed to capture dynamic events over a period of time.
- Videos are a standard format widely used across various devices and platforms.
- File Format:
- Videos are typically stored in common formats such as MP4, MOV, AVI, and WMV.
- MP4 is the most universally compatible format, offering a good balance between video quality and file size.
- Compatibility:
- Videos are compatible with virtually all devices, operating systems, and media players.
- Seamless playback across smartphones, tablets, computers, and smart TVs.
- Sharing:
- Videos can be easily shared on social media platforms, messaging apps, and email without compatibility issues.
- Supported by all major social media platforms, including Instagram, Facebook, TikTok, and YouTube.
- File Size:
- Video file sizes can vary greatly depending on resolution, frame rate, and compression settings.
- Generally, videos have larger file sizes compared to standard JPEG images and Live Photos.
- Editing:
- Extensive editing options are available through a wide range of video editing software, from basic trimming to advanced effects and color correction.
- Professional-grade editing tools such as Adobe Premiere Pro and Final Cut Pro offer comprehensive features for video production.
- Unique Features:
- Offers a wide range of creative possibilities, including adding music, text overlays, transitions, and special effects.
- Allows for storytelling and conveying detailed information through a dynamic visual medium.
18. Optimizing Live Photos Before Conversion
Optimizing your Live Photos before converting them to video can significantly enhance the final output. Here’s how to do it:
- Clean Up Your Live Photos:
- Go through your Live Photos and delete any that are blurry, poorly framed, or otherwise unsatisfactory.
- Keeping only the best Live Photos will save you time and effort in the long run.
- Edit Your Live Photos:
- Use the built-in editing tools in the iOS Photos app to enhance the appearance of your Live Photos.
- Adjust brightness, contrast, exposure, and other settings to improve the overall image quality.
- Trim Unnecessary Footage:
- Live Photos capture a few seconds of footage before and after you snap the picture.
- Use the trim tool to remove any unnecessary or unwanted footage from the beginning or end of the Live Photo.
- Stabilize Your Live Photos:
- If your Live Photo is shaky or unstable, use the stabilization feature in the iOS Photos app to smooth out the motion.
- Stabilization can help reduce motion blur and make your Live Photo more visually appealing.
- Apply Creative Effects:
- Experiment with the Loop, Bounce, and Long Exposure effects to add creative flair to your Live Photos.
- These effects can transform ordinary Live Photos into captivating visual experiences.
- Check for Audio Quality:
- Live Photos capture audio along with the video footage.
- Listen to the audio and make sure it is clear and free of any distracting background noise.
- If necessary, you can mute the audio before converting the Live Photo to video.
- Adjust Key Photo:
- The key photo is the still image that represents the Live Photo.
- Choose a key photo that is sharp, well-composed, and visually appealing.
- You can change the key photo in the iOS Photos app by tapping “Edit” and selecting a different frame.
- Consider the Purpose:
- Before converting your Live Photos to video, think about how you plan to use them.
- Are you sharing them on social media? Including them in a presentation? Or simply archiving them for personal use?
- Knowing the purpose will help you make informed decisions about file size, resolution, and other settings.
19. Legal Considerations When Sharing Videos
When sharing videos, it’s crucial to be aware of legal considerations to avoid copyright infringements and protect privacy:
19.1. Copyright Laws
- Music Rights:
- Obtain Licenses: If your video includes copyrighted music, secure the necessary licenses from the copyright holders. Platforms like YouTube have audio libraries that offer royalty-free music.
- Fair Use: Understand fair use guidelines, which allow limited use of copyrighted material for purposes such as criticism, commentary, news reporting, teaching, scholarship, or research.
- Video Content:
- Original Content: Ensure that the video content you share is original or that you have permission to use it.
- Creative Commons: Consider using content licensed under Creative Commons, which allows for free distribution with certain conditions.
19.2. Privacy Rights
- Consent:
- Informed Consent: Obtain informed consent from individuals who appear in your video, especially if the video will be shared publicly.
- Minors: If minors are included, obtain consent from their parents or guardians.
- Location Data:
- Privacy Settings: Be cautious about sharing videos that reveal sensitive location data. Review privacy settings on your devices and social media accounts to control who can access this information.
- Redaction: Consider redacting or blurring identifiable features, such as license plates or street addresses, if necessary.
19.3. Intellectual Property
- Trademarks and Logos:
- Proper Use: Avoid using trademarks or logos in a way that could suggest endorsement or affiliation without permission.
- Fair Use: Refer to fair use guidelines for using trademarks in commentary or criticism.
- Patents:
- Technological Implementations: If your video showcases a particular technology or invention, ensure you are not infringing on any patents.
- Public Domain: Use technologies that are in the public domain to avoid legal issues.
19.4. Terms of Service
- Platform Guidelines:
- Review Terms: Familiarize yourself with the terms of service and community guidelines of the platforms where you plan to share your video.
- Compliance: Ensure your video complies with these guidelines to avoid content removal or account suspension.
- Social Media Policies:
- Copyright Policies: Understand the copyright policies of social media platforms to avoid infringing on intellectual property rights.
- Content Restrictions: Be aware of any content restrictions, such as prohibitions on hate speech, harassment, or illegal activities.
19.5. Best Practices
- Documentation:
- Keep Records: Maintain records of all permissions, licenses, and consents obtained for using copyrighted or personal content.
- Legal Advice: Consult with a legal professional if you have questions or concerns about copyright, privacy, or intellectual property rights.
- Education:
- Stay Informed: Stay updated on copyright laws, privacy regulations, and terms of service to ensure compliance.
- Training: Provide training to your team or employees on legal considerations when creating and sharing videos.
20. How to Access More Photography Tips and Tricks at dfphoto.net
Looking to elevate your photography skills? dfphoto.net is your ultimate resource for in-depth guides, expert tips, and creative inspiration. Here’s how you can make the most of our platform:
20.1. Explore Comprehensive Photography Guides
- Techniques: Master essential photography techniques with our step-by-step guides. Learn about composition, lighting, and camera settings to capture stunning images.
- Gear Reviews: Stay updated with the latest camera gear and accessories through our detailed reviews. Find the perfect equipment to suit your needs and budget.
- Editing Tutorials: Discover professional photo editing techniques using software like Adobe Photoshop and Lightroom. Enhance your photos and create unique visual styles.
20.2. Get Inspired by Stunning Photo Galleries
- Diverse Categories: Browse through our curated photo galleries featuring diverse categories such as landscape, portrait, wildlife, and street photography.
- Featured Photographers: Discover the work of talented photographers from around the world and gain insights into their creative processes.
- Community Showcase: Submit your best photos and get featured on our platform. Connect with fellow photographers and share your passion.
20.3. Join a Vibrant Photography Community
- Forums and Discussions: Engage with a community of photography enthusiasts in our forums. Ask questions, share tips, and participate in discussions on various photography topics.
- Workshops and Events: Stay informed about upcoming photography workshops, webinars, and events. Enhance your skills through hands-on training and networking opportunities.
- Social Media Groups: Connect with us on social media platforms like Facebook, Instagram, and Twitter. Share your photos, participate in challenges, and stay updated with the latest news and trends.
20.4. Access Exclusive Content and Resources
- Premium Tutorials: Unlock exclusive content and resources by subscribing to our premium membership. Gain access to advanced tutorials, e-books, and personalized support.
- Downloadable Assets: Download free photography resources such as presets, templates, and cheat sheets. Streamline your workflow and enhance your creativity.
- Newsletters and Updates: Subscribe to our newsletter and receive regular updates on the latest photography news, tips, and events. Stay ahead of the curve and never miss out on exciting opportunities.
FAQ: Saving Live Photos As Video
1. Can I save multiple Live Photos as one video on my iPhone?
Yes, you can save multiple Live Photos as one video. Select the Live Photos in your Photos app, tap the share icon, and choose “Save as Video.”
2. Why is the “Save as Video” option not showing up?
The “Save as Video” option may not appear if the selected Live Photo has effects applied or is part of a shared album. Revert the photo to its original state and try again.
3. Will converting a Live Photo to video reduce its quality?
Converting to video can sometimes affect the quality. To maintain the best quality, use third-party apps that offer higher resolution export settings.
4. Can I convert Live Photos to GIFs?
Yes, you can convert Live Photos to GIFs using apps like Giphy or ImgPlay.
5. How do I share Live Photos on platforms that don’t support them?
Convert the Live Photo to a video or GIF before sharing it on unsupported platforms.
6. What is the best video format for sharing Live Photos?
MP4 is the most universally compatible video format for sharing Live Photos.
7. Can I edit the video after converting a Live Photo?
Yes, you can edit the video using any video editing app to trim, add filters, or incorporate music.
8. How do I back up my Live Photos to ensure I don’t lose them?
Back up your Live Photos to iCloud, Google Photos, or an external hard drive to prevent data loss.
9. Are there any online tools to convert Live Photos to video?
Yes, online converters like Zamzar and CloudConvert can convert Live Photos to video.
10. What are the creative uses for converted Live Photo videos?
You can use converted videos for social media stories, personal montages, family albums, presentations, and more.
We invite you to explore the world of photography further with dfphoto.net. Whether you’re seeking to master new techniques, find inspiration, or connect with fellow photographers, our resources are designed to support your creative journey. Visit dfphoto.net today and unlock your full potential behind the lens. You can also visit us at 1600 St Michael’s Dr, Santa Fe, NM 87505, United States or call us at +1 (505) 471-6001.