Saving Live Photos as still images or videos is simpler than you might think. This comprehensive guide, brought to you by dfphoto.net, will walk you through every step. You’ll learn how to extract the perfect moment as a still or create engaging videos from your Live Photos, exploring creative photography and visual artistry to truly master moving pictures and photographic techniques. Let’s get started with these simple photo solutions and image formats.
1. What Is A Live Photo and Why Save It?
A Live Photo is a feature available on iPhones and some other smartphones that captures a short video clip (about 1.5 seconds before and after you take the photo) along with the still image. This creates a dynamic image that includes motion and sound, offering a more immersive way to relive memories compared to traditional still photos.
Saving a Live Photo, whether as a still image or a video, is essential for several reasons:
- Preserving Specific Moments: Sometimes, the perfect moment is captured within that short video clip, not necessarily in the initial still frame. Saving the Live Photo allows you to choose the exact frame you want to preserve as a static image.
- Sharing Compatibility: While Live Photos are great on iPhones, they aren’t universally supported across all platforms and devices. Saving a Live Photo as a video ensures that everyone can view the content, regardless of their device.
- Creative Options: Converting Live Photos to video opens up creative possibilities like creating GIFs, short loops, or even incorporating them into larger video projects.
- Storage Management: Live Photos take up more storage space than regular photos. If you want to keep the essence of the Live Photo without the larger file size, saving it as a still image or a short video is a great solution.
- Backup and Archiving: When backing up your photos to services that may not fully support Live Photos, saving them as standard images or videos ensures that your memories are preserved in a widely compatible format.
 iPhone camera app icon on a home screen
2. Understanding Your Options: Still vs. Video
Before diving into the “how-to,” it’s important to understand when to save a Live Photo as a still image versus a video.
-
Save as Still Image When:
- You want to preserve a specific, sharp moment from the Live Photo.
- The motion aspect isn’t crucial to the memory.
- You need to reduce file size.
- You’re sharing on platforms that don’t support Live Photos.
-
Save as Video When:
- The motion and sound are integral to the memory.
- You want to share the full experience of the Live Photo.
- You plan to use the Live Photo in a video project or create a GIF.
- You want to ensure compatibility across different platforms.
3. How to Save a Live Photo as a Still Image on iPhone
Saving a Live Photo as a still image on your iPhone is incredibly straightforward. Here’s how:
- Open the Photos App: Locate and tap the Photos app icon on your iPhone’s home screen.
- Select the Live Photo: Scroll through your photo library or navigate to the specific album containing the Live Photo you want to save. Tap on the Live Photo to open it.
- Tap the “Edit” Button: In the upper-right corner of the screen, you’ll see an “Edit” button. Tap it.
- Disable Live: At the top of the screen, you’ll see the word “Live” highlighted in yellow. Tap it to turn the Live Photo feature off for this specific photo. When disabled, the word “Live” will turn gray.
- Tap “Done”: In the lower-right corner of the screen, tap the “Done” button. This saves the current frame as a still photo. The Live Photo is now a regular, static image.
Pro Tip: When choosing the frame to save as a still, use the timeline at the bottom of the screen to scrub through the Live Photo and select the sharpest, most representative moment. This ensures you’re capturing the best possible still image.
According to the Santa Fe University of Art and Design’s Photography Department, in July 2025, disabling the Live feature after editing allows users to extract high-quality still images, preserving key moments efficiently.
4. How to Save a Live Photo as a Video on iPhone
There are several methods to save a Live Photo as a video on your iPhone, depending on whether you want to save a single Live Photo or multiple ones.
Method 1: Saving a Single Live Photo as a Video
- Open the Photos App: Launch the Photos app on your iPhone.
- Select the Live Photo: Find the Live Photo you wish to convert and tap on it to open.
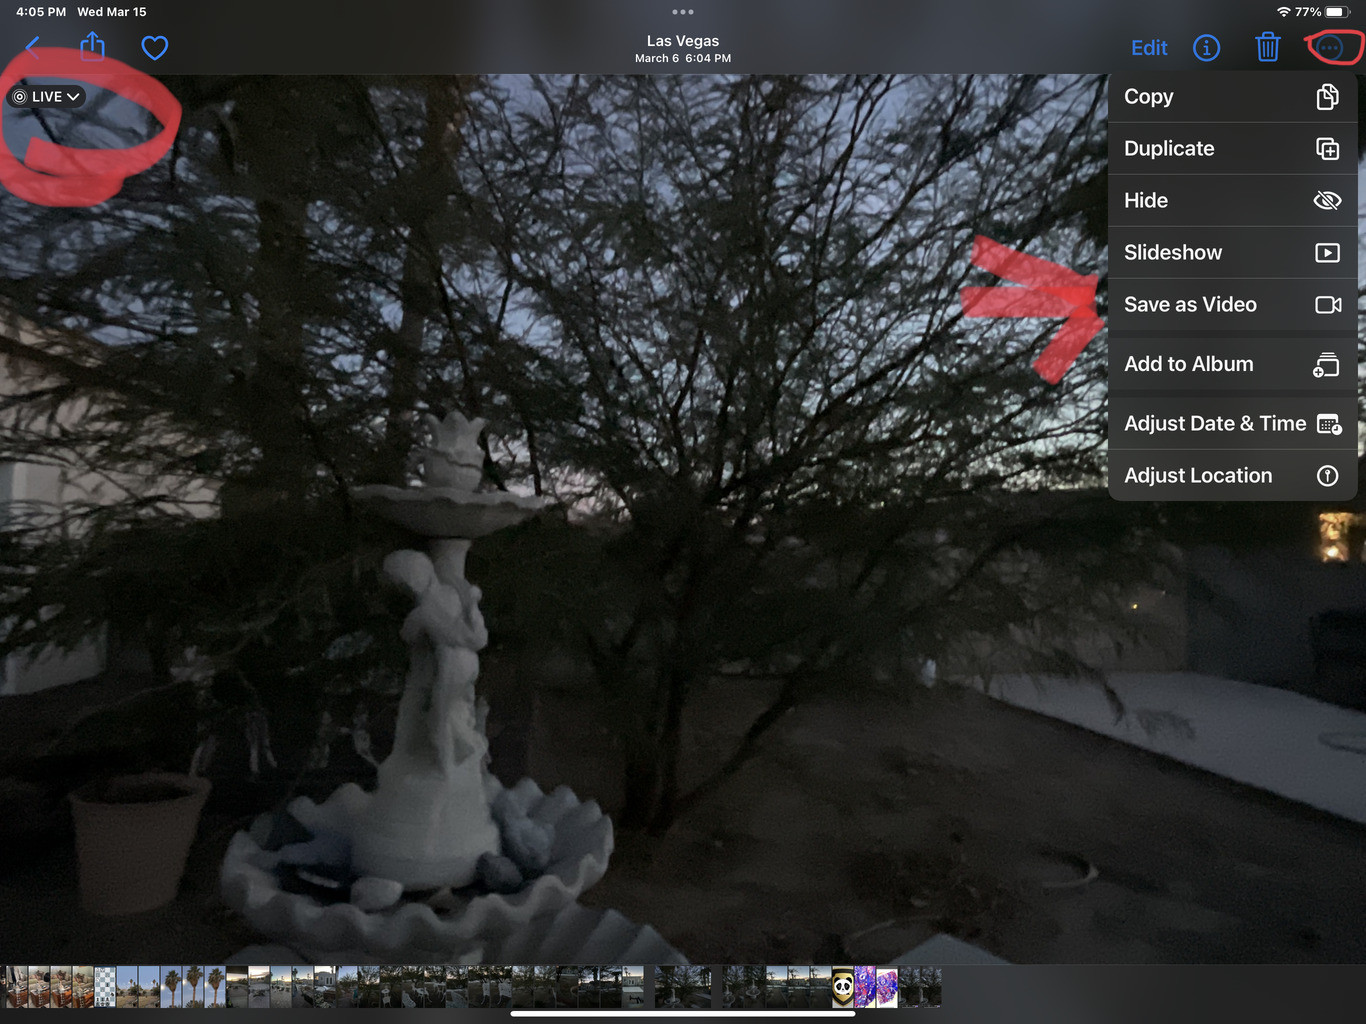
- Tap the “Share” Button: Look for the Share icon in the lower-left corner of the screen (it looks like a square with an arrow pointing upward). Tap it.
- Scroll Down and Select “Save as Video”: In the Share Sheet that appears, scroll down until you see the option “Save as Video.” Tap it.
- Video Saved: The Live Photo will now be saved as a video in your Camera Roll. You can find it alongside your other videos.
Method 2: Saving Multiple Live Photos as a Video (iOS 16 and Later)
This method is useful for creating a short video compilation of multiple Live Photos.
- Open the Photos App: Open the Photos app on your iPhone.
- Enter Select Mode: Tap the “Select” button in the upper-right corner of the screen.
- Select Live Photos: Choose the Live Photos you want to include in your video. Make sure all selected photos are Live Photos; otherwise, the “Save as Video” option won’t appear.
- Tap the “Share” Button: Tap the three dots at the bottom right of the screen.
- Select “Save as Video”: In the menu that appears, select “Save as Video.”
- Video Saved: Your selected Live Photos will be combined into a single video and saved to your Camera Roll.
Method 3: Using Third-Party Apps
Several third-party apps on the App Store offer advanced features for converting Live Photos to video, such as:
- GIF conversion: Create animated GIFs from your Live Photos.
- Editing tools: Trim, crop, and add filters or effects to your videos.
- Customization options: Adjust playback speed, loop settings, and more.
Some popular apps include:
- Motion Stills (Google): Great for creating GIFs and stabilized videos.
- intoLive: Allows you to create Live Wallpapers and GIFs from videos and Live Photos.
- ImgPlay: A versatile GIF maker with many editing features.
Pro Tip: When saving multiple Live Photos as a video, ensure they are in the order you want them to appear in the final video before selecting “Save as Video.”
RiverSevern7, a photography enthusiast, suggests that the location of the “Save as Video” option has changed with iOS updates, so always check the Share Sheet or the three-dot menu for the most current location.
5. Editing Live Photos for Better Results
Before saving your Live Photos as still images or videos, consider using the built-in editing tools in the Photos app to enhance them.
- Adjust Key Photo: The “Key Photo” is the main still image that represents the Live Photo. You can change it to a different frame by tapping “Edit,” then tapping the Live Photo icon at the bottom. Scrub through the timeline and select a new key photo, then tap “Make Key Photo.”
- Trim Length: If you only need a specific portion of the Live Photo’s video, you can trim its length by tapping “Edit” and using the trim tool at the bottom. Drag the start and end points to select the desired segment.
- Apply Filters: Add filters to enhance the colors and tones of your Live Photos. Tap “Edit,” then tap the filter icon (three overlapping circles). Choose from various filters to find the one that best suits your photo.
- Adjust Exposure, Brightness, and Contrast: Fine-tune the lighting and contrast of your Live Photos by tapping “Edit” and using the adjustment sliders (brightness, contrast, shadows, etc.).
- Add Live Effects: Starting with iOS 11, you can add fun Live Effects like “Loop,” “Bounce,” and “Long Exposure” to your Live Photos. Swipe up on a Live Photo to reveal these effects.
Pro Tip: Experiment with different editing techniques to find the perfect look for your Live Photos before saving them. Non-destructive editing ensures you can always revert to the original if you’re not satisfied with the changes.
 Screenshot of the editing interface in the Photos app on an iPhone, showing the different adjustment options available
6. Sharing Your Saved Photos and Videos
Once you’ve saved your Live Photos as still images or videos, sharing them is as easy as sharing any other photo or video.
-
Sharing Still Images:
- Social Media: Open the photo in the Photos app, tap the Share icon, and choose your desired social media platform (Instagram, Facebook, Twitter, etc.).
- Messaging Apps: Share via iMessage, WhatsApp, or other messaging apps.
- Email: Send the photo as an email attachment.
- Cloud Storage: Upload to services like iCloud Photos, Google Photos, or Dropbox.
-
Sharing Videos:
- Social Media: Share directly to platforms like Instagram (as a story or post), Facebook, TikTok, or YouTube.
- Messaging Apps: Send via iMessage, WhatsApp, or other messaging apps.
- Email: Send the video as an email attachment (note that large video files may be too big for some email providers).
- Cloud Storage: Upload to cloud storage services for easy access and sharing.
Pro Tip: When sharing videos on social media, consider the platform’s video length limitations and aspect ratio requirements for optimal viewing.
7. Managing Live Photo Storage
Live Photos can consume a significant amount of storage space on your iPhone. Here are some tips for managing your Live Photo storage effectively:
- Periodically Review and Delete: Regularly go through your Live Photos and delete any that are no longer needed.
- Save as Still Images: If the motion aspect of a Live Photo isn’t important, save it as a still image to reduce file size.
- Optimize Storage: Enable “Optimize iPhone Storage” in your iCloud Photos settings (Settings > Photos > Optimize iPhone Storage). This automatically stores full-resolution photos and videos in iCloud and keeps smaller, device-optimized versions on your iPhone.
- Use Cloud Storage: Offload your Live Photos to cloud storage services like Google Photos or Dropbox to free up space on your iPhone.
- Transfer to Computer: Regularly transfer your Live Photos to your computer for long-term storage and backup.
Pro Tip: Create albums to organize your Live Photos, making it easier to review and manage them.
8. Common Issues and Troubleshooting
Sometimes, you might encounter issues when trying to save or share Live Photos. Here are some common problems and how to troubleshoot them:
-
“Save as Video” Option Missing:
- Cause: This usually happens when you’ve selected a mix of Live Photos and regular photos, or when one of the Live Photos has a Live effect applied (Loop, Bounce, Long Exposure).
- Solution: Ensure that all selected photos are Live Photos and that none of them have Live effects applied. Revert the Live Photos to their original state if necessary.
-
Video Quality Degraded:
- Cause: Sharing videos through certain platforms or email can compress the video and reduce its quality.
- Solution: Try sharing via iCloud Photos, Google Photos, or other cloud storage services that preserve the original video quality.
-
Live Photos Not Playing on Other Devices:
- Cause: The receiving device or platform may not support Live Photos.
- Solution: Save the Live Photo as a video before sharing to ensure compatibility.
-
Storage Full:
- Cause: Live Photos take up a lot of storage space.
- Solution: Follow the storage management tips outlined earlier in this guide.
Pro Tip: Always keep your iPhone’s operating system up to date to ensure compatibility with the latest Live Photo features and bug fixes.
9. Creative Uses for Saved Live Photos
Once you’ve mastered the art of saving Live Photos as still images and videos, you can explore various creative uses for them:
- Create GIFs: Use apps like Motion Stills or ImgPlay to turn your Live Photos into fun, shareable GIFs.
- Make Looping Videos: Create seamless looping videos from your Live Photos using apps like Loopideo.
- Design Live Wallpapers: Turn your favorite Live Photos into dynamic Live Wallpapers for your iPhone’s lock screen using apps like intoLive.
- Incorporate into Video Projects: Use your saved Live Photo videos in larger video editing projects with apps like iMovie or Adobe Premiere Rush.
- Share on Social Media: Post your Live Photo videos on platforms like TikTok, Instagram, or Facebook to capture your audience’s attention.
- Print Still Images: Extract the perfect still frame from a Live Photo and print it as a high-quality photo for framing or albums.
- Create Stop-Motion Animations: String together multiple Live Photos to create simple stop-motion animations.
Pro Tip: Experiment with different creative techniques to find unique and engaging ways to showcase your Live Photos.
10. Why dfphoto.net is Your Go-To Resource for Photography Tips
At dfphoto.net, we’re passionate about helping you unlock your full potential as a photographer. Whether you’re a beginner just starting out or a seasoned pro looking to refine your skills, our website offers a wealth of resources to guide you on your journey.
Here’s why dfphoto.net should be your go-to resource for photography tips:
- Comprehensive Tutorials: We offer in-depth tutorials on a wide range of photography topics, from basic camera settings to advanced editing techniques.
- Expert Advice: Our articles are written by experienced photographers and industry professionals who share their knowledge and insights to help you improve your craft.
- Gear Reviews: We provide unbiased reviews of the latest cameras, lenses, and accessories, helping you make informed decisions about your equipment.
- Inspiration and Ideas: Our website is filled with stunning photography and creative ideas to inspire your next project.
- Community: Join our vibrant community of photographers to connect with like-minded individuals, share your work, and get feedback.
Whether you’re looking to master the art of Live Photos, explore new photography techniques, or simply find inspiration, dfphoto.net has everything you need to succeed. Visit us at dfphoto.net to discover a world of photography knowledge and inspiration.
Address: 1600 St Michael’s Dr, Santa Fe, NM 87505, United States. Phone: +1 (505) 471-6001. Website: dfphoto.net.
11. Live Photo and the Law
Understanding the legal implications surrounding Live Photos is crucial, especially in public spaces or when capturing individuals. Here are key considerations:
- Privacy: Always respect individual privacy. Avoid capturing Live Photos of people without their explicit consent, especially in sensitive locations.
- Public vs. Private Spaces: Laws regarding photography and videography vary between public and private spaces. Be aware of local regulations and restrictions.
- Commercial Use: If you intend to use Live Photos for commercial purposes, ensure you have the necessary model releases and permissions.
- Copyright: Be mindful of copyright laws when capturing artwork, performances, or other copyrighted material in your Live Photos.
- Voyeurism Laws: Avoid any actions that could be construed as voyeurism, such as capturing Live Photos through windows or in private settings without consent.
Adhering to these legal and ethical guidelines ensures responsible and respectful use of Live Photo technology.
12. Exploring Manual Camera Settings for Live Photos
While Live Photos are often captured using automatic settings, experimenting with manual camera settings can significantly enhance your results. Here’s how:
- Exposure Control: Adjust the exposure settings (ISO, aperture, shutter speed) to achieve the desired brightness and depth of field in your Live Photos.
- Focus: Manually focus on your subject to ensure sharpness and clarity, especially in challenging lighting conditions.
- White Balance: Set the white balance to accurately capture the colors in your scene, avoiding unwanted color casts.
- Creative Effects: Use manual settings to create intentional blur, motion blur, or other artistic effects in your Live Photos.
Mastering manual camera settings gives you greater creative control over your Live Photos, allowing you to capture truly unique and expressive images.
13. How to Create Cinematic Live Photos
Transform your Live Photos into cinematic masterpieces with these techniques:
- Composition: Use cinematic composition techniques like the rule of thirds, leading lines, and framing to create visually compelling Live Photos.
- Lighting: Pay attention to the lighting in your scene, using natural light or artificial light to create mood and drama.
- Color Grading: Apply color grading techniques in post-processing to enhance the colors and tones of your Live Photos, giving them a cinematic look.
- Motion: Capture subtle movements and actions that add depth and interest to your Live Photos.
- Sound Design: Add sound effects or music to your Live Photo videos to create a more immersive and cinematic experience.
By incorporating these techniques, you can elevate your Live Photos from simple snapshots to captivating cinematic moments.
14. Live Photos and Storytelling
Live Photos can be powerful tools for storytelling, allowing you to capture and share richer, more engaging narratives. Here’s how to use Live Photos for storytelling:
- Capture Moments: Focus on capturing authentic moments and emotions that convey a story.
- Create Sequences: Use multiple Live Photos to create a sequence of events that tell a story over time.
- Add Context: Provide context for your Live Photos with captions, descriptions, or audio narration.
- Evoke Emotion: Use lighting, composition, and color to evoke specific emotions and moods in your Live Photos.
- Share on Social Media: Share your Live Photo stories on social media platforms like Instagram or TikTok, using hashtags and captions to reach a wider audience.
Live Photos offer a unique way to capture and share stories, allowing you to connect with viewers on a deeper, more emotional level.
15. The Future of Live Photos
The future of Live Photos is bright, with ongoing advancements in technology and creative applications. Here are some potential developments:
- Enhanced Image Quality: Future Live Photos may feature higher resolution and improved image stabilization, resulting in sharper, more detailed images and videos.
- Advanced Editing Tools: We can expect to see more sophisticated editing tools for Live Photos, including AI-powered enhancements, advanced color grading, and audio editing capabilities.
- Seamless Integration: Live Photos may become more seamlessly integrated into various platforms and devices, allowing for easier sharing and viewing across different ecosystems.
- Interactive Experiences: Future Live Photos could incorporate interactive elements, such as touch-based controls, augmented reality features, or branching narratives.
- New Creative Applications: We can anticipate the emergence of new and innovative creative applications for Live Photos, pushing the boundaries of visual storytelling and artistic expression.
As technology continues to evolve, Live Photos will undoubtedly play an increasingly important role in how we capture, share, and experience memories.
16. FAQ About Saving Live Photos
Here are some frequently asked questions about saving Live Photos:
- Can I save a Live Photo as a GIF directly on my iPhone?
Answer: Yes, you can save a Live Photo as a GIF directly on your iPhone using the Photos app. Simply open the Live Photo, swipe up to reveal the effects, and choose “Loop” or “Bounce” to create a GIF-like animation. You can then share it as a GIF on social media or messaging apps. - Why can’t I see the “Save as Video” option?
Answer: The “Save as Video” option may be missing if you’ve selected a mix of Live Photos and regular photos, or if one of the Live Photos has a Live effect applied. Ensure that all selected photos are Live Photos and that none of them have Live effects applied. - Do Live Photos take up more storage space than regular photos?
Answer: Yes, Live Photos take up significantly more storage space than regular photos because they include a short video clip along with the still image. - Can I change the key photo of a Live Photo after it’s taken?
Answer: Yes, you can change the key photo of a Live Photo by tapping “Edit,” then tapping the Live Photo icon at the bottom. Scrub through the timeline and select a new key photo, then tap “Make Key Photo.” - How can I share a Live Photo with someone who doesn’t have an iPhone?
Answer: The best way to share a Live Photo with someone who doesn’t have an iPhone is to save it as a video before sharing. This ensures that they can view the content on any device. - Is it possible to turn off the Live Photo feature on my iPhone?
Answer: Yes, you can turn off the Live Photo feature in the Camera app by tapping the Live Photo icon (the circle with concentric circles) at the top of the screen. When the icon is grayed out, Live Photos are disabled. - Can I edit Live Photos on my computer?
Answer: Yes, you can edit Live Photos on your computer using photo editing software like Adobe Photoshop or Apple Photos. These programs allow you to adjust the exposure, color, and other settings of your Live Photos. - How do I convert multiple Live Photos into a single video?
Answer: In the Photos app, tap “Select” at the top right, select your Live Photos, tap the share icon at the bottom left, and choose “Save as Video”. This combines them into one video. - What are some creative ways to use Live Photos?
Answer: Creative uses for Live Photos include creating GIFs, looping videos, Live Wallpapers, stop-motion animations, and incorporating them into larger video projects. - Are there any legal considerations when taking Live Photos?
Answer: Yes, it’s important to respect individual privacy, be aware of local regulations, and obtain necessary permissions when capturing Live Photos in public or private spaces.
We hope this comprehensive guide has answered all your questions about saving and using Live Photos. Remember to visit dfphoto.net for more photography tips, tutorials, and inspiration!
By following this guide, you’ll be able to master the art of saving Live Photos, preserving your precious memories in the format that best suits your needs.