Frustrated because your video is playing sideways in Apple Photos? You’re not alone. Many users find themselves needing to rotate videos after recording them on iPhones or other devices. Unlike photos, the Photos app on macOS doesn’t offer a direct, built-in rotate feature for videos. This article will guide you through effective workarounds to rotate your videos and ensure they are correctly displayed and saved in your Photos library.
Understanding the Limitation in Photos App
As highlighted in Apple Support Communities, the Photos application, while excellent for photo management, has limitations when it comes to video editing. Specifically, directly rotating a video within the Photos app interface isn’t an option, unlike the straightforward rotation available for still images.
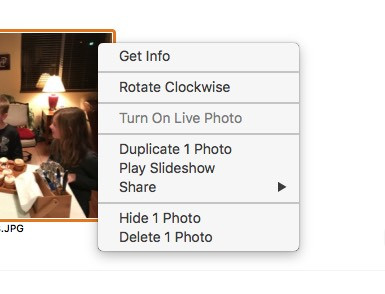 Contextual menu for a photo in Photos app, showing rotate options
When you right-click (or Control-click) on a photo, you are presented with rotation options directly in the contextual menu. However, this is not the case for videos.
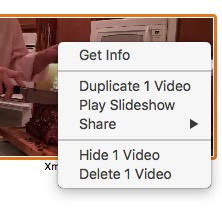 Contextual menu for a video in Photos app, lacking rotate options
Right-clicking a video reveals a different set of options, noticeably missing the rotate functionality. This absence can be puzzling and inconvenient for users needing to correct video orientation. So, how can you rotate your videos and save them back into Photos? Let’s explore some practical methods.
Method 1: Utilizing QuickTime Player for Video Rotation
QuickTime Player, Apple’s native media player, offers a simple solution to rotate videos. This method involves exporting your video from Photos, rotating it in QuickTime Player, and then saving it. Here’s how:
-
Export Your Video from Photos:
First, you need to get your video out of the Photos library. Open Photos and select the video you want to rotate. Go to File in the menu bar, then choose Export and select Export Unmodified Original. This ensures you are working with the original video file without any quality loss. Choose a location to save the exported video, such as your Desktop.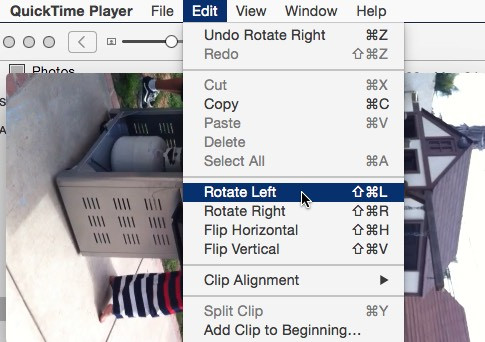 Menu option to Export Unmodified Original from Photos app
 -
Open with QuickTime Player:
Locate the exported video file and open it with QuickTime Player. You can usually do this by right-clicking the file and selecting Open With > QuickTime Player. -
Rotate the Video:
In QuickTime Player, go to Edit in the menu bar and select Rotate Left or Rotate Right until your video is in the desired orientation. You can also use the shortcut Command-J to open the Movie Inspector, where you might find visual settings that include rotation options, depending on your QuickTime version. -
Save the Rotated Video:
Once rotated, go to File and select Export As…. Choose your desired export settings (like 1080p, 720p, or 4K, depending on the original video quality) and save the rotated video. Give it a new name to differentiate it from the original, for example, “Rotated Video”. -
Import Back into Photos:
Now, import the newly rotated video back into your Photos library. Simply drag and drop the rotated video file into the Photos app window, or go to File > Import and select the file.
Considerations for QuickTime Rotation:
-
Metadata: As some users have pointed out, exporting and re-importing videos might lead to concerns about metadata. While exporting as “Unmodified Original” preserves the original file data, any tags, keywords, or location data added within Photos might not automatically re-attach. However, videos generally have limited EXIF data compared to photos; most metadata is managed by the Photos app itself.
-
File Format: Be aware that depending on your original video format and QuickTime version, the exported and rotated video might be saved in a different format (e.g., .mov or .m4v). This is generally compatible with Photos, but it’s good to be mindful of potential file conversions.
Method 2: Using iMovie for Video Rotation (and More)
For users seeking more video editing capabilities, including rotation, iMovie is another excellent option available on macOS and iOS. iMovie provides a user-friendly interface for rotating videos and offers additional editing features.
-
Import Video to iMovie:
Open iMovie and create a new project. Import the video you want to rotate into your iMovie project. You can drag the video file directly into iMovie or use the import function. -
Rotate the Video in iMovie:
Select the video clip in the iMovie timeline. Above the viewer window, you will find editing controls. Look for the rotate icons (usually located in the crop or adjustment section). Click the rotate buttons to rotate your video left or right until it’s correctly oriented. -
Export and Share to Photos:
Once rotated, finalize any other edits you want to make in iMovie. Then, click the Share button (usually in the top right corner) and choose Photos. iMovie will export the rotated video and directly save it to your Photos library.
Benefits of Using iMovie:
- More Editing Options: iMovie offers a range of video editing tools beyond rotation, such as trimming, adding transitions, text, and color adjustments.
- Direct Sharing to Photos: iMovie simplifies the process by allowing you to directly share the edited video back to your Photos library.
Important Note: Avoid Modifying the Photos Library Directly
It’s crucial to heed the advice from experienced users and never directly modify the Photos Library package. Attempting to open and alter files within the Photos Library, as suggested in some older discussions using QuickTime 7, is highly discouraged and carries significant risks. Directly manipulating the library can lead to data loss, corruption, and instability in your Photos application. Always use the proper export and import methods provided by Photos and other applications like QuickTime Player or iMovie.
Conclusion
While Apple Photos doesn’t offer a direct rotation feature for videos as it does for photos, you have effective workarounds using QuickTime Player and iMovie. QuickTime Player provides a quick and simple rotation solution, while iMovie offers more comprehensive editing capabilities along with rotation. Choose the method that best suits your needs and always remember to work with exported copies of your videos to protect the integrity of your Photos library. If you feel that direct video rotation should be a feature in Photos, consider providing feedback to Apple through their official feedback channels. User feedback is valuable and can influence future updates and features in Apple software.