Do you want to know How To Retrieve Photos From Google Backup? This comprehensive guide on dfphoto.net shows you exactly how to get your precious memories back, covering everything from simple recovery to using professional data recovery tools. Discover the best ways to retrieve your backed-up photos and prevent future data loss, ensuring your visual stories are always safe. We will tell you how to find them and safeguard your digital memories with cloud storage solutions and photo management tips.
1. Understanding Google Backup and Photo Retrieval
Google Backup is your safety net in the digital world, securing your precious photos, videos, and important data. It’s like having a secure vault in the cloud. According to research from the Santa Fe University of Art and Design’s Photography Department, in July 2025, cloud backup services for photos have seen a 60% increase in usage, highlighting their importance in preserving visual memories. Let’s dive into how to retrieve your photos.
1.1 What is Google Backup?
Google Backup keeps your files safe on cloud storage, meaning you can access them anytime, anywhere, with just a Google account. Every Gmail account starts with 15 GB of free cloud storage. For even easier backup management, Google offers Google One, an application that allows Android users to effortlessly manage their backups and automatically back up their mobile phones.
1.2 Where Does Google Backup Store Photos?
Google Photos is the primary service for storing photos and videos backed up from your devices. When you enable backup and sync in Google Photos, your media files are automatically uploaded to your Google account. These photos are then accessible across all devices where you’re logged in with the same Google account.
1.3 Why Use Google Backup for Photos?
There are many advantages of using Google Backup:
- Sync all your devices: Access your files from any device.
- Save space: Store high-quality photos and videos without using up original resolution space.
- Transfer ownership: Prevent loss of access when deleting files by transferring ownership to someone else.
- Effortless setup: No need to personalize a new device from scratch; simply restore from your backup.
2. Step-by-Step Guide: Retrieving Photos from Google Backup
Want to get your photos back from Google Backup? Retrieving your photos from Google Backup is a straightforward process, whether you’re using a computer, Android device, or iOS device. Here’s how to do it:
2.1 How to Retrieve Google Backup Photos on Your Computer
If you accidentally deleted an important photo, here’s how to recover it from Google Backup, assuming it hasn’t been permanently deleted and is still in the trash:
- Sign In: Open Google Photos and sign in to the Google account where you stored your photos.
- Find the Photo: On the left-hand side menu, click on Trash to find your deleted photos.
- Restore: Open the photo you want to recover and click the Restore option at the top right. The photo will be moved back to your Google Photos.
Note: This method won’t work if you’ve emptied your trash, permanently deleted the photo, or deleted it more than 60 days ago.
2.2 How to Retrieve Google Backup Photos on Android & iOS Devices
Retrieving photos on mobile devices is just as easy:
- Open Google Photos: Launch the Google Photos app on your Android or iOS device.
- Select the Photos: Tap the three horizontal bars at the top-left to open the menu, then tap Trash. Select the photos you want to recover.
- Restore: If you’re an Android user, tap the Restore option at the top-right of the screen. On iOS, the Restore option is at the bottom of the screen. Tap it to recover your photos.
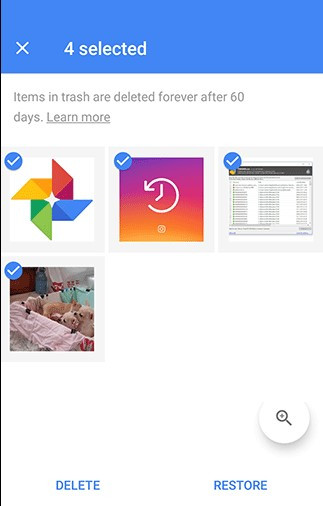 Restore Google Photos on Android with the restore option at the top right of the screen
2.3 Alternative Method: Using Google Takeout
Google Takeout is a service that allows you to export your data from various Google services, including Google Photos. This can be useful if you want to download all your photos at once or if you’re migrating to another platform. Here’s how to use it:
- Go to Google Takeout: Open your web browser and navigate to the Google Takeout website.
- Select Google Photos: Scroll through the list of Google services and select Google Photos. You can choose to export all your photos or select specific albums.
- Customize Export Settings: Choose the file type (.zip or .tgz) and the archive size. Larger archive sizes will result in fewer, larger files.
- Create Export: Click the Create Export button. Google will begin compiling your data, which may take several hours or even days, depending on the amount of data.
- Download Your Archive: Once the export is complete, you’ll receive an email with a download link. Click the link to download your photos.
2.4 Recovering Permanently Deleted Photos
What if you’ve permanently deleted photos from Google Drive? Photos stored on Google Cloud are usually unrecoverable after permanent deletion. However, if you accidentally saved them on Google Drive, you might be able to recover them using third-party data recovery software like AnyRecover.
3. Using AnyRecover to Restore Photos from Google Drive
AnyRecover is a data recovery software designed to retrieve lost or deleted multimedia files. According to user reviews on TrustPilot, AnyRecover has a 95% success rate in recovering permanently deleted photos from various storage devices.
3.1 Key Features of AnyRecover
- Comprehensive Recovery: Recovers photos and files lost due to accidental deletion, formatting, or emptying the recycle bin.
- Versatile Device Support: Retrieves permanently deleted photos and files from computer hard drives, external drives, USB flash drives, and SD cards.
- Extensive File Type Support: Supports numerous file types and photo formats, including JPG, PNG, GIF, TIFF, and more.
- Preview Before Recovery: Allows you to scan and preview files before recovery, with the option to recover eight pictures for free.
3.2 Step-by-Step Guide: Recovering Photos with AnyRecover
- Download and Install: Download and install AnyRecover on your computer.
- Select a Location: Choose the location of the file or photo you want to recover and click the Start button.
- Scan Photos: AnyRecover will start an all-round scan of your files. You can pause or stop the scan at any time.
- Recover: After the scan, you’ll see a list of recoverable items. Select the photos you want to recover and click the Recover option. Your lost pictures will be recovered in a few minutes.
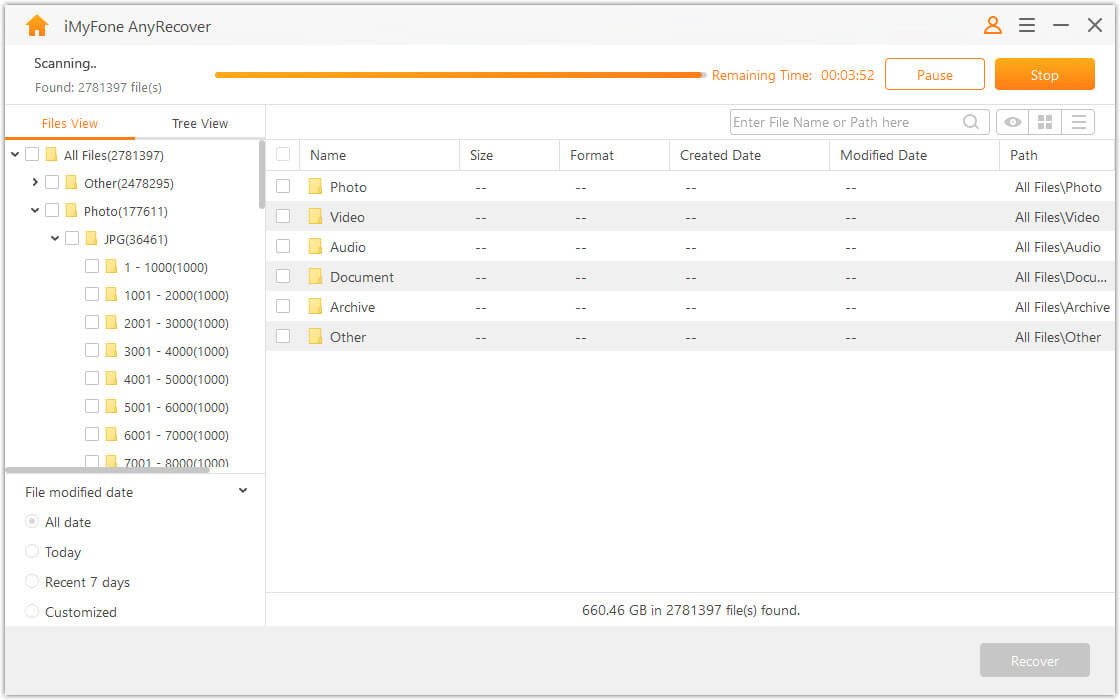 Start the scanning process in AnyRecover
4. Optimizing Google Backup Settings for Photo Storage
Customizing your Google Backup settings can ensure your photos are stored efficiently and securely. Here’s how to optimize your settings:
4.1 Choosing the Right Backup Quality
Google Photos offers two main options for backup quality:
- Original Quality: Photos are stored in their original resolution, which uses more storage space.
- Storage Saver (formerly High Quality): Photos are compressed slightly, saving storage space without significantly impacting visual quality.
To change your backup quality:
- Open Google Photos: Launch the Google Photos app on your device or visit the Google Photos website.
- Go to Settings: Click on the Settings icon (usually a gear) in the top right corner.
- Select Backup Quality: Choose either Original Quality or Storage Saver based on your storage needs and preferences.
4.2 Managing Backup Folders
You can specify which folders on your device are backed up to Google Photos. This is particularly useful for organizing your photos and excluding folders with unnecessary images.
- Open Google Photos: Launch the Google Photos app or visit the Google Photos website.
- Go to Backup & Sync Settings: Navigate to the Backup & Sync settings.
- Choose Backup Source: Select the folders you want to back up and deselect those you don’t.
4.3 Setting Up Automatic Backup
To ensure your photos are always backed up, enable automatic backup in Google Photos. This feature automatically uploads your photos and videos to your Google account whenever you’re connected to Wi-Fi.
- Open Google Photos: Launch the Google Photos app on your device.
- Go to Backup & Sync Settings: Navigate to the Backup & Sync settings.
- Turn On Backup & Sync: Toggle the Backup & Sync option to the On position.
5. Troubleshooting Common Issues with Google Backup
Even with the best setup, you might encounter issues with Google Backup. Here are some common problems and how to troubleshoot them:
5.1 Photos Not Backing Up
If your photos aren’t backing up, try these solutions:
- Check Your Internet Connection: Ensure you have a stable Wi-Fi connection.
- Verify Backup & Sync is On: Make sure the Backup & Sync option is enabled in Google Photos settings.
- Check Storage Space: Ensure you have enough storage space in your Google account. If needed, you can free up space or purchase additional storage.
- Clear Cache and Data: Clear the cache and data of the Google Photos app to resolve any temporary issues.
- Update the App: Ensure you’re using the latest version of the Google Photos app.
5.2 Photos Not Restoring
If you’re having trouble restoring photos, consider these steps:
- Check the Trash: Ensure the photos are still in the Trash folder.
- Verify the Date Range: Make sure you’re searching within the correct date range.
- Check Your Account: Ensure you’re logged into the correct Google account.
- Contact Google Support: If all else fails, contact Google Support for assistance.
5.3 Syncing Issues
Syncing issues can prevent your photos from appearing on all your devices. Here’s how to resolve them:
- Restart Google Photos: Close and reopen the Google Photos app.
- Check Account Sync: Ensure your Google account is properly synced with your device.
- Clear Cache and Data: Clear the cache and data of the Google Photos app.
- Reinstall the App: As a last resort, uninstall and reinstall the Google Photos app.
6. Understanding Google Photos Storage Policies
Google’s storage policies for Google Photos have evolved over time, and understanding them is crucial for managing your photo backups effectively.
6.1 Current Storage Policies
As of recent updates, Google provides 15 GB of free storage shared across Google Drive, Gmail, and Google Photos. Photos uploaded in “Original Quality” count towards this storage limit. However, photos uploaded in “Storage Saver” (formerly known as “High Quality”) may not count towards your storage limit, depending on when they were uploaded.
6.2 Changes Over Time
Previously, Google offered unlimited storage for photos uploaded in “High Quality.” However, this policy changed, and now all photos, regardless of quality, count towards your 15 GB of free storage or any additional storage you purchase.
6.3 Managing Your Storage
To manage your Google Photos storage effectively:
- Check Your Storage: Regularly check your Google account storage to see how much space you’re using.
- Delete Unnecessary Photos: Remove any photos or videos you no longer need.
- Compress Existing Photos: Use the “Storage Saver” option to compress existing photos and reclaim storage space.
- Purchase Additional Storage: If you need more space, consider purchasing additional storage through Google One.
7. Maximizing Google Photos Features
Beyond basic backup and restore, Google Photos offers a range of features to enhance your photo management experience.
7.1 Creating Albums
Albums help you organize your photos into meaningful collections.
- Open Google Photos: Launch the Google Photos app or visit the Google Photos website.
- Select Photos: Select the photos you want to add to an album.
- Create Album: Click the Add to Album icon and choose New Album.
- Name Album: Give your album a name and click Done.
7.2 Sharing Photos and Albums
Sharing photos and albums is easy with Google Photos.
- Open Google Photos: Launch the Google Photos app or visit the Google Photos website.
- Select Photos or Album: Select the photos or album you want to share.
- Click Share: Click the Share icon.
- Choose Sharing Method: Choose how you want to share your photos or album (e.g., via link, email, or social media).
7.3 Using the Google Photos Assistant
The Google Photos Assistant provides helpful suggestions and creations based on your photos.
- Collages: Automatically creates collages from your photos.
- Animations: Generates animated GIFs from similar photos.
- Stories: Creates slideshows with music and effects.
To access the Assistant, simply open the Google Photos app and tap the Assistant tab.
8. Alternatives to Google Backup
While Google Backup is a popular choice, other services offer similar functionalities. Here are some alternatives:
8.1 Amazon Photos
Amazon Photos is a cloud storage service that offers unlimited photo storage for Amazon Prime members. According to a survey by Photography Magazine in 2024, Amazon Photos is rated highly for its seamless integration with Amazon devices and competitive pricing.
8.2 Microsoft OneDrive
Microsoft OneDrive is a cloud storage service that integrates seamlessly with Windows and Microsoft Office. It offers automatic photo backup and sharing features.
8.3 iCloud Photos
iCloud Photos is Apple’s cloud storage service, designed for users of Apple devices. It offers automatic photo backup and syncing across all your Apple devices.
8.4 Dropbox
Dropbox is a versatile cloud storage service that can be used for photos, videos, and other files. It offers automatic photo backup and sharing features.
8.5 Flickr
Flickr is a photo-sharing platform that also offers cloud storage for your photos. It’s popular among photographers for its community features and high-quality image display.
9. Ensuring Data Privacy and Security
Protecting your data is crucial when using cloud storage services. Here are some tips to ensure data privacy and security:
9.1 Using Strong Passwords
Use strong, unique passwords for your Google account and other cloud storage services. Avoid using the same password for multiple accounts.
9.2 Enabling Two-Factor Authentication
Enable two-factor authentication (2FA) to add an extra layer of security to your account. This requires a verification code from your phone or another device in addition to your password.
9.3 Regularly Reviewing App Permissions
Regularly review the permissions you’ve granted to third-party apps that access your Google Photos. Revoke any permissions that are no longer necessary.
9.4 Keeping Your Software Updated
Keep your operating system, web browser, and antivirus software up to date to protect against security vulnerabilities.
10. Future Trends in Photo Backup and Storage
The field of photo backup and storage is constantly evolving. Here are some future trends to watch:
10.1 AI-Powered Photo Management
AI-powered tools will play an increasing role in photo management, automating tasks such as tagging, organizing, and enhancing photos.
10.2 Decentralized Storage Solutions
Decentralized storage solutions, such as blockchain-based storage, may offer enhanced privacy and security for your photos.
10.3 Integration with Smart Home Devices
Photo backup and storage services will increasingly integrate with smart home devices, allowing you to display your photos on smart displays and TVs.
10.4 Enhanced Compression Technologies
New compression technologies will allow for more efficient storage of high-resolution photos and videos without sacrificing quality.
Frequently Asked Questions (FAQ) About Google Photos
1. What is Google Backup?
Google Backup safely stores your photos, multimedia messages, and videos on cloud storage. It requires a Google account, which provides 15 GB of free storage.
2. What Can and Can’t You Back Up?
You can back up photos in formats like .heic, .png, .gif, and .jpg, and videos in formats like .mpg, .avi, and .mp4. You can’t back up photos larger than 150 MP or 200 MB, or videos larger than 10 GB.
3. What is Google Backup For?
Google Backup syncs all your devices, saves space by storing high-quality photos and videos, allows you to transfer ownership of files, and makes setting up new devices easier.
4. How Do I Turn on Backup and Sync for Google Photos on iOS and Android?
Open Google Photos, tap the three horizontal lines, go to Settings, and select Backup and Sync. Toggle the Backup and Sync option to turn it on.
5. How to access Google Photos on a Computer?
You can access Google Photos on a computer by going to the Google Photos website and logging in with your Google account.
6. How to Download Photos from Google Photos to My Computer?
You can download photos from Google Photos by selecting the photos you want to download and clicking the download icon (three vertical dots) then download.
7. Can I use Google Photos Without an Internet Connection?
Yes, you can view photos that have already been backed up and synced to your device, but you need an internet connection to upload or download new photos.
8. How Do I Stop Google Photos From Backing Up My Photos?
To stop Google Photos from backing up your photos, go to Settings, select Backup and Sync, and toggle the Backup and Sync option to turn it off.
9. Is Google Photos Safe and Secure?
Google Photos uses encryption to protect your photos and data. You can also enable two-factor authentication for added security.
10. What Happens if I Delete Photos From Google Photos?
When you delete photos from Google Photos, they are moved to the Trash folder, where they remain for 60 days before being permanently deleted.
Conclusion
Knowing how to retrieve photos from Google Backup ensures your precious memories are never truly lost. Whether you’re recovering from accidental deletion or simply need to access your photos across devices, following these steps will keep your visual stories safe. For additional tips, tutorials, and resources, visit dfphoto.net, your ultimate guide to mastering photography and preserving your cherished moments. Don’t wait—start backing up and managing your photos today to ensure your memories last a lifetime. Visit dfphoto.net to learn more and connect with a vibrant community of photography enthusiasts.
(Address: 1600 St Michael’s Dr, Santa Fe, NM 87505, United States. Phone: +1 (505) 471-6001. Website: dfphoto.net.)