Are you wondering How To Retrieve Deleted Photos From Sd Card, preserving your precious memories? At dfphoto.net, we understand the panic that sets in when you accidentally delete photos. With effective photo recovery techniques and robust data retrieval methods, it’s possible to restore those seemingly lost visual treasures. You can easily recover those memories with our guide on digital preservation, image restoration, and data security.
1. Why is SD Card Photo Recovery Necessary?
Like any digital storage medium, Secure Digital (SD) cards can sometimes fail, leading to data loss. Here’s why you might need to recover photos from an SD card:
- Accidental Deletion: A common mistake; you might accidentally delete a photo, or several, while reviewing them.
- Card Formatting: Sometimes, an SD card gets formatted inadvertently, erasing all its content.
- Card Corruption: SD cards can become corrupted due to various reasons, making the photos inaccessible.
If these photos hold value, such situations can cause stress. Fortunately, methods exist to recover those images, no matter the OS.
1.1 What Operating Systems Are Supported?
These methods will work, depending on your OS:
2. What are 6 Ways to Recover Deleted Photos From an SD Card?
Depending on the operating system and device you’re using, you have many ways to recover deleted photos from an SD card. Here are a few methods.
2.1 Way 1: How to Use Data Recovery Software
The safest way to recover deleted photos from your SD card is through data recovery software, such as Disk Drill SD Card Recovery.
Disk Drill is a data recovery app that can retrieve deleted pictures from your SD card and recover almost any file format, including RAW images!
2.1.1 How to Recover Deleted Pictures from an SD Card on Windows
-
Download and install Disk Drill onto your Windows computer. The free version allows you to preview recoverable files and actually recover up to 500 MB of data for free, without upgrading to the Pro version.
 Disk Drill Sidebar
Data recovery for free
Your Companion for Deleted Files Recovery
Free Download
-
Connect the SD Card to your Windows PC using an SD card adapter, or the built-in SD card slot if your computer has one.
-
Launch Disk Drill and select your memory card from the list of available disks. Once you’ve selected the card, click on Search for lost data.
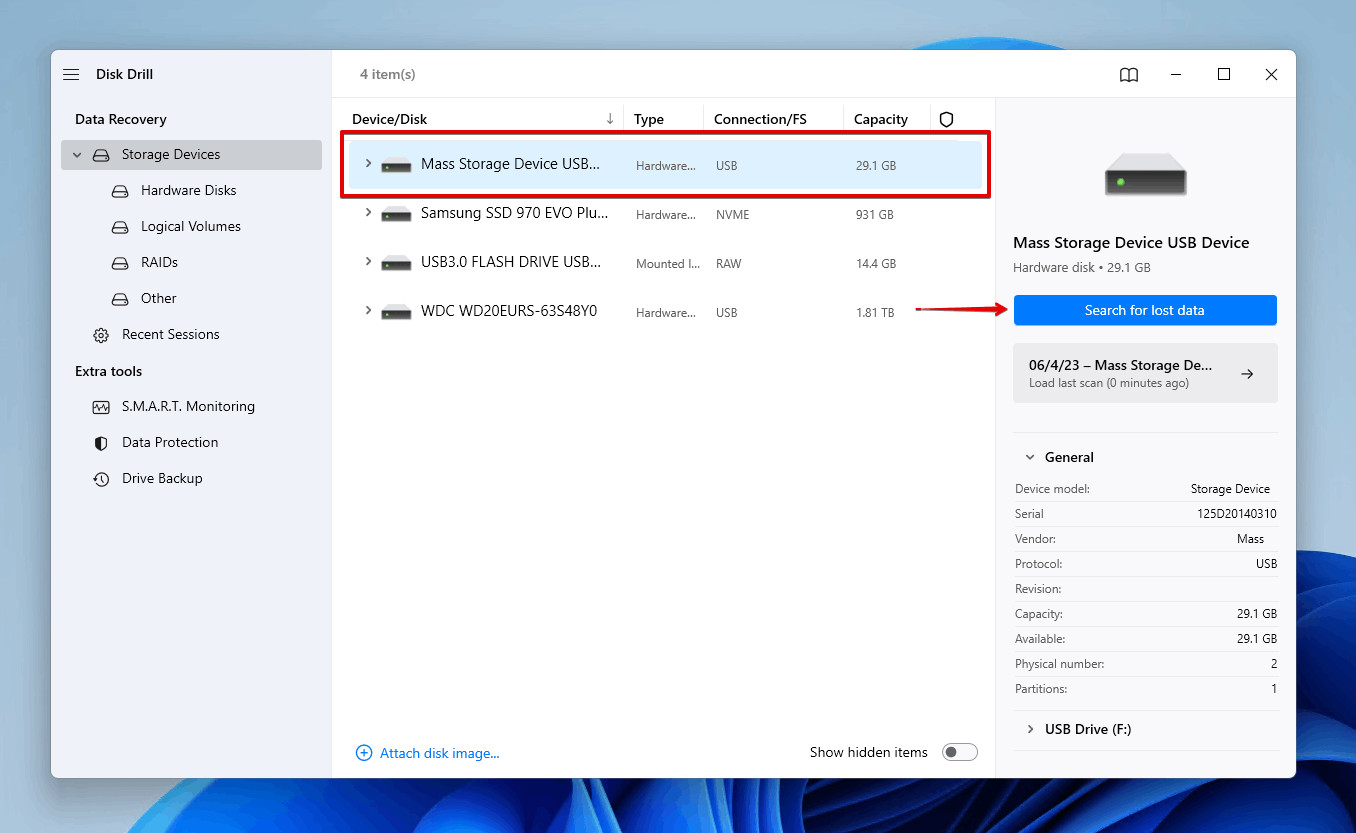 Scanning the SD card for deleted photos on Windows PC
 -
Wait for the scan process to complete.
 Scanning memory card using data recovery software
 -
Browse the photos that Disk Drill found on the SD card once the scan has finished. Click on the Preview icon to look at the pictures before you choose to recover them.
-
Check the files that you would like to recover and then click on the Recover button.
 Selecting the SD card photos.
 -
Choose a suitable recovery destination for the files on a separate storage device.
 Choosing a recovery destination.
2.1.2 How to Recover Deleted Photos from an SD card on Mac
Mac users can download a free version of Disk Drill that allows them to preview the files that it can recover before any financial investment is required. If the files you need are recoverable, you can opt to purchase the Pro version of Disk Drill and perform the actual data recovery.
-
Download and install Disk Drill onto your Mac.
Data recovery for free
Your Companion for Deleted Files Recovery
Free Download
-
Connect the SD card that held the deleted photos to your Mac using an SD card reader or port.
-
Select the SD card from the list of disks presented by Disk Drill. In this case, we’re going to select our SD card but it could be any storage device.
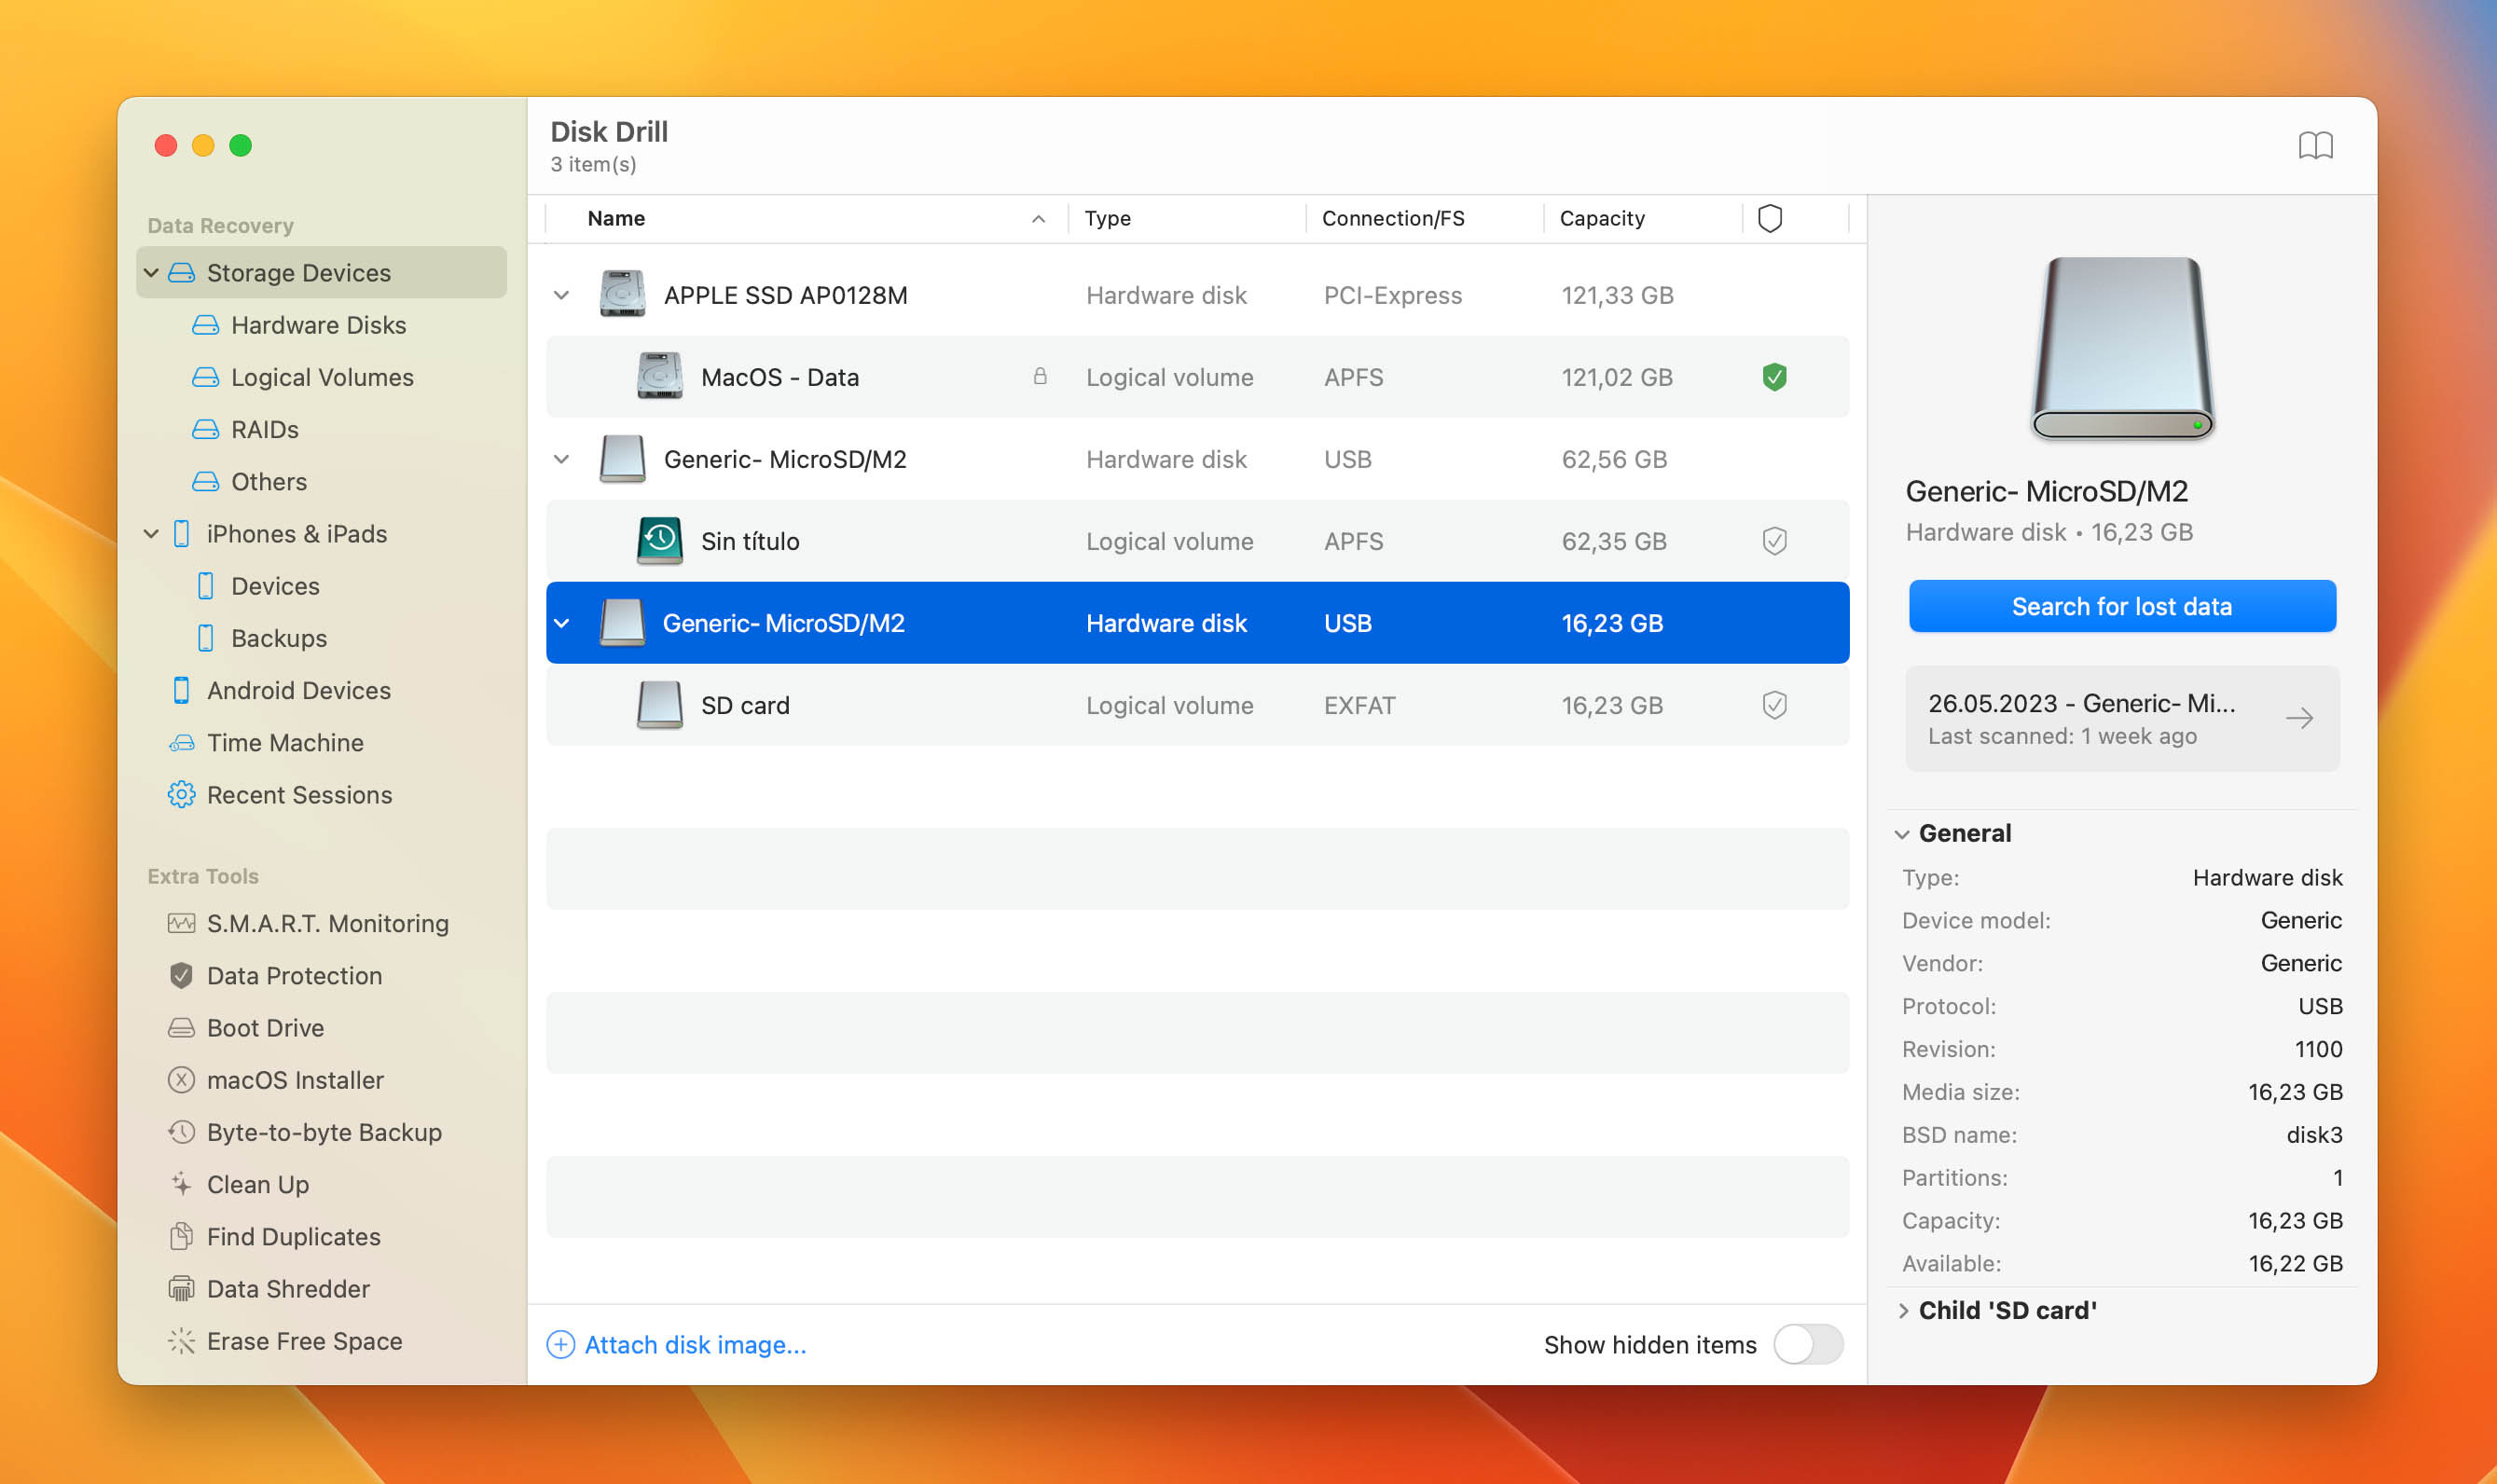 SD card in Disk Drill
 -
Wait for the scan process to complete. This can take some time depending on how much data you have to scan.
 Scan in progress
 -
Now that the scan is done, review the items that Disk Drill was able to recover from your SD card. You can browse your files, use the search box to find something, and also use the Preview function to look at something before recovering it.
-
Look through the files that you want to recover from your SD card and then checkmark the box to select them for recovery. Now, click on the blue Recover button to recover the files and put them back onto your Mac.
 Selecting files for recovery in Disk Drill
 -
Choose an appropriate location for recovery. Make sure you don’t recover the photos to the same SD card, as it can corrupt them.
2.2 Way 2: How to Use an Android Data Recovery App
If you need to recover deleted photos from an SD card that expanded the storage space of your Android smartphone or tablet, then you can use an Android data recovery app like DiskDigger photo recovery.
To recover deleted photos with DiskDigger:
-
Download the app from the Play Store.
-
Launch it and scan your SD card (usually appears as “/mnt/sdcard” or something similar).
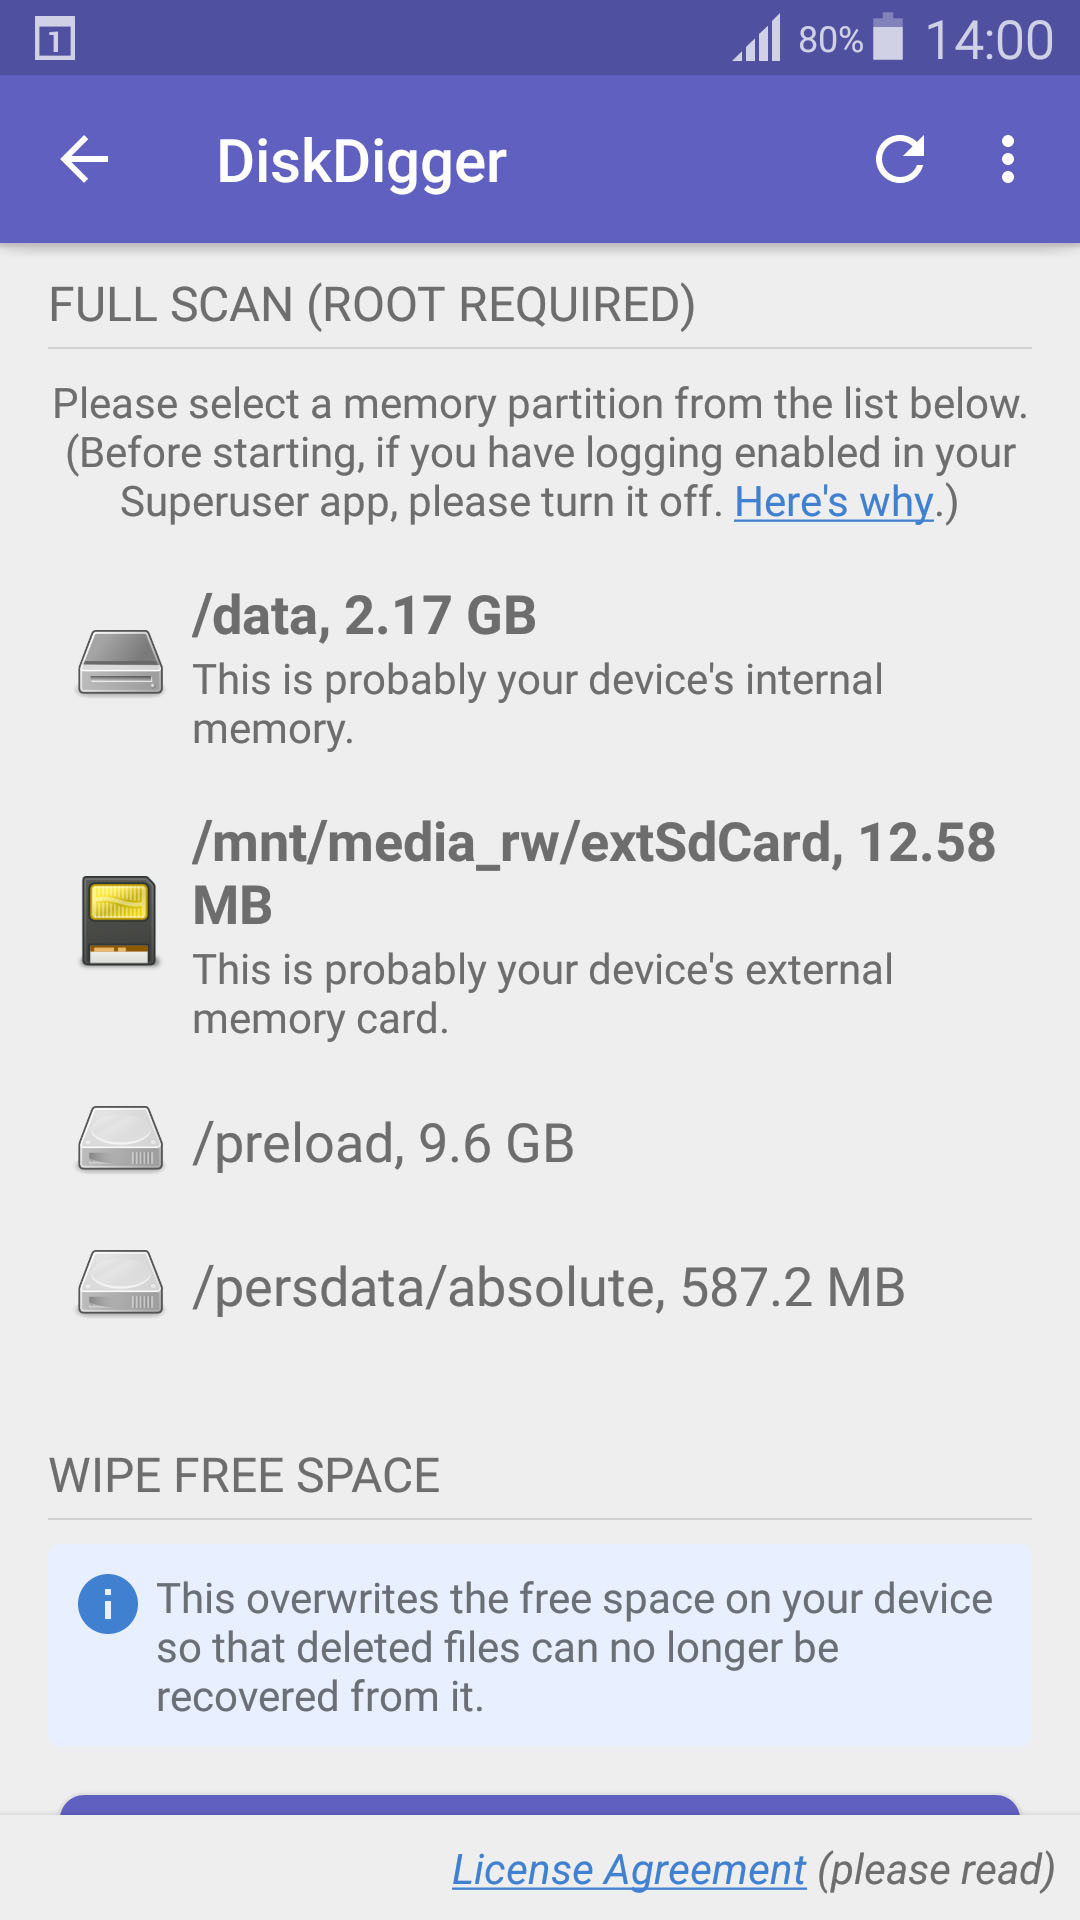 Select storage device
 -
Specify the file types you would like to search for and tap OK.
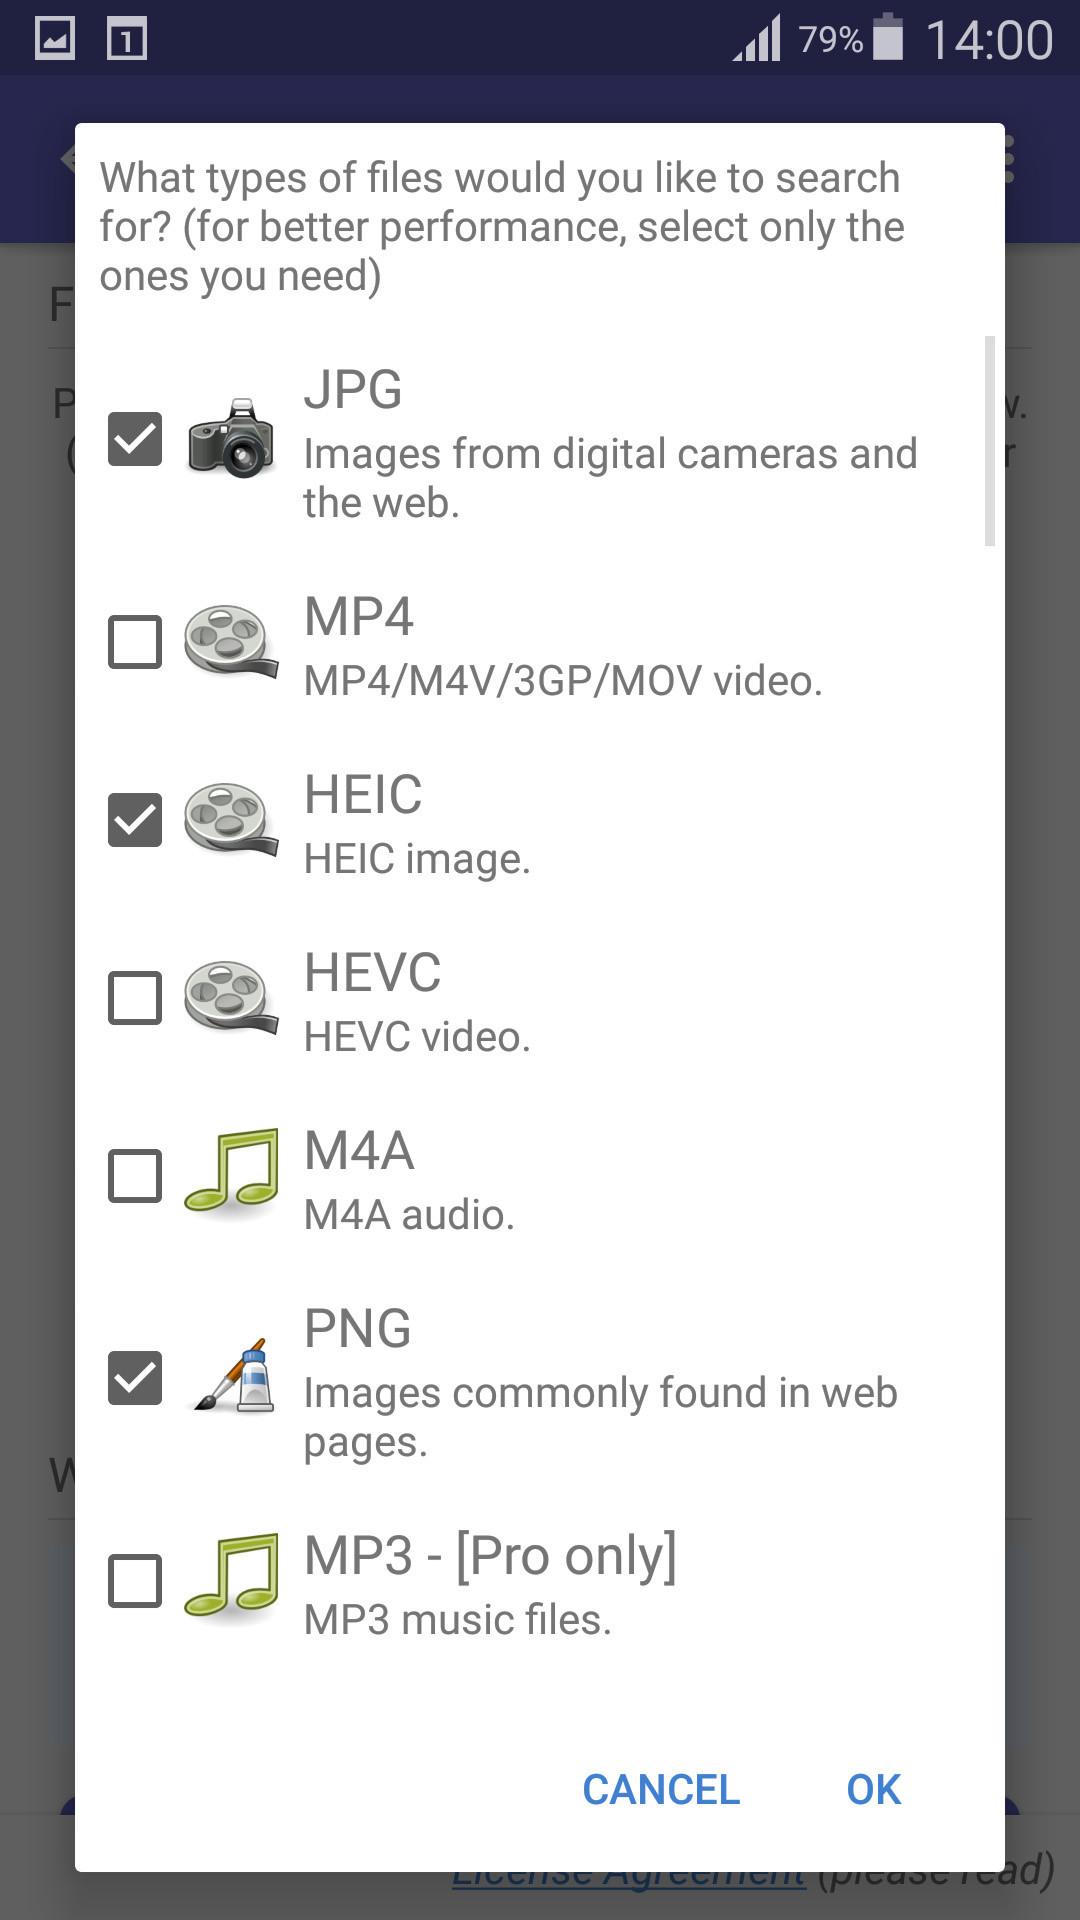 Select file types
 -
Choose the files you want to recover.
 Select files for recover
 -
Tap the Recover button to save them to your device.
 Select recover destination
For the best results, your device should be rooted, and you should use DiskDigger Pro instead of the free version. However, don’t expect to find as many deleted photos as with desktop data recovery software like Disk Drill.
2.3 Way 3: How to Restore Photos from a Backup
An SD card can be used for long-term storage of digital photos or for expanded capacity on a photographic device. If you have just taken a photo and then deleted it there was probably no time to have taken a backup of your photos. On the other hand, if it’s a card you use for transferring photos to be viewed on different devices and the pictures have been resident on the card for some time, it would be best for you to create a backup of those photos.
2.3.1 How to Retrieve from a Backup on Windows
On Windows 10 and 11, you can use the native backup utility File History to back up your personal files. This includes data on external storage devices, like SD cards. If it was set up to back up the photos stored on your SD card, a copy of the photos will be stored on the drive that was designated to be used by File History. Using File History, you can then restore the deleted photos.
-
Open Start and search File History. Open it.
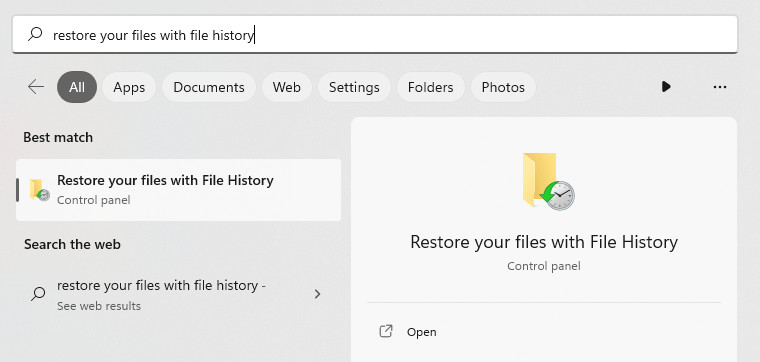 Opening File History.
 -
Click Restore personal file.
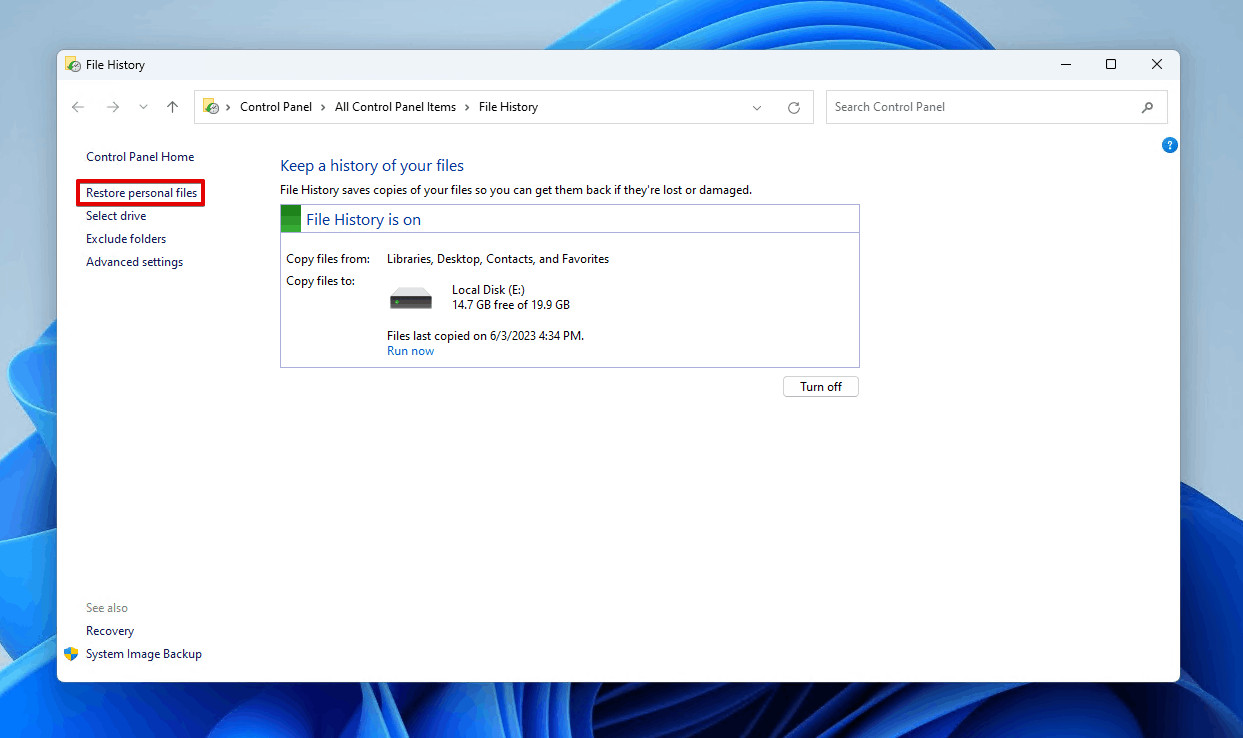 Restoring personal files.
 -
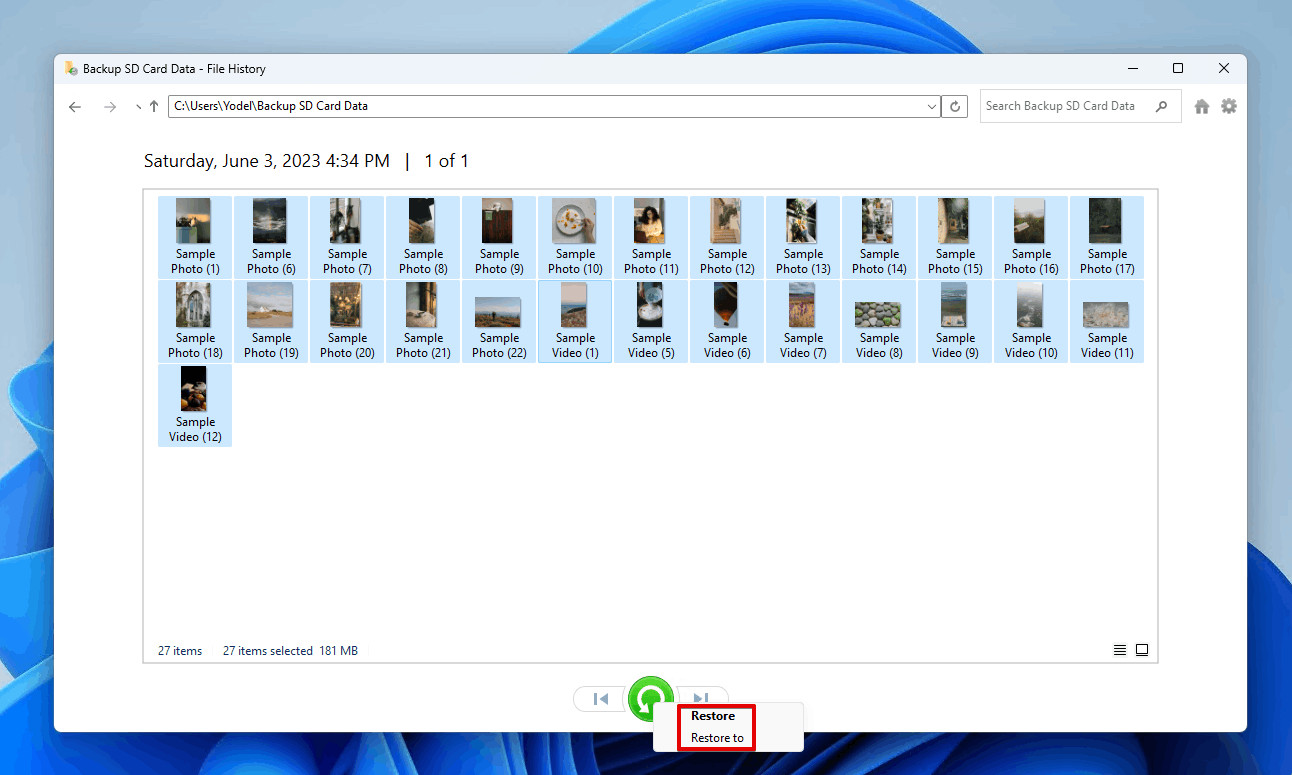
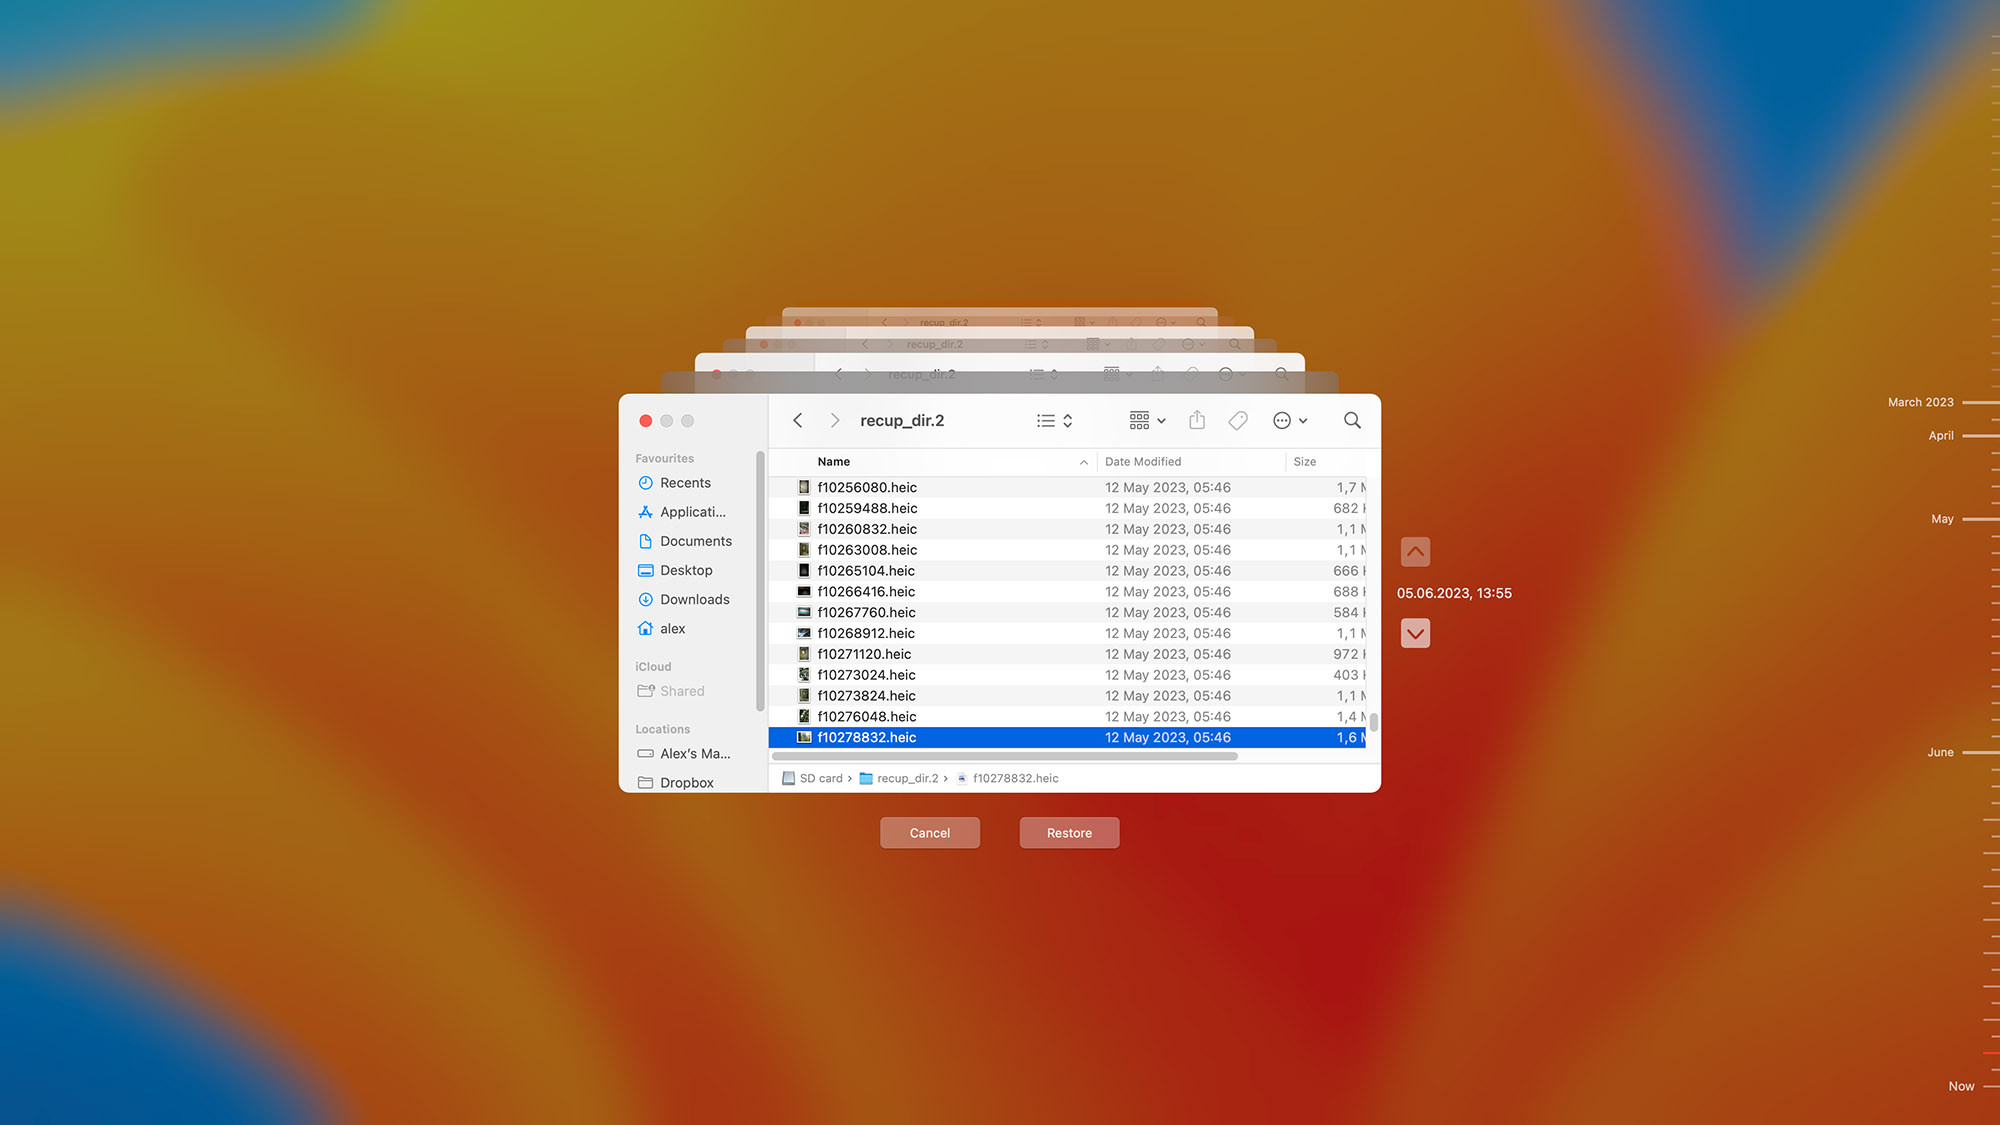
Navigate to the backed-up photos and select the ones you want to restore.
 Selecting the SD card photos.
 -
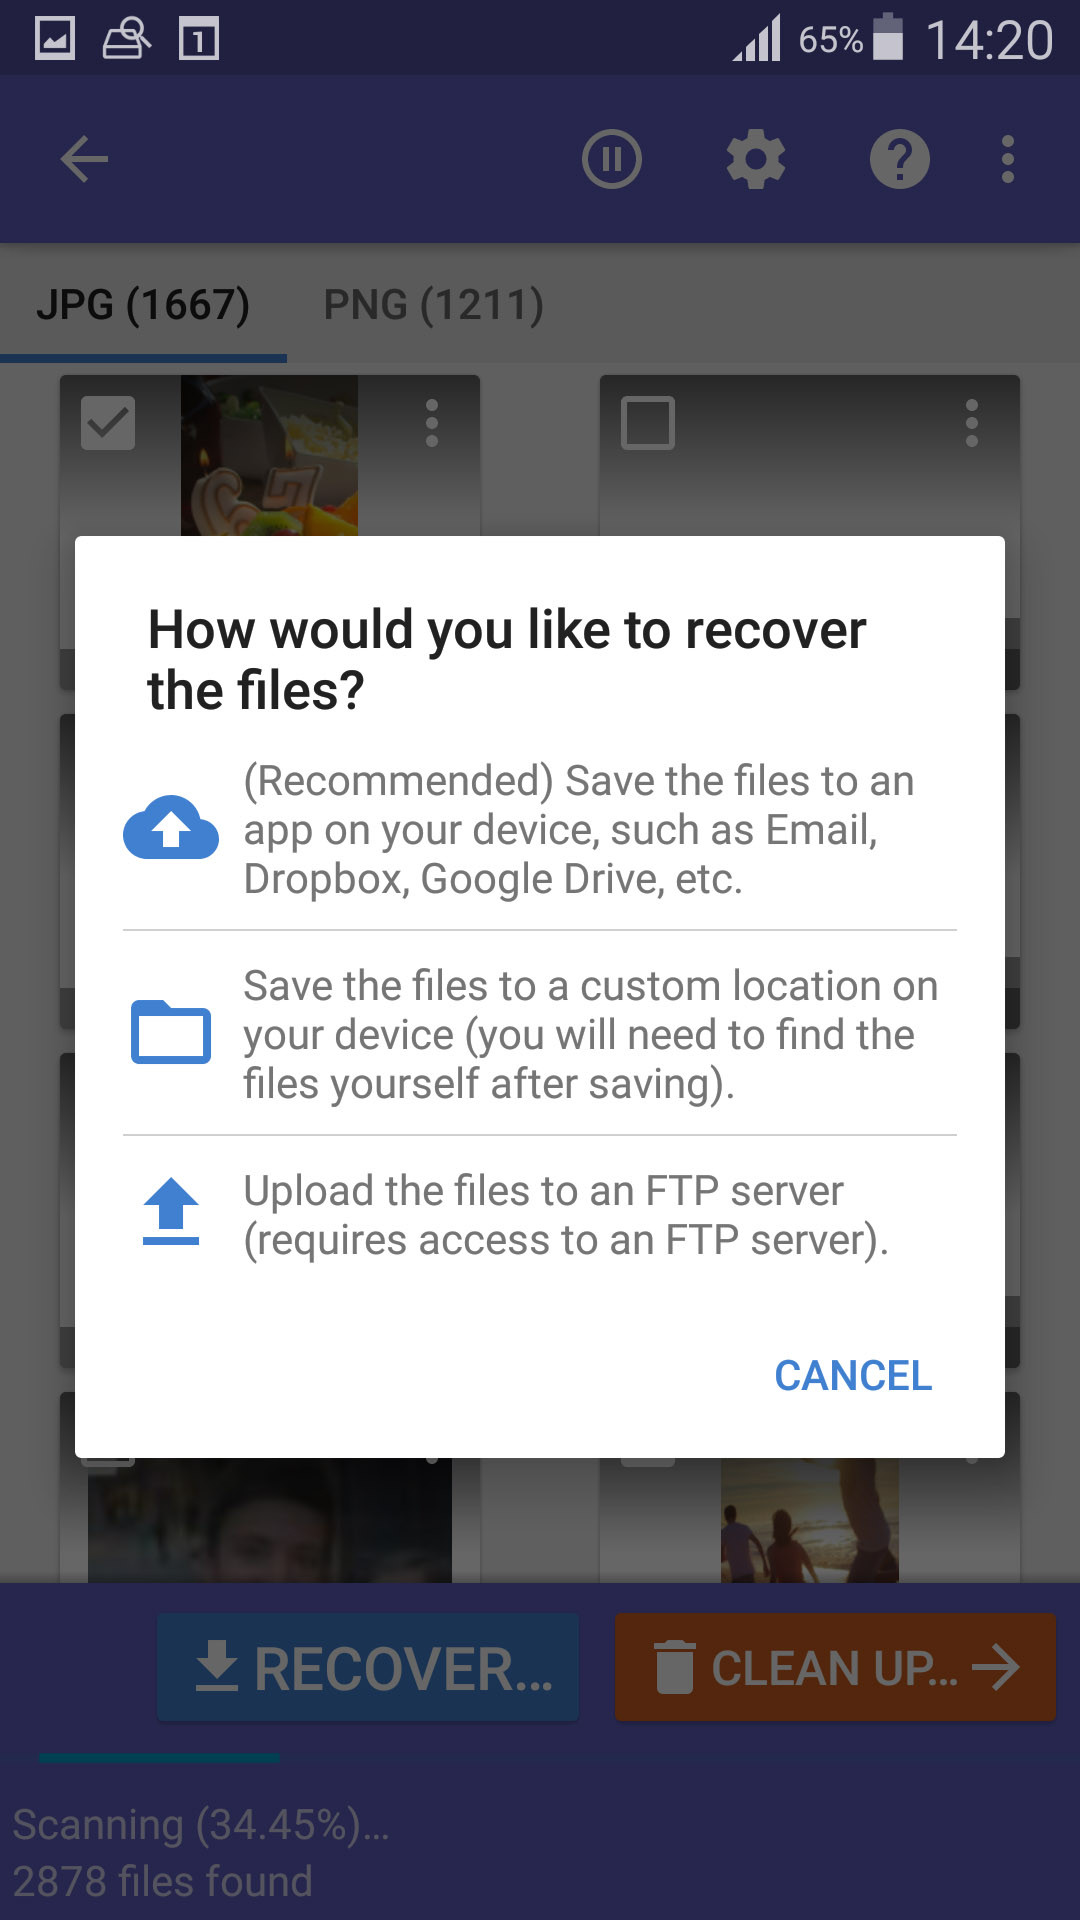
Right-click the green Restore button and either click Restore to restore them to the original location, or Restore to in order to choose a custom destination.
 Choosing how to restore the photos.
Alternatively, if you previously copied or moved the files from your SD card to your computer, try searching for the photos instead, as they may reside in a subfolder somewhere. Using File Explorer, you can enter the name of the photo or folder you’re looking for into the search box. Or, you can pull all files by a specific type if you cannot remember the name.
2.3.2 How to Restore from a Backup on Mac
Time Machine is the primary backup feature for macOS. It can be used to automatically back up your personal data, allowing you to easily restore files that have become deleted, damaged, or otherwise inaccessible.
You can recover photos that were deleted from your SD card using Time Machine if it was previously configured to back up data from external devices. This is, of course, only possible if you have previously connected the SD card to your Mac at least once in order for them to be backed up.
If you want to learn more about how to use Time Machine, Apple has a walkthrough which you can view here.
In cases of loss or theft of an SD card, a backup may be the only way that you can ever recover your photos. Most people think that data loss won’t happen to them, I would recommend that you start backing up sooner rather than later.
 Time Machine
Again, your exact procedure will vary based on the type of backups that you perform. Whether you have backed up to the cloud or an external storage device, there is a secure feeling that comes with knowing that you can recover all of your precious memories at any time.
2.4 Way 4: How to Get Back Photos from a Cloud Backup
Android users have it great because they can not only tell their smartphones to store photos on a removable SD card, but they can also take advantage of apps like OneDrive, Dropbox, or Google Photos to back up everything to the cloud.
If that’s your case, then you should be able to recover each and every deleted photo just by downloading it from your cloud storage service of choice. Best of all, you can do so from anywhere and on any device, so this method can save you even if your original device has become stolen or lost.
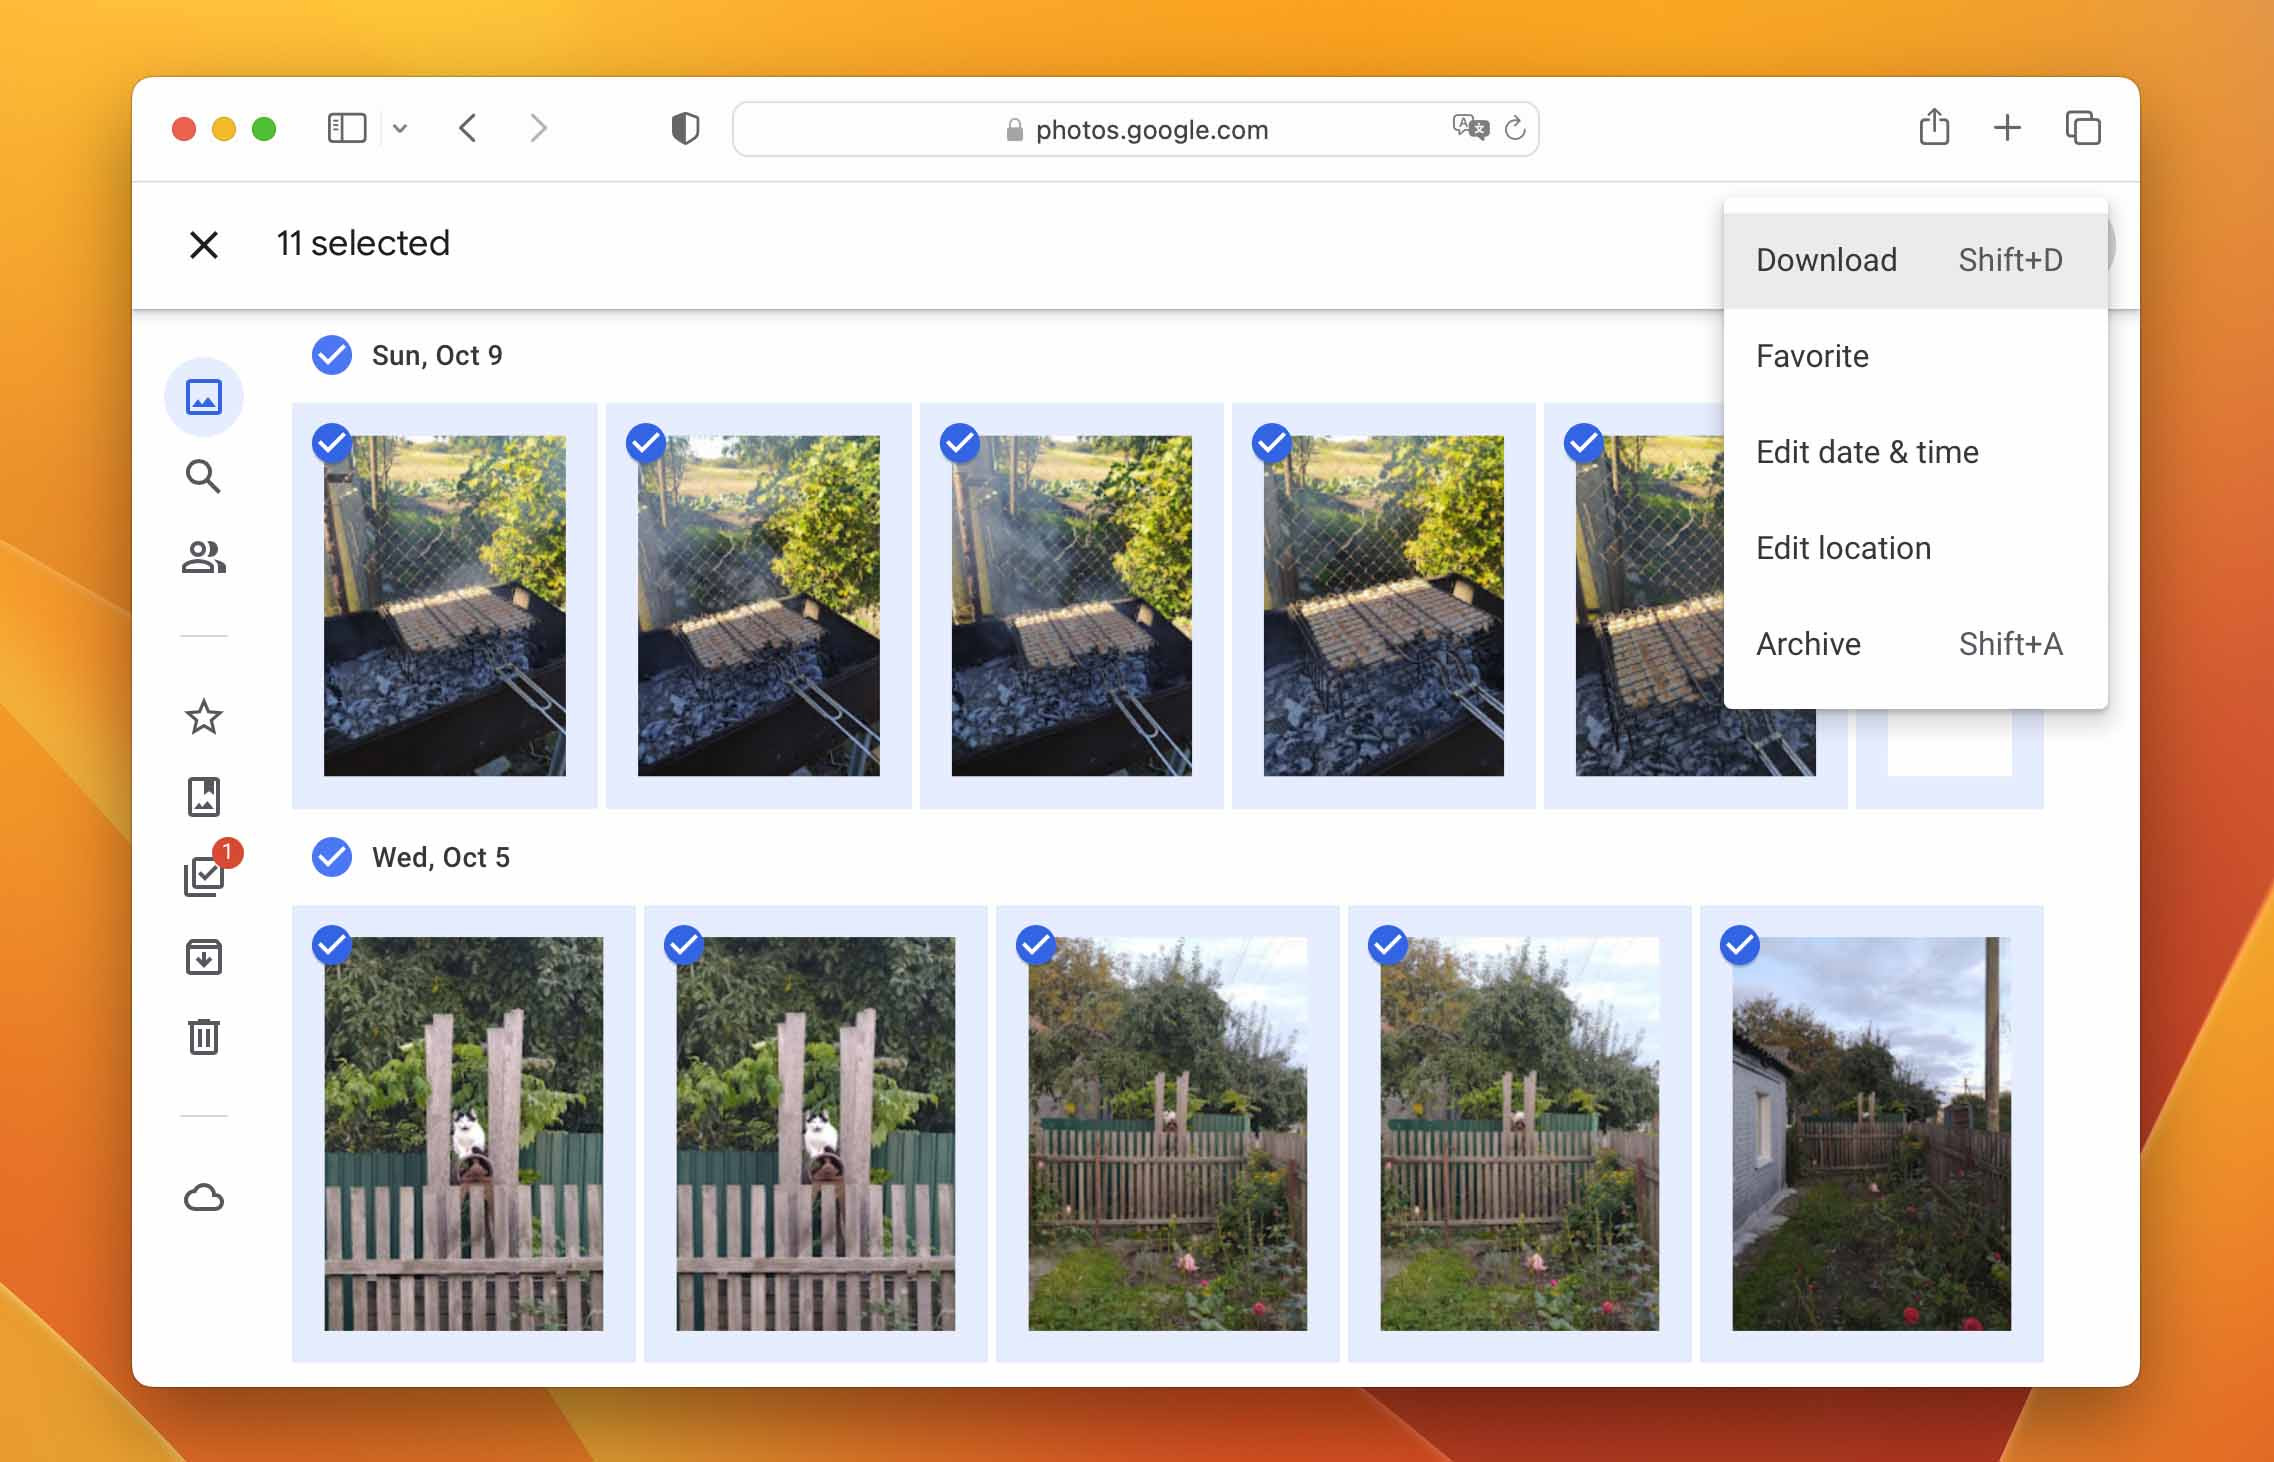 Recovering from a Cloud Backup
Use the following links to see official guides on how to download files from popular cloud storage services:
- How to download files from OneDrive
- How to download files from Dropbox
- How to download files from Google Photos
Do you use a different cloud backup app and are not sure how to download your deleted photos from it? Then we recommend you consult Google and look for a suitable guide.
2.5 Way 5: How to Retrieve Photos from Your Device’s Internal Memory or Storage
Be sure to check your device’s internal memory or temporary storage on Mac or Windows PC. When you delete a photo on your device, it is logically deleted and its storage space is marked as available, allowing new data to overwrite it at the same location. It is not immediately physically removed from your SD card.
For this reason, stop using your device as soon as you notice that you have deleted a photo that you want to recover. This will give you the best chance of recovery before the storage that contained the lost pictures is overwritten.
Of course, you can also restore the deleted photos from apps that retained copies of them, such as Photos on macOS. The Photos app allows you to import photos from your SD card. In doing so, a copy of the photos will be moved to your Mac’s storage disk. If they’re deleted from within the app, you can then go to the Recently Deleted folder and quickly restore them.
This is only possible if the SD card has been connected to your Mac and the photos have previously been imported. Deleted photos in the Recently Deleted folder will be retained for 30 days.
A similar procedure can be performed using the various photo gallery apps found on Android devices. Technology is pretty smart and helps us out a lot.
2.6 Way 6: How to Recovering Photos From the Recycle Bin
In case you weren’t aware, there is a place where files go before they’re permanently deleted on Windows and macOS. On Windows, this is Recycle Bin. On Mac, it’s Trash. The two work very similar to each other, with only slight differences.
2.6.1 On Windows
Windows will send any file you delete to the Recycle Bin unless it’s either permanently deleted or too large to be stored in the Recycle Bin.
Files deleted from an external storage device (external hard drive, USB flash drive, etc.) will not go to the Recycle Bin. Instead, you must use data recovery software to get such files back.
Here’s how you can restore files from the Recycle Bin on Windows 10 and 11:
-
Open Recycle Bin on your Desktop.
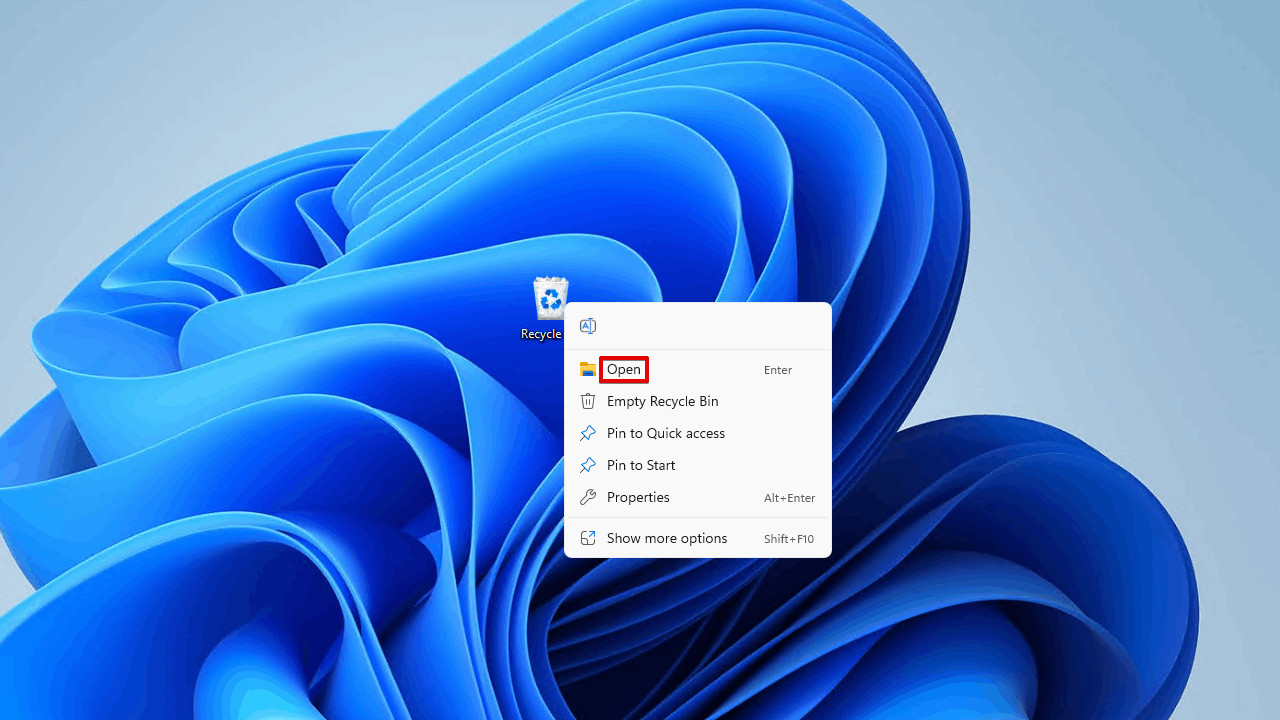 Opening Recycle Bin.
 -
Select the data you want to restore, then click Restore the selected items.
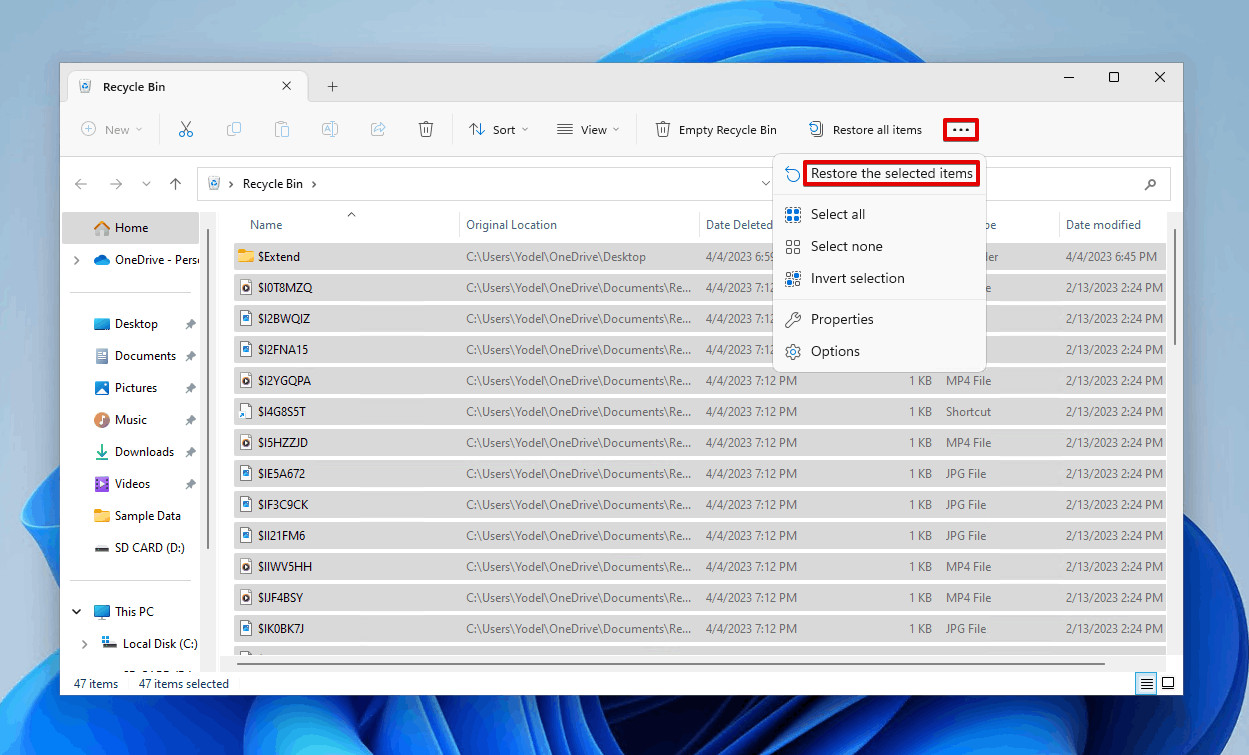 Restoring the selected files.
This will restore the items back to their original location. If you want to restore them elsewhere, simply drag and drop them out of Recycle Bin and into another folder.
2.6.2 On Mac
The process of restoring data is similar on macOS.
- Open Trash using Finder.
- Drag and drop the files to a safe location.
When you delete files from an external storage device on older versions macOS, it created a hidden .TRASHES folder on the device. To access it, go to the root directory of your storage device and press CMD + SHIFT + . to show hidden files. Then, simply restore the deleted photos from the Trash folder. Unfortunately, this is no longer possible on the current version of macOS.
3. Conclusion
As you can see there are a variety of options available to you if you accidentally deleted some photos from an SD card on Mac or Windows PC. Depending on how long ago they were deleted and the availability of a backup, it might be a simple or more complex procedure.
Make use of the power of data recovery software by using Disk Drill for Mac or Disk Drill for Windows to recover your deleted photos. The free download lets you preview the files that can be recovered for you and Windows users can recover up to 500MB for free. Download a copy today and protect your important photos from accidental deletion.
Read also
Ways to Recover Lost Photos from iPhone
Recover Permanently Deleted Photos on Mac
Recover Permanently Deleted Photos From Android
Best Photo Recovery Software Tools
At dfphoto.net, we’re dedicated to offering comprehensive resources for photographers. From in-depth tutorials to showcasing stunning visual works, our platform aims to inspire and support your photographic journey. Encountering challenges such as accidental photo deletion can be disheartening. That’s why we provide detailed guides like this one, ensuring you have the knowledge and tools to overcome technical obstacles and continue pursuing your passion.
We invite you to explore dfphoto.net further. Dive into our collection of tutorials, discover awe-inspiring photographs, and connect with a vibrant community of fellow photographers. Whether you’re seeking technical advice, creative inspiration, or simply a space to share your work, dfphoto.net is here to enrich your photographic experience.
Address: 1600 St Michael’s Dr, Santa Fe, NM 87505, United States
Phone: +1 (505) 471-6001
Website: dfphoto.net
4. FAQ
4.1 How to recover deleted photos from an SD card?
To recover deleted photos from an SD card:
- Download and install Disk Drill.
- Connect the SD card to your computer and launch Disk Drill.
- Scan the SD card.
- Select your deleted photos.
- Recover them to a safe location.
4.2 How to recover photos from a corrupted SD card?
That depends on how bad the corruption is. If your computer can recognize the SD card, we recommend you use SD card recovery software to scan the corrupted SD card and recover as many photos from it as possible. But if the SD card is unrecognizable, you first need to fix the corruption using CHKDSK in Windows or First Aid in macOS.
4.3 How can I recover deleted photos from my SD card for free?
You can use a free SD card recovery application. Here are three popular options:
- Disk Drill (500 MB for free with Windows version)
- PhotoRec (Windows, Mac, and Linux)
- Windows File Recovery (Windows)
Disk Drill has an easy-to-use graphical user interface, while PhotoRec and Windows File Recovery are command-line utilities.
4.4 How to recover deleted photos from memory card without software?
Unfortunately, it’s not possible to recover deleted photos from a memory card without software. You can, however, go thought your backups and look for them there. Some digital cameras automatically create backup copies and store them on in the internal memory, so make sure to look there as well.
4.5 How to recover deleted photos from an SD card on Android phone?
Android users can download an SD card recovery app called DiskDigger directly from Google Play Store and use it to recover deleted photos with a few simple taps. The basic version of DiskDigger is free, but there’s also a paid version that includes several extra features.
4.6 How Do I Recover Photos From a Sandisk SD Card?
- Download and install Disk Drill onto your Mac.
- Launch Disk Drill and connect the Sandisk SD card via card reader. Once you have found the storage device, click on Search for lost data and the scan process will start.
- Wait for the scan process to complete.
- Now that the scan process is done, look for the files that you would like to recover. You can also use the Preview function to take a look at them before you recover them.
- Check the box to select them for recovery.
- Click on the blue Recover button.
4.7 Can You Recover Photos From a Formatted SD Card?
If your SD card has been formatted, then we will want to use a third-party recovery software to recover the files from the storage device. Keep in mind a formatted SD card doesn’t have the highest chance for data recovery, especially after a full format, but it’s worth trying.
Follow the steps listed in the article above and that will allow you to scan and recover any files that Disk Drill can find.
4.8 What factors affect the success rate of photo recovery from an SD card?
Several factors influence the likelihood of successfully retrieving deleted photos:
- Time elapsed: The sooner you attempt recovery after deletion, the better your chances.
- SD card usage: Continued use of the SD card after deletion can overwrite the deleted files, making recovery difficult.
- Type of deletion: Simple deletion is easier to recover from than formatting or physical damage.
- Data recovery software: The quality and effectiveness of the recovery software play a crucial role.
- File system: Different file systems (FAT32, exFAT, NTFS) can affect the recovery process.
4.9 What are the common causes of SD card data loss?
Several factors can lead to losing pictures from an SD card:
- Accidental deletion: Human error, such as accidentally pressing the delete button.
- Formatting: Intentionally or unintentionally formatting the SD card.
- Corruption: File system corruption due to power outages, improper removal, or malware.
- Physical damage: Damage to the SD card from bending, water, or extreme temperatures.
- Logical errors: Errors in the file system or directory structure.
4.10 How can dfphoto.net help me prevent data loss in the future?
- Educational Resources: We provide guides and articles on data backup strategies, SD card maintenance, and safe handling practices.
- Product Reviews: We offer reviews and recommendations on reliable SD cards and storage solutions.
- Community Support: Our community forums allow you to connect with other photographers and share experiences and tips for data protection.
- Software Recommendations: We suggest reputable data recovery software and tools to help you recover lost photos.