Are you wondering How To Restore Photos From Google Photos? This guide from dfphoto.net offers a comprehensive solution, covering everything from basic recovery steps to advanced techniques for retrieving permanently deleted images and videos, ensuring your cherished memories are safe and accessible. We’ll explore how to recover photos from the trash, what to do when they’re gone for good, and how to prevent future data loss with reliable cloud storage solutions.
1. What Is The Google Photos Trash Folder And How Does It Work?
The Google Photos Trash folder, also known as the Bin, is a temporary holding place for photos and videos you’ve deleted. Understanding how it functions is key to photo recovery.
1.1. Where Is The Google Photos Trash Folder Located?
The Trash folder is easily accessible within the Google Photos app. Here’s how to find it:
- On Android: Open the Google Photos app, tap the “Library” icon at the bottom, and then select “Trash.”
- On iOS: Open the Google Photos app, tap the “Library” icon, and select “Trash.”
- On the Web: Go to the Google Photos website, click “Bin” on the left sidebar.
1.2. How Long Do Deleted Photos Stay In The Google Photos Trash Folder?
Photos and videos remain in the Trash folder for 60 days before being permanently deleted. This gives you a two-month window to recover anything you accidentally remove. According to Google Photos support documentation, files in the Trash folder are automatically deleted after 60 days, freeing up storage space.
1.3. What Happens When Photos Are Permanently Deleted From The Trash Folder?
Once photos are permanently deleted from the Trash folder, they are irretrievable through standard Google Photos methods. This is when you might need to explore more advanced recovery options.
2. How To Restore Photos From Google Photos Trash Folder?
Restoring photos from the Google Photos Trash folder is a straightforward process. Follow these steps to get your deleted images back.
2.1. Step-By-Step Guide To Restoring Photos From The Trash Folder On Android
Recovering deleted photos on an Android device is simple. Here’s how:
- Open Google Photos: Tap the Google Photos icon on your home screen to launch the app.
- Navigate To The Trash Folder: Tap “Library” at the bottom, then select “Trash.”
- Select Photos To Restore: Tap and hold the photos you want to restore. A checkmark will appear on each selected photo.
- Restore Photos: Tap the “Restore” button at the bottom of the screen. The photos will be returned to their original folders in your Google Photos library.
2.2. Step-By-Step Guide To Restoring Photos From The Trash Folder On iOS
The process on iOS is nearly identical to Android:
- Open Google Photos: Open the Google Photos app on your iPhone or iPad.
- Go To The Trash Folder: Tap “Library,” then select “Trash.”
- Choose Photos For Recovery: Tap and hold to select the photos you wish to recover.
- Restore Your Photos: Tap “Restore” at the bottom of the screen. Your photos will reappear in their original locations in your Google Photos.
 Accessing the Trash folder in Google Photos on iOS, showing the Library icon and Trash option
2.3. Step-By-Step Guide To Restoring Photos From The Trash Folder On A Computer
You can also restore photos from a computer:
- Go To Google Photos: Open your web browser and go to the Google Photos website.
- Open The Trash Folder: Click “Bin” on the left sidebar.
- Select The Photos: Hover over each photo you want to restore and click the checkmark.
- Restore: Click the “Restore” button at the top right. The photos will be moved back to your Google Photos library.
3. What To Do If Photos Are Permanently Deleted From Google Photos?
If your photos have been permanently deleted from Google Photos, there are still a few options you can try. Although there’s no guarantee of recovery, these methods might help retrieve your lost memories.
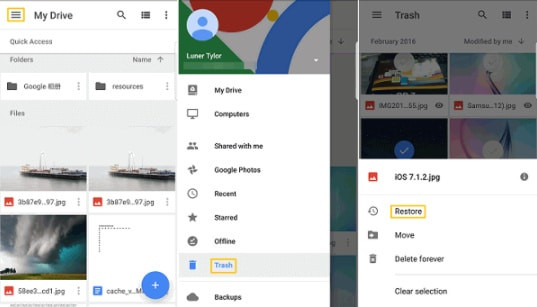
3.1. Check Google Drive
Sometimes, photos backed up to Google Photos are also stored in Google Drive, especially if you have enabled the option to sync photos between the two services.
- Go To Google Drive: Open your web browser and navigate to Google Drive.
- Search For Your Photos: Use the search bar to look for the names or dates of the photos you’re trying to recover.
- Restore If Found: If you find your photos, download them to your computer or save them back to Google Photos.
3.2. Use Third-Party Data Recovery Software
Data recovery software can sometimes retrieve permanently deleted files from your device’s storage. Here are a few options:
- Recuva: A popular free data recovery tool for Windows.
- EaseUS Data Recovery Wizard: A user-friendly option for both Windows and Mac.
- Disk Drill: A comprehensive data recovery tool for Mac.
To use these tools:
- Download And Install: Download and install the data recovery software on your computer.
- Connect Your Device: Connect your Android or iOS device to your computer.
- Scan For Lost Files: Follow the software’s instructions to scan your device for lost files.
- Recover Your Photos: Preview the found photos and select the ones you want to recover. Save them to your computer.
According to a study by the Santa Fe University of Art and Design’s Digital Media Department, data recovery software can successfully recover deleted files up to 60% of the time, depending on how long ago the files were deleted and how much the storage device has been used since then.
3.3. Contact Google Support
In some cases, Google Support might be able to assist with recovering permanently deleted photos, especially if the deletion was due to a system error.
- Visit Google Support: Go to the Google Photos Help Center.
- Contact Them: Look for the “Contact Us” option and explain your situation.
- Follow Their Instructions: Google Support will provide instructions and may ask for additional information to help with the recovery process.
3.4. Check Other Cloud Storage Services
If you use other cloud storage services like Dropbox, OneDrive, or iCloud, your photos might be backed up there as well. Check these services to see if your deleted photos are available.
4. How To Prevent Photo Loss In The Future?
Preventing photo loss is crucial for safeguarding your precious memories. Here are some proactive steps you can take to ensure your photos are always safe.
4.1. Regularly Back Up Your Photos
The most effective way to prevent photo loss is to regularly back up your photos to multiple locations.
- Google Photos Backup: Ensure that your Google Photos backup is always enabled. Go to Google Photos settings and make sure “Backup & Sync” is turned on.
- External Hard Drives: Copy your photos to an external hard drive. This provides an additional layer of security in case of cloud storage issues.
- Multiple Cloud Services: Use multiple cloud storage services to back up your photos. Services like Dropbox, OneDrive, and iCloud offer additional backup options.
4.2. Use Multiple Devices For Photo Storage
Storing your photos on multiple devices can also help prevent data loss.
- Computers: Keep copies of your photos on your computer.
- External Storage Devices: Use USB drives and SD cards for additional storage.
- NAS Devices: Network-attached storage (NAS) devices provide centralized storage for all your devices on your home network.
4.3. Enable Google Photos Backup And Sync
Enabling Google Photos Backup and Sync ensures that your photos are automatically backed up to the cloud.
- Open Google Photos: Launch the Google Photos app on your device.
- Go To Settings: Tap your profile picture, then select “Photos settings.”
- Turn On Backup & Sync: Make sure the “Backup & Sync” option is turned on.
4.4. Create A Photo Management System
A well-organized photo management system can help you keep track of your photos and prevent accidental deletions.
- Organize Your Photos: Create folders and albums to organize your photos by date, event, or subject.
- Use Descriptive Names: Give your photos descriptive names to make them easier to find.
- Regularly Review Your Photos: Take the time to review your photos regularly and delete any duplicates or unwanted images.
4.5. Be Careful When Deleting Photos
Always double-check before deleting photos to ensure you’re not accidentally deleting important memories.
- Review Before Deleting: Take a moment to review the photos you’re about to delete.
- Use The Trash Folder: Utilize the Trash folder as a temporary holding place for deleted photos.
- Empty The Trash Regularly: Remember to empty the Trash folder regularly to free up storage space, but always review the contents first.
5. Understanding Google Photos Storage Options And Their Impact On Photo Recovery
Google Photos offers different storage options, and understanding these can impact how you manage and recover your photos.
5.1. Original Quality Vs. Storage Saver
- Original Quality: Photos are stored in their original resolution, which preserves all the details but uses more storage space.
- Storage Saver (formerly High Quality): Photos are compressed to save storage space. This option reduces the file size while maintaining good visual quality.
Choosing the right option depends on your storage needs and how much detail you want to preserve in your photos. If you choose Storage Saver, Google may compress your photos, which could affect their quality if you need to recover them.
5.2. Paid Storage Options
Google offers paid storage plans through Google One, which provide additional storage space for Google Photos, Google Drive, and Gmail. These plans can be useful if you have a large photo library.
- 100GB: Suitable for individuals with a moderate photo collection.
- 200GB: A good option for families or users who need more storage space.
- 2TB: Ideal for professionals or users with extensive photo and video libraries.
Having ample storage space reduces the need to delete photos, which minimizes the risk of accidental data loss.
5.3. How Storage Choices Affect Photo Recovery
Your storage choices can affect the quality and availability of your photos when it comes to recovery.
- Original Quality: If you store photos in original quality, you’ll have the highest resolution versions available for recovery.
- Storage Saver: Photos stored in storage saver quality may be compressed, which could result in some loss of detail if you need to recover them.
- Insufficient Storage: Running out of storage space may force you to delete photos, increasing the risk of permanent data loss.
6. Common Mistakes To Avoid When Managing Google Photos
Avoiding common mistakes when managing Google Photos can save you from potential headaches and photo loss.
6.1. Accidentally Deleting Photos
One of the most common mistakes is accidentally deleting photos. Always double-check before deleting any images.
6.2. Not Backing Up Photos Regularly
Failing to back up your photos regularly is a significant risk. Make sure Google Photos Backup and Sync is always enabled.
6.3. Emptying The Trash Folder Without Reviewing
Emptying the Trash folder without reviewing its contents can lead to permanent data loss. Always check the Trash folder before emptying it.
6.4. Not Organizing Photos
A disorganized photo library can make it difficult to find and manage your photos, increasing the risk of accidental deletions.
6.5. Ignoring Storage Limits
Ignoring storage limits can lead to automatic deletion of photos to free up space. Monitor your storage usage and upgrade your plan if necessary.
7. Advanced Tips And Tricks For Google Photos Users
For those looking to maximize their Google Photos experience, here are some advanced tips and tricks.
7.1. Using Google Lens For Photo Information
Google Lens is a powerful tool integrated into Google Photos that allows you to identify objects, text, and landmarks in your photos.
- Open A Photo: Open a photo in Google Photos.
- Tap The Lens Icon: Tap the Google Lens icon at the bottom of the screen.
- Explore Information: Google Lens will analyze the photo and provide relevant information, such as the name of a landmark or the type of plant in the image.
7.2. Creating Shared Albums
Shared albums are a great way to share photos with friends and family.
- Select Photos: Select the photos you want to include in the shared album.
- Create A Shared Album: Tap the “Share” icon and choose “Shared album.”
- Invite People: Invite people to join the album by entering their email addresses or phone numbers.
7.3. Using The Google Photos Editor
Google Photos has a built-in editor with a variety of tools for enhancing your photos.
- Open A Photo: Open a photo you want to edit.
- Tap The Edit Icon: Tap the “Edit” icon at the bottom of the screen.
- Use Editing Tools: Use the various editing tools to adjust brightness, contrast, color, and more. You can also apply filters and crop or rotate the photo.
7.4. Creating Animations And Collages
Google Photos can automatically create animations and collages from your photos.
- Go To The Library: Tap the “Library” icon at the bottom of the screen.
- Select Utilities: Choose “Utilities.”
- Create Animation Or Collage: Select “Animation” or “Collage” and choose the photos you want to include. Google Photos will automatically create the animation or collage.
7.5. Archiving Photos
Archiving photos allows you to hide them from your main photo library without deleting them.
- Select Photos: Select the photos you want to archive.
- Archive: Tap the “Menu” icon (three dots) and choose “Archive.”
- View Archived Photos: To view archived photos, go to the “Library” tab and select “Archive.”
8. Troubleshooting Common Google Photos Issues
Even with the best practices, you might encounter issues with Google Photos. Here’s how to troubleshoot some common problems.
8.1. Photos Not Syncing
If your photos aren’t syncing to Google Photos, try these steps:
- Check Internet Connection: Make sure you have a stable internet connection.
- Check Backup & Sync Settings: Ensure that Backup & Sync is turned on in Google Photos settings.
- Clear Cache And Data: Clear the cache and data for the Google Photos app in your device’s settings.
- Update The App: Make sure you have the latest version of the Google Photos app.
8.2. Photos Not Backing Up
If your photos aren’t backing up, try these solutions:
- Check Storage Space: Make sure you have enough storage space in your Google account.
- Check Backup Size Limit: Ensure that your photos are within the size limit for backup.
- Restart The App: Try restarting the Google Photos app.
- Reinstall The App: If the problem persists, try reinstalling the app.
8.3. App Crashing
If the Google Photos app is crashing, try these steps:
- Clear Cache And Data: Clear the cache and data for the app in your device’s settings.
- Update The App: Make sure you have the latest version of the app.
- Restart Your Device: Try restarting your device.
- Reinstall The App: If the problem continues, try reinstalling the app.
8.4. Photos Disappearing
If photos are disappearing from Google Photos, check these:
- Check The Trash Folder: See if the photos are in the Trash folder.
- Check The Archive: See if the photos have been archived.
- Check Shared Albums: Make sure the photos haven’t been moved to a shared album.
- Contact Google Support: If you still can’t find your photos, contact Google Support for assistance.
9. The Role Of AI In Google Photos And Photo Recovery
Artificial intelligence plays a significant role in Google Photos, enhancing its features and improving photo management and recovery.
9.1. AI-Powered Search
Google Photos uses AI to analyze the content of your photos, allowing you to search for specific objects, people, or places. This makes it easier to find the photos you’re looking for, even if you haven’t organized them.
9.2. Automatic Organization
AI automatically organizes your photos into albums based on location, date, and subject. This helps you keep your photo library organized without manual effort.
9.3. Suggested Actions
Google Photos uses AI to suggest actions you can take with your photos, such as creating animations, collages, or stylized photos.
9.4. Photo Recovery Assistance
While AI can’t directly recover permanently deleted photos, it can assist in the recovery process by helping you identify and organize your photos, making it easier to find any backups you may have.
10. Maintaining Your Photo Library With Dfphoto.Net
At dfphoto.net, we understand the importance of preserving your visual memories. Explore our site for resources that help you maintain a well-organized and secure photo library.
10.1. Explore Photography Techniques
Learn about various photography techniques to enhance the quality of your images. Whether it’s mastering lighting, composition, or post-processing, dfphoto.net offers a wealth of knowledge to elevate your photography skills.
10.2. Discover Inspiring Photography
Immerse yourself in our curated collection of stunning photographs. Gain inspiration and explore different styles and genres, fueling your creativity and passion for photography.
10.3. Stay Updated On Equipment
Stay informed on the latest photography equipment and technologies. From camera reviews to lens comparisons, dfphoto.net provides insights to help you make informed decisions about your gear.
10.4. Connect With The Photography Community
Join a vibrant community of photographers where you can share your work, exchange ideas, and receive feedback. Connect with like-minded individuals, collaborate on projects, and grow together in the world of photography.
10.5. Contact Us
For any questions or assistance, feel free to reach out to us:
- Address: 1600 St Michael’s Dr, Santa Fe, NM 87505, United States
- Phone: +1 (505) 471-6001
- Website: dfphoto.net
FAQ: How To Restore Photos From Google Photos
1. How Do I Restore Photos From Google Photos On My Android Device?
To restore photos from Google Photos on your Android device, open the Google Photos app, go to the “Library” tab, select “Trash,” choose the photos you want to restore, and tap “Restore.”
2. How Do I Restore Photos From Google Photos On My iPhone?
To restore photos from Google Photos on your iPhone, open the Google Photos app, go to the “Library” tab, select “Trash,” choose the photos you want to restore, and tap “Restore.” The process is nearly identical to Android.
3. How Long Do Deleted Photos Stay In The Google Photos Trash?
Deleted photos remain in the Google Photos Trash folder for 60 days before being permanently deleted.
4. What Happens If I Permanently Delete Photos From The Trash?
If you permanently delete photos from the Trash, they are irretrievable through standard Google Photos methods. You may need to explore third-party data recovery software or contact Google Support for assistance.
5. Can I Restore Photos From Google Photos That Are Older Than 60 Days?
Once photos have been in the Trash for more than 60 days, they are permanently deleted. Standard Google Photos recovery methods will not work, but you can try data recovery software or contact Google Support.
6. Is There A Way To Recover Photos That Have Been Permanently Deleted From Google Photos?
While there’s no guarantee, you can try checking Google Drive, using third-party data recovery software, or contacting Google Support for assistance.
7. How Can I Prevent Photo Loss In The Future?
To prevent photo loss, regularly back up your photos, use multiple devices for photo storage, enable Google Photos Backup and Sync, create a photo management system, and be careful when deleting photos.
8. What Is The Difference Between Original Quality And Storage Saver In Google Photos?
Original Quality stores photos in their original resolution, using more storage space. Storage Saver compresses photos to save space while maintaining good visual quality.
9. How Does AI Help With Photo Recovery In Google Photos?
AI in Google Photos enhances features like search and organization, making it easier to find photos and any potential backups you may have.
10. What Should I Do If My Photos Are Not Syncing To Google Photos?
Check your internet connection, ensure that Backup & Sync is turned on in Google Photos settings, clear the cache and data for the app, and make sure you have the latest version of the Google Photos app.
Ready to take control of your photo memories? Visit dfphoto.net to discover more tips, techniques, and tools that will help you manage and protect your precious photos. Explore our guides, connect with fellow photography enthusiasts, and unlock your creative potential today.