Losing precious photo memories can be distressing. Whether it’s accidental deletion, a device malfunction, or simply needing to access older photos, understanding how to restore iCloud photos on your iPhone is crucial. iCloud, Apple’s cloud storage service, is designed to synchronize your photos across all your Apple devices, offering a safety net for your visual memories. This guide will explore various methods to effectively restore your iCloud photos, ensuring you never lose those important moments.
Method 1: Recovering Photos Directly from iCloud.com
One of the simplest ways to restore your photos is through the iCloud website. This method is particularly useful if you’ve deleted photos from your iPhone but they are still stored in iCloud. Here’s how to retrieve them:
- Navigate to iCloud Website: Open your preferred web browser on any device (computer, tablet, or phone) and go to iCloud.com.
- Sign In: Log in using your Apple ID and password. Ensure this is the same Apple ID associated with your iCloud Photos.
- Access Photos: Once logged in, click on the Photos icon. This will take you to your iCloud Photos library in the browser.
- Select and Download: Browse through your photos and videos. Select the items you wish to restore by clicking on them. You can select multiple items by holding down the Ctrl (Cmd on Mac) or Shift key while clicking.
- Download to Your Device: After selecting your photos, click the Download button (it usually looks like a cloud with a downward arrow) at the top of the page.
- Choose Download Options: You might be prompted to choose between “Unmodified Originals” or “Most Compatible.” “Unmodified Originals” is generally recommended to maintain the original quality and metadata of your photos.
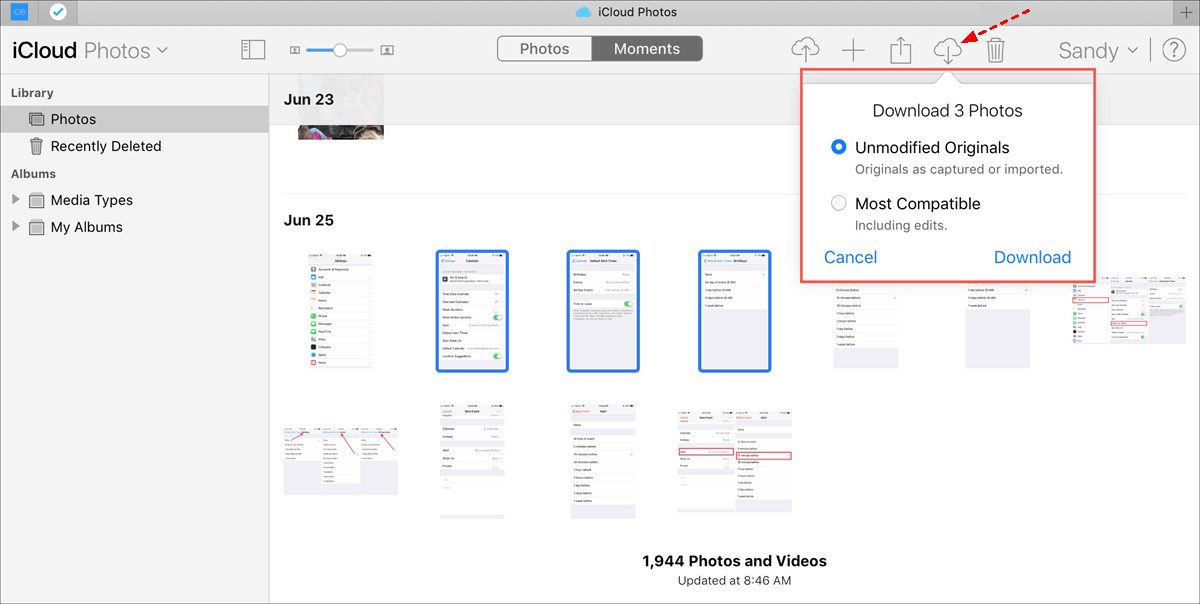 Download Photos from iCloud Website
Once downloaded, these photos will be saved to your device’s download location, from where you can move them back to your iPhone’s Photos app if needed.
Method 2: Restoring from the “Recently Deleted” Album
iCloud provides a “Recently Deleted” album which acts like a recycle bin for your photos. When you delete photos from your iPhone or any device synced with iCloud Photos, they are moved to this album for 30 days before permanent deletion. This offers a window to easily recover accidentally deleted photos.
Here’s how to restore photos from the “Recently Deleted” album on iCloud.com:
- Go to iCloud.com and Sign In: As in Method 1, go to iCloud.com and log in with your Apple ID.
- Open Photos: Click on the Photos icon to access your iCloud Photos library.
- Find “Recently Deleted”: In the left sidebar, you will find the Recently Deleted album. Click on it.
- Select Photos to Recover: Review the photos and videos in the “Recently Deleted” album. Select the ones you want to restore.
- Recover Photos: Click the Recover button, usually located at the top right corner.
The recovered photos will be restored to their original albums in your iCloud Photos library and will reappear on your iPhone and other synced devices shortly. Remember, photos are only recoverable from this album for 30 days. After this period, they are permanently removed from iCloud.
Method 3: Recovering Photos from an iCloud Backup
If you have been using iCloud Backup to back up your iPhone, and your photos were included in these backups (especially if you weren’t using iCloud Photos), you can restore your entire iPhone from an iCloud backup. This method will revert your iPhone to a previous state, including the photos from that backup.
Note: Restoring from an iCloud Backup will erase all current data on your iPhone and replace it with the data from the chosen backup. Ensure you back up your current iPhone data if needed before proceeding.
Here are the steps to restore iCloud Photos from an iCloud Backup:
- Erase iPhone Content and Settings: On your iPhone, go to Settings > General > Transfer or Reset iPhone > Erase All Content and Settings. Confirm your decision if prompted.
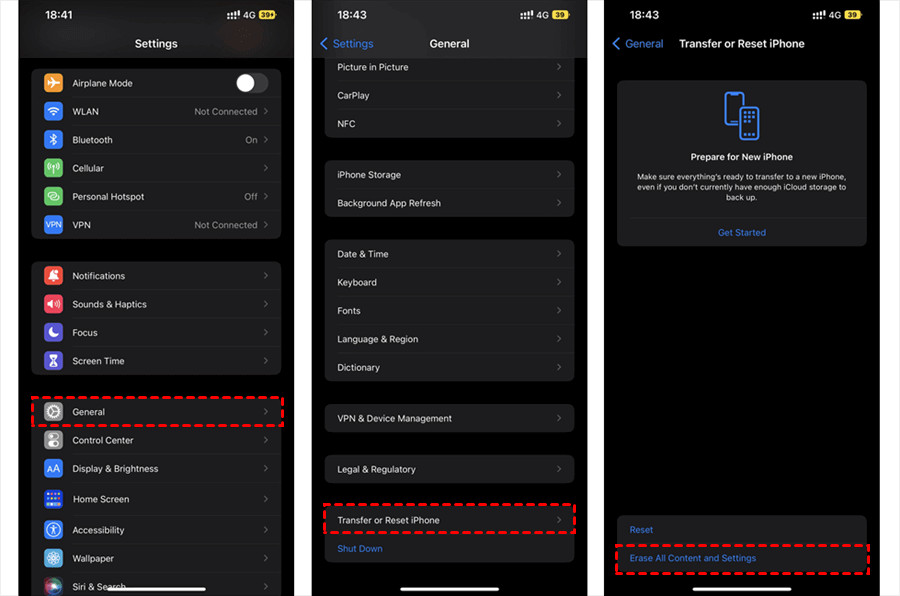 Erase All Content And Settings
-
Set Up iPhone and Choose Restore Option: After your iPhone restarts and goes through the initial setup screens, you’ll reach the “Apps & Data” screen. Here, choose Restore from iCloud Backup.
-
Sign in to iCloud: Enter your Apple ID and password to sign in to iCloud.
-
Choose a Backup: You will be presented with a list of available iCloud backups. Select the most relevant backup that you believe contains your desired photos. Choose carefully, considering the date and size of the backups.
-
Start Restore Process: Tap Restore. Your iPhone will begin downloading and restoring from the selected iCloud backup. This process can take some time depending on the size of the backup and your internet connection speed.
Once the restore process is complete, your iPhone will restart, and it will contain the data, including photos, from the iCloud backup you selected.
Method 4: Restoring Photos from iCloud Drive
While iCloud Photos is the primary service for photo storage, you might have also saved photos directly to iCloud Drive. If you have, restoring them is straightforward:
- Access iCloud Drive: Go to iCloud.com and sign in with your Apple ID. Click on the iCloud Drive icon.
- Browse Files: Navigate through your iCloud Drive folders to locate your photos.
- Select and Download: Select the photos or folders containing photos you want to restore.
- Download to Your Device: Click the Download icon at the top of the page.
 Allow iCloud Drive to Download
The photos will be downloaded to your computer or device, ready to be transferred back to your iPhone if needed.
Method 5: Restoring iCloud Photos on iPhone by Re-enabling iCloud Photos
If you have previously disabled iCloud Photos on your iPhone, but your photos are still safely stored in iCloud, re-enabling iCloud Photos is the easiest way to restore them to your device.
Here’s how to restore iCloud Photos by enabling the feature on your iPhone:
- Open Settings: Go to Settings on your iPhone.
- Tap on Your Apple ID: Tap your name at the top to access your Apple ID settings.
- Go to iCloud: Tap iCloud.
- Select Photos: Tap Photos.
- Enable iCloud Photos: Toggle the iCloud Photos switch to the ON position (it should turn green).
- Choose Download Option: You will be asked to choose between “Optimize iPhone Storage” or “Download and Keep Originals.” To fully restore all photos to your iPhone, select Download and Keep Originals.
Once enabled, your iPhone will start downloading all your iCloud Photos to your device. The time it takes will depend on the size of your photo library and your internet speed.
Restoring iCloud Photos on Mac and Windows PC
The process to restore iCloud Photos is similar across Apple devices and even Windows PCs.
On Mac:
- Open the Photos app.
- Go to Photos in the menu bar > Preferences.
- Click on the iCloud tab.
- Check iCloud Photos and select Download Originals to this Mac.
On Windows PC:
- Download and open iCloud for Windows.
- Next to Photos, click Options.
- Ensure iCloud Photos is checked and click Done, then Apply.
 Enable iCloud Photos And Download to Windows PC
These steps will download your iCloud Photos to your Mac or Windows PC, effectively restoring them to these devices.
Bonus Tip: Backup iCloud Photos for Enhanced Data Security
While iCloud is reliable, having a backup of your iCloud Photos in a separate location adds an extra layer of security. Consider backing up your iCloud Photos to another cloud service like Google Drive or OneDrive. Services like MultCloud can help automate this process, allowing you to regularly backup, sync, and transfer your iCloud Photos to other cloud platforms. This ensures that even if something happens to your iCloud account, you have a secure copy of your precious photos.
Conclusion
Restoring iCloud Photos on your iPhone is generally a straightforward process, thanks to Apple’s integrated ecosystem and features like iCloud. Whether you need to recover recently deleted photos, restore from a backup, or simply re-sync your library, iCloud offers multiple pathways to retrieve your valuable memories. By understanding these methods, you can confidently manage your photo library and ensure that your photos are always accessible when you need them. Remember to regularly back up your photos to prevent data loss and keep your memories safe for years to come.
