Have you accidentally deleted precious photos from your iPhone? Don’t worry, dfphoto.net is here to help you navigate the recovery process with expert advice and proven methods, ensuring you can restore those memories. Explore the realm of photo retrieval, learn about file system nuances, and enhance data security practices for safeguarding digital assets, including iPhone data recovery, iOS data security, and digital memory preservation.
1. Where Do Deleted iPhone Photos Go Initially?
Deleted iPhone photos initially go to the “Recently Deleted” album within the Photos app. This album acts as a temporary holding place for photos and videos you’ve deleted, offering a window of opportunity to recover them before they are permanently erased from your device. Understanding this feature is the first step in learning How To Restore Deleted Iphone Photos effectively.
1.1. How Long Do Photos Remain in the ‘Recently Deleted’ Album?
Photos remain in the ‘Recently Deleted’ album for 30 days. After this period, they are automatically and permanently deleted from your iPhone, freeing up storage space. According to Apple’s support documentation, this 30-day window provides a safety net, allowing you to recover photos you might have accidentally deleted or changed your mind about keeping. This is a crucial point to remember when you’re trying to restore deleted iPhone photos.
1.2. How To Access the ‘Recently Deleted’ Album?
To access the ‘Recently Deleted’ album:
- Open the Photos app on your iPhone.
- Tap the Albums tab at the bottom of the screen.
- Scroll down to the Utilities section and tap on Recently Deleted.
This will display all the photos and videos that have been deleted within the last 30 days. From there, you can select and recover the ones you want to restore. Knowing how to navigate to this album is fundamental to restoring deleted iPhone photos.
1.3. How To Recover Photos From the ‘Recently Deleted’ Album?
To recover photos from the ‘Recently Deleted’ album:
- Open the Recently Deleted album as described above.
- Tap Select in the upper-right corner.
- Tap on the photos you want to recover, or tap Recover All to restore all the items.
- Tap Recover at the bottom of the screen, then confirm by tapping Recover Photo.
The selected photos will be restored to your main Photos library, allowing you to view and share them again. This simple process can save you a lot of stress when you need to restore deleted iPhone photos.
2. What To Do Immediately After Accidentally Deleting Photos?
Immediately after accidentally deleting photos on your iPhone, the most important thing to do is to stop using your device as much as possible. This minimizes the risk of new data overwriting the deleted files, which can make them unrecoverable. Additionally, check the ‘Recently Deleted’ album and consider enabling iCloud Backup to prevent future data loss.
2.1. Why Is It Important To Minimize iPhone Usage After Deletion?
Minimizing iPhone usage after deleting photos is crucial because deleted data isn’t immediately wiped from your device’s storage. Instead, the space it occupied is marked as available for new data. Writing new data to your iPhone increases the risk of overwriting the deleted photos, making them much harder, if not impossible, to recover. According to data recovery specialists at DriveSavers, the success rate of recovering deleted files drops significantly with increased device usage post-deletion.
2.2. How Does Overwriting Affect Data Recovery?
Overwriting directly impacts data recovery by replacing the deleted files with new data. When a file is deleted, it remains physically on the storage medium until new data is written over it. Data recovery software works by locating these remnants of deleted files. However, if the sectors containing the deleted photos are overwritten, the original data is lost forever. This is why minimizing device usage and avoiding new photo captures or app installations is vital when you’re trying to restore deleted iPhone photos.
2.3. What Are the First Steps To Take on Your iPhone After Realizing Photos Are Missing?
After realizing photos are missing on your iPhone, take these immediate steps:
- Stop using your iPhone: Avoid taking new photos, downloading apps, or any activity that writes new data to your device.
- Check the ‘Recently Deleted’ album: As mentioned earlier, this is the first place to look for recently deleted photos.
- Enable Airplane Mode: This prevents your iPhone from syncing with iCloud or other services, which could potentially overwrite deleted data.
- Consider data recovery software: If the photos aren’t in the ‘Recently Deleted’ album, start researching reputable data recovery software for iOS devices.
These steps increase your chances of successfully restoring deleted iPhone photos.
3. What Are The Best Data Recovery Software Options For iPhones?
Several data recovery software options are available for iPhones, each with its strengths and weaknesses. Some of the best include Stellar Data Recovery for iPhone, Dr.Fone – Data Recovery, and EaseUS MobiSaver. These tools scan your iPhone for recoverable data, including photos, and can often restore files that are no longer accessible through normal means.
3.1. What Features Should You Look For In Data Recovery Software?
When selecting data recovery software for your iPhone, look for the following features:
- Compatibility: Ensure the software is compatible with your iPhone model and iOS version.
- Recovery Rate: Research the software’s success rate in recovering photos and other types of data.
- Ease of Use: Choose software with a user-friendly interface and clear instructions.
- Preview Function: A preview function allows you to view recoverable photos before purchasing the full version.
- Customer Support: Opt for software with reliable customer support in case you encounter any issues.
3.2. How Do These Software Options Work?
These data recovery software options work by scanning your iPhone’s internal storage for deleted files. When a file is deleted, it isn’t immediately erased but remains on the storage until overwritten. The software identifies these deleted files and attempts to reconstruct them.
Here’s a general overview of how they work:
- Connect your iPhone: Connect your iPhone to your computer using a USB cable.
- Launch the software: Open the data recovery software on your computer.
- Scan your iPhone: Initiate a scan of your iPhone’s storage. The software will search for recoverable files.
- Preview recoverable files: After the scan, you’ll be able to preview the recoverable photos and other data.
- Recover the files: Select the photos you want to recover and choose a location on your computer to save them.
3.3. What Are The Limitations of Data Recovery Software?
Data recovery software has limitations, and success isn’t guaranteed. The most significant limitation is overwriting. If the deleted photos have been overwritten by new data, they may be unrecoverable. Additionally, the success rate can vary depending on the software’s algorithm, the condition of the storage, and the amount of time that has passed since the deletion. According to a study by the University of Texas at Austin’s Computer Science Department, data recovery success rates decrease exponentially over time after deletion, highlighting the importance of acting quickly.
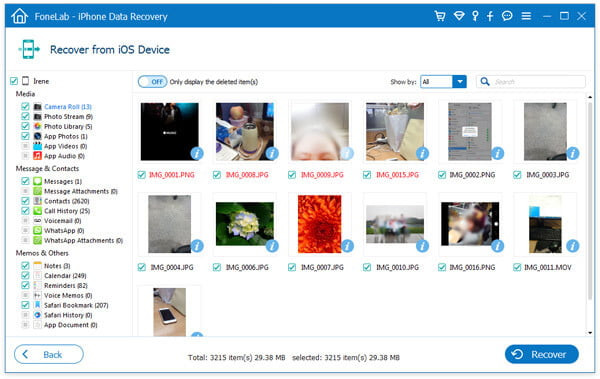 iPhone photo deleted but recoverable using data recovery software
4. How Can iCloud Be Used To Restore Deleted Photos?
iCloud can be a valuable tool for restoring deleted photos, provided you have iCloud Photos enabled. When iCloud Photos is turned on, your photos and videos are automatically uploaded and stored in iCloud. If you accidentally delete photos from your iPhone, you can restore them from iCloud, either through the iCloud website or directly on your device.
4.1. How To Check If iCloud Photos Is Enabled?
To check if iCloud Photos is enabled on your iPhone:
- Open the Settings app.
- Tap on your name at the top.
- Tap iCloud.
- Tap Photos.
- Ensure that iCloud Photos is toggled on.
If iCloud Photos is enabled, your photos and videos are being automatically backed up to iCloud.
4.2. Steps To Restore Photos Via iCloud Website?
To restore photos via the iCloud website:
- Go to iCloud.com and sign in with your Apple ID.
- Click on the Photos app.
- In the Photos app, look for the Recently Deleted album in the sidebar.
- Select the photos you want to recover.
- Click Recover at the top of the screen.
The selected photos will be restored to your iCloud Photos library and will reappear on your iPhone and other devices connected to the same Apple ID.
4.3. Restoring Photos Directly From iCloud On Your iPhone?
If you have iCloud Photos enabled, restoring photos directly from iCloud on your iPhone is straightforward:
- Open the Photos app.
- Tap the Albums tab.
- Scroll down to the Utilities section and tap on Recently Deleted.
- Select the photos you want to recover.
- Tap Recover at the bottom of the screen.
This restores the photos to your main Photos library, syncing them across all your devices connected to iCloud.
5. What Role Do iTunes Or Finder Backups Play In Photo Recovery?
iTunes or Finder backups can play a crucial role in photo recovery if you regularly back up your iPhone to your computer. These backups create a snapshot of your iPhone’s data, including photos, at the time of the backup. If you delete photos, you can restore your iPhone from a recent backup to recover them.
5.1. How To Determine If You Have An iTunes Or Finder Backup?
To determine if you have an iTunes or Finder backup:
- For macOS Catalina or later: Open Finder, connect your iPhone to your computer, and look for your device in the sidebar under Locations. If your iPhone appears, you likely have a backup.
- For macOS Mojave or earlier, or Windows: Open iTunes, go to Edit > Preferences > Devices. Here, you’ll see a list of your device backups, along with the dates they were created.
5.2. How To Restore Your iPhone From An iTunes Or Finder Backup?
To restore your iPhone from an iTunes or Finder backup:
- Connect your iPhone to your computer using a USB cable.
- For macOS Catalina or later: Open Finder and select your iPhone in the sidebar.
- For macOS Mojave or earlier, or Windows: Open iTunes.
- Click Restore Backup.
- Choose the most relevant backup from the list and click Restore.
- Follow the on-screen instructions to complete the restoration process.
Keep in mind that restoring from a backup will replace all the current data on your iPhone with the data from the backup.
5.3. What Are the Risks and Considerations When Restoring From A Backup?
Restoring from a backup has risks and considerations:
- Data Loss: Restoring from a backup will overwrite all the current data on your iPhone. Any data created since the backup was made will be lost.
- Backup Integrity: If the backup is corrupted, the restoration process may fail or result in further data loss.
- Time Consumption: Restoring from a backup can take a significant amount of time, depending on the size of the backup.
- iOS Version Compatibility: Ensure that the backup is compatible with your current iOS version. Restoring from an older backup might cause compatibility issues.
6. Are There Professional Data Recovery Services For iPhones?
Yes, professional data recovery services for iPhones exist and can be a viable option if other methods fail. These services have specialized tools and expertise to recover data from iPhones that have suffered physical damage, software corruption, or other complex issues. While they can be more expensive, they offer a higher chance of success in challenging data recovery scenarios.
6.1. When Should You Consider Using A Professional Service?
Consider using a professional data recovery service in these situations:
- Physical Damage: Your iPhone has suffered physical damage, such as water damage or a broken screen.
- Software Corruption: Your iPhone is experiencing severe software issues that prevent you from accessing your data.
- Failed Recovery Attempts: You’ve tried data recovery software and other methods without success.
- Critical Data: The photos are extremely important, and you’re willing to invest in the best possible chance of recovery.
6.2. What To Look For In A Reputable Data Recovery Service?
When choosing a data recovery service, look for these qualities:
- Experience: Choose a service with extensive experience in iPhone data recovery.
- Success Rate: Inquire about their success rate and ask for references.
- Data Security: Ensure they have strict data security and confidentiality policies.
- Cleanroom Environment: For physical damage recovery, they should have a cleanroom environment to prevent further damage.
- Cost Transparency: Get a clear estimate of the cost and understand the payment terms.
6.3. What Are The Average Costs Associated With These Services?
The costs associated with professional data recovery services can vary widely depending on the complexity of the recovery and the service provider. Simple logical recovery (e.g., recovering deleted files) might cost several hundred dollars, while more complex physical damage recovery can cost thousands. Always get a detailed estimate before proceeding.
7. How To Prevent Future Photo Loss On Your iPhone?
Preventing future photo loss on your iPhone involves implementing a robust backup strategy and practicing safe data management habits. Regularly backing up your iPhone to iCloud or your computer ensures that you have a copy of your photos in case of accidental deletion, device damage, or other data loss scenarios.
7.1. Setting Up Automatic iCloud Backups?
To set up automatic iCloud backups:
- Open the Settings app.
- Tap on your name at the top.
- Tap iCloud.
- Tap iCloud Backup.
- Toggle iCloud Backup on.
With iCloud Backup enabled, your iPhone will automatically back up your data to iCloud when it’s connected to Wi-Fi, plugged into power, and the screen is locked.
7.2. Alternatives To iCloud For Photo Backup?
Alternatives to iCloud for photo backup include:
- Google Photos: Google Photos offers free storage (up to 15 GB) and automatic photo backup.
- Dropbox: Dropbox provides cloud storage and automatic photo uploads.
- Amazon Photos: If you’re an Amazon Prime member, you get unlimited photo storage with Amazon Photos.
- External Hard Drive: Regularly backing up your iPhone to an external hard drive provides a local backup.
7.3. Best Practices For Managing Photos On Your iPhone?
Best practices for managing photos on your iPhone include:
- Regularly organize your photos: Delete duplicates, blurry photos, and unwanted screenshots to free up storage and make it easier to find what you need.
- Use albums: Create albums to categorize your photos and keep them organized.
- Enable iCloud Photos: This ensures that your photos are automatically backed up to iCloud.
- Back up your iPhone regularly: In addition to iCloud Photos, perform regular backups to your computer or an external hard drive.
- Be careful when deleting photos: Double-check before deleting photos to avoid accidental loss.
8. What Are The Common Causes Of Photo Loss On iPhones?
Photo loss on iPhones can occur due to various reasons, ranging from accidental deletion to more complex issues like software corruption or physical damage. Understanding these common causes can help you take preventive measures and minimize the risk of losing your precious photos.
8.1. Accidental Deletion And How To Avoid It?
Accidental deletion is one of the most common causes of photo loss on iPhones. It can happen when you’re quickly deleting photos to free up space, or simply by tapping the wrong button.
To avoid accidental deletion:
- Be careful when deleting photos: Take your time and double-check before tapping the delete button.
- Use the ‘Recently Deleted’ album: Familiarize yourself with the ‘Recently Deleted’ album and check it regularly to recover any accidentally deleted photos.
- Consider a confirmation step: Some apps offer a confirmation step before deleting photos, which can help prevent accidental deletion.
8.2. Software Updates And Potential Data Loss Risks?
Software updates can sometimes lead to data loss on iPhones, although it’s relatively rare. This can happen if the update process is interrupted or if there are compatibility issues with your device.
To minimize the risk of data loss during software updates:
- Back up your iPhone before updating: Always back up your iPhone to iCloud or your computer before installing a software update.
- Ensure sufficient battery: Make sure your iPhone has enough battery power (at least 50%) before starting the update.
- Maintain a stable internet connection: Use a stable Wi-Fi connection during the update process to avoid interruptions.
8.3. Physical Damage And Its Impact On Photo Storage?
Physical damage, such as water damage, a broken screen, or internal component failure, can significantly impact photo storage on iPhones. Physical damage can render your iPhone unusable and make it difficult or impossible to access your photos.
To protect your iPhone from physical damage:
- Use a protective case: A durable case can protect your iPhone from drops and impacts.
- Avoid water exposure: Keep your iPhone away from water and other liquids.
- Handle your iPhone with care: Avoid dropping or mishandling your iPhone.
9. How To Back Up Photos To A Computer Without Using iCloud?
Backing up photos to a computer without using iCloud is a great way to ensure you have a local copy of your precious memories. This can be done using a USB cable and either Finder (on macOS Catalina and later) or iTunes (on older macOS versions and Windows).
9.1. Step-by-Step Guide To Transfer Photos To A Mac?
Here’s a step-by-step guide to transfer photos from your iPhone to a Mac:
- Connect your iPhone to your Mac using a USB cable.
- If this is the first time you’ve connected your iPhone to your Mac, you may need to tap Trust on your iPhone and enter your passcode.
- Open the Photos app on your Mac.
- Select your iPhone from the sidebar under Devices.
- Click Import All New Photos or select the photos you want to import and click Import Selected.
- Choose where you want to save the photos on your Mac.
- Click Delete After Import if you want to remove the photos from your iPhone after they’ve been transferred.
- Click Import.
9.2. Transferring Photos To A Windows PC?
To transfer photos from your iPhone to a Windows PC:
- Connect your iPhone to your Windows PC using a USB cable.
- If this is the first time you’ve connected your iPhone to your PC, you may need to tap Trust on your iPhone and enter your passcode.
- Open File Explorer on your Windows PC.
- Select your iPhone from the list of devices.
- Navigate to the Internal Storage > DCIM folder.
- Copy the photos you want to transfer to a folder on your Windows PC.
- You can also use the Photos app in Windows to import photos from your iPhone.
9.3. What Are The Benefits Of Local Backups?
Local backups offer several benefits:
- Control: You have complete control over your data and where it’s stored.
- Speed: Local backups are typically faster than cloud backups.
- Privacy: Your photos are stored locally, so you don’t have to worry about privacy concerns associated with cloud storage.
- Accessibility: You can access your photos even without an internet connection.
10. How Do Live Photos Affect Data Recovery?
Live Photos, which capture a few seconds of video along with a still image, can add complexity to the data recovery process. Because a Live Photo consists of both a still image and a video clip, data recovery software needs to be able to identify and recover both components to fully restore the Live Photo.
10.1. What Are Live Photos And How Are They Stored?
Live Photos are a feature on iPhones that capture a short video clip along with a still image. When you take a Live Photo, your iPhone records 1.5 seconds of video before and after you press the shutter button. This creates a dynamic photo that comes to life when you touch and hold it.
Live Photos are stored as two separate files: a still image in JPEG format and a video clip in MOV format. These two files are linked together, so they appear as a single Live Photo in your Photos app.
10.2. Challenges In Recovering Live Photos?
Recovering Live Photos can be more challenging than recovering regular photos because data recovery software needs to identify and recover both the JPEG image and the MOV video clip. If either component is corrupted or overwritten, the Live Photo may not be fully recoverable.
10.3. Tips For Successfully Recovering Live Photos?
Here are some tips for successfully recovering Live Photos:
- Use data recovery software that supports Live Photos: Ensure that the data recovery software you’re using is capable of recovering both the JPEG image and the MOV video clip that make up a Live Photo.
- Act quickly: The sooner you attempt to recover deleted Live Photos, the higher your chances of success.
- Minimize iPhone usage: Avoid using your iPhone after deleting Live Photos to prevent overwriting.
FAQ: Restoring Deleted iPhone Photos
1. Can I recover deleted iPhone photos without a backup?
Yes, it is possible to recover deleted iPhone photos without a backup using data recovery software, but the success rate depends on whether the deleted data has been overwritten.
2. How long do photos stay in the Recently Deleted album?
Photos remain in the Recently Deleted album for 30 days before being permanently deleted.
3. Is it safe to use third-party data recovery software?
It is generally safe, but choose reputable software and read reviews to avoid malware.
4. Will a factory reset erase all my photos permanently?
Yes, a factory reset will erase all data, including photos, permanently, unless you have a backup.
5. Does iCloud automatically back up my photos?
Yes, if you have iCloud Photos enabled, your photos are automatically backed up to iCloud.
6. Can I recover photos from a water-damaged iPhone?
Possibly, with professional data recovery services, but success is not guaranteed.
7. How much does professional iPhone data recovery cost?
Professional data recovery can cost from several hundred to thousands of dollars, depending on the complexity.
8. What should I do immediately after deleting a photo by accident?
Stop using your iPhone and check the Recently Deleted album.
9. Can iOS updates cause photo loss?
Rarely, but it’s always recommended to back up your iPhone before updating.
10. Are Live Photos harder to recover than regular photos?
Yes, because they consist of both a still image and a video clip that need to be recovered.
Restoring deleted iPhone photos can be a stressful experience, but with the right knowledge and tools, it is often possible to recover your precious memories. Whether you’re using the ‘Recently Deleted’ album, data recovery software, iCloud, or professional services, understanding your options is key to success. And remember, the best way to prevent photo loss is to implement a robust backup strategy and practice safe data management habits.
Visit dfphoto.net for more expert tips, stunning photography, and a vibrant community of photographers. Discover tutorials, find inspiration, and connect with fellow enthusiasts. Start your journey to mastering photography today! Located at 1600 St Michael’s Dr, Santa Fe, NM 87505, United States, or call +1 (505) 471-6001.