Resizing photos is a common task for photographers and anyone who works with images online. Whether you need to reduce the file size for faster uploading, change dimensions for printing, or optimize images for web display, understanding how to resize photos effectively is crucial. This guide will walk you through the essentials of photo resizing, ensuring your images are perfectly sized for any purpose.
Understanding Photo Resizing: Dimensions vs. File Size
Before diving into the methods, it’s important to clarify what resizing a photo actually means. Often, “resizing” can refer to two different aspects:
- Image Dimensions: This refers to the physical size of the photo, measured in pixels (width and height). Reducing dimensions means decreasing the number of pixels, making the image smaller in terms of visual size.
- File Size: This refers to the digital storage space the photo occupies, usually measured in kilobytes (KB) or megabytes (MB). File size is influenced by dimensions, file format (JPEG, PNG, etc.), and compression. Resizing dimensions often reduces file size, but file size can also be reduced through compression without changing dimensions.
Understanding this difference is key to choosing the right resizing method for your needs.
Resizing Photos by Cropping: Adjusting Proportions
One way to “resize” a photo, in terms of changing its proportions, is by cropping. Cropping doesn’t technically reduce the dimensions of the original image but rather changes the visible area and aspect ratio.
As pointed out in discussions, proportion refers to the ratio of length to breadth. You adjust this through cropping. Many photo editing tools, including the built-in Photos app on macOS, offer cropping tools with preset aspect ratios, making it easy to achieve desired proportions for various platforms or print sizes.
For instance, if you need a photo with a 1:1 aspect ratio for a profile picture, you would use the crop tool to square the image.
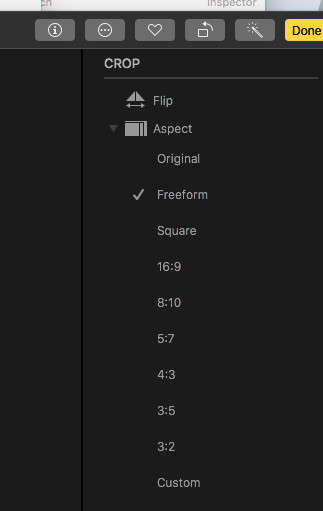 Cropping tool in photo editing software, demonstrating aspect ratio options
It’s important to note that cropping is distinct from resizing dimensions. Cropping changes the composition and aspect ratio, while dimension resizing alters the pixel width and height of the entire image.
Resizing Photo Dimensions: Exporting for Specific Sizes
To truly resize a photo by changing its dimensions, you typically need to export the image with new size settings. While some users have wished for a direct “resize” option within photo applications like Apple Photos, the standard workflow involves exporting.
When exporting a photo, you are generally given options to control the size. These options often include:
- Pixel Dimensions: You can specify the exact width and height in pixels. This is useful when you need images to fit specific website layouts or online platform requirements.
- Quality/Compression: For JPEG files, you can often adjust the quality setting, which affects file size. Lower quality means more compression and smaller file size, but may also result in some loss of detail.
- Preset Sizes: Some software offers preset sizes like “Small,” “Medium,” “Large,” or “Web,” which automatically adjust dimensions and compression for common use cases.
Steps to Resize Dimensions when Exporting (General Steps – May Vary by Software):
- Open your photo in your chosen photo editing software (e.g., Adobe Photoshop, GIMP, online resizing tools, or even the export function of photo management apps).
- Select “Export” or “Save As” option.
- Look for size settings. This might be labeled as “Image Size,” “Dimensions,” “Resize,” or similar.
- Enter your desired width and height in pixels. Ensure you maintain aspect ratio if you don’t want to distort the image. Some tools have a “constrain proportions” or “lock aspect ratio” option.
- Adjust quality/compression settings if available and if you want to further control file size.
- Choose your file format (JPEG is common for web use due to its balance of file size and quality).
- Export/Save the resized photo.
Why Resize Photos? Practical Applications
Resizing photos is essential for various reasons:
- Website Optimization: Large images slow down website loading times. Resizing images to appropriate dimensions and file sizes for web display improves user experience and SEO.
- Email and Sharing: Sending large image files via email can be cumbersome and exceed attachment limits. Resizing makes sharing quicker and easier.
- Social Media: Social media platforms often have recommended or maximum image dimensions. Resizing ensures your photos display correctly and load quickly on these platforms.
- Printing: For printing photos in specific sizes, resizing dimensions might be necessary to match print ratios or reduce file size for printing services.
- Storage Space: While storage is increasingly affordable, resizing photos, especially for archival purposes or when dealing with large batches, can help manage digital storage more efficiently.
Choosing the Right Method
The best method for resizing photos depends on your specific goals:
- To change proportions: Use the crop tool.
- To reduce file size for web or sharing: Export with reduced dimensions and/or increased compression.
- To prepare for printing in specific sizes: Resize dimensions to match print ratios and desired print size.
By understanding the nuances of photo resizing and the tools available, you can effectively manage your images and ensure they are perfectly sized for any application, from online display to print.
