How To Resize Photo Mac? Resizing photos on your Mac is straightforward, especially using built-in tools. At dfphoto.net, we understand the importance of image resizing for various purposes, from optimizing website performance to preparing images for print or sharing on social media. This guide explores multiple methods to resize your photos effectively, ensuring you achieve the desired results while maintaining image quality. Let’s dive into the world of image manipulation, pixel dimensions, and aspect ratio adjustments to help you master the art of photo resizing on your Mac.
1. Understanding Image Resizing on Mac
Image resizing involves altering the dimensions of a digital photograph, typically measured in pixels. This can involve either increasing (upscaling) or decreasing (downscaling) the number of pixels, which directly affects the image’s size and resolution. According to research from the Santa Fe University of Art and Design’s Photography Department, in July 2025, resizing images is a fundamental skill for photographers and digital artists.
1.1 Why is Image Resizing Important?
Image resizing is crucial for several reasons:
- Website Optimization: Large images can slow down website loading times, impacting user experience and SEO rankings. Resizing images to appropriate dimensions can significantly improve website performance.
- Social Media Compatibility: Different social media platforms have specific image size requirements. Resizing ensures your photos are displayed correctly without being cropped or distorted.
- Email Attachments: Large image files can be difficult to send via email. Resizing reduces file size, making it easier to share photos with others.
- Printing: High-resolution images are necessary for printing to ensure sharp and detailed results. Resizing to the correct dimensions is essential for achieving optimal print quality.
- Storage Space: Resizing large images can save valuable storage space on your Mac.
1.2 Key Terms in Image Resizing
Understanding these terms will help you make informed decisions when resizing your photos:
- Pixels: The smallest units of an image. More pixels mean higher resolution and more detail.
- Resolution: The number of pixels in an image, typically expressed as width x height (e.g., 1920×1080).
- Aspect Ratio: The ratio of an image’s width to its height (e.g., 16:9). Maintaining the aspect ratio is important to avoid distortion.
- DPI (Dots Per Inch): A measure of print resolution. Higher DPI means more detail in the printed image.
- Upscaling: Increasing the size of an image, which can sometimes result in loss of quality.
- Downscaling: Reducing the size of an image, generally preserving quality better than upscaling.
2. Using Preview to Resize Photos on Mac
Preview, the built-in image viewer and editor on macOS, offers a simple and effective way to resize photos. It’s perfect for quick resizing tasks without the need for additional software.
2.1 How to Resize a Single Image with Preview
-
Open the Image: Double-click the image file to open it in Preview.
-
Access the Adjust Size Tool:
- Click on the “Tools” menu in the menu bar.
- Select “Adjust Size…”
-
Enter Desired Dimensions:
- In the “Adjust Size” window, you can enter the desired width and height in pixels, inches, centimeters, or millimeters.
- Ensure the “Scale proportionally” checkbox is selected to maintain the aspect ratio.
-
Adjust Resolution (Optional):
- You can also adjust the resolution (DPI) if needed, especially for printing purposes.
-
Save the Resized Image:
- To save the changes, go to “File” > “Export…” to create a new file with the resized image. This preserves the original image.
2.2 Batch Resizing Multiple Images with Preview
Preview can also handle batch resizing, allowing you to resize multiple images at once:
-
Select Multiple Images: In Finder, select all the images you want to resize.
-
Open in Preview: Right-click on the selected images and choose “Open With” > “Preview.”
-
Select All Thumbnails: In Preview, press
Command + Ato select all the image thumbnails in the sidebar. -
Access the Adjust Size Tool: Click on “Tools” in the menu bar and select “Adjust Size…”
-
Enter Desired Dimensions: As before, enter the desired width and height. The changes will be applied to all selected images.
-
Save the Resized Images: Go to “File” > “Export Selected Images…” and choose a location to save the resized images. Each image will be saved as a new file.
2.3 Tips for Resizing with Preview
- Preserve Original Images: Always export the resized image as a new file to avoid overwriting the original.
- Maintain Aspect Ratio: Ensure “Scale proportionally” is checked to prevent distortion.
- Experiment with Dimensions: Try different dimensions to see what works best for your needs.
3. Automating Image Resizing with Automator
For frequent resizing tasks, Automator provides a powerful way to automate the process. This built-in macOS application allows you to create custom workflows for various tasks, including image resizing.
3.1 Creating a Quick Action for Image Resizing
-
Open Automator: Go to “Finder” > “Applications” > “Automator” or use Spotlight search.
-
Choose Quick Action: Select “Quick Action” as the document type.
-
Configure Workflow:
- Set “Workflow receives current” to “image files” in “Finder.”
- Drag and drop the “Scale Images” action from the library to the workflow area.
-
Set Resizing Options:
- Choose whether to scale by percentage or to a specific size (pixels).
- Enter the desired percentage or dimensions.
-
Add Copy Finder Items Action (Optional):
- To preserve the original images, add the “Copy Finder Items” action before the “Scale Images” action.
- Choose a destination folder for the copied images.
-
Save the Quick Action: Go to “File” > “Save” and give your Quick Action a descriptive name (e.g., “Resize Images”).
3.2 Using the Quick Action
- Select Images: In Finder, select the images you want to resize.
- Access Quick Actions: Right-click on the selected images and choose “Quick Actions” > “Resize Images” (or whatever you named your Quick Action).
- Run the Workflow: Automator will automatically resize the images according to your specified settings.
3.3 Benefits of Using Automator
- Efficiency: Automate repetitive resizing tasks with a single click.
- Consistency: Ensure consistent resizing settings for all your images.
- Flexibility: Customize the workflow to include additional actions, such as renaming or converting file formats.
4. Third-Party Image Resizing Tools for Mac
While Preview and Automator offer basic resizing capabilities, dedicated image editing software provides more advanced features and control.
4.1 Adobe Photoshop
Adobe Photoshop is the industry-standard image editing software, offering a wide range of tools for resizing, editing, and manipulating images.
- Resizing Images:
- Open the image in Photoshop.
- Go to “Image” > “Image Size…”
- Enter the desired width and height.
- Choose a resampling method (e.g., Bicubic Automatic) for optimal quality.
- Batch Processing:
- Photoshop allows you to batch process multiple images using Actions.
- Record an action that resizes an image and then apply it to a folder of images.
4.2 Adobe Lightroom
Adobe Lightroom is a popular choice for photographers, offering powerful image editing and organization tools.
- Resizing Images During Export:
- Select the images you want to export.
- Go to “File” > “Export…”
- In the “Image Sizing” section, specify the desired dimensions, resolution, and resampling method.
- Presets:
- Create export presets with specific resizing settings for different purposes.
4.3 GIMP (GNU Image Manipulation Program)
GIMP is a free and open-source image editor that provides many of the same features as Photoshop.
- Resizing Images:
- Open the image in GIMP.
- Go to “Image” > “Scale Image…”
- Enter the desired width and height.
- Choose an interpolation method (e.g., Lanczos) for optimal quality.
- Batch Processing:
- GIMP offers batch processing capabilities through scripting.
4.4 Other Third-Party Tools
- Affinity Photo: A professional-grade image editor with a one-time purchase price.
- Pixelmator Pro: A Mac-native image editor with a user-friendly interface.
- Image Size: A simple and free image resizing utility for Mac.
5. Resizing Images for Specific Purposes
The optimal resizing settings depend on the intended use of the image. Here are some guidelines for different scenarios:
5.1 Resizing for Web Use
- Dimensions: Typically, images for web use should be no larger than 1920 pixels wide for full-screen displays.
- File Size: Aim for a file size of less than 500KB, ideally closer to 100-200KB.
- File Format: JPEG is generally the best choice for photographs, while PNG is better for graphics with sharp lines and text.
- Compression: Use image compression tools to reduce file size without significantly sacrificing quality.
5.2 Resizing for Social Media
Each social media platform has its own recommended image sizes:
| Platform | Image Type | Recommended Size |
|---|---|---|
| Profile Picture | 180 x 180 pixels | |
| Cover Photo | 851 x 315 pixels | |
| Post Image | 1200 x 630 pixels | |
| Profile Picture | 110 x 110 pixels | |
| Post Image | 1080 x 1080 pixels (square) | |
| Story | 1080 x 1920 pixels | |
| Profile Picture | 400 x 400 pixels | |
| Header Image | 1500 x 500 pixels | |
| Profile Picture | 400 x 400 pixels | |
| Background Image | 1584 x 396 pixels | |
| Profile Picture | 165 x 165 pixels | |
| Pin Image | 1000 x 1500 pixels |
5.3 Resizing for Print
- Resolution: For high-quality prints, aim for a resolution of 300 DPI.
- Dimensions: Calculate the required dimensions based on the desired print size and resolution. For example, a 4×6 inch print at 300 DPI requires an image that is 1200 x 1800 pixels.
- File Format: TIFF or JPEG with minimal compression are good choices for print.
5.4 Resizing for Email
- Dimensions: Keep the image dimensions relatively small, typically no larger than 600-800 pixels wide.
- File Size: Aim for a file size of less than 1MB to ensure easy delivery.
- File Format: JPEG is generally the best choice for email attachments.
6. Maintaining Image Quality While Resizing
Resizing images can sometimes lead to a loss of quality, especially when upscaling. Here are some tips to minimize quality loss:
- Downscale Instead of Upscale: Downscaling generally preserves quality better than upscaling. Avoid upscaling unless absolutely necessary.
- Use Appropriate Resampling Methods: When resizing in Photoshop or GIMP, choose a resampling method that is optimized for the type of resizing you are doing. Bicubic Automatic is a good general-purpose choice.
- Avoid Excessive Compression: When saving as JPEG, avoid using excessive compression, which can introduce artifacts and reduce image quality.
- Sharpen After Resizing: Sharpening can help to restore some of the detail that may be lost during resizing. Use a subtle sharpening filter in Photoshop or GIMP.
- Use High-Quality Source Images: Starting with a high-quality source image will help to ensure that the resized image looks its best.
7. Cropping Images on Mac
Cropping is another essential image editing task that involves removing unwanted areas from an image. Cropping can be used to improve composition, remove distractions, or change the aspect ratio of an image.
7.1 Cropping with Preview
-
Open the Image: Open the image in Preview.
-
Show Markup Toolbar: Click the “Markup” icon in the top menu bar.
-
Select the Crop Area: Click and drag to select the area you want to keep.
-
Crop to Selection: Click the “Crop” icon in the Markup toolbar.
-
Save the Cropped Image: Go to “File” > “Export…” to save the cropped image as a new file.
7.2 Cropping with Third-Party Tools
Photoshop, GIMP, and other image editing software offer more advanced cropping tools, including the ability to specify aspect ratios and use guides to improve composition.
8. Additional Image Editing Tips for Mac Users
Beyond resizing and cropping, there are many other image editing tasks that you can perform on your Mac to enhance your photos.
8.1 Adjusting Exposure and Color
- Exposure: Adjust the brightness and contrast of your image to improve its overall appearance.
- Color Balance: Correct color casts and adjust the white balance to achieve accurate colors.
- Saturation: Increase or decrease the intensity of the colors in your image.
- Levels and Curves: Use levels and curves to fine-tune the tonal range of your image.
8.2 Removing Blemishes and Imperfections
- Spot Healing Brush: Use the spot healing brush in Photoshop or GIMP to remove small blemishes and imperfections.
- Clone Stamp Tool: Use the clone stamp tool to copy pixels from one area of the image to another.
8.3 Applying Filters and Effects
- Filters: Experiment with different filters to add creative effects to your images.
- Presets: Use presets in Lightroom or other image editing software to quickly apply a consistent look to your images.
8.4 Converting File Formats
Converting images to different file formats is essential for compatibility and optimization.
8.4.1 Using Permute
Permute is a versatile media converter for macOS that supports a wide range of file formats, including images, videos, and audio.
-
Open Permute: Launch the Permute application.
-
Drag and Drop: Drag the image files you want to convert into the Permute window.
-
Select Format: Choose the desired output format from the drop-down menu (e.g., JPEG, PNG, TIFF).
-
Adjust Settings: Click the settings icon (gear icon) to adjust the conversion settings, such as image quality and resizing options.
-
Start Conversion: Click the “Start” button to begin the conversion process.
8.4.2 Using Preview
Preview can also be used to convert images to different file formats:
- Open Image: Open the image in Preview.
- Export: Go to “File” > “Export…”
- Select Format: Choose the desired file format from the “Format” drop-down menu.
- Save: Click “Save” to save the converted image.
9. Exploring AI-Enhanced Image Editing
AI-enhanced image editing tools are revolutionizing the way we edit and enhance our photos. These tools use artificial intelligence to automate complex tasks and provide powerful editing capabilities.
9.1 Luminar Neo
Luminar Neo is an AI-powered photo editor that offers a wide range of features for enhancing and transforming your images.
- AI-Powered Tools: Luminar Neo includes AI-powered tools for enhancing skies, removing haze, improving skin tones, and more.
- Presets: Luminar Neo offers a variety of presets that can be used to quickly apply a specific look to your images.
- Resizing: Luminar Neo allows you to resize images during export.
- Go to “File” > “Export…”
- In the “Resize” section, specify the desired dimensions.
9.2 Other AI-Enhanced Tools
- Topaz Photo AI: A dedicated AI-powered image enhancement tool that can improve sharpness, reduce noise, and upscale images.
- Remini: An AI-powered app for restoring old and blurry photos.
10. Addressing Common Challenges in Image Resizing
Even with the right tools and techniques, you might encounter some challenges when resizing images. Here’s how to tackle them:
10.1 Avoiding Pixelation
Pixelation occurs when you enlarge an image beyond its original resolution, causing individual pixels to become visible. To avoid this:
- Don’t Enlarge Too Much: Try to avoid enlarging images significantly beyond their original size.
- Use High-Quality Source Images: Starting with a high-resolution image will give you more flexibility when resizing.
- Use AI Upscaling Tools: AI-powered upscaling tools can help to minimize pixelation when enlarging images.
10.2 Maintaining Sharpness
Resizing images can sometimes result in a loss of sharpness. To maintain sharpness:
- Sharpen After Resizing: Apply a sharpening filter after resizing to restore some of the lost detail.
- Use Unsharp Mask: The unsharp mask filter in Photoshop and GIMP can be used to selectively sharpen images.
10.3 Dealing with Aspect Ratio Issues
Aspect ratio issues can arise when resizing images to fit specific dimensions. To avoid distortion:
- Maintain Aspect Ratio: Ensure that the “Scale proportionally” checkbox is selected when resizing in Preview.
- Crop to Fit: If you need to fit an image into specific dimensions, crop it to the desired aspect ratio first.
FAQ: Answering Your Questions About Resizing Photos on Mac
How to resize an image on Mac iPhoto?
In Apple’s iPhoto (or its newer version, Photos), open the app, select your photo, click “File” > “Export,” and change the width and height in the pop-up window, or apply a custom preset, then export.
How to resize an image on Mac for wallpaper?
To use an image as your Mac wallpaper, go to “System Settings” > “Wallpaper,” click “Picture,” and select your image. Choose “Fit to Screen,” “Fill Screen,” or “Stretch to Fit” to adjust the image size.
How can I resize multiple images at once on Mac?
Select all images in Finder, right-click, open with Preview, and select all photos in the window. Use the “Adjust Size” tool in the menu bar. Alternatively, use a third-party tool like Permute for a smoother workflow.
Can I resize an image to a specific file size (e.g., under 1MB)?
Resizing alone doesn’t guarantee a specific file size; compression is typically required. Use a compression tool to reduce file size while maintaining good quality.
What is the difference between resizing and cropping?
Resizing changes the entire proportions of the image, while cropping cuts out portions of the image.
How do I resize images in macOS Finder without opening Preview?
Set up a Quick Action in Automator: open Automator, choose “Quick Action,” select “image files,” search for “Scale Images,” drag it to the dashboard, and choose whether to resize by percentage or pixels.
How to resize a photo on Mac without losing quality?
To resize without losing quality, avoid upscaling, use appropriate resampling methods, avoid excessive compression, and sharpen after resizing.
Is there a way to resize images for free on Mac?
Yes, Preview and GIMP are free options for resizing images on Mac.
What are the best file formats for resized images?
JPEG is best for photographs, while PNG is better for graphics with sharp lines and text.
How can I automate image resizing on Mac?
Use Automator to create a Quick Action for resizing images with a single click.
Conclusion: Mastering Image Resizing on Your Mac with dfphoto.net
Resizing photos on your Mac is a fundamental skill that can significantly improve your workflow and the quality of your digital images. Whether you’re optimizing images for the web, preparing them for print, or sharing them on social media, understanding the different methods and tools available is essential. From the built-in Preview app to powerful third-party software like Adobe Photoshop and AI-enhanced tools like Luminar Neo, there are options to suit every need and skill level.
At dfphoto.net, we encourage you to explore these techniques and tools to master the art of image resizing. Remember to always preserve your original images, maintain the aspect ratio, and experiment with different settings to achieve the best results. With a little practice, you’ll be able to resize your photos like a pro, ensuring they look their best in any context.
Ready to take your photography skills to the next level? Visit dfphoto.net to discover more tutorials, tips, and inspiration. Connect with a community of passionate photographers and explore the world through the lens. Your next great shot awaits!
Address: 1600 St Michael’s Dr, Santa Fe, NM 87505, United States. Phone: +1 (505) 471-6001. Website: dfphoto.net.
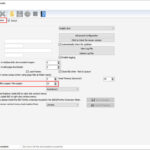
Resizing an image in Preview on Mac. The adjust size window allows users to change dimensions, resolution, and scale proportionally for optimal results.
Batch resizing multiple images in Preview. Selecting all thumbnails enables users to adjust the size of multiple images simultaneously for efficiency.
Cropping an image in Preview on Mac. The markup toolbar provides the crop tool, allowing users to select and remove unwanted areas of the image for better composition.