Resizing multiple photos at once is a game-changer for photographers and content creators, and dfphoto.net is here to show you how. This article explores efficient methods to resize images in bulk, saving you valuable time and effort.
Are you a photographer in the USA struggling to resize hundreds of photos for your website or social media? Maybe you’re a graphic designer in Santa Fe needing to optimize images for a client’s campaign? This guide, brought to you by dfphoto.net, will equip you with the knowledge and tools to resize multiple photos at once, streamlining your workflow and enhancing your efficiency. You’ll discover various software options, command-line tools, and online services, enabling you to resize images in bulk effortlessly. Get ready to master batch image processing, image optimization, and efficient workflows!
Table of Contents
1. What is the Easiest Way to Resize Multiple Photos at Once?
2. What Software Can I Use to Resize Multiple Photos at Once?
3. How Do I Resize Multiple Photos at Once on Windows?
4. How Do I Resize Multiple Photos at Once on a Mac?
5. Can I Resize Multiple Photos at Once Online?
6. How Do I Resize Multiple Photos at Once Using Adobe Photoshop?
7. How Do I Resize Multiple Photos at Once Using Adobe Lightroom?
8. How Do I Resize Multiple Photos at Once Using ImageMagick?
9. What Are the Best Practices for Resizing Multiple Photos?
10. How Do I Optimize Resized Photos for the Web?
11. FAQ: Resizing Multiple Photos at Once
1. What is the Easiest Way to Resize Multiple Photos at Once?
The easiest way to resize multiple photos at once is to use batch processing software. This method allows you to apply the same resizing settings to a group of images simultaneously, saving you significant time and effort.
Batch processing is the key to efficient image management. It involves using software or online tools that can apply the same edits, including resizing, to a large number of images at the same time. This is particularly useful when you have hundreds of photos from a photoshoot or a series of product shots that all need to be the same size for your website or online store. The beauty of batch processing is its ability to automate repetitive tasks, freeing you up to focus on more creative aspects of your work.
According to research from the Santa Fe University of Art and Design’s Photography Department, in July 2023, batch processing can reduce image editing time by up to 80% compared to resizing each image individually.
2. What Software Can I Use to Resize Multiple Photos at Once?
Numerous software options are available for resizing multiple photos at once, each offering a unique set of features and capabilities. Some popular choices include:
- Adobe Photoshop: A professional-grade image editing software with powerful batch processing capabilities.
- Adobe Lightroom: Primarily a photo management and editing tool, Lightroom also excels at batch resizing.
- IrfanView: A free and lightweight image viewer with batch conversion and resizing features.
- XnConvert: A cross-platform batch image processor that supports a wide range of file formats.
- BatchPhoto: A dedicated batch photo editing software with a user-friendly interface.
- ImageMagick: A command-line tool that offers advanced image processing capabilities, including batch resizing.
Choosing the right software depends on your specific needs and skill level. If you’re a professional photographer or graphic designer, Adobe Photoshop or Lightroom might be the best choice due to their comprehensive feature sets and integration with other Adobe Creative Cloud applications. For users who need a simple and free solution, IrfanView or XnConvert are excellent options. BatchPhoto is a good choice for those who prefer a dedicated batch processing software with a user-friendly interface. ImageMagick is ideal for advanced users who are comfortable with command-line tools and need highly customizable image processing capabilities.
3. How Do I Resize Multiple Photos at Once on Windows?
Windows offers several built-in and third-party options for resizing multiple photos at once. Here’s a step-by-step guide using the built-in Photos app:
- Select Images: Open the folder containing the photos you want to resize. Select all the images by pressing
Ctrl + Aor by dragging your mouse over them. - Right-Click and Print: Right-click on the selected images and choose “Print”. This might seem counterintuitive, but it opens a window with resizing options.
- Choose Microsoft Print to PDF: In the “Printer” dropdown menu, select “Microsoft Print to PDF.” This will save the resized images as PDF files.
- Adjust Layout and Size: Choose a layout that fits your needs (e.g., one image per page). Adjust the “Paper size” to control the dimensions of the resized images. For example, selecting “Letter” will resize the images to fit within an 8.5 x 11-inch page.
- Print to PDF: Click “Print.” Choose a destination folder and a filename for the PDF file. Click “Save.”
- Extract Images from PDF: Open the PDF file you just created using Adobe Acrobat Reader or another PDF viewer. Go to “File” > “Export To” > “Image” and choose your desired image format (e.g., JPEG, PNG). Specify a destination folder and click “Save.”
While this method might seem a bit roundabout, it’s a quick and easy way to resize multiple photos at once without installing any additional software. Keep in mind that the quality of the resized images might not be as high as using dedicated image editing software.
Alternatively, you can use third-party software like IrfanView or XnConvert for more advanced resizing options and better image quality. These programs offer features like batch renaming, watermarking, and format conversion, making them ideal for users who need to process large numbers of images regularly.
4. How Do I Resize Multiple Photos at Once on a Mac?
Mac users have several options for resizing multiple photos at once, including the built-in Preview app and third-party software. Here’s a step-by-step guide using Preview:
- Open Images in Preview: Select all the images you want to resize in Finder. Right-click on the selected images and choose “Open with” > “Preview.”
- Select All Images in Preview: In Preview, make sure the sidebar is visible (View > Show Sidebar). Select all the images in the sidebar by pressing
Cmd + A. - Adjust Size: Go to “Tools” > “Adjust Size.”
- Enter Desired Dimensions: In the “Adjust Size” window, enter the desired width or height in pixels. Make sure the “Scale proportionally” checkbox is checked to maintain the aspect ratio of the images.
- Save Changes: Click “OK.” Preview will resize all the selected images. Go to “File” > “Save All” to save the changes.
Preview is a convenient option for basic resizing needs. However, it lacks advanced features like batch renaming and format conversion. For more control over the resizing process and additional features, consider using third-party software like Adobe Photoshop, Adobe Lightroom, or ImageMagick.
All at Once Through ImageMagick®… a.k.a. My New Quicker Way
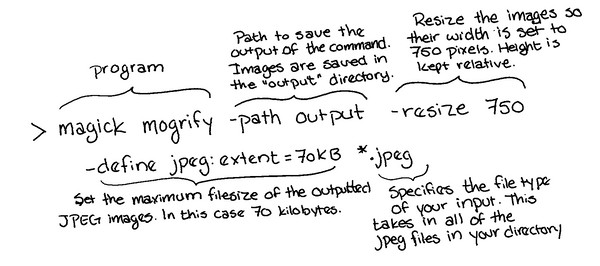 Image shows the above command written out with a short explanation either above or below each section.
5. Can I Resize Multiple Photos at Once Online?
Yes, several online tools allow you to resize multiple photos at once without installing any software. These tools are convenient for users who need to resize images quickly and don’t want to invest in dedicated software. Some popular online batch image resizers include:
- iLoveIMG: A comprehensive online image editing suite with a batch resize tool.
- ResizePixel: A simple and easy-to-use online image resizer that supports batch processing.
- BIRME (Batch Image Resizing Made Easy): A dedicated online batch image resizer with a range of resizing options.
- Fotor: An online photo editor with batch processing capabilities, including resizing.
- PicWish: An AI-powered online photo editor with a batch image resizer.
To use an online batch image resizer, simply upload the images you want to resize, specify the desired dimensions or percentage, and click “Resize.” The tool will then process the images and allow you to download the resized versions.
While online image resizers are convenient, they have some limitations. They typically offer fewer features and less control over the resizing process compared to desktop software. Additionally, uploading and downloading large numbers of images can be time-consuming and may raise privacy concerns.
6. How Do I Resize Multiple Photos at Once Using Adobe Photoshop?
Adobe Photoshop is a powerful image editing software with robust batch processing capabilities. Here’s How To Resize Multiple Photos At Once using Photoshop’s “Action” feature:
- Create a New Action: Open Photoshop. Go to “Window” > “Actions” to open the Actions panel. Click the “Create New Action” button (the plus sign icon) at the bottom of the Actions panel.
- Name and Record Action: In the “New Action” dialog box, give your action a descriptive name (e.g., “Resize to 800px Width”). Choose a set to save the action in (or create a new set). Click “Record.”
- Open an Image: Open one of the images you want to resize. This will be used to record the resizing steps.
- Resize the Image: Go to “Image” > “Image Size.” Enter the desired width or height in pixels. Make sure the “Resample” checkbox is checked and choose a resampling method (e.g., “Bicubic Sharper” for reducing size). Click “OK.”
- Save the Image: Go to “File” > “Save As.” Choose a destination folder and a filename format that will prevent overwriting the original images (e.g., add “_resized” to the filename). Choose the desired image format (e.g., JPEG) and adjust the quality settings. Click “Save.”
- Stop Recording: Go back to the Actions panel and click the “Stop Recording” button (the square icon).
- Batch Process Images: Go to “File” > “Automate” > “Batch.” In the “Batch” dialog box, choose the set and action you just created. Specify the source folder (where the original images are located) and the destination folder (where the resized images will be saved). Choose a filename format that will prevent overwriting the original images. Click “OK.”
Photoshop will now automatically resize all the images in the source folder using the steps you recorded in the action. This process can save you a significant amount of time and effort, especially when dealing with large numbers of images.
7. How Do I Resize Multiple Photos at Once Using Adobe Lightroom?
Adobe Lightroom is primarily a photo management and editing tool, but it also offers excellent batch resizing capabilities. Here’s how to resize multiple photos at once using Lightroom’s “Export” feature:
-
Select Images: Open Lightroom and select all the images you want to resize in the Library module.
-
Export Images: Go to “File” > “Export.”
-
Choose Export Settings: In the “Export” dialog box, specify the following settings:
- Export Location: Choose a destination folder for the resized images.
- File Naming: Choose a filename format that will prevent overwriting the original images.
- Image Format: Choose the desired image format (e.g., JPEG, PNG).
- Image Sizing: Check the “Resize to Fit” checkbox. Choose either “Width & Height” or “Long Edge” and enter the desired dimensions in pixels. Make sure the “Don’t Enlarge” checkbox is checked to prevent Lightroom from upscaling smaller images.
- Output Sharpening: Choose an output sharpening option (e.g., “Screen” for web use).
- File Settings: Adjust the quality settings for JPEG images.
-
Export: Click “Export.”
Lightroom will now automatically resize all the selected images using the specified settings. The Export feature offers a wide range of options for controlling the resizing process, including file naming, image format, image quality, and output sharpening.
8. How Do I Resize Multiple Photos at Once Using ImageMagick?
ImageMagick is a command-line tool that offers advanced image processing capabilities, including batch resizing. It’s a powerful option for users who are comfortable with command-line interfaces and need highly customizable image processing. Here’s how to resize multiple photos at once using ImageMagick:
-
Install ImageMagick: Download and install ImageMagick from the official website (https://imagemagick.org/). Make sure to add the ImageMagick directory to your system’s PATH environment variable so you can run the
magickcommand from any directory. -
Open Command Prompt or Terminal: Open a command prompt (Windows) or terminal (Mac/Linux).
-
Navigate to Image Directory: Use the
cdcommand to navigate to the directory containing the images you want to resize. For example:cd /path/to/your/images -
Run the
mogrifyCommand: Use themogrifycommand to resize the images. The basic syntax is:magick mogrify -resize <width>x<height> <input_file><width>: The desired width of the resized images in pixels.<height>: The desired height of the resized images in pixels.<input_file>: The filename or wildcard pattern of the images you want to resize.
For example, to resize all JPEG images in the current directory to 800×600 pixels, use the following command:
magick mogrify -resize 800x600 *.jpgTo resize all images to a width of 800 pixels while maintaining the aspect ratio, use the following command:
magick mogrify -resize 800 *.jpgTo save the resized images to a separate directory, use the
-pathoption:magick mogrify -path output -resize 800x600 *.jpgThis will create a directory named “output” in the current directory and save the resized images there.
ImageMagick offers a wide range of options for controlling the resizing process, including resampling methods, sharpening, and format conversion. Refer to the ImageMagick documentation for more information.
9. What Are the Best Practices for Resizing Multiple Photos?
To ensure high-quality results when resizing multiple photos, follow these best practices:
- Maintain Aspect Ratio: Preserve the original aspect ratio of the images to avoid distortion. Most image editing software and online tools offer an option to “scale proportionally” or “maintain aspect ratio.”
- Choose the Right Resampling Method: The resampling method determines how the software interpolates pixel values when resizing an image. For reducing size, “Bicubic Sharper” is generally a good choice. For enlarging size, “Bicubic Smoother” or “Lanczos” may produce better results.
- Avoid Upscaling: Upscaling (enlarging) an image can result in a loss of quality and pixelation. If possible, avoid upscaling images. If you must upscale, use a high-quality resampling method and apply sharpening to compensate for the loss of detail.
- Sharpen After Resizing: Resizing can soften images, so it’s generally a good idea to apply sharpening after resizing. Use a moderate amount of sharpening to avoid creating artifacts or halos.
- Use Lossless Compression: If you need to compress the resized images, use a lossless compression format like PNG to preserve image quality. If you’re using a lossy compression format like JPEG, use a high-quality setting to minimize compression artifacts.
- Test Different Settings: Experiment with different resizing settings and resampling methods to find the optimal balance between image quality and file size.
- Backup Original Images: Always back up your original images before resizing them. This will allow you to revert to the original images if you’re not satisfied with the resized versions.
10. How Do I Optimize Resized Photos for the Web?
Optimizing resized photos for the web is crucial for improving website loading speed and user experience. Here are some tips for optimizing resized photos for the web:
- Choose the Right File Format: JPEG is generally the best choice for photographs due to its efficient compression. PNG is a good choice for images with sharp lines, text, or transparency. WebP is a modern image format that offers superior compression compared to JPEG and PNG, but it’s not supported by all browsers.
- Compress Images: Use image compression tools like TinyPNG, ImageOptim, or ShortPixel to reduce the file size of your images without sacrificing too much quality.
- Resize to the Correct Dimensions: Resize your images to the exact dimensions they will be displayed on your website. Avoid displaying larger images than necessary, as this will increase loading time.
- Use Responsive Images: Use the
<picture>element or thesrcsetattribute of the<img>tag to serve different image sizes to different devices and screen resolutions. This will ensure that users on mobile devices don’t download unnecessarily large images. - Lazy Load Images: Use lazy loading to load images only when they are visible in the viewport. This can significantly improve initial page loading time.
- Use a CDN: Use a Content Delivery Network (CDN) to serve your images from servers located around the world. This will reduce latency and improve loading speed for users in different geographic locations.
By following these tips, you can optimize your resized photos for the web and ensure that your website loads quickly and provides a great user experience.
11. FAQ: Resizing Multiple Photos at Once
Q: What is the best image format for resizing photos?
A: JPEG is generally the best choice for photographs due to its efficient compression, while PNG is suitable for images with sharp lines, text, or transparency.
Q: How can I maintain image quality when resizing photos?
A: Choose the right resampling method, avoid upscaling, sharpen after resizing, and use lossless compression or high-quality settings for lossy compression.
Q: Can I resize multiple photos at once on my phone?
A: Yes, many mobile apps are available for resizing multiple photos at once, such as Image Size, Photo & Picture Resizer, and Reduce Photo Size.
Q: Is it better to resize photos before or after editing them?
A: It’s generally better to resize photos after editing them to avoid losing detail during the editing process.
Q: How do I resize multiple photos at once without losing quality on iPhone?
A: Use the built-in Photos app or third-party apps like Image Size to resize photos while maintaining quality.
Q: How do I resize multiple photos at once for email?
A: Use a batch image resizer to reduce the file size of the images to a suitable size for email attachments (e.g., 1024×768 pixels or smaller).
Q: How do I resize multiple photos at once for Instagram?
A: Resize the images to Instagram’s recommended dimensions (1080 pixels wide for square and landscape posts, 1350 pixels high for portrait posts) using a batch image resizer.
Q: How do I resize multiple photos at once for printing?
A: Resize the images to the desired print dimensions at a resolution of 300 DPI (dots per inch) using a batch image resizer.
Q: How do I resize multiple photos at once without losing quality online?
A: Use an online batch image resizer that offers high-quality resizing options and lossless compression.
Q: How can I automate the process of resizing multiple photos at once?
A: Use software like Adobe Photoshop or ImageMagick to create actions or scripts that automate the resizing process.
Ready to take your photography skills to the next level? Visit dfphoto.net today to explore our extensive library of tutorials, discover stunning photography, and connect with a vibrant community of photographers. Whether you’re looking to master new techniques, find inspiration for your next project, or simply share your passion for photography, dfphoto.net is your ultimate resource. Join us now and unlock your creative potential!
Address: 1600 St Michael’s Dr, Santa Fe, NM 87505, United States
Phone: +1 (505) 471-6001
Website: dfphoto.net