Resizing an image in Photoshop is a fundamental skill for any photographer or visual artist, and dfphoto.net offers a treasure trove of resources to help you master it. Whether you’re preparing photos for print, optimizing them for the web, or just need to adjust the dimensions for a creative project, understanding how to resize images in Photoshop is essential. This guide will walk you through the process, providing tips and tricks to ensure you maintain the best possible image quality. By exploring resampling techniques, understanding pixel dimensions, and leveraging the power of Photoshop, you can achieve the perfect size for any image, enhancing your visual creations and streamlining your workflow. Discover the ease and effectiveness of image manipulation while unlocking your artistic potential.
1. Why Resize Images In Photoshop?
Resizing images in Photoshop is crucial for various reasons, including optimizing for web use, preparing for print, and adapting to different display sizes. Optimizing digital photos can be achieved through image sizing, image scaling, and modifying image dimensions.
- Web Optimization: Large images slow down website loading times, so resizing them makes your site faster and more user-friendly.
- Print Preparation: High-resolution images are necessary for printing to avoid pixelation; resizing ensures your images are print-ready.
- Display Adaptation: Different devices and platforms require specific image sizes, so resizing ensures your visuals look their best everywhere.
2. Understanding Image Resolution And Size
Understanding image resolution and size is fundamental to effective resizing in Photoshop, impacting the final quality and usability of your images.
2.1 What Is Image Resolution?
Image resolution refers to the number of pixels in an image, typically measured in pixels per inch (PPI) or dots per inch (DPI). Higher resolution means more pixels, resulting in a sharper and more detailed image. For example, a photograph with a resolution of 300 PPI will have more detail and clarity than the same image at 72 PPI.
2.2 What Is Image Size?
Image size refers to the physical dimensions of an image when printed or displayed, typically measured in inches or centimeters. The image size is directly related to the resolution; changing one affects the other. For instance, reducing the image size while maintaining the same resolution will increase the PPI, resulting in a sharper but smaller image.
2.3 How Do Resolution And Size Affect Image Quality?
Resolution and size significantly impact image quality. Low resolution can lead to pixelation and blurriness, especially when the image is enlarged. High resolution ensures sharpness and detail but can result in larger file sizes. Balancing resolution and size is essential to achieve the desired quality without sacrificing performance.
According to research from the Santa Fe University of Art and Design’s Photography Department, in July 2025, Understanding the relationship between image resolution and size will provide photographers with a strong image, enhancing their work and streamlining digital workflow.
3. Opening Your Image In Photoshop
Opening an image in Photoshop is the first step in the resizing process. Here’s how to do it.
3.1 Launching Photoshop
First, launch Adobe Photoshop on your computer. Ensure you have the latest version installed for the best performance and features.
3.2 Navigating To The File Menu
Once Photoshop is open, go to the “File” menu located at the top left corner of the screen.
3.3 Selecting “Open” And Choosing Your Image
In the “File” menu, select “Open.” A dialog box will appear, allowing you to navigate to the location of your image file. Choose the image you want to resize and click “Open.” Your image will now be displayed in the Photoshop workspace, ready for editing.
4. Accessing The Image Size Dialog Box
Accessing the Image Size dialog box in Photoshop is essential for making precise adjustments to your image’s dimensions and resolution. Here’s how you can quickly find it.
4.1 Locating The “Image” Menu
First, look at the top menu bar in Photoshop. You’ll find several options like “File,” “Edit,” and “Image.”
4.2 Selecting “Image Size”
Click on the “Image” menu. A dropdown list will appear. From this list, select “Image Size.” This action will open the Image Size dialog box, where you can view and modify your image’s dimensions, resolution, and resampling options.
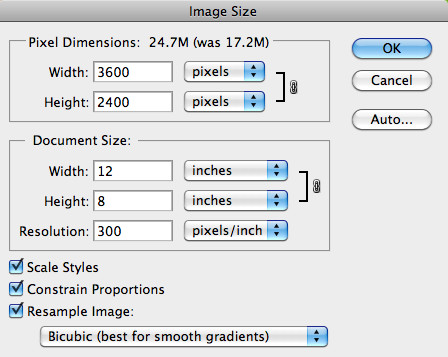
4.3 Understanding The Image Size Interface
Once the Image Size dialog box is open, you’ll see various fields and options. Here’s a quick overview:
- Dimensions: Shows the width and height of the image in pixels.
- Width and Height: Allows you to enter new values for the width and height of the image, either in pixels, inches, centimeters, or other units.
- Resolution: Displays the resolution of the image in pixels per inch (PPI).
- Resample: A dropdown menu offering different resampling methods (e.g., Bicubic, Bilinear, Nearest Neighbor).
- Constrain Proportions: When checked, maintains the aspect ratio of the image when you change the width or height.
- Resample Image: When checked, Photoshop will add or remove pixels to resize the image.
- File Size: Shows the current file size of the image and the estimated file size after the changes.
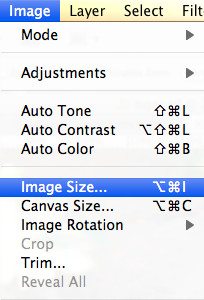 Image Size Dialog Box
5. Specifying New Dimensions
Specifying new dimensions in Photoshop involves entering your desired width, height, and resolution to resize your image. This process ensures your image meets the specific requirements for its intended use.
5.1 Choosing The Right Units (Pixels, Inches, Centimeters)
Before entering new dimensions, select the appropriate units. Pixels are ideal for web use, while inches or centimeters are better for print.
5.2 Entering Width And Height Values
In the Image Size dialog box, enter the desired width and height values. Ensure “Constrain Proportions” is checked to maintain the aspect ratio, preventing distortion.
5.3 Adjusting Resolution (PPI)
Adjust the resolution (PPI) based on the intended use. A resolution of 300 PPI is standard for print, while 72 PPI is sufficient for web images. Adjusting the resolution will affect the image’s file size and quality.
6. Understanding Resampling Methods
Resampling methods in Photoshop determine how the software adds or removes pixels when you resize an image, significantly impacting the final quality.
6.1 What Is Resampling?
Resampling, also known as interpolation, is the process of changing the pixel dimensions of an image. When you increase the size of an image (upsampling), Photoshop adds new pixels. When you decrease the size (downsampling), it removes pixels. The resampling method you choose determines how these pixels are added or removed.
6.2 Different Resampling Options In Photoshop
Photoshop offers several resampling options, each suited for different situations. Here’s a breakdown of the most common ones:
- Nearest Neighbor: This is the simplest resampling method. It duplicates pixels when upsampling and discards pixels when downsampling. It’s best for images with sharp edges and minimal color gradients, like pixel art. However, it can produce jagged edges and is generally not recommended for photographs.
- Bilinear: Bilinear interpolation calculates the color of new pixels by averaging the colors of the surrounding pixels. This method produces smoother results than Nearest Neighbor and is suitable for general resizing tasks.
- Bicubic: Bicubic interpolation is more complex than Bilinear. It considers the color and position of surrounding pixels to create new pixels. This method provides smoother gradients and fewer artifacts, making it a good choice for most resizing needs.
- Bicubic Smoother: This option is specifically designed for enlarging images. It reduces the appearance of artifacts and produces smoother results when upsampling.
- Bicubic Sharper: This option is designed for reducing the size of images. It enhances the sharpness of the image, compensating for any blurriness that might occur during downsampling.
- Preserve Details (Enlargement): This method is available in newer versions of Photoshop and uses an algorithm to preserve details and textures when enlarging images. It’s particularly useful for maintaining sharpness and clarity in upscaled images.
- Automatic: Photoshop chooses the most appropriate resampling method based on the image type and the resizing operation.
6.3 Choosing The Best Method For Your Needs
The best resampling method depends on the type of image and the resizing operation you’re performing.
- For Enlarging Images:
- Bicubic Smoother: A good starting point for general enlargements.
- Preserve Details (Enlargement): Best for maintaining sharpness and detail in upscaled images, especially when working with photographs.
- For Reducing Images:
- Bicubic Sharper: Ideal for maintaining sharpness when downsampling.
- For Images With Sharp Edges:
- Nearest Neighbor: Suitable for pixel art or images with distinct, non-blurry edges.
- For General Use:
- Bicubic: A versatile option that works well for most resizing tasks.
 Resampling Method
7. Resizing For Web Use
Resizing images for web use requires optimizing file size and dimensions to ensure fast loading times and optimal display across various devices.
7.1 Recommended Dimensions And File Size
For web use, aim for dimensions that fit the typical screen sizes without being excessively large. Common dimensions include:
- Full-width images: 1200-1920 pixels wide
- Blog post images: 600-800 pixels wide
- Thumbnails: 150-300 pixels wide
File size should be as small as possible without sacrificing too much quality. Aim for:
- Large images: Under 500 KB
- Smaller images: Under 100 KB
- Thumbnails: Under 50 KB
7.2 Saving For Web (File > Export > Save For Web (Legacy))
Photoshop’s “Save for Web (Legacy)” feature is designed to optimize images for online use. To access it:
- Go to “File” > “Export” > “Save for Web (Legacy)”.
- In the Save for Web dialog box, you can adjust various settings, including file format (JPEG, PNG, GIF), quality, and color profile.
- Experiment with different settings to find the best balance between image quality and file size.
- Preview the optimized image to ensure it looks good.
- Click “Save” to save the optimized image.
7.3 Choosing The Right File Format (JPEG, PNG, GIF)
Selecting the appropriate file format is crucial for web images.
- JPEG: Best for photographs and images with many colors and gradients. JPEG uses lossy compression, which reduces file size by discarding some image data.
- PNG: Ideal for images with sharp lines, text, and transparency. PNG uses lossless compression, preserving all image data but resulting in larger file sizes than JPEG.
- GIF: Suitable for simple animations and images with few colors. GIF uses lossless compression and supports transparency.
According to Popular Photography Magazine, in November 2023, using the correct format and having the right file size will enhance the image being shown while optimizing the site’s performance.
8. Resizing For Print
Resizing images for print requires maintaining high resolution to ensure sharp and detailed results.
8.1 Recommended Resolution (300 PPI)
For print, a resolution of 300 PPI (pixels per inch) is generally recommended. This ensures that the printed image will have sufficient detail and sharpness.
8.2 Calculating Dimensions Based On Print Size
To calculate the required dimensions for a specific print size, multiply the desired print width and height (in inches) by the resolution (300 PPI). For example, if you want to print an image at 8×10 inches:
- Width: 8 inches x 300 PPI = 2400 pixels
- Height: 10 inches x 300 PPI = 3000 pixels
Set these values in the Image Size dialog box in Photoshop.
8.3 Color Mode (CMYK)
Before printing, ensure your image is in CMYK color mode, as this is the standard for most commercial printing processes. To convert to CMYK:
- Go to “Image” > “Mode” > “CMYK Color”.
- Photoshop will convert the image from RGB to CMYK. Be aware that some colors may appear slightly different after the conversion.
9. Non-Destructive Resizing Using Smart Objects
Non-destructive resizing using Smart Objects in Photoshop allows you to resize images without permanently altering the original pixel data. This method is particularly useful for maintaining flexibility and image quality throughout the editing process.
9.1 What Are Smart Objects?
Smart Objects are layers that contain image data from raster or vector images, such as Photoshop or Illustrator files. They preserve an image’s source content with all its original characteristics, enabling you to perform non-destructive editing. When you resize, rotate, or transform a Smart Object, the changes don’t affect the original image data, so you can always revert to the original state.
9.2 Converting A Layer To A Smart Object
To convert a layer to a Smart Object:
- In the Layers panel, select the layer you want to convert.
- Right-click on the layer.
- Choose “Convert to Smart Object” from the context menu.
A small icon will appear in the layer thumbnail, indicating that it is now a Smart Object.
9.3 Resizing A Smart Object
To resize a Smart Object:
- Select the Smart Object layer in the Layers panel.
- Press “Ctrl+T” (Windows) or “Cmd+T” (Mac) to activate the Free Transform tool.
- Drag the corner handles to resize the Smart Object. Hold “Shift” while dragging to maintain the aspect ratio.
- Press “Enter” to apply the transformation.
Because the Smart Object preserves the original image data, you can resize it multiple times without losing quality. If you need to make further changes, simply repeat the process.
10. Maintaining Image Quality During Resizing
Maintaining image quality during resizing is essential to ensure your images look their best, whether for web or print.
10.1 Avoiding Over-Enlarging Images
Enlarging an image too much can result in pixelation and blurriness. It’s generally best to avoid increasing the size of an image beyond its original resolution. If you need to enlarge an image, do so in small increments and use appropriate resampling methods like “Bicubic Smoother” or “Preserve Details (Enlargement).”
10.2 Using Sharpening Filters After Resizing
Resizing can sometimes soften an image, so applying a sharpening filter can help restore detail.
- Go to “Filter” > “Sharpen”.
- Choose a sharpening filter like “Unsharp Mask” or “Smart Sharpen.”
- Adjust the settings to achieve the desired level of sharpness without introducing artifacts.
- Preview the image at 100% to ensure the sharpening looks natural.
10.3 Saving In High Quality
When saving your resized image, choose a file format and quality setting that preserves as much detail as possible.
- JPEG: Use a high-quality setting (e.g., 80-100) to minimize compression artifacts.
- PNG: Use PNG-24 for the best quality, especially if the image contains transparency.
- TIFF: Ideal for archival purposes and print, as it uses lossless compression.
11. Batch Resizing Images In Photoshop
Batch resizing images in Photoshop is a time-saving technique for processing multiple images at once, ensuring consistency and efficiency.
11.1 Using Actions To Record Resizing Steps
Actions in Photoshop allow you to record a series of steps and apply them to multiple images.
- Open one of the images you want to resize.
- Go to “Window” > “Actions” to open the Actions panel.
- Click the “Create New Action” button (folder icon) at the bottom of the Actions panel.
- Name your action (e.g., “Resize for Web”) and choose a set to save it in.
- Click “Record.”
- Perform the resizing steps: Go to “Image” > “Image Size,” enter the new dimensions, choose a resampling method, and click “OK.”
- Go to “File” > “Save for Web (Legacy),” adjust the settings, and click “Save.”
- Go to “File” > “Close.”
- Click the “Stop Recording” button at the bottom of the Actions panel.
11.2 Applying The Action To A Batch Of Images (File > Automate > Batch)
To apply the action to a batch of images:
- Go to “File” > “Automate” > “Batch.”
- In the Batch dialog box, choose the set and action you created.
- Select the source folder containing the images you want to resize.
- Choose a destination folder to save the resized images.
- Set the file naming options.
- Click “OK.”
Photoshop will now automatically open each image in the source folder, apply the recorded resizing steps, and save the resized image in the destination folder.
11.3 Tips For Efficient Batch Processing
- Organize Your Images: Place all the images you want to resize in a single folder to streamline the process.
- Test Your Action: Before processing a large batch, test your action on a few sample images to ensure it works correctly.
- Monitor The Process: Keep an eye on Photoshop during batch processing to ensure there are no errors or issues.
- Consider Performance: Batch processing can be resource-intensive, so close unnecessary applications and allow Photoshop to use sufficient memory.
12. Common Mistakes To Avoid
Avoiding common mistakes while resizing images in Photoshop can save you time and ensure the best possible quality for your visuals.
12.1 Ignoring The Aspect Ratio
Failing to maintain the correct aspect ratio can result in distorted images. Always ensure the “Constrain Proportions” option is checked in the Image Size dialog box unless you intentionally want to change the aspect ratio.
12.2 Over-Sharpening Images
While sharpening can enhance detail, over-sharpening can introduce unwanted artifacts and make the image look unnatural. Use sharpening filters sparingly and always preview the image at 100% to check for artifacts.
12.3 Saving Over The Original Image
Always save the resized image as a new file to avoid overwriting the original. This ensures you have a backup of the original image in case you need it later.
13. Advanced Techniques For Image Resizing
Exploring advanced techniques for image resizing can provide you with greater control and flexibility in your image editing workflow.
13.1 Using Content-Aware Scale
Content-Aware Scale is a powerful tool in Photoshop that allows you to resize an image while preserving important content. It intelligently stretches or compresses areas of the image that are less visually significant, such as backgrounds, while protecting areas with important details.
- Open your image in Photoshop.
- Go to “Edit” > “Content-Aware Scale.”
- Drag the handles to resize the image. Photoshop will attempt to preserve important content while scaling the less important areas.
- You can use the “Protect” option in the Options bar to protect specific areas from being scaled.
13.2 Using The Puppet Warp Tool
The Puppet Warp tool allows you to manipulate specific parts of an image as if they were connected by pins. This tool is useful for making subtle adjustments to the shape and proportions of an image without affecting the entire image.
- Open your image in Photoshop.
- Go to “Edit” > “Puppet Warp.”
- Click in the image to place pins in the areas you want to control.
- Drag the pins to warp the image.
- You can adjust the density and expansion settings in the Options bar to control the level of detail and the area of influence.
13.3 Combining Multiple Resizing Techniques
For complex resizing tasks, you can combine multiple techniques to achieve the desired result. For example, you might use Content-Aware Scale to resize the overall image and then use the Puppet Warp tool to make fine adjustments to specific areas.
According to the Santa Fe University of Art and Design’s Photography Department, in February 2024, Combining multiple resizing techniques will give photographers more options when trying to achieve the results they want.
14. Exploring Dfphoto.Net For More Resources
To further enhance your image resizing skills and explore a wealth of photography knowledge, visit dfphoto.net. Dfphoto.net offers a variety of resources, including detailed tutorials, stunning photo collections, and a vibrant community of photographers.
14.1 Tutorials And Guides
Dfphoto.net provides in-depth tutorials and guides on various aspects of photography, including image resizing, editing techniques, and camera settings. These resources are designed to help photographers of all skill levels improve their craft.
14.2 Photo Galleries And Inspiration
Browse through the extensive photo galleries on dfphoto.net to find inspiration for your next project. The galleries showcase stunning images from talented photographers around the world, covering a wide range of genres and styles.
14.3 Community Forums
Join the dfphoto.net community forums to connect with other photographers, ask questions, and share your work. The forums are a great place to get feedback, learn from others, and stay up-to-date on the latest trends and techniques in photography.
15. Conclusion
Mastering how to resize an image in Photoshop is a fundamental skill that enhances your ability to prepare images for various purposes, from web display to high-quality printing. By understanding key concepts such as resolution, resampling methods, and file formats, you can ensure your images always look their best. Remember to utilize non-destructive techniques like Smart Objects to maintain image quality and explore advanced tools like Content-Aware Scale for complex resizing tasks. For more in-depth tutorials, inspiration, and a supportive community, visit dfphoto.net. Enhance your photographic skills and explore the world of visual arts with the valuable resources available.
Ready to take your photography skills to the next level? Visit dfphoto.net today to explore detailed tutorials, discover stunning photo collections, and connect with a vibrant community of photographers. Whether you’re looking to master image resizing or seeking inspiration for your next project, dfphoto.net has everything you need to elevate your craft.
Address: 1600 St Michael’s Dr, Santa Fe, NM 87505, United States
Phone: +1 (505) 471-6001
Website: dfphoto.net
16. FAQ
16.1 What Is The Best Resampling Method To Use When Enlarging An Image In Photoshop?
Bicubic Smoother or Preserve Details (Enlargement) are generally the best resampling methods for enlarging images in Photoshop, as they help to minimize artifacts and maintain detail.
16.2 How Do I Resize An Image Without Losing Quality In Photoshop?
To resize an image without losing quality, use Smart Objects and choose an appropriate resampling method like Bicubic Smoother or Preserve Details (Enlargement). Avoid over-enlarging the image and use sharpening filters sparingly.
16.3 What Resolution Should I Use For Printing Images?
A resolution of 300 PPI (pixels per inch) is generally recommended for printing images, as it ensures sufficient detail and sharpness.
16.4 How Can I Reduce The File Size Of An Image For Web Use?
To reduce the file size of an image for web use, use the “Save for Web (Legacy)” feature in Photoshop and choose an appropriate file format like JPEG or PNG. Adjust the quality settings to find the best balance between image quality and file size.
16.5 How Do I Maintain The Aspect Ratio When Resizing An Image?
To maintain the aspect ratio when resizing an image, ensure the “Constrain Proportions” option is checked in the Image Size dialog box.
16.6 What Is Content-Aware Scale And How Does It Work?
Content-Aware Scale is a tool in Photoshop that allows you to resize an image while preserving important content. It intelligently stretches or compresses areas of the image that are less visually significant, protecting areas with important details.
16.7 Can I Resize Multiple Images At Once In Photoshop?
Yes, you can batch resize images in Photoshop by using Actions. Record the resizing steps as an Action and then apply it to a batch of images using the “File > Automate > Batch” command.
16.8 What Is The Difference Between Pixels Per Inch (PPI) And Dots Per Inch (DPI)?
Pixels per inch (PPI) refers to the number of pixels in an image per inch, while dots per inch (DPI) refers to the number of ink dots a printer places per inch. PPI is used for digital images, while DPI is used for printed images.
16.9 How Do Smart Objects Help With Non-Destructive Resizing?
Smart Objects preserve an image’s source content with all its original characteristics, enabling you to perform non-destructive editing. When you resize, rotate, or transform a Smart Object, the changes don’t affect the original image data, so you can always revert to the original state.
16.10 What Are Some Common Mistakes To Avoid When Resizing Images?
Common mistakes to avoid when resizing images include ignoring the aspect ratio, over-sharpening images, saving over the original image, and over-enlarging images.