Resizing a photo on your Mac is a fundamental skill for anyone involved in photography or visual arts. This guide on dfphoto.net provides a comprehensive overview of How To Resize A Photo In Mac, ensuring your images are perfectly sized for any purpose, from online sharing to professional printing. Whether you’re aiming to optimize images for web use, reduce file sizes for email, or prepare photos for print, mastering these techniques will enhance your digital workflow. Learn about image dimensions and file size reduction through various methods and techniques today.
1. Why Should I Resize Photos On My Mac?
Resizing photos on your Mac is essential for numerous reasons, impacting everything from storage space to website performance.
- Optimize Digital Storage: Resizing reduces file sizes, freeing up space on your Mac’s hard drive or external storage.
- Enhance Website Performance: Smaller image files lead to faster loading times, improving user experience and SEO rankings, states Google’s Search Central guidelines.
- Email Efficiency: Resized images are easier to attach and send via email without exceeding attachment limits.
- Social Media Compatibility: Different platforms have different size requirements. Resizing ensures your photos look their best on each platform.
- Print Preparation: Resizing ensures your photos have the correct dimensions and resolution for high-quality printing.
2. What Are The Different Ways To Resize A Photo In Mac?
There are several methods to resize photos on your Mac, each offering different levels of control and convenience.
- Preview: macOS’s built-in image viewer offers a quick and easy way to resize images.
- Photos App: Ideal for resizing images within your photo library.
- Image Editors (e.g., Adobe Photoshop): Provide advanced resizing options and greater control over image quality.
- Third-Party Apps: Offer specialized features and batch processing capabilities.
- Online Tools: Convenient for quick resizing without installing software.
3. How To Resize A Photo In Mac Using Preview?
Preview is a straightforward tool for quickly resizing photos on your Mac.
- Open the Image: Double-click the image file to open it in Preview.
- Access Adjust Size: Go to Tools > Adjust Size.
- Enter New Dimensions: In the Adjust Size window, enter the desired width or height. The other dimension will adjust automatically to maintain the aspect ratio.
- Adjust Resolution (Optional): Change the resolution if needed. For web use, 72 pixels per inch (PPI) is standard. For printing, 300 PPI is recommended.
- Resample Image: Ensure the “Scale proportionally” box is checked to maintain the aspect ratio.
- Save the Resized Image: Go to File > Export. Choose a new name and location for the resized image to avoid overwriting the original.
4. Can I Resize Multiple Photos At Once Using Preview?
Yes, Preview allows you to batch resize multiple photos.
- Open Multiple Images: Select all the images you want to resize in Finder, right-click, and choose Open with > Preview.
- Select Thumbnails: In Preview, ensure the sidebar is visible (View > Show Sidebar). Select all the image thumbnails in the sidebar.
- Access Adjust Size: Go to Tools > Adjust Size.
- Enter New Dimensions: As before, enter the desired width or height. The changes will apply to all selected images.
- Save the Resized Images: Go to File > Export Selected Images. Choose a folder to save the resized images.
 Preview Sidebar Selected for Batch Resizing
5. How To Resize A Photo In Mac Using The Photos App?
The Photos app provides a simple way to resize images within your photo library.
- Open the Photos App: Launch the Photos app on your Mac.
- Select the Image: Find the photo you want to resize and double-click to open it.
- Export the Photo: Go to File > Export > Export Photo.
- Adjust Size Options: In the export dialog, you can choose from several size options:
- Small: Suitable for email and quick sharing.
- Medium: Good for general web use.
- Large: Best for social media and viewing on larger screens.
- Actual Size: Exports the photo without resizing.
- Custom: Allows you to specify the exact dimensions or file size.
- Set Quality: Adjust the quality slider to balance image quality and file size. Higher quality results in larger file sizes.
- Export the Resized Photo: Choose a location to save the resized photo and click Export.
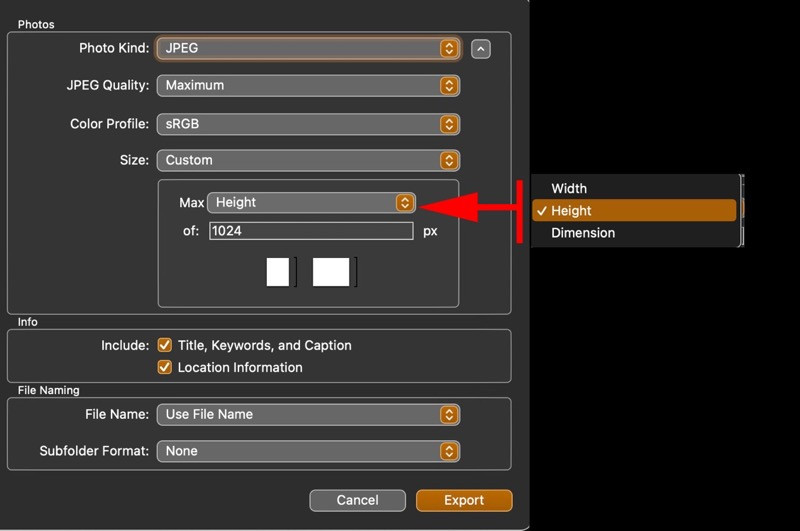
6. What Are The Advanced Resizing Options In The Photos App?
For more precise control, use the “Custom” option in the Photos app’s export settings.
- Select Custom Size: In the export dialog, choose Custom.
- Set Dimensions: Enter the desired width and height, or specify a maximum dimension.
- File Size Limit: You can also set a maximum file size. The Photos app will adjust the image quality to meet this limit.
- Export: Click Export to save the resized photo.
 Photos App Export Options
7. How Can I Resize A Photo In Mac Using Adobe Photoshop?
Adobe Photoshop offers the most advanced and precise resizing options.
- Open the Image: Launch Photoshop and open the image you want to resize (File > Open).
- Access Image Size: Go to Image > Image Size.
- Enter New Dimensions: In the Image Size dialog, enter the desired width, height, or resolution.
- Resampling Options: Choose a resampling method from the dropdown menu:
- Automatic: Photoshop chooses the best method based on the image.
- Preserve Details (enlargement): Best for increasing image size while preserving details.
- Bicubic Smoother: Best for enlargement.
- Bicubic Sharper: Best for reduction.
- Bicubic: A good general-purpose method.
- Nearest Neighbor: Best for images with sharp edges and no anti-aliasing.
- Constrain Proportions: Ensure the “Constrain Proportions” box is checked to maintain the aspect ratio.
- Save the Resized Image: Go to File > Export > Export As or File > Save As. Choose a new name and location to avoid overwriting the original.
8. What Are The Best Practices For Resizing In Photoshop?
Follow these best practices to ensure high-quality resizing in Photoshop:
- Resample Appropriately: Choose the resampling method that best suits your resizing needs.
- Avoid Excessive Enlargement: Enlarging an image too much can result in pixelation and loss of detail.
- Sharpen After Resizing: Use the Unsharp Mask filter (Filter > Sharpen > Unsharp Mask) to restore sharpness after resizing.
- Save in the Right Format: Save your resized images in JPEG format for web use or TIFF format for printing.
9. Are There Any Third-Party Apps For Resizing Photos On Mac?
Yes, several third-party apps offer specialized features for resizing photos on Mac.
- Resize Master: A simple and efficient app for batch resizing.
- Image Size: A straightforward app with a clean interface.
- BatchPhoto: Offers advanced batch processing capabilities and watermarking.
- PhotoBulk: Allows you to resize, optimize, and rename images in bulk.
10. How Does Resize Master Work?
Resize Master is a user-friendly app designed for quick and easy batch resizing.
- Download and Install: Download Resize Master from the Mac App Store and install it on your Mac.
- Add Images: Drag and drop a folder of image files into the open window.
- Set Resizing Options: Choose from a number of options, such as specifying the width, height, or percentage.
- Start Resizing: Click the “Resize” button to start the process.
- Save Resized Images: Choose a location to save the resized images.
 Resize Master App Interface
11. What Are The Advantages Of Using Third-Party Apps?
Third-party apps often provide additional features and benefits compared to built-in tools.
- Batch Processing: Resize multiple images at once.
- Advanced Options: More precise control over resizing parameters.
- User-Friendly Interface: Often designed for ease of use.
- Additional Features: Watermarking, renaming, and optimization tools.
12. Can I Resize Photos Online Without Installing Software?
Yes, several online tools allow you to resize photos without installing any software.
- Adobe Express: A web-based tool from Adobe that offers resizing and other editing features.
- iLoveIMG: A comprehensive online image editing tool with resizing capabilities.
- PicResize: A simple and straightforward online image resizer.
- Fotor: An online photo editor with resizing and enhancement tools.
13. How Do I Use An Online Photo Resizer?
Using an online photo resizer is generally straightforward.
- Visit the Website: Go to the website of your chosen online photo resizer.
- Upload the Image: Click the “Upload” or “Choose File” button to upload the image you want to resize.
- Set Resizing Options: Enter the desired width, height, or percentage.
- Apply Changes: Click the “Resize” or “Apply” button to resize the image.
- Download the Resized Image: Click the “Download” button to save the resized image to your computer.
14. What Are The Considerations When Using Online Resizing Tools?
Keep these considerations in mind when using online resizing tools:
- Internet Connection: A stable internet connection is required.
- File Size Limits: Some tools have limits on the maximum file size you can upload.
- Privacy: Be mindful of the privacy policies of the website, especially if you are resizing sensitive images.
- Features: Online tools offer fewer features than desktop software.
15. What Is Image Resolution And Why Does It Matter?
Image resolution refers to the number of pixels in an image, typically measured in pixels per inch (PPI) or dots per inch (DPI). Higher resolution means more pixels, resulting in a sharper, more detailed image.
- Web Use: For web images, a resolution of 72 PPI is generally sufficient.
- Print Use: For printing, a resolution of 300 DPI is recommended to ensure high-quality prints.
16. How Does Resizing Affect Image Quality?
Resizing can affect image quality, especially when enlarging images.
- Enlarging: Enlarging an image increases the size of each pixel, which can lead to pixelation and loss of detail.
- Reducing: Reducing an image averages the color of neighboring pixels, which can result in a slight loss of sharpness.
17. What Is The Best File Format For Resized Images?
The best file format for resized images depends on their intended use.
- JPEG: Ideal for photographs and images with complex colors. JPEG uses lossy compression, which reduces file size but can also reduce image quality.
- PNG: Best for images with sharp lines, text, and graphics. PNG uses lossless compression, which preserves image quality but results in larger file sizes.
- GIF: Suitable for simple animations and images with few colors.
18. How Can I Maintain Image Quality When Resizing?
To maintain image quality when resizing:
- Use Appropriate Resampling Methods: Choose the resampling method that best suits your resizing needs.
- Avoid Excessive Enlargement: Enlarging an image too much can result in pixelation and loss of detail.
- Sharpen After Resizing: Use the Unsharp Mask filter to restore sharpness after resizing.
- Save in the Right Format: Save your resized images in the appropriate file format for their intended use.
19. How Do I Resize An Image For Email?
To resize an image for email:
- Open the Image: Open the image in Preview, Photos, or an image editor.
- Resize the Image: Reduce the dimensions to around 600-800 pixels wide.
- Save as JPEG: Save the resized image as a JPEG with a quality setting of 60-80%.
- Attach to Email: Attach the resized image to your email.
20. What Are The Optimal Image Sizes For Social Media?
Different social media platforms have different image size requirements. Here are some optimal sizes for popular platforms:
| Platform | Image Type | Recommended Size |
|---|---|---|
| Profile Picture | 170 x 170 pixels | |
| Cover Photo | 851 x 315 pixels | |
| Post Image | 1200 x 630 pixels | |
| Profile Picture | 110 x 110 pixels | |
| Post Image | 1080 x 1080 pixels | |
| Profile Picture | 400 x 400 pixels | |
| Header Image | 1500 x 500 pixels | |
| In-Stream Photo | 1200 x 675 pixels | |
| Profile Picture | 400 x 400 pixels | |
| Cover Photo | 1584 x 396 pixels | |
| Post Image | 1200 x 627 pixels | |
| Profile Picture | 165 x 165 pixels | |
| Pin Image | 1000 x 1500 pixels |
21. How Do I Resize An Image For Printing?
To resize an image for printing:
- Open the Image: Open the image in Photoshop or another image editor.
- Access Image Size: Go to Image > Image Size.
- Set Resolution: Set the resolution to 300 DPI.
- Enter Print Dimensions: Enter the desired print width and height.
- Resample Image: Choose an appropriate resampling method.
- Save the Image: Save the resized image as a TIFF file.
22. What Is The Difference Between Resizing And Cropping?
Resizing and cropping are different image editing techniques.
- Resizing: Changes the dimensions of the entire image, either increasing or decreasing the number of pixels.
- Cropping: Removes portions of the image, changing its composition and aspect ratio.
23. Can I Revert An Image To Its Original Size?
Whether you can revert an image to its original size depends on how you resized it.
- Non-Destructive Editing: If you used non-destructive editing techniques (e.g., in Adobe Lightroom), you can revert to the original size at any time.
- Saving a Copy: If you saved a copy of the resized image, the original image remains unchanged.
- Overwriting the Original: If you overwrote the original image, you cannot revert to the original size unless you have a backup.
24. What Are The Common Mistakes To Avoid When Resizing?
Avoid these common mistakes when resizing images:
- Enlarging Too Much: Enlarging an image too much can result in pixelation and loss of detail.
- Using the Wrong Resampling Method: Using the wrong resampling method can result in blurry or distorted images.
- Overwriting the Original Image: Always save a copy of the resized image to avoid overwriting the original.
- Ignoring Aspect Ratio: Failing to maintain the aspect ratio can result in distorted images.
- Saving in the Wrong Format: Saving in the wrong file format can result in loss of quality or compatibility issues.
25. How Do I Check The Size Of An Image On Mac?
To check the size of an image on your Mac:
- Select the Image: In Finder, select the image file.
- Get Info: Right-click and choose Get Info.
- View Dimensions: In the Get Info window, you can see the image dimensions (width and height) and file size.
26. Can I Automate Image Resizing On Mac?
Yes, you can automate image resizing on Mac using several methods:
- Automator: macOS’s built-in automation tool allows you to create workflows for batch resizing.
- AppleScript: You can write AppleScript scripts to automate resizing tasks.
- Third-Party Apps: Some third-party apps offer built-in automation features.
27. How Do I Create An Automator Workflow For Resizing?
To create an Automator workflow for resizing:
- Open Automator: Launch Automator from the Applications folder.
- Choose Workflow: Select Workflow as the document type.
- Add Actions:
- Add the Get Specified Finder Items action to select the images you want to resize.
- Add the Scale Images action to set the resizing options.
- Add the Move Finder Items action to save the resized images to a new folder.
- Run the Workflow: Click the Run button to start the workflow.
- Save the Workflow: Go to File > Save to save the workflow for future use.
28. What Are The Keyboard Shortcuts For Resizing In Preview?
Preview does not have dedicated keyboard shortcuts for resizing. However, you can use standard macOS shortcuts:
- Command + Plus (+): Zoom in.
- Command + Minus (-): Zoom out.
- Command + 0 (Zero): Actual size.
- Command + Option + 0 (Zero): Fit to window.
29. How Do I Reduce The File Size Of A Photo Without Resizing?
To reduce the file size of a photo without resizing:
- Open the Image: Open the image in Photoshop or another image editor.
- Save for Web: Go to File > Export > Save for Web (Legacy).
- Adjust Quality: Adjust the quality slider to reduce the file size.
- Optimize: Choose an optimization method (e.g., Progressive JPEG).
- Save the Image: Save the optimized image.
30. Where Can I Find More Resources On Photo Editing?
For more resources on photo editing, consider these options:
- dfphoto.net: Offers a wealth of articles, tutorials, and resources on photography and photo editing.
- Adobe Photoshop Tutorials: Adobe offers a wide range of tutorials and resources for Photoshop users.
- Photography Magazines: Popular Photography, Digital Photography Review, and other photography magazines offer tips and techniques for photo editing.
- Online Courses: Platforms like Skillshare and Udemy offer courses on photo editing.
- Photography Communities: Join online photography communities to connect with other photographers and share tips and techniques.
31. What Are The Legal Considerations When Resizing Photos?
When resizing photos, be aware of these legal considerations:
- Copyright: Ensure you have the right to use and modify the images you are resizing.
- Licensing: Respect the terms of any licenses associated with the images.
- Permissions: Obtain permission from the copyright holder before resizing and using copyrighted images.
32. What Are Some Common Use Cases For Resized Photos?
Here are some common use cases for resized photos:
- Websites: Resizing images for websites improves loading times and user experience.
- Social Media: Resizing ensures your photos look their best on different social media platforms.
- Email: Resizing makes it easier to attach and send images via email.
- Printing: Resizing ensures your photos have the correct dimensions and resolution for high-quality printing.
- Presentations: Resizing allows you to include images in presentations without increasing the file size too much.
33. How Can I Use Resized Photos To Improve My Website’s SEO?
Resizing photos can improve your website’s SEO in several ways:
- Faster Loading Times: Smaller image files lead to faster loading times, which is a ranking factor for Google.
- Improved User Experience: Faster loading times improve user experience, which can lead to higher engagement and lower bounce rates.
- Mobile Optimization: Resizing images for mobile devices ensures a better experience for mobile users.
- Image Optimization: Use descriptive file names and alt text for your images to improve their visibility in search results.
34. What Role Does Compression Play In Resizing?
Compression plays a crucial role in resizing by reducing the file size of the image.
- Lossy Compression: Reduces file size by discarding some image data. JPEG uses lossy compression.
- Lossless Compression: Reduces file size without discarding any image data. PNG uses lossless compression.
35. How Do I Choose The Right Compression Level?
To choose the right compression level:
- Consider the Intended Use: For web images, a higher compression level (lower quality) is acceptable. For printing, a lower compression level (higher quality) is recommended.
- Experiment: Experiment with different compression levels to find the best balance between file size and image quality.
- Use Visual Inspection: Visually inspect the resized image to ensure that the compression artifacts are not too noticeable.
36. How To Use The Command Line To Resize Images On Mac?
For advanced users, the command line offers powerful tools for image resizing.
-
Open Terminal: Launch Terminal from the Utilities folder.
-
Use sips: The
sips(Scriptable Image Processing System) command is a built-in tool for image manipulation. -
Basic Resizing: To resize an image to a specific width, use the following command:
sips -z [height] [width] input.jpg --out output.jpgReplace
[height]and[width]with the desired dimensions,input.jpgwith the name of the input file, andoutput.jpgwith the desired name for the output file. -
Resizing By Percentage: To resize an image by a percentage, you can use
sipsin conjunction with other command-line tools likebc(basic calculator). First, get the current dimensions of the image, then calculate the new dimensions based on the percentage, and finally, usesipsto resize the image.width=$(sips -g pixelWidth input.jpg | grep pixelWidth | awk '{print $2}') height=$(sips -g pixelHeight input.jpg | grep pixelHeight | awk '{print $2}') percentage=50 # Example: 50% newWidth=$(echo "$width * $percentage / 100" | bc) newHeight=$(echo "$height * $percentage / 100" | bc) sips -z $newHeight $newWidth input.jpg --out output.jpg
37. How Can I Use Automator And Command Line Together?
You can combine Automator and command-line tools for more complex image resizing workflows.
- Open Automator: Launch Automator and create a new workflow.
- Add “Run Shell Script” Action: Add the “Run Shell Script” action to your workflow.
- Enter Command-Line Script: Enter the command-line script in the text area of the “Run Shell Script” action.
- Pass Input: Configure the action to receive input from previous actions in the workflow.
- Save and Run: Save and run the workflow.
38. What Are The Best Practices For File Naming?
Following these best practices for file naming can improve your workflow and SEO:
- Use Descriptive Names: Use descriptive names that accurately reflect the content of the image.
- Include Keywords: Include relevant keywords in the file name to improve SEO.
- Use Hyphens: Use hyphens to separate words in the file name.
- Use Lowercase: Use lowercase letters for file names.
- Avoid Special Characters: Avoid using special characters in file names.
39. How Can I Add Alt Text To Resized Images?
Adding alt text to resized images improves accessibility and SEO.
-
Locate the Image: Find the image in your website’s content management system (CMS) or HTML code.
-
Add Alt Text: Add alt text to the
altattribute of theimgtag:<img src="image.jpg" alt="Descriptive alt text"> -
Be Descriptive: Write descriptive alt text that accurately describes the content of the image.
-
Include Keywords: Include relevant keywords in the alt text to improve SEO.
40. What Is The Difference Between Scaling And Resizing?
Scaling and resizing are often used interchangeably, but there can be subtle differences.
- Resizing: Generally refers to changing the dimensions of an image by changing the number of pixels.
- Scaling: Can refer to changing the dimensions of an image without changing the number of pixels. Scaling often involves resampling, which can affect image quality.
41. How Can I Check The Dimensions Of An Image In Terminal?
To check the dimensions of an image in Terminal:
-
Open Terminal: Launch Terminal from the Utilities folder.
-
Use
sips: Use thesipscommand with the-goption to get the pixel width and height:sips -g pixelWidth -g pixelHeight image.jpgReplace
image.jpgwith the name of the image file.
42. What Tools Are Available For Batch Renaming?
Batch renaming can be useful when you resize multiple images. Here are some tools:
- Finder: macOS’s built-in Finder allows you to rename multiple files at once.
- Automator: You can create an Automator workflow to batch rename files.
- Third-Party Apps: Several third-party apps offer advanced batch renaming features.
43. How Do I Batch Rename Files In Finder?
To batch rename files in Finder:
- Select Files: Select all the files you want to rename.
- Right-Click: Right-click on the selected files and choose Rename.
- Choose Rename Mode: Choose a rename mode from the dropdown menu:
- Replace Text: Replaces specific text in the file names.
- Add Text: Adds text to the beginning or end of the file names.
- Format: Changes the file names to a specific format.
- Enter Options: Enter the appropriate options for the chosen rename mode.
- Rename: Click the Rename button to rename the files.
44. How Does Color Space Affect Resized Images?
Color space affects the way colors are represented in an image.
- sRGB: The standard color space for web images.
- Adobe RGB: A wider color space that is often used for printing.
When resizing images, it’s important to ensure that the color space is appropriate for the intended use.
45. Can I Convert Color Spaces When Resizing?
Yes, you can convert color spaces when resizing images.
- Photoshop: Photoshop allows you to convert color spaces using the Image > Mode menu.
- sips: The
sipscommand can also be used to convert color spaces.
46. How Do I Convert To sRGB Using sips?
To convert an image to sRGB using sips:
sips -s colorSpace sRGB input.jpg --out output.jpgReplace input.jpg with the name of the input file and output.jpg with the desired name for the output file.
47. What Is The Role Of Metadata In Resized Images?
Metadata is data about data. In the context of images, metadata includes information such as:
- Camera Settings: The camera settings used to capture the image.
- Date and Time: The date and time the image was captured.
- Location: The location where the image was captured.
- Copyright Information: Copyright information about the image.
48. Should I Preserve Or Remove Metadata When Resizing?
Whether you should preserve or remove metadata when resizing depends on your needs.
- Preserve: Preserving metadata can be useful for archival purposes and for maintaining copyright information.
- Remove: Removing metadata can reduce file size and protect your privacy.
49. How Can I Remove Metadata From An Image On Mac?
You can remove metadata from an image on Mac using several methods:
- Preview: In Preview, go to Tools > Show Inspector and click the Remove GPS button.
- Image Editors: Image editors like Photoshop allow you to remove metadata using the File > Export > Save for Web (Legacy) menu.
- Command Line: The
sipscommand can be used to remove metadata.
50. How Do I Remove All Metadata Using sips?
To remove all metadata from an image using sips:
sips -d GPSLongitude -d GPSLatitude -d all input.jpg --out output.jpgReplace input.jpg with the name of the input file and output.jpg with the desired name for the output file. This command removes GPS coordinates and all other metadata from the image.
By mastering these techniques, you’ll be well-equipped to handle any image resizing task on your Mac, ensuring your photos always look their best. For more in-depth guides, stunning photography, and a vibrant community, visit dfphoto.net today. Discover new perspectives and elevate your photography skills with dfphoto.net, your ultimate resource for all things photography. Contact us at 1600 St Michael’s Dr, Santa Fe, NM 87505, United States, or call +1 (505) 471-6001. Visit our website at dfphoto.net.
FAQ: How To Resize A Photo In Mac?
1. What is the easiest way to resize a photo on a Mac?
The easiest way to resize a photo on a Mac is by using the Preview app, which allows you to quickly adjust the dimensions of an image. Open the image in Preview, go to Tools > Adjust Size, and enter the new dimensions.
2. How can I resize multiple photos at once on my Mac?
You can resize multiple photos at once on your Mac by opening all the images in Preview, selecting them in the sidebar, and then going to Tools > Adjust Size to apply the changes to all selected images.
3. Is it possible to resize a photo in the Photos app on Mac?
Yes, you can resize a photo in the Photos app on Mac by exporting the photo and choosing a different size option during the export process, allowing you to select from small, medium, large, or custom sizes.
4. What is the best resolution for resizing photos for web use on a Mac?
The best resolution for resizing photos for web use on a Mac is typically 72 pixels per inch (PPI), which ensures faster loading times and optimal display on web browsers.
5. How can I resize a photo in Photoshop on my Mac?
You can resize a photo in Photoshop on your Mac by opening the image, going to Image > Image Size, and entering the desired dimensions while choosing an appropriate resampling method to maintain quality.
6. What is resampling and why is it important when resizing images?
Resampling is a technique used to recalculate the pixels in an image when resizing, and it’s important because it affects the quality of the resized image. Different resampling methods, like bicubic or nearest neighbor, can produce varying results depending on whether you are enlarging or reducing the image.
7. Are there any free apps available for resizing photos on Mac?
Yes, there are several free apps available for resizing photos on Mac, such as Resize Master and Image Size, which offer simple and efficient ways to resize images, often with batch processing capabilities.
8. Can I resize photos online without downloading any software?
Yes, you can resize photos online without downloading any software by using web-based tools like Adobe Express, iLoveIMG, or PicResize, which allow you to upload an image, specify the new dimensions, and download the resized version.
9. How do I maintain image quality when resizing a photo on my Mac?
To maintain image quality when resizing a photo on your Mac, use appropriate resampling methods in Photoshop or other advanced tools, avoid excessive enlargement, sharpen the image after resizing, and save it in the appropriate file format (JPEG for photos, PNG for graphics).
10. How do I reduce the file size of an image on my Mac without changing its dimensions?
You can reduce the file size of an image on your Mac without changing its dimensions by using the “Save for Web (Legacy)” option in Photoshop, which allows you to adjust the quality and compression settings to reduce the file size while preserving the image dimensions.