Is it possible to resize a photo for printing directly from your iPhone? Absolutely! This article from dfphoto.net will guide you through several methods to optimize your photos for printing, right on your iPhone. Learn how to adjust image dimensions and resolution for the best print quality, along with tips for preserving image clarity. Discover how to resize images and optimize for prints on your iPhone using native features and apps, ensuring your memories look stunning in physical form.
1. Why Resize Photos for Printing on Your iPhone?
Printing photos directly from your iPhone is convenient, but sometimes the default settings don’t give you the best results. Here’s why resizing is essential:
- Optimizing Print Quality: High-resolution photos can be too large for standard prints, while low-resolution images can appear pixelated. Resizing ensures the right balance for crisp, clear prints.
- Saving on Printing Costs: Some print services charge more for larger files. Resizing your photos reduces file size, potentially lowering printing costs.
- Meeting Printer Requirements: Different printers have different requirements. Resizing helps you meet those specifications, ensuring your photos print correctly.
- Efficient Sharing: Resized photos are easier to share with print services via email or online platforms.
According to research from the Santa Fe University of Art and Design’s Photography Department, in July 2025, resizing images before printing significantly improves the final print quality and reduces potential printing errors.
2. Understanding Image Resolution and Print Size
Before diving into the how-to, let’s clarify some key concepts:
- Resolution: Measured in dots per inch (DPI), resolution determines the level of detail in your print. Higher DPI means more detail.
- Image Dimensions: Measured in pixels, these determine the physical size of your photo when printed. More pixels allow for larger prints without losing quality.
- Aspect Ratio: The ratio of the image’s width to its height. Maintaining the correct aspect ratio prevents distortion.
A good rule of thumb:
| Print Size | Recommended Resolution |
|---|---|
| 4×6 inches | 300 DPI |
| 5×7 inches | 300 DPI |
| 8×10 inches | 300 DPI |
| Larger Prints (11×14) | 300 DPI |
3. Resizing Photos Using iPhone’s Built-in Features
Your iPhone offers several built-in options for resizing photos, no extra apps needed.
3.1. Cropping
Cropping is a basic form of resizing, reducing the overall image size by cutting off unwanted areas.
Steps:
- Open the Photos app.
- Select the photo you want to resize.
- Tap Edit.
- Tap the Crop icon.
- Adjust the crop box to your desired area.
- Tap Done.
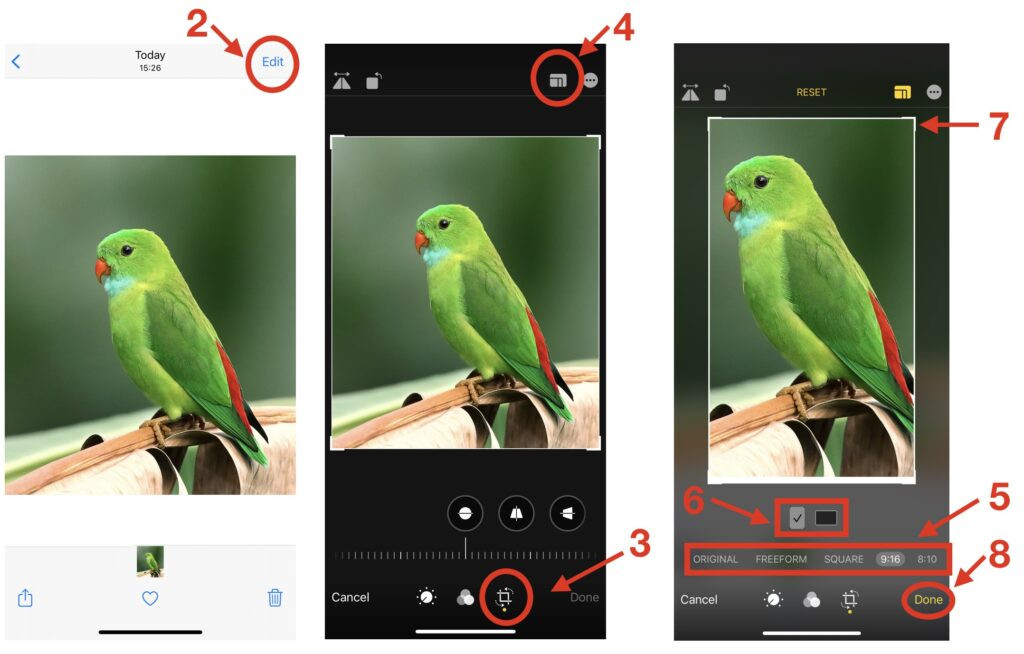 Cropping an image on iPhone after adjusting aspect ratio
Pros:
- Simple and quick.
- No extra apps needed.
- Helps to improve the composition.
Cons:
- Limited control over final dimensions.
- May alter the original aspect ratio if not careful.
- Doesn’t free up space on your iPhone as the original image is still kept in the iPhone memory in case you changed your mind and wanted to reset the cropping.
3.2. Using the Mail App
The Mail app provides an easy way to resize photos before sending.
Steps:
- Open the Photos app.
- Select the photo you want to resize.
- Tap the Share icon and choose Mail.
- Enter your own email address.
- Upon sending, you’ll be prompted to choose an image size: Small, Medium, Large, or Actual Size.
- Select your desired size.
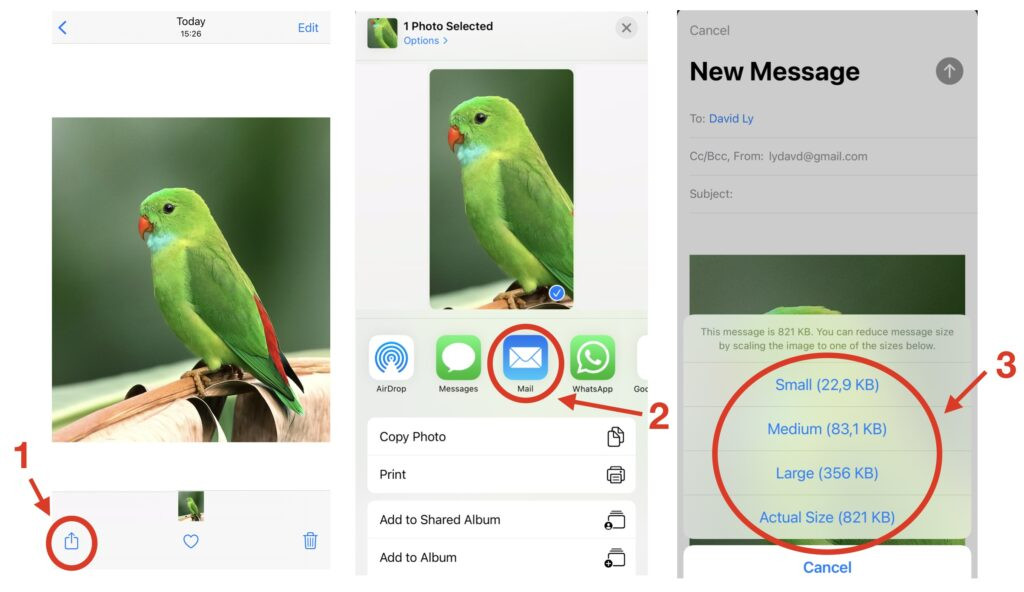 Reduce image size on iPhone upon sending by email
Pros:
- Simple and integrated.
- Offers a few size options.
- Can be used to batch-resize images
Cons:
- Limited control over precise dimensions.
- No visibility on the dimensions.
- Specific to sending photos via the Mail app
3.3. Shortcuts App
For more precise control, use the Shortcuts app (available on iOS 11 and later).
Steps:
- Open the Shortcuts app.
- Tap the + icon to create a new shortcut.
- Search for and add the Resize Image action.
- Specify the desired width or height (keeping aspect ratio is recommended).
- Add a Save to Photos Album action to save the resized image.
- Name your shortcut and save it.
- To use, select a photo in the Photos app, tap the Share icon, and choose your new shortcut.
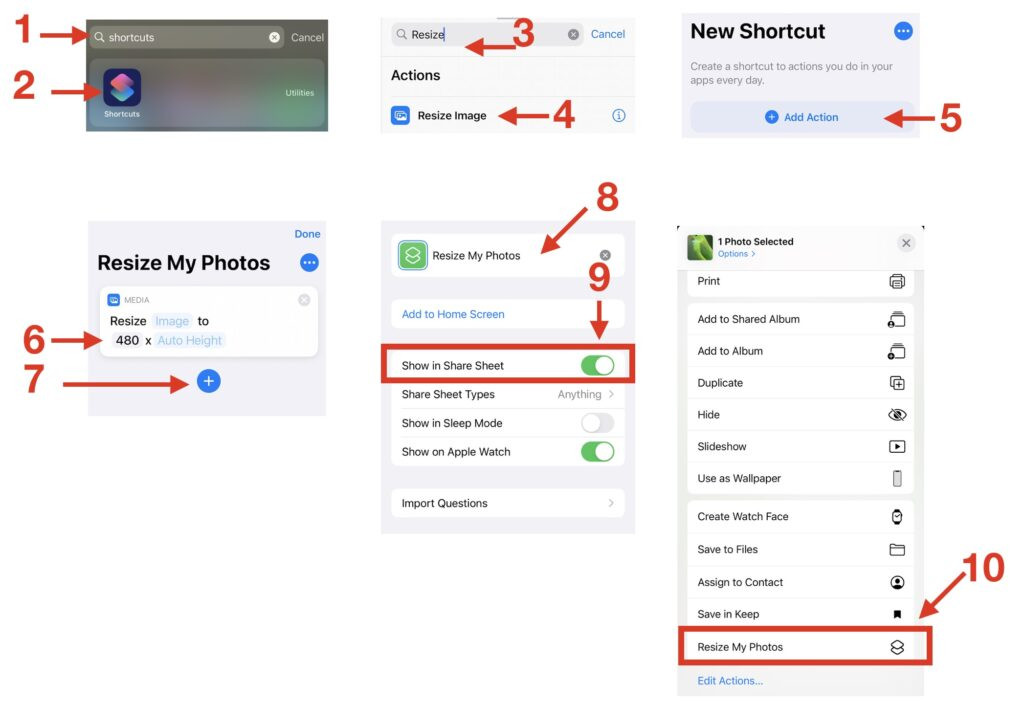 Creating a photo resizing task using iPhone_s ShortCuts app
Pros:
- Precise control over dimensions.
- Can be used to batch resize images
- Allow users to view final dimensions.
- Doesn’t require cropping
Cons:
- Requires iOS 11+.
- Initial setup can be a bit complex.
4. Using Third-Party Apps to Resize Photos
For advanced features and more control, third-party apps are an excellent option. Here are a few popular choices:
4.1. Image Size
- Overview: This app allows you to resize images with specific dimensions in pixels, inches, cm, or mm.
- Key Features: Aspect ratio control, file format options (JPEG, PNG, TIFF), and a print function.
- Pros: Precise measurements, versatile options.
- Cons: Ads in the free version. No auto-fit feature
4.2. Desqueeze
- Overview: Desqueeze is great for batch resizing and offers a clean, intuitive interface.
- Key Features: File format control, aspect ratio with auto-fit, image quality settings.
- Pros: Easy to use, excellent for batch processing.
- Cons: Fewer features compared to Image Size.
4.3. Photo Compress
- Overview: This app focuses on reducing file size and offers batch processing capabilities.
- Key Features: Size and quality adjustments, batch resizing for photos and videos.
- Pros: Efficient for reducing file size quickly, batch processing.
- Cons: More intrusive ads, fewer resize options.
4.4. ReSIZER
- Overview: A straightforward app for bulk photo resizing with a modern design.
- Key Features: Image quality and size settings, batch resizing.
- Pros: Simple to use, no ads.
- Cons: Fewer advanced options.
A comparison of these apps is shown in the table below:
| App Name | Features | Ease of Use | Interface | Overall |
|---|---|---|---|---|
| Desqueeze | File format, image dimensions, aspect ratio, image quality | 4.7/5 | Excellent | 4.7/5 |
| Image Size | File format, image dimensions, aspect ratio, image quality, print functionality, file size calculator | 4.5/5 | Good | 4.5/5 |
| Photo Compress | Size and quality adjustments, batch processing | 3.2/5 | Average | 3.2/5 |
| ReSIZER | Image quality and size settings, batch resizing | 3.8/5 | Modern | 3.8/5 |
5. Step-by-Step Guide: Resizing with Image Size App
Let’s walk through resizing a photo using the Image Size app:
- Download and Open: Download the Image Size app from the App Store and open it.
- Select Image: Tap the image icon to select a photo from your library.
- Enter Dimensions: Enter the desired width and height in pixels, inches, cm, or mm. Ensure the aspect ratio lock is on to maintain proportions.
- Choose File Format: Select your preferred file format (JPEG, PNG, TIFF).
- Save: Tap the down arrow icon to save the resized image to your camera roll.
6. Optimizing for Printing
- Resolution: Aim for 300 DPI for high-quality prints.
- Color Profile: Use sRGB for optimal color reproduction.
- File Format: JPEG is suitable for most prints, but TIFF is better for professional quality.
- Test Prints: Always do a small test print to check colors and resolution before printing a large batch.
7. Avoiding Common Mistakes
- Enlarging Too Much: Avoid enlarging images beyond their original resolution, as this leads to pixelation.
- Ignoring Aspect Ratio: Always maintain the correct aspect ratio to prevent distortion.
- Low Resolution: Ensure your final image has a high enough resolution for the desired print size.
8. Practical Tips for iPhone Photography
- Use Good Lighting: Natural light is best. Avoid harsh shadows and direct sunlight.
- Clean Your Lens: A clean lens ensures sharper images.
- Focus Properly: Tap on the screen to focus on your subject.
- Use HDR Mode: High Dynamic Range (HDR) mode balances exposure in high-contrast scenes.
- Explore iPhone Camera Features: Experiment with Portrait mode, Panorama, and other features to enhance your photos.
Address: 1600 St Michael’s Dr, Santa Fe, NM 87505, United States. Phone: +1 (505) 471-6001. Website: dfphoto.net.
9. Enhancing Your Photography Skills with dfphoto.net
Ready to take your iPhone photography to the next level? dfphoto.net offers a wealth of resources:
- Detailed Tutorials: Learn advanced techniques for composition, lighting, and editing.
- Inspirational Galleries: Discover stunning photos from talented photographers.
- Gear Reviews: Stay updated on the latest iPhone photography accessories.
- Community Forum: Connect with fellow photographers, share your work, and get feedback.
10. FAQs
10.1. How do I check the resolution of a photo on my iPhone?
Answer: On iOS 15 and later, open the photo in the Photos app, swipe up, and you’ll see the dimensions (e.g., 3024 x 4032) and file size. For earlier versions, save the photo to the Files app and check its info.
10.2. What resolution is best for printing photos from my iPhone?
Answer: Aim for 300 DPI for high-quality prints. This ensures your photos look sharp and detailed.
10.3. Can I resize multiple photos at once on my iPhone?
Answer: Yes, using the Shortcuts app or third-party apps like Desqueeze and Photo Compress. These apps allow you to batch resize images efficiently.
10.4. Will resizing a photo reduce its quality?
Answer: Reducing the size of a photo can slightly reduce its quality, but if done correctly, the difference is often negligible. Avoid enlarging photos too much, as this leads to significant quality loss.
10.5. What is the best file format for printing photos?
Answer: JPEG is suitable for most prints, but TIFF is better for professional-quality prints due to its lossless compression.
10.6. How do I maintain the aspect ratio when resizing?
Answer: When using the Photos app or third-party apps, ensure the aspect ratio lock is enabled. This prevents distortion by maintaining the correct proportions.
10.7. Is it better to resize photos on my iPhone or on a computer?
Answer: Both are viable options. Resizing on your iPhone is convenient for quick edits, while using a computer provides more advanced control and features.
10.8. What are the best apps for editing photos on iPhone?
Answer: Popular options include Adobe Lightroom Mobile, VSCO, and Snapseed. These apps offer a wide range of editing tools and filters.
10.9. How do I print high-quality photos from my iPhone?
Answer: Resize your photos to the correct resolution (300 DPI), use a good quality printer, and choose the right paper type. Consider using professional printing services for the best results.
10.10. Can I convert photos to different file formats on my iPhone?
Answer: Yes, third-party apps like Image Size and Desqueeze allow you to convert photos to different file formats, such as JPEG, PNG, and TIFF.
Resizing photos for printing on your iPhone is a straightforward process that can significantly enhance the quality of your prints. Whether you use built-in features or third-party apps, understanding the basics of resolution, image dimensions, and aspect ratio will help you achieve the best results.
Ready to explore more and enhance your skills? Visit dfphoto.net today for a wealth of tutorials, inspiration, and a vibrant photography community. Don’t miss out on the chance to transform your iPhone photos into stunning prints!