While the iPhone’s Photos app excels at capturing and organizing memories, it lacks a direct feature to rename your photos and videos. This can be frustrating when you want to better categorize your visuals for easier searching and management. Renaming photos can significantly streamline your photo library, making it simpler to find specific images later. Fortunately, there are a few effective workarounds to rename your iPhone photos. This guide will walk you through these methods, ensuring you can organize your visual content just the way you want.
Method 1: Utilizing the Files App to Rename Photos
Although the Photos app itself doesn’t offer a rename option, the Files app provides a clever detour. By saving your photos to the Files app, you gain the ability to rename them. This method is particularly useful for individual photos or a small selection of images. While it’s not a bulk renaming solution, it’s a straightforward approach that doesn’t require any additional apps. Let’s explore how to rename your photos using the Files app.
Step-by-step guide to rename photos via Files app:
- Launch the Photos app and locate the photo you wish to rename. Simply navigate through your albums or “All Photos” to find the specific image.
- Tap the Share icon. This icon, located at the bottom left corner of your screen, is your gateway to various sharing and saving options.
- Select “Save to Files” from the Share Sheet. Scroll down the options in the Share menu until you find “Save to Files” and tap it.
- Choose a location in the Files app. You’ll be directed to the Browse interface of the Files app. Select where you want to save the photo. “On My iPhone” or iCloud Drive are common choices.
- Tap the filename to rename. In the Files app interface, you’ll see the current filename next to the photo thumbnail. Tap on this text box to edit.
- Enter the new name. Use the on-screen keyboard to type in your desired new name for the photo. Delete the existing text before typing your new filename.
- Tap “Save”. Once you’ve entered the new name, tap “Save” at the top right corner to finalize the renaming process.
After completing these steps, your renamed photo is now saved in the Files app at your chosen location. You can access it anytime through the Files app.
Method 2: Organizing Photos with Albums (An Alternative to Renaming)
If your primary goal for renaming photos is to improve organization and make them easier to find, consider using albums as a powerful alternative. Creating albums allows you to group photos thematically, by event, or any category you prefer. While it doesn’t technically rename individual files, it offers a robust way to navigate and sort your photo library efficiently, especially when dealing with a large number of images. For instance, after a vacation, concert, or family event, grouping related photos into a dedicated album can be much faster than renaming each one.
Here’s how to organize your photos using albums on your iPhone:
- Open the Photos app and go to the “Library” tab. This is usually at the bottom left of your screen. Then, select “All Photos” to view your entire photo collection.
- Tap “Select” at the top right corner. This activates selection mode, allowing you to choose multiple photos.
- Select the photos and videos for your album. Tap on each photo and video you want to include in your new album.
- Tap the “More” button (ellipsis circle) and choose “Add to Album”. The “More” button is located at the bottom right and looks like three dots in a circle. Tap it, then select “Add to Album”.
- Create a new album or add to an existing one. You can either choose an existing album from the list or tap “New Album…” to create a new one.
- Name your new album and tap “Save”. If creating a new album, a pop-up will appear prompting you to name it. Enter a descriptive name and tap “Save”.
All the selected photos will now be neatly organized within the album you created, offering a streamlined way to access related images without needing to rename each file individually.
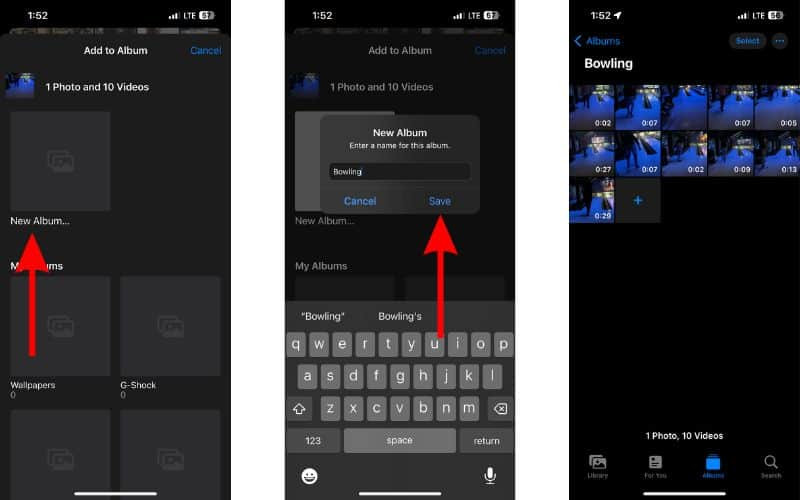 Adding photos to a new album for improved photo library navigation
Renaming Albums for Better Categorization
Further enhancing album organization, you can also rename albums themselves. This is useful if the theme of an album evolves or you simply want a more descriptive title.
Steps to rename an album in the Photos app:
- Go to the “Albums” tab in the Photos app. This tab is usually located at the bottom of the screen, next to “Library”.
- Select the album you want to rename. Tap on the album you wish to modify.
- Tap the “More” button (ellipsis circle) and choose “Rename Album”. Again, the “More” button is at the top right. Tap it and select “Rename Album” from the options.
- Enter the new name. The current album name will be highlighted. Type in the new name you want for the album.
- Tap “Save”. Tap “Save” to apply the new album name.
Method 3: Renaming Screenshots Immediately After Capture
Interestingly, iPhones allow you to rename screenshots right at the moment you take them. This provides a quick way to label screenshots as you capture them, making them instantly identifiable. You have two options when renaming screenshots: renaming before sharing or renaming before saving to Files.
Option 1: Rename and Share Screenshots
- Capture a screenshot. Simultaneously press the Volume Up button and the Side button to take a screenshot.
- Tap the screenshot preview. A small preview of the screenshot will appear briefly at the bottom left corner of your screen. Tap it quickly.
- Tap the Share button. Once the screenshot opens in Markup view, tap the Share button at the top right corner.
- Tap “Options” in the Share Sheet. In the Share menu, you’ll see the auto-assigned screenshot name at the top. Below it, tap “Options”.
- Rename the screenshot. Tap in the text box, delete the existing name, and type in your new name for the screenshot. Tap “Done” after renaming.
- Choose a sharing method and recipient. Select how you want to share the renamed screenshot (e.g., Messages, Email, etc.) and choose your recipient.
- Send the screenshot. Complete the sharing process by tapping the send button.
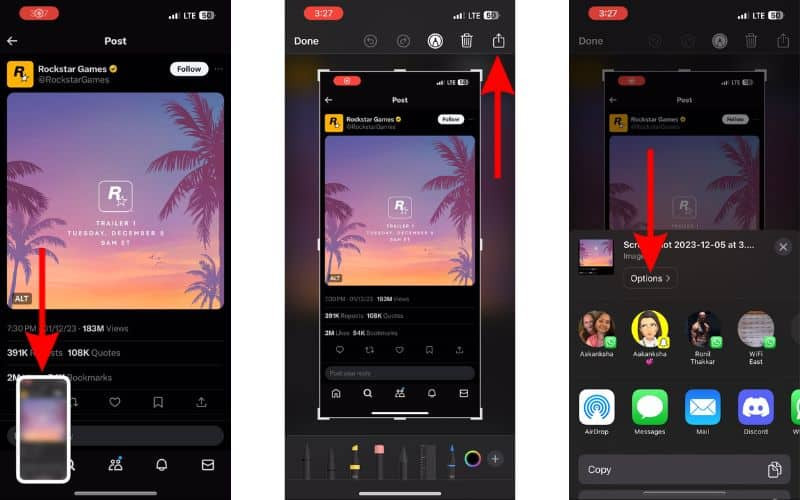 Capturing a screenshot on iPhone for immediate renaming and sharing
Option 2: Rename and Save Screenshots to Files
- Capture a screenshot. Press the Volume Up and Side buttons together.
- Tap the screenshot preview. Tap the preview at the bottom left corner.
- Tap “Done” and select “Save to Files”. In the Markup view, tap “Done” at the top left corner, and then choose “Save to Files”.
- Rename the screenshot in the Files app interface. You’ll be taken to the Files app interface where you can see the default screenshot name. Tap the text box to edit.
- Enter the new name and tap “Save”. Type your desired name for the screenshot, and then tap “Save” at the top right corner.
 Renaming a screenshot and saving it to Files on iPhone for organized storage
Conclusion
While a direct “rename” feature within the iPhone Photos app would be a welcome addition, these workarounds offer practical solutions for organizing your photo library. Whether you choose to rename individual photos using the Files app, utilize albums for thematic grouping, or rename screenshots as you capture them, you can effectively manage your visual content on your iPhone. Hopefully, future iOS updates will introduce a native renaming feature, further simplifying photo management. Until then, these methods provide valuable tools for keeping your photos organized and easily accessible.

