Are you struggling with unwanted white light in your photos and seeking effective removal techniques? At dfphoto.net, we understand the frustration of light flares and offer a comprehensive guide to help you master their removal using advanced image editing techniques and tools, enhancing your photographic art. Improve your photo clarity and restore the desired aesthetic. This guide covers everything from preventing white light during shoots to advanced removal methods, including color correction and glare reduction.
1. Understanding White Light and Its Impact
1.1. What is White Light in Photography?
White light in photography, often referred to as glare or light flares, is unwanted light that enters the lens, causing bright spots or washed-out areas in your images. This typically occurs when a bright light source, like the sun or artificial lighting, directly hits the camera lens. Understanding the characteristics of white light is crucial for effective removal, allowing photographers to restore image quality and enhance visual appeal.
1.2. How Does White Light Affect Your Photos?
White light can significantly degrade the quality of your photos by:
- Reducing Contrast: It washes out the dark areas, making the image appear flat.
- Creating Distracting Glare: Bright spots can draw the viewer’s attention away from the main subject.
- Lowering Sharpness: The overall clarity of the image can be compromised.
- Altering Colors: White light can distort the true colors of the scene, making them appear faded or inaccurate.
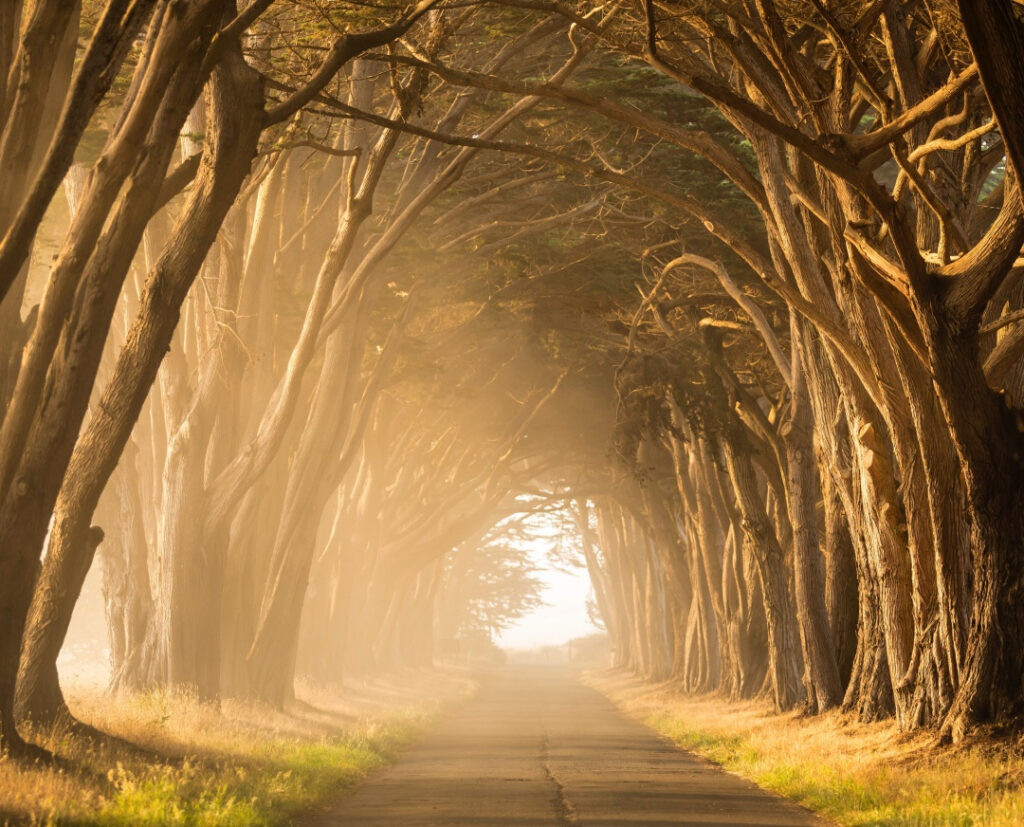 Landscape Photography Example with white light glare
Landscape Photography Example showcases unwanted white light glare. Image by Stephen Leonardi on Unsplash.
1.3. Common Scenarios Where White Light Appears
White light is more likely to occur in specific shooting conditions, such as:
- Outdoor Photography on Sunny Days: The sun is a primary culprit, especially when shooting towards it.
- Indoor Photography with Bright Lights: Direct light from lamps or windows can cause glare.
- Shooting Through Windows: Reflections and bright light sources outside can create unwanted light flares.
- Using Wide-Angle Lenses: These lenses tend to capture more light, increasing the chance of glare.
Being aware of these scenarios can help you anticipate and mitigate white light issues during your shoots.
2. Preventing White Light: Proactive Measures
2.1. Use a Lens Hood
A lens hood is an essential accessory that blocks stray light from entering the lens, reducing glare and improving contrast. It’s particularly effective in outdoor settings where sunlight is a major factor. A lens hood is crucial for mitigating unwanted light flares by physically blocking extraneous light sources.
2.2. Use a Polarizing Filter
A polarizing filter reduces reflections and glare from non-metallic surfaces like water or glass, and it can also darken the sky, enhancing contrast. By selectively filtering light, it minimizes reflections and enhances the overall clarity and color saturation of your images.
2.3. Reposition Your Camera
Adjusting your camera angle can significantly reduce glare by moving the light source out of the direct line of sight. This simple technique can make a big difference in the final image. Repositioning the camera can drastically alter the angle at which light enters the lens, helping to avoid direct light flares and improving overall image quality.
2.4. Adjust Camera Settings: Underexpose Highlights
Slightly underexposing your highlights can prevent them from blowing out and creating excessive glare. This technique preserves detail in the brightest areas of your image. Underexposing highlights ensures that the brightest parts of the image retain detail and don’t become overexposed, which contributes to light flares and loss of information.
3. Key Search Intents When Searching How to Remove White Light from Photos
- Techniques for Removing Glare: Users want to find step-by-step guides on how to remove glare from their photos using various editing tools.
- Best Software for Glare Removal: People are looking for recommendations on the best software to use for removing white light, comparing features and ease of use.
- Preventative Measures: Users seek advice on how to prevent white light from appearing in their photos in the first place.
- Understanding White Light: Users want to understand what causes white light and how it affects their images.
- Restoring Image Quality: People are looking for solutions to restore the quality of photos damaged by white light, including color correction and detail recovery.
4. Removing White Light in Adobe Lightroom: Detailed Methods
4.1. Method 1: Using the Masking Brush
The Masking Brush in Lightroom allows you to selectively edit specific areas of your photo, making it ideal for removing localized glare. This method offers precise control over adjustments, ensuring natural-looking results. The Masking Brush is a powerful tool for localized adjustments, providing the precision needed to target and correct specific areas affected by white light.
4.1.1. Step-by-Step Guide to Using the Masking Brush
-
Calibrate Your Monitor: For accurate color representation, use a monitor calibrator like TruHu.
-
Apply Lens Correction: Correct any lens distortion specific to your camera/lens combination.
-
Load Your Image: Open the photo in Adobe Lightroom.
-
Open the Masking Menu: Access the Masking menu from the right panel (or press M).
-
Create a New Mask: Add a Brush Mask for each distinct area with glare.
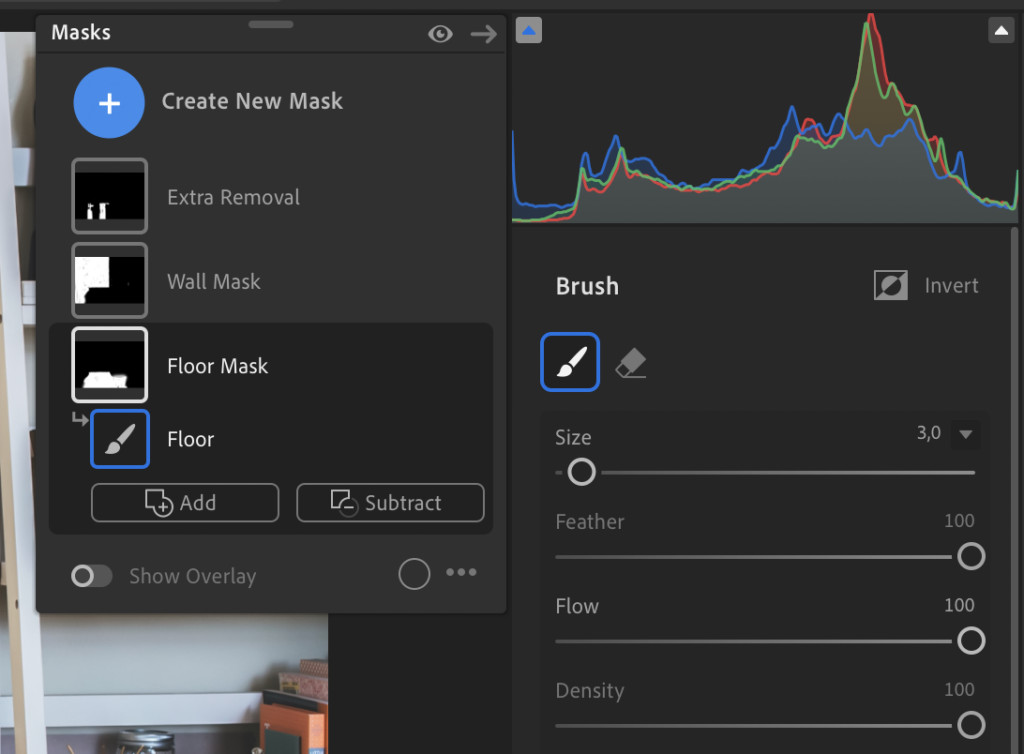 Add Mask Brush Lightroom Remove White Light Glare
Adding a Mask Brush in Lightroom to remove light glare effectively.
-
Set Up Your Brush:
- Increase Dehaze under Effects.
- Bump Feather and Flow to max.
- Adjust brush size using the mouse scroll wheel.
-
Brush Over the Glare: Carefully brush over the areas with glare, including the surrounding surface. Use the Overlay (press O) to refine edges with the Eraser brush.
-
Adjust Light, Color, and Effects:
- Increase Dehaze slightly.
- Increase Clarity and Whites.
- Adjust Exposure (usually reduce, but use judgment).
- Decrease Blacks and Shadows.
- Increase Whites if needed.
- Reduce Texture depending on the background.
-
Compare and Adjust: Compare the edited image with the original and make any necessary adjustments to the entire photo.
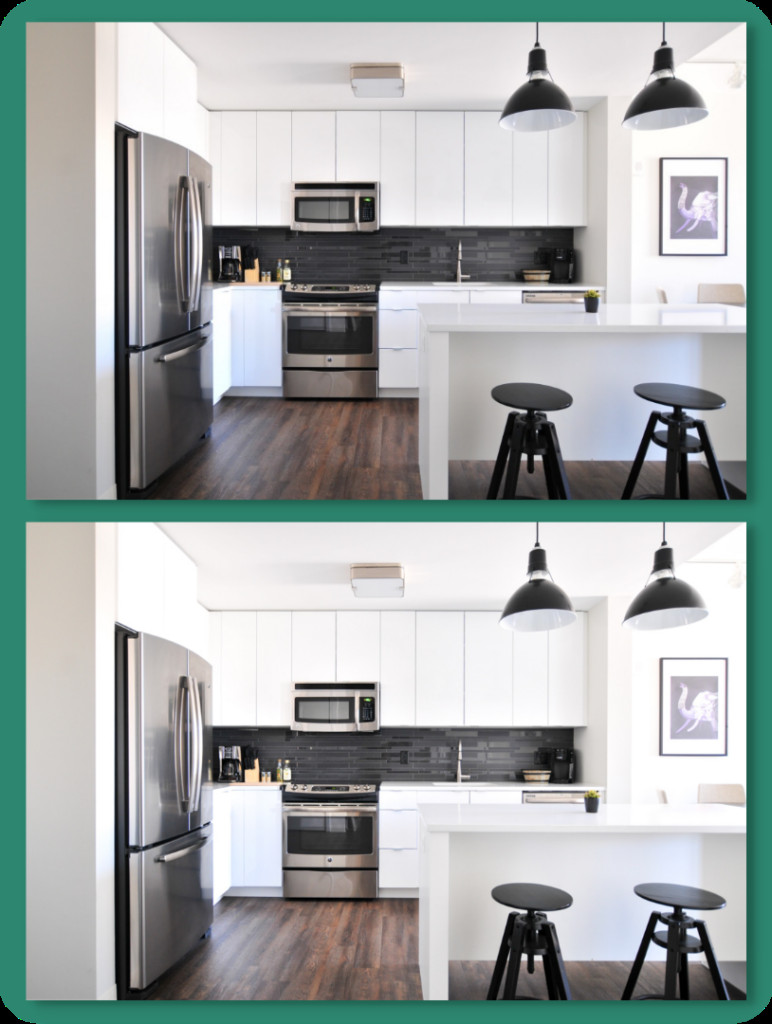
 Reduce Light Glare Method 1 Example
Before and after editing to reduce glare with the Masking Brush in Lightroom.
4.1.2. Advanced Tips for Masking Brush Technique
- Feathering: Use a high feather value to blend the edges of your mask smoothly.
- Flow: Adjust the flow to build up the effect gradually.
- Overlay: Use the overlay to ensure precise coverage of the affected area.
- Multiple Masks: Create multiple masks for different areas to fine-tune adjustments.
Mastering these advanced tips enhances the Masking Brush technique, providing more control and precision in removing white light.
4.2. Method 2: Using the Radial Filter Mask
The Radial Filter Mask in Lightroom is excellent for addressing glare that affects a broader area, such as sunlight washing out a landscape. The Radial Filter is particularly effective for managing glare over larger areas, providing a smooth and natural-looking correction.
4.2.1. Step-by-Step Guide to Using the Radial Filter Mask
-
Calibrate Your Monitor: Use a calibrator like TruHu for accurate color representation.
-
Apply Lens Correction: Correct any lens distortions.
-
Load Your Image: Open the photo in Adobe Lightroom.
-
Open the Masking Menu: Access the Masking menu from the right panel (or press M).
-
Create a New Mask: Add a Radial Filter.
-
Adjust the Filter: Show the Overlay and adjust the filter around the area affected by sunlight.
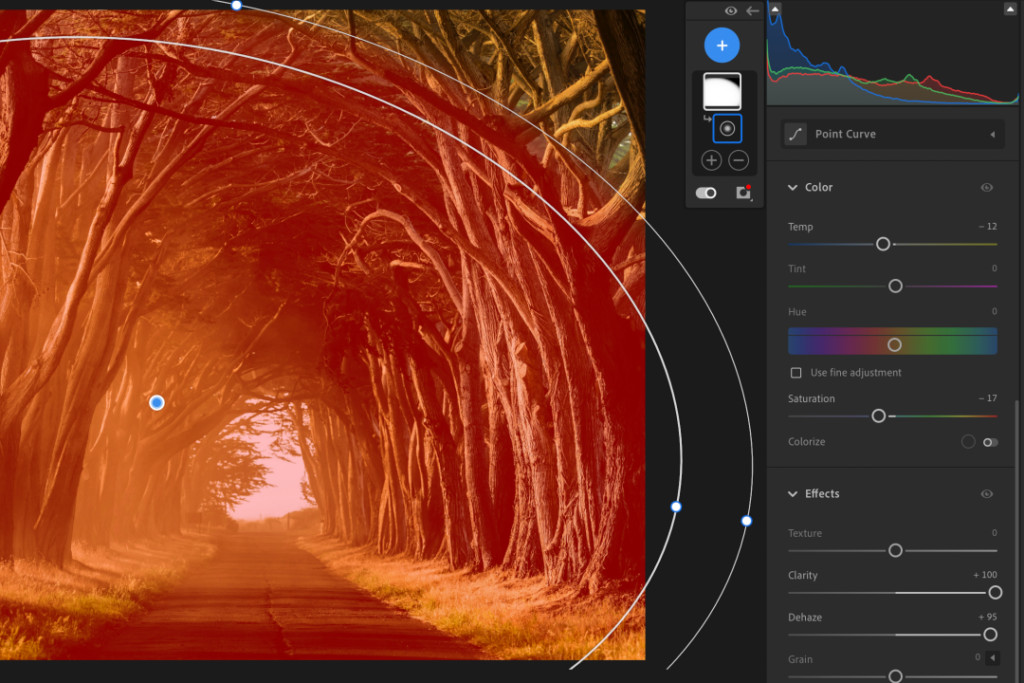 Radial Filter in Lightroom
Applying a Radial Filter in Lightroom to correct overall white light issues.
-
Increase Dehaze and Clarity: Adjust these sliders to your preferred levels.
-
Compare and Adjust: Compare the edited image with the original and make necessary adjustments.
4.2.2. Advanced Tips for Radial Filter Mask Technique
- Feather: Use a high feather value to create a smooth transition between the filtered area and the rest of the image.
- Invert: Invert the filter to affect the area outside the ellipse.
- Size and Shape: Adjust the size and shape of the ellipse to fit the affected area precisely.
- Blending: Experiment with different blending modes for subtle effects.
4.3. Method 3: Utilizing the Healing Tool
The Healing Tool in Lightroom is ideal for removing small, isolated spots of glare, especially on surfaces like countertops or eyeglasses. The Healing Tool is perfect for spot corrections, removing small and isolated areas of glare without affecting the surrounding details.
4.3.1. Step-by-Step Guide to Using the Healing Tool
-
Calibrate Your Monitor: Use a calibrator like TruHu for accurate color correction.
-
Apply Lens Correction: Correct any lens distortions.
-
Load Your Image: Open the photo in Adobe Lightroom.
-
Zoom In: Zoom into the area with the glare.
-
Select the Healing Tool: Find it on the right-hand side (or press H).
-
Set Opacity: Set the opacity to 90.
-
Adjust Brush: Adjust the brush size and feather according to your preference.
-
Heal the Area: After healing, remove any remaining noise and distortion using the Content Aware Removal brush.
 Remove Light Glare Method 3 – Heal Tool
Using the Healing Tool in Lightroom to remove specific glare spots effectively.
4.3.2. Advanced Tips for Healing Tool Technique
- Source Selection: Manually select the source area for more control over the healing process.
- Opacity: Adjust opacity for subtle corrections.
- Feather: Use feather to blend the healed area with the surrounding pixels.
- Zoom Level: Work at high zoom levels for precise corrections.
5. Color Calibration: Ensuring Accuracy in Your Edits
5.1. Why Color Calibration is Essential for Pro Photographers
Color calibration ensures that the colors you see on your monitor are accurate, allowing you to make precise editing decisions. Accurate colors are crucial for professional photography, ensuring that your images look consistent across different devices and platforms.
5.2. Steps to Calibrate Your Monitor for Professional Accuracy
- Clean Your Monitor: Thoroughly clean your monitor to remove any haze or smudges.
- Set Ambient Lighting: Ensure your ambient lighting is set to your typical working conditions, avoiding glare on the screen.
- Use a Color Calibration Tool: Use a tool like the TruHu app to perform color correction.
- Repeat Regularly: Repeat the calibration process at least once a month, as monitors lose brightness and color accuracy over time.
5.3. Benefits of Having a Calibrated Screen
- Trustworthy Colors: You can trust that the colors you see are accurate.
- Consistent Results: Your photos will look great on most screens.
- Professional Standards: Your photos will meet professional color standards.
A calibrated screen provides confidence in color accuracy, ensuring your photos look professional and consistent across various viewing platforms.
6. Addressing Common Issues When Removing White Light
6.1. Dealing with High Contrast Glare
High contrast glare can be challenging to remove without making the image look unnatural. The key is to make subtle adjustments and focus on blending the corrected area with its surroundings.
6.2. Correcting Color Discrepancies
When removing glare, color discrepancies can arise. Use the color adjustment tools in Lightroom to ensure the corrected area matches the surrounding colors.
6.3. Avoiding Over-Editing
It’s easy to over-edit when trying to remove glare. Take a step back and evaluate the image as a whole to ensure your edits look natural and balanced.
7. Alternative Software for Removing White Light
7.1. Adobe Photoshop
Photoshop offers advanced tools like the Clone Stamp and Content-Aware Fill, which can be highly effective for removing glare. These tools provide precise control and can produce seamless results.
7.2. Capture One
Capture One is another popular choice among professional photographers, offering robust masking and color editing capabilities. Its advanced color handling makes it ideal for correcting color issues caused by glare.
7.3. GIMP
GIMP is a free, open-source alternative to Photoshop, offering many of the same features, including tools for removing glare. While it may have a steeper learning curve, it’s a powerful option for those on a budget.
8. The Importance of Understanding Light in Photography
8.1. Natural Light vs. Artificial Light
Understanding the characteristics of natural and artificial light is crucial for capturing well-lit photos and minimizing glare. Each type of light has its own unique properties that affect the appearance of your images.
8.2. How Light Affects Mood and Composition
Light plays a significant role in setting the mood and enhancing the composition of your photos. Understanding how light interacts with your subject can elevate your photography from technically sound to visually stunning.
8.3. Tips for Shooting in Different Lighting Conditions
- Golden Hour: Shoot during the golden hour (sunrise and sunset) for warm, soft light.
- Overcast Days: Use overcast days for even, diffused lighting.
- Direct Sunlight: Avoid direct sunlight to prevent harsh shadows and glare.
- Artificial Light: Control artificial light sources to achieve the desired effect.
9. Integrating White Light Removal into Your Workflow
9.1. Best Practices for a Smooth Editing Process
- Organize Your Files: Keep your photos organized for easy access.
- Backup Your Work: Regularly back up your photos to prevent data loss.
- Use Presets: Create or use presets to speed up your editing workflow.
- Take Breaks: Avoid burnout by taking regular breaks during long editing sessions.
9.2. Efficiently Managing Large Photo Batches
- Batch Processing: Use Lightroom’s batch processing feature to apply the same edits to multiple photos.
- Keywords and Metadata: Add keywords and metadata to your photos for easy searching and organization.
- Culling: Cull your photos to remove unwanted images before editing.
9.3. Maintaining Consistent Quality Across All Images
- Color Consistency: Ensure consistent color grading across all images.
- Sharpening: Apply consistent sharpening to maintain clarity.
- Noise Reduction: Use consistent noise reduction to minimize grain.
10. Real-World Examples: Case Studies
10.1. Landscape Photography: Restoring a Sunset Scene
In landscape photography, white light can wash out the vibrant colors of a sunset. By using the Radial Filter and adjusting the Dehaze and Clarity, you can restore the scene’s natural beauty.
10.2. Portrait Photography: Removing Glare from Eyeglasses
Glare on eyeglasses can be distracting in portraits. The Healing Tool is perfect for removing these reflections, allowing the subject’s eyes to shine through.
10.3. Real Estate Photography: Enhancing Interior Shots
White light from windows can make interior shots look unappealing. Using the Masking Brush, you can selectively reduce glare and enhance the details of the room.
11. Community and Further Learning
11.1. Joining Photography Forums and Groups
Engage with other photographers by joining online forums and groups. Share your work, ask for feedback, and learn from experienced professionals.
11.2. Following Influential Photographers and Blogs
Stay updated with the latest trends and techniques by following influential photographers and blogs. Get inspired and learn new approaches to photography.
11.3. Online Courses and Workshops
Enhance your skills by taking online courses and workshops. Many platforms offer in-depth tutorials on various photography topics, including light management and editing.
12. The Future of White Light Removal Technology
12.1. AI-Powered Editing Tools
AI-powered editing tools are becoming increasingly sophisticated, offering automated solutions for removing white light and enhancing image quality. These tools can analyze images and make intelligent adjustments, saving photographers time and effort.
12.2. Advancements in Camera Technology
Advancements in camera technology are also helping to minimize white light issues. New sensors and lens coatings are designed to reduce glare and improve overall image quality.
12.3. Predictions for the Future of Photography
The future of photography is likely to be shaped by AI and advanced technology, making it easier than ever to capture and edit stunning images. As technology evolves, photographers will have access to more powerful tools for managing light and creating visually compelling content.
13. FAQ: Everything You Need to Know About Removing White Light From Photos
13.1. What causes white light in photos?
White light is caused by stray light entering the camera lens, typically from bright sources like the sun or artificial lights.
13.2. How can I prevent white light when shooting outdoors?
Use a lens hood, polarizing filter, and adjust your camera angle to minimize direct light exposure.
13.3. What is the best software for removing white light?
Adobe Lightroom and Photoshop are popular choices, offering a range of tools for precise glare removal.
13.4. How does color calibration improve my editing?
Color calibration ensures that the colors you see on your monitor are accurate, leading to more precise and consistent edits.
13.5. Can I remove white light from photos on my smartphone?
Yes, many mobile editing apps offer tools for reducing glare and improving image quality.
13.6. What are the key settings to adjust in Lightroom for glare removal?
Adjust Dehaze, Clarity, Exposure, Shadows, and Whites in Lightroom for effective glare removal.
13.7. Is it always necessary to remove white light from photos?
No, sometimes white light can add a creative effect. It depends on the desired look and feel of the image.
13.8. How do I avoid over-editing when removing white light?
Take frequent breaks, evaluate the image as a whole, and make subtle adjustments to avoid an unnatural look.
13.9. What is the difference between the Masking Brush and Radial Filter in Lightroom?
The Masking Brush is for localized adjustments, while the Radial Filter is for broader areas.
13.10. Where can I find more resources for learning about photography and editing?
Join photography forums, follow influential photographers, and take online courses to enhance your skills.
14. Conclusion: Mastering White Light Removal for Stunning Photos
Removing white light from photos is a critical skill for any photographer looking to produce high-quality images. Whether you’re preventing glare during the shoot or editing it out in post-production, mastering these techniques will elevate your work and ensure your photos look their best. For more in-depth guides, stunning photo collections, and a vibrant photography community, visit dfphoto.net today and start exploring the world of photography with confidence.
Ready to take your photography skills to the next level? Visit dfphoto.net to explore our extensive collection of tutorials, inspiring images, and connect with a community of passionate photographers. Discover new techniques, get inspired, and elevate your photography today!