Do you have cherished old photographs marred by scratches and imperfections? At dfphoto.net, we understand the sentimental value of these images and offer solutions to restore them. Discover effective methods and tools to remove scratches from old photos, preserving your precious memories for generations. This guide will explore various techniques for digital photo restoration and offer tips for preserving your physical photos to prevent further damage. Let’s delve into the world of photo restoration!
Table of Contents
- Understanding the Challenges of Old Photographs
- Identifying Your Search Intent
- Free Online Tools to Remove Scratches
- Professional Desktop Software for Photo Restoration
- DIY Scratch Removal Techniques
- Preventive Measures to Protect Your Photos
- Advanced Restoration Techniques
- The Science Behind Photo Deterioration
- Choosing the Right Restoration Method
- FAQ: Removing Scratches From Old Photos
1. Understanding the Challenges of Old Photographs
Old photographs often suffer from various issues that detract from their visual appeal. These can include fading, color casts, scratches, tears, and the accumulation of dust and stains. Addressing these problems requires a careful and methodical approach, whether you choose to employ digital tools or physical restoration methods. Understanding the nature of the damage is the first step in determining the most effective course of action.
1.1 Common Types of Damage
Before diving into restoration methods, let’s identify common issues:
- Fading: Loss of color and detail due to light exposure.
- Color Casts: A shift in the overall color balance, often appearing as yellowing or redness.
- Scratches: Physical marks on the photo surface.
- Tears and Creases: Structural damage to the photograph.
- Dust and Stains: Surface contaminants affecting image clarity.
- Mold and Mildew: Growth due to humidity, causing blotches and damage.
1.2 Digital vs. Physical Restoration
Restoring old photos can be done either digitally or physically. Digital restoration involves scanning the photo and using software to correct imperfections. Physical restoration requires hands-on techniques to clean and repair the original print. Each method has its pros and cons, depending on the photo’s condition and your skill level.
- Digital Restoration: Non-invasive, allows for experimentation, easily shareable.
- Physical Restoration: Preserves the original artifact, requires expertise and care.
2. Identifying Your Search Intent
Understanding the different reasons people search for “How To Remove Scratches From Old Photos” helps tailor the best solutions. Here are five common search intents:
- Quick Fix: Users want a simple, fast method, often using free online tools.
- Professional Quality: Users seek high-quality restoration, willing to invest in software or services.
- DIY Methods: Users prefer hands-on techniques for physical restoration.
- Preventive Care: Users want to learn how to protect existing photos from future damage.
- Information Gathering: Users are researching various restoration methods to make an informed decision.
3. Free Online Tools to Remove Scratches
For a quick and accessible solution, several online tools can help remove scratches from old photos without any cost. These tools often use AI to automate the restoration process, making it easy for beginners to achieve decent results.
3.1 Wondershare Repairit Online
Wondershare Repairit Online offers an AI-driven solution to restore old photos. It can remove scratches, spots, and smudges, enhance face clarity, and even colorize black and white photos.
How to Use Wondershare Repairit Online
- Upload: Go to the Wondershare Repairit Online website and upload your old photo.
- Enhance: Select “AI Enhancement” and choose “Old Photo Restore“.
- Start: Click “Start” to begin the restoration process.
- Preview: Review the restored photo and download it.
 Add old photo online
3.2 Other Online Tools
- Lunapic: A free online editor with basic retouching tools.
- Fotor: Offers a suite of editing tools, including scratch removal.
- VanceAI: Uses AI to enhance and restore old photos automatically.
These tools provide a convenient starting point for photo restoration, especially for those new to the process.
4. Professional Desktop Software for Photo Restoration
For more advanced and precise scratch removal, professional desktop software offers a wider range of tools and features. These programs provide greater control over the restoration process, allowing for high-quality results.
4.1 PhotoGlory
PhotoGlory is a dedicated photo restoration software with tools for color correction, scratch removal, and adding custom text.
How to Use PhotoGlory
- Download: Install PhotoGlory on your computer.
- Crop: Remove damaged edges using the crop tool.
- Retouch: Use the patch tool, clone stamp, or healing brush to erase cracks and stains.
- Restore Colors: Revive faded colors and colorize black and white photos.
 erase cracks and stains in photo
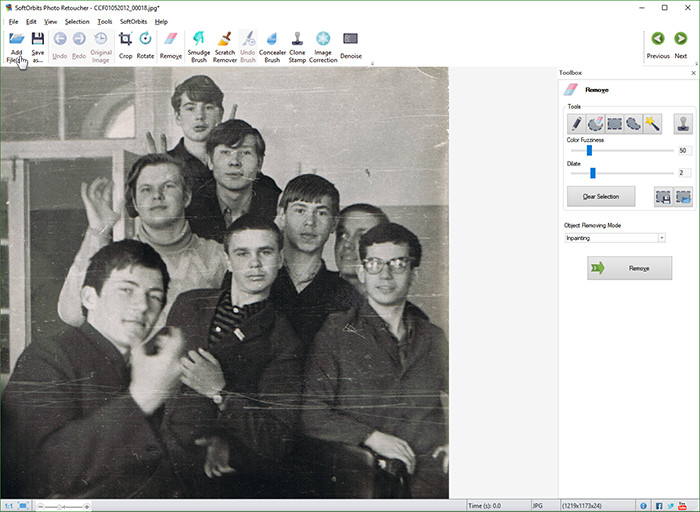
4.2 SoftOrbits Photo Retoucher
SoftOrbits Photo Retoucher is designed for reviving faded vintage images with simple and effective tools.
How to Use SoftOrbits Photo Retoucher
- Scan: Create a digital copy of the photo.
- Load: Open the image in SoftOrbits.
- Remove Tool: Select the “Remove” tool.
- Highlight: Mark the damaged areas with the pencil icon.
- Clean: Click “Remove” to automatically clean up the marked areas.
 scan original image in software
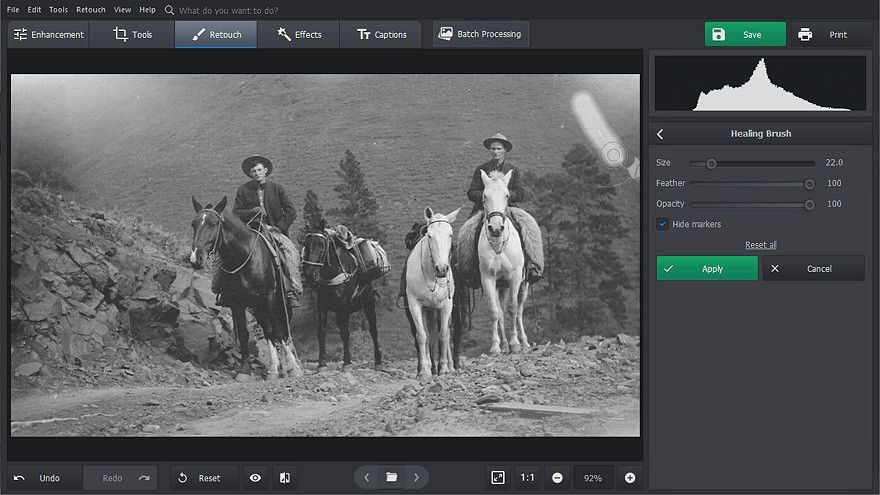
4.3 Adobe Photoshop
Adobe Photoshop is the industry standard for photo editing and offers powerful tools for photo restoration.
How to Use Adobe Photoshop
- Open: Open the scanned image in Photoshop.
- Healing Brush: Use the Healing Brush tool to remove small scratches and blemishes.
- Clone Stamp: Use the Clone Stamp tool to copy undamaged areas over damaged ones.
- Content-Aware Fill: Utilize Content-Aware Fill for larger areas of damage.
These software options provide comprehensive tools for restoring old photos to their former glory, suitable for both amateur and professional users.
5. DIY Scratch Removal Techniques
For those who prefer a hands-on approach, physical restoration techniques can be employed to remove scratches and imperfections from old photos. These methods require caution and a gentle touch to avoid further damage.
5.1 Cleaning the Photo Surface
Before attempting to remove scratches, it’s essential to clean the photo surface to remove dust and debris.
Materials
- Soft brush
- Microfiber cloth
- Photo cleaning solution
Steps
- Brush: Gently brush the surface to remove loose particles.
- Wipe: Lightly dampen the microfiber cloth with the cleaning solution and wipe the photo surface.
- Dry: Allow the photo to air dry completely.
5.2 Filling Scratches
For deeper scratches, filling them with a suitable material can help restore the photo’s appearance.
Materials
- Photo retouching dyes
- Fine brush
- Cotton swabs
Steps
- Apply Dye: Carefully apply a small amount of photo retouching dye to the scratch.
- Blend: Use a fine brush to blend the dye with the surrounding area.
- Clean: Gently wipe away excess dye with a cotton swab.
5.3 Professional Services
When DIY methods seem daunting, consider dfphoto.net! Reach out to a professional photo restoration service to handle delicate tasks.
6. Preventive Measures to Protect Your Photos
Preventing damage is as important as restoring it. Taking steps to protect your photos can prolong their lifespan and reduce the need for future restoration.
6.1 Proper Storage
Storing photos in the right conditions is crucial for their preservation.
- Temperature: Maintain a stable temperature between 65°F and 70°F.
- Humidity: Keep relative humidity around 50%.
- Light: Store photos away from direct sunlight and UV light.
6.2 Archival Materials
Using archival-quality materials ensures that your photos are protected from harmful chemicals.
- Acid-Free Paper: Use acid-free paper for storing and interleaving photos.
- PVC-Free Albums: Choose albums made from PVC-free polymers like Polyester, Mylar, Polypropylene, or Polyethylene.
6.3 Handling Precautions
Handle photos with care to prevent scratches and tears.
- Clean Hands: Always wash your hands before handling photos.
- Gloves: Consider wearing cotton gloves to avoid transferring oils and dirt.
- Support: Support the photo when handling it to prevent bending and creasing.
7. Advanced Restoration Techniques
For severely damaged photos, advanced restoration techniques may be necessary to achieve satisfactory results.
7.1 Digital Compositing
Digital compositing involves combining parts of multiple images to reconstruct damaged areas.
How to Use
- Scan: Scan multiple copies of the same photo, if available.
- Identify: Identify the best parts from each scan.
- Combine: Use Photoshop to combine the best parts into a single image.
7.2 Frequency Separation
Frequency separation is a Photoshop technique that separates the image into high and low-frequency layers, allowing for targeted retouching.
How to Use
- Duplicate: Duplicate the image layer twice.
- Blur: Apply a Gaussian Blur to the lower layer (low frequency).
- Subtract: Apply Image > Apply Image to the upper layer, subtracting the blurred layer.
- Retouch: Retouch each layer separately for targeted adjustments.
8. The Science Behind Photo Deterioration
Understanding the scientific reasons behind photo deterioration can help you take more informed preventive measures.
8.1 UV Light
UV light causes the molecules in photographic materials to degrade, leading to fading and discoloration.
8.2 Airborne Pollutants
Pollutants such as dust, smoke, and chemicals can react with the image emulsion, causing it to deteriorate over time.
8.3 Acid Damage
Acids in paper and adhesives can damage photos, leading to yellowing and embrittlement.
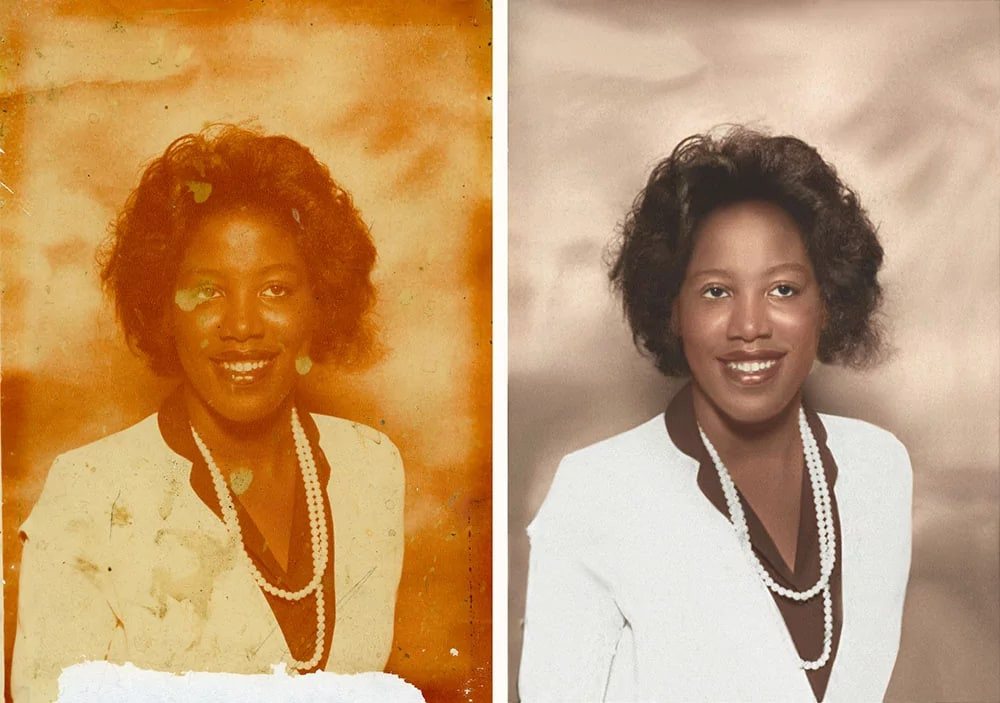 color cast photo restoration
9. Choosing the Right Restoration Method
Selecting the appropriate restoration method depends on several factors, including the type and extent of damage, your skill level, and the desired outcome.
9.1 Assessment
Assess the condition of the photo to determine the best course of action.
- Minor Damage: Online tools or simple retouching techniques may suffice.
- Moderate Damage: Professional software or DIY methods may be necessary.
- Severe Damage: Advanced techniques or professional services may be required.
9.2 Skill Level
Consider your comfort level with various restoration techniques.
- Beginner: Start with easy-to-use online tools.
- Intermediate: Explore professional software and DIY methods.
- Advanced: Utilize advanced techniques or seek professional help.
10. FAQ: Removing Scratches From Old Photos
10.1 Can I remove scratches from old photos at home?
Yes, you can remove scratches using online tools, desktop software, or DIY techniques. The best method depends on the extent of the damage and your skill level.
10.2 What is the best software for removing scratches from old photos?
PhotoGlory, SoftOrbits Photo Retoucher, and Adobe Photoshop are excellent choices for removing scratches.
10.3 How do I protect my old photos from further damage?
Store photos in a cool, dry place away from direct sunlight, use archival-quality materials, and handle them with care.
10.4 Can AI really restore old photos?
Yes, AI-powered tools like Wondershare Repairit Online can effectively remove scratches and enhance old photos automatically.
10.5 Is it better to restore photos digitally or physically?
Digital restoration is non-invasive and allows for experimentation, while physical restoration preserves the original artifact. The best choice depends on your goals and the photo’s condition.
10.6 How much does it cost to have a photo professionally restored?
The cost of professional photo restoration varies depending on the complexity of the job and the service provider.
10.7 What materials should I use to store old photos?
Use acid-free paper, PVC-free albums, and archival-quality sleeves.
10.8 Can I colorize old black and white photos?
Yes, software like PhotoGlory and online tools like Wondershare Repairit Online can colorize black and white photos.
10.9 How do I scan old photos for digital restoration?
Use a flatbed scanner with a resolution of at least 300 DPI and save the images as TIFF files.
10.10 What should I do if my photo has mold or mildew?
Gently clean the photo with a soft brush and photo cleaning solution, then store it in a dry environment. If the damage is severe, seek professional help.
At dfphoto.net, we’re passionate about helping you preserve your cherished memories. Explore our website for more in-depth guides, tutorials, and inspiration to elevate your photography skills and restore your precious photos. Let’s bring your old photos back to life! Visit dfphoto.net to learn more and connect with our photography community!
Address: 1600 St Michael’s Dr, Santa Fe, NM 87505, United States. Phone: +1 (505) 471-6001. Website: dfphoto.net.