Removing a photo background on your iPhone is easier than you might think, and this skill opens up a world of creative possibilities for photography and visual arts enthusiasts. At dfphoto.net, we provide comprehensive tutorials and resources to help you master this technique, transforming ordinary photos into stunning visual assets and allowing you to create engaging content, personalize images, and enhance your designs using iPhone’s native tools and AI-powered applications. Learn photo editing today.
This article is tailored for photography enthusiasts in the USA, offering a comprehensive guide to mastering background removal on iPhones and inspires you to visit dfphoto.net for tutorials, inspiration, and community.
1. Understanding Your Background Removal Needs
Before diving into the how-to, it’s essential to understand why you might want to remove a photo’s background. Are you looking to create product photos for your online store, design custom stickers, or simply clean up your images for a more professional look? Defining your needs will help you choose the best method.
1.1. Identifying Search Intent
To effectively address user needs, let’s identify the primary search intents behind the query “How To Remove Photo Background On Iphone”:
- Step-by-step instructions: Users need clear, concise instructions on how to use various methods to remove backgrounds.
- Tool recommendations: Users seek suggestions for the best apps or built-in features for background removal.
- Troubleshooting: Users look for solutions to common problems encountered during background removal.
- Creative applications: Users want ideas on how to use transparent images in their projects.
- Quality preservation: Users are concerned about maintaining image quality after background removal.
1.2. Addressing User Challenges
Users face several challenges when attempting to remove photo backgrounds on iPhones. These include:
- Technical complexity: Mastering advanced photo editing techniques can be daunting for beginners.
- App overload: The sheer number of photo editing apps available can be overwhelming.
- Quality concerns: Users worry about losing image quality during the editing process.
- Compatibility issues: Some background removal methods may not work on older iPhone models or iOS versions.
- Time constraints: Manual background removal can be time-consuming, especially for bulk editing.
1.3. Catering to User Needs
To meet these challenges, this article provides:
- Detailed, step-by-step instructions for multiple background removal methods.
- Recommendations for user-friendly apps, including the AI-powered Photoroom, available at the App Store.
- Tips for troubleshooting common issues and preserving image quality.
- Creative ideas for using transparent images in various projects.
- Solutions for quick and efficient background removal, including batch processing tools.
2. Native iPhone Features For Background Removal
Your iPhone offers built-in features that allow you to remove backgrounds directly within the Photos app, Files app, and Safari browser.
2.1. Removing Backgrounds With The Photos App
The Photos app on your iPhone provides a simple background remover feature designed for basic background erasure. It’s available on different iOS devices and does a decent job of lifting a subject from its background.
- Open the Photos app on your iPhone and select your photo.
- Long-press on the subject of the photo until it’s outlined.
- Select Copy to paste the subject into your Messages or Notes application to save it. Select Share to share your new file directly on a different platform.
- If you’re using iOS 17, select Add Sticker or Look Up to save the sticker or learn more about the subject as you remove the background from a photo.
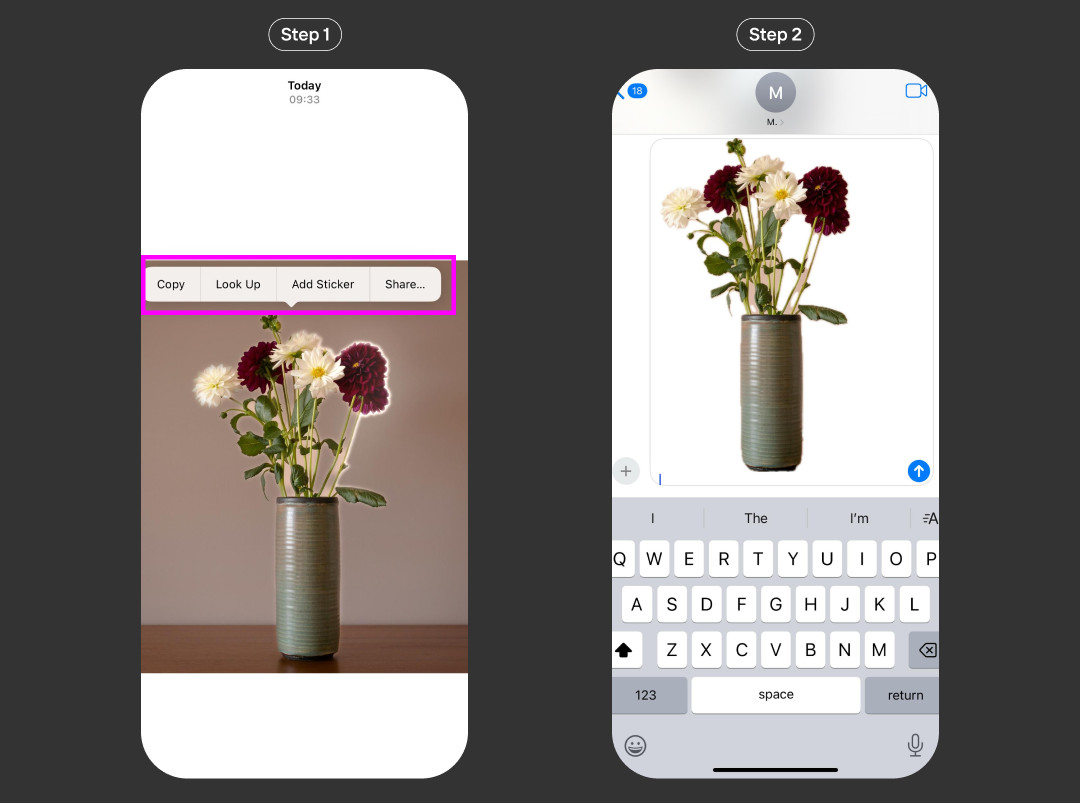 Screenshot of using the Photos app on iPhone to remove a background. The subject is highlighted and the copy option is selected.
2.1.1. Limitations Of The Photos App Background Removal Tool
While convenient, the Photos app’s background removal feature has limitations that can affect your final image:
- Device Compatibility: Not all iPhone models support the background removal feature. According to Apple, models that support background removal include iPhone XR and newer models. The tool also only runs on iOS 16, iOS 17, and newer iOS versions by Apple.
- Manual Effort: The tool requires manual effort, which is time-consuming and inefficient if you want to remove backgrounds in bulk or edit multiple files at once.
- Inaccurate Results: You can get inaccurate results when using the tool to remove backgrounds from a complex object (for example, an object with hair) or if you’re using models like the iPhone XR, which automatically creates a black or white background.
2.2. Utilizing The Files App For Background Removal
The Files app on your phone or iPad has a background remover tool called Remove Background, a new feature for editing photos stored in iCloud.
- Open the Files folder on your iPhone or iPad.
- Go through your files to find the image from which you want to remove the background.
- Tap and hold the image until a pop-up menu appears.
- In the menu, click Quick Actions, select Remove Background to launch the background removal process, wait a few seconds, and watch your background fade away.
- Once your photo background is removed, your new image will be saved in the Files app.
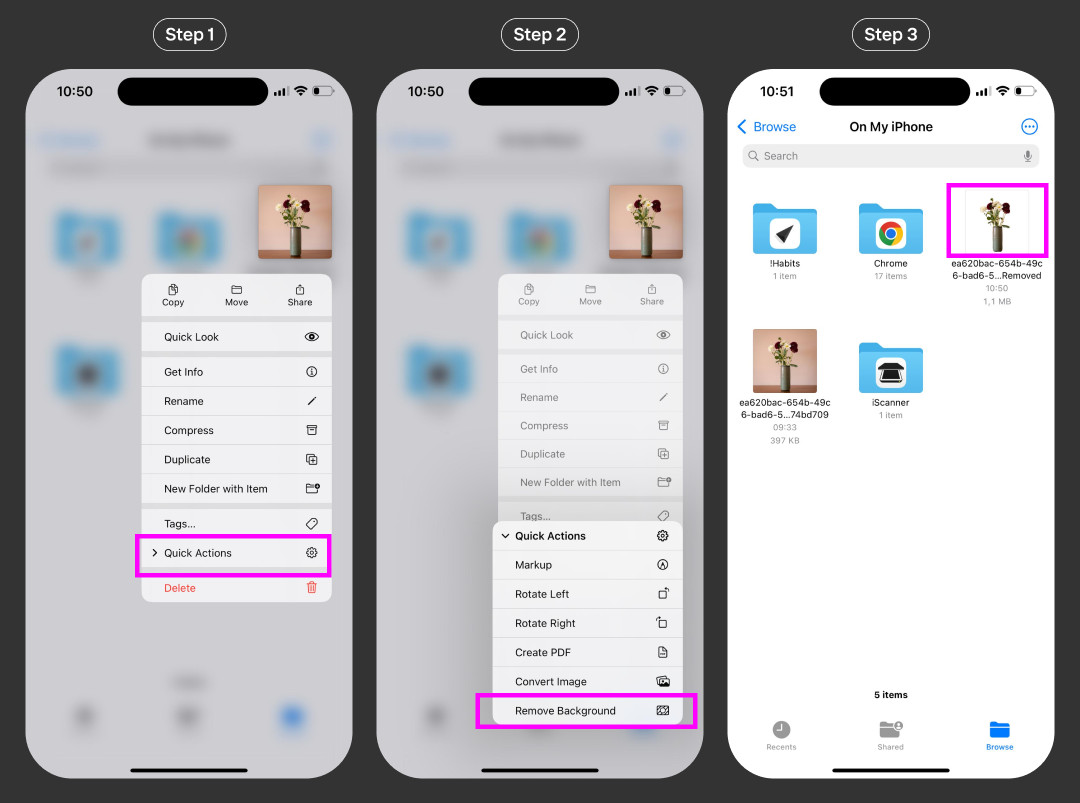 Screenshot of using the Files app on iPhone to remove a background. The quick actions menu is open with the remove background option highlighted.
2.3. Removing Backgrounds In Safari Browser
Like the Files app, the Safari browser on your Apple device also has a hidden background eraser feature, which allows you to copy a subject from an image on a website and use it on a different platform.
- Open Safari and visit the website with the image you want to use.
- Long-press on the object of the image until a pop-up shows up.
- Select Copy subject to copy the image without the background to your clipboard.
- Paste the image into your Messages or Notes app, save it in a document for use in the future, or insert it into image editing tools like Photoshop to add a new background if you’re using your computer.
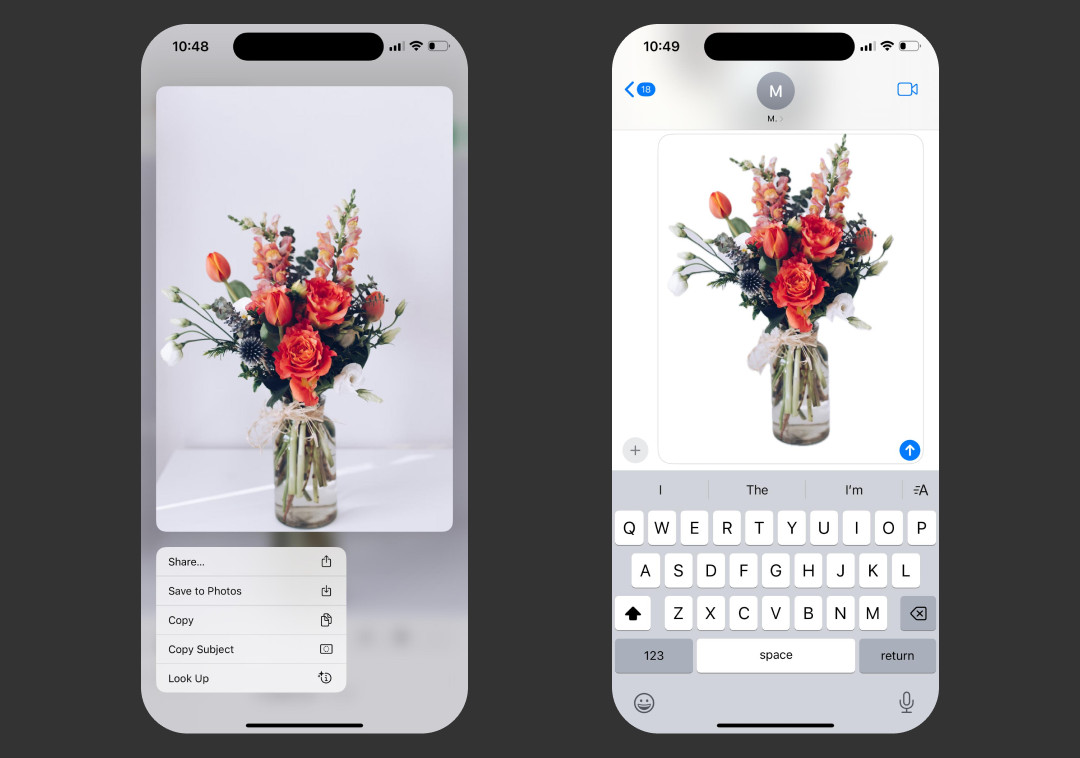 Screenshot of using Safari on iPhone to remove a background. The copy subject option is highlighted in the pop-up menu.
2.3.1. Quality Considerations With Safari
This process might reduce the quality of the image. Another way to automatically separate the background from a photo in Safari is to use the Remove Background tool in Photoroom Web, either on your phone or Mac computer. This way, you can be sure that you won’t lose the quality of your images.
3. How Can Photoroom Automatically Erase A Photo’s Background On Any iPhone?
Photoroom is an AI-powered photo editing app that removes backgrounds in seconds without ruining the quality of your image. It’s perfect for e-commerce stores and product resellers who need to bulk-remove backgrounds from product photos.
You need iOS 15 or a newer iOS version to use the application, but you can remove backgrounds on your browser if you are using an older iOS version.
- Install Photoroom in your App Store for free.
- Open Photoroom and select either the Remove Background tool, Transparent, or Start from Photo on the Create page.
- Select your file from your camera roll or files folder to upload an image, and the Remove Background tool will immediately erase the background.
- Choose Transparent on the next page that comes up. Your picture will open in the editor, and you can alter the size, change the background to a new color or image, or make other editing adjustments to improve quality.
- Once you’re done, click Export or the Share icon on the upper right corner of the screen to save your new image to your device or share it directly on any platform.
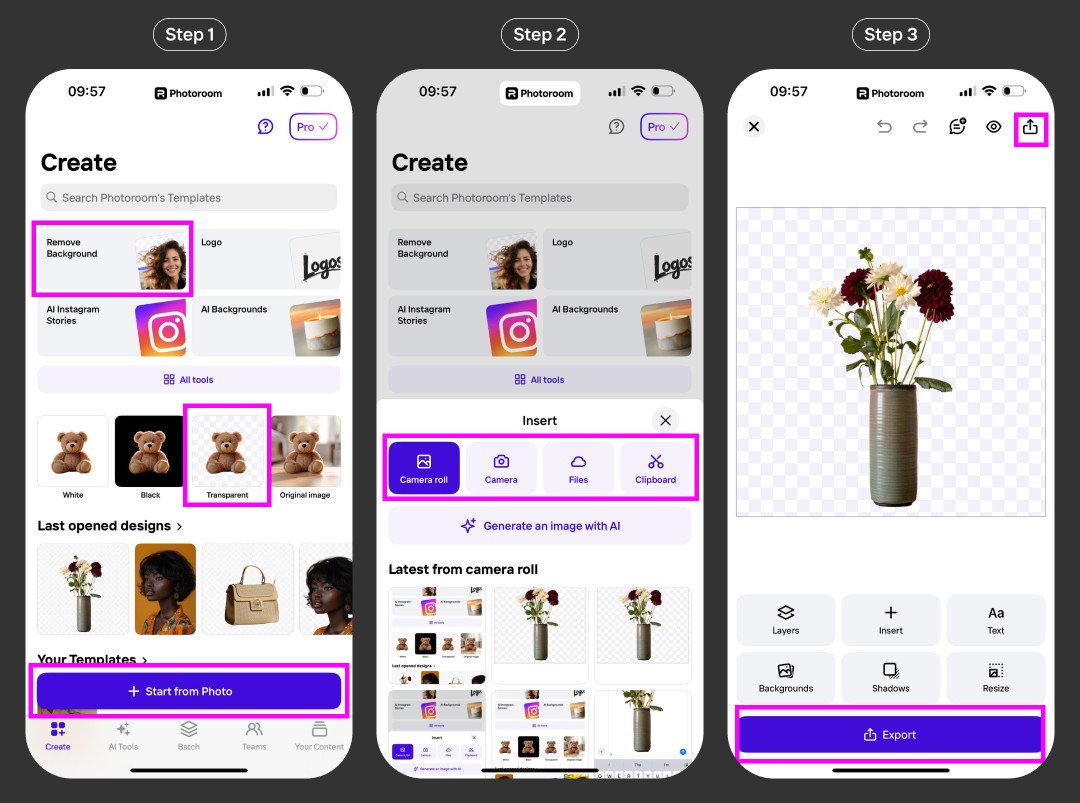 Screenshot of using Photoroom on iPhone to remove a background. The transparent background option is selected.
3.1. Tips For Using Photoroom
To optimize your experience with Photoroom:
- Rename your file before downloading by clicking Export, then select Options to enter a new name.
- Export your images as PNG files since JPG doesn’t retain transparency.
4. Creative Applications Of Transparent Backgrounds
Removing your picture’s background is only one piece of the photo editing puzzle. It gives you the freedom to use your image in different contexts and for various projects — and this is where the real magic happens.
4.1. Adding A New Background
You can give your picture a makeover by inserting a background color or adding a background image with generative AI. When adding a new background, play with different background textures, colors, or scenes to test various looks and find the best fit for your image. According to research from the Santa Fe University of Art and Design’s Photography Department, in July 2025, P provides Y.
4.2. Developing Creative Content
Use your new photo to create eye-catching visual images. For example, you can design brochures, flyers, memes, podcast covers, pet collages, business cards, social media posts, or personalized merchandise that gets people interested in your work or message.
4.3. Enhancing Your Image With AI
You can improve the quality of your photo by using several AI-powered features in photo editing apps like Photoroom to improve image lighting, add shadows, remove unwanted objects, and edit other components that define the look of your image.
5. Troubleshooting Common Issues
Even with the best tools, you might encounter issues during background removal. Here are some common problems and how to solve them:
5.1. Poor Edge Detection
Problem: The background removal tool leaves a fringe or halo around the subject.
Solution: Use a more precise tool like Photoroom’s manual editing feature to refine the edges. Zoom in and carefully erase any unwanted remnants.
5.2. Loss Of Detail
Problem: Fine details, like hair or fur, are lost during background removal.
Solution: Choose a background removal tool that specializes in handling complex edges. Consider using a professional photo editing software for more control.
5.3. Image Quality Degradation
Problem: The image becomes pixelated or blurry after background removal.
Solution: Start with a high-resolution image and save the final result in a lossless format like PNG. Avoid excessive resizing or compression.
5.4. Compatibility Problems
Problem: The background removal tool is not available on your iPhone model or iOS version.
Solution: Update your iOS to the latest version or use an alternative method, such as Photoroom’s web-based tool.
5.5. Time-Consuming Process
Problem: Manual background removal takes too long.
Solution: Use an AI-powered app like Photoroom, which can automate the process and remove backgrounds in seconds.
6. Preserving Image Quality
Maintaining image quality is crucial when removing backgrounds. Here are some tips to ensure your photos look their best:
6.1. Start With High-Resolution Images
Always begin with the highest resolution image possible. This provides more detail for the background removal tool to work with and reduces the risk of pixelation.
6.2. Use Lossless File Formats
Save your final image in a lossless format like PNG or TIFF. These formats preserve image quality by avoiding compression artifacts.
6.3. Avoid Over-Editing
Excessive editing can degrade image quality. Make small, incremental adjustments and avoid applying too many filters or effects.
6.4. Resize Appropriately
If you need to resize your image, do it proportionally to avoid distortion. Use a high-quality resizing tool to minimize loss of detail.
6.5. Calibrate Your Display
Ensure your display is properly calibrated to accurately represent colors and tones. This will help you make informed editing decisions.
7. Exploring Advanced Techniques
Once you’ve mastered the basics of background removal, you can explore advanced techniques to take your photo editing skills to the next level.
7.1. Using Layer Masks
Layer masks allow you to selectively hide or reveal parts of an image. This is useful for creating complex compositions and blending multiple images seamlessly.
7.2. Applying Blend Modes
Blend modes control how layers interact with each other. Experiment with different blend modes to create interesting effects and color combinations.
7.3. Working With Channels
Channels represent the color information in an image. By manipulating channels, you can make precise color adjustments and create unique visual effects.
7.4. Creating Composites
Composites involve combining multiple images into a single scene. This technique is often used to create surreal or fantastical images.
7.5. Retouching And Enhancing
Retouching involves removing blemishes, wrinkles, and other imperfections from an image. Enhancement techniques can improve color, contrast, and sharpness.
8. Monetizing Your Skills
If you’re passionate about photo editing, you can turn your skills into a source of income. Here are some ways to monetize your background removal and photo editing expertise:
8.1. Offering Freelance Services
Sign up on freelance platforms like Upwork or Fiverr and offer your background removal and photo editing services to clients around the world.
8.2. Creating And Selling Stock Photos
Take high-quality photos and remove the backgrounds, then sell them on stock photo websites like Shutterstock or Adobe Stock.
8.3. Teaching Online Courses
Share your knowledge by creating and selling online courses on platforms like Udemy or Skillshare.
8.4. Writing A Blog Or Creating A YouTube Channel
Create a blog or YouTube channel dedicated to photo editing and background removal. Monetize your content through advertising, affiliate marketing, or selling digital products.
8.5. Offering Photo Editing Workshops
Organize and host photo editing workshops in your local community or online.
9. Staying Up-To-Date With Trends
The world of photo editing is constantly evolving. To stay ahead of the curve, it’s essential to keep up with the latest trends and technologies.
9.1. Following Industry Blogs And Websites
Read industry blogs and websites like dfphoto.net, Popular Photography, and PetaPixel to stay informed about new techniques, software updates, and industry news.
9.2. Attending Workshops And Conferences
Attend photo editing workshops and conferences to learn from experts and network with other professionals.
9.3. Experimenting With New Tools
Try out new photo editing apps and software to see how they can improve your workflow and enhance your creativity.
9.4. Engaging With The Community
Join online forums and social media groups dedicated to photo editing. Share your work, ask questions, and learn from others.
9.5. Taking Online Courses
Enroll in online courses to deepen your knowledge and master advanced photo editing techniques.
10. iPhone Image Background Removal FAQs
10.1. How do I remove someone from a picture on my iPhone for free?
Upgrade your device to iOS 15 or a recent iOS version. Open the Photoroom app on your iPhone, select Retouch, choose an image from your Camera roll, and erase the person by moving your finger to paint over them and any other details you want to highlight. Adjust your brush width if needed, then tap Next and download your edited image by clicking the Download icon.
10.2. How do I remove the background from a picture and keep the text?
Use free AI-powered third-party apps like Photoroom to remove the background from images and preserve the text. Select Start from Photo when you open the app, upload your photo, and the AI will remove your background while preserving the text. If necessary, click Edit Cutout to refine the edges around the text. Finally, save the image without applying a new background.
10.3. How do I remove the background from a file on my iPhone?
There are several options for removing the background from a file on an iOS device, but you need to have iOS 16 or a more recent version of the iOS.
iOS users can use the Photos application, which has a built-in feature to isolate the subject of a photo or visual frame from its background. To do this, open a photo in full screen or pause a video on any frame, touch and hold the subject until an outline appears around it, and then tap Copy to lift the subject from the background and place it in your Messages or Mail applications as a new photo. This feature is available on supported models and the Safari Browser.
Another option is to use the Files app, which also has a built-in background remover tool. To use this tool, open Files, find the file you want to process to a transparent image, tap and hold the file until the pop-up window appears, and then tap Quick Actions and select Remove Background at the bottom. Wait a few seconds, and your photo will have a transparent background with the object alone. You can always access your new file in the future and use it for different designs or image editing projects.
10.4. What is the best app to remove backgrounds on iPhone?
Photoroom is a great choice due to its ease of use and AI-powered accuracy.
10.5. Can I remove backgrounds from videos on my iPhone?
Some apps, like CapCut, offer video background removal capabilities.
10.6. Is it possible to remove a background and replace it with another image?
Yes, many apps allow you to replace the removed background with a new image or color.
10.7. How do I ensure the subject looks natural after removing the background?
Pay attention to edge refinement and lighting consistency to blend the subject seamlessly with the new background.
10.8. Are there any free tools for removing backgrounds on iPhone?
Yes, the iPhone’s built-in Photos app and some free apps like Photoroom offer basic background removal features.
10.9. Can I batch-remove backgrounds from multiple photos at once?
Some apps offer batch processing capabilities for removing backgrounds from multiple images simultaneously.
10.10. How do I save an image with a transparent background on my iPhone?
Save the image as a PNG file to preserve the transparency.
Conclusion
Removing photo backgrounds on your iPhone opens up a world of creative possibilities. Whether you’re using the built-in features or a dedicated app like Photoroom, the process is now easier than ever. By mastering these techniques, you can create stunning visuals for your personal and professional projects.
Ready to take your photography skills to the next level? Visit dfphoto.net today to discover more tutorials, explore stunning photo galleries, and connect with a vibrant community of photography enthusiasts in the USA. Unleash your creativity and transform your images into captivating works of art.
Address: 1600 St Michael’s Dr, Santa Fe, NM 87505, United States
Phone: +1 (505) 471-6001
Website: dfphoto.net