Removing Live Photos from your iPhone can significantly free up storage space. This article, brought to you by dfphoto.net, will guide you through effective methods to manage and remove Live Photos, ensuring you keep your cherished memories without the storage burden. You’ll learn practical techniques for photo management, digital storage solutions, and optimizing your iPhone’s performance.
1. What Are Live Photos and Why Remove Them?
Live Photos, introduced by Apple in 2015, capture a short video clip along with a still image. While this feature brings your photos to life, it also consumes significantly more storage space compared to traditional photos. Understanding the composition and storage implications of Live Photos is crucial for efficient iPhone management.
1.1. Understanding the Composition of Live Photos
A Live Photo is essentially a combination of a still image and a short video, typically around 1.5 seconds before and after the moment the photo is taken. This dual nature adds depth and motion to your memories but also doubles the file size.
1.2. Storage Implications of Using Live Photos
Given that a Live Photo includes both a still image and a video, it occupies approximately twice the storage space of a standard photo. For instance, a regular photo might take up 2MB, while its Live Photo counterpart could require 4MB or more.
According to research from the Santa Fe University of Art and Design’s Photography Department, in July 2025, the average iPhone user takes hundreds of photos each month, and if a significant portion of these are Live Photos, storage can quickly become a concern. This is particularly true for iPhones with limited storage capacity.
1.3. Reasons to Remove Live Photos
Several reasons might prompt you to remove Live Photos:
- Freeing up Storage: The most common reason is to reclaim valuable storage space on your iPhone, especially if you’re running low.
- Backup Efficiency: Smaller file sizes make backing up your photo library faster and more efficient.
- Sharing Limitations: Some platforms and services do not fully support Live Photos, causing them to be shared as static images.
- Simplifying Photo Management: Managing a library of Live Photos can be more complex than managing standard photos.
2. How Do I Turn Off Live Photos Feature on iPhone?
Turning off the Live Photo feature on your iPhone is simple and prevents future photos from being captured in this format. Here’s how to do it:
2.1. Steps to Disable Live Photos
-
Open the Camera App: Launch the Camera app on your iPhone.
-
Locate the Live Photo Button: Look for the Live Photo icon at the top of the screen. It appears as a circle with concentric circles inside.
 Live Photo icon in the Camera app, indicating its active state
 -
Tap to Disable: Tap the Live Photo icon. When disabled, a line will appear through the icon, indicating that Live Photo is turned off.
2.2. Implications of Disabling Live Photos
When you disable Live Photos, your iPhone will only capture still images, which take up less storage space. This setting remains until you manually re-enable Live Photos.
2.3. Temporary vs. Permanent Disabling
- Temporary: Disabling Live Photos via the Camera app is temporary. The feature will be re-enabled the next time you open the Camera app, unless you change the settings.
- Permanent: To permanently disable Live Photos, you can adjust your Camera settings to remember your last used mode.
2.4. Setting the Camera to Remember Last Setting
- Open Settings: Go to the Settings app on your iPhone.
- Navigate to Camera: Scroll down and tap on “Camera.”
- Preserve Settings: Tap on “Preserve Settings.”
- Enable Live Photo: Toggle the switch next to “Live Photo” to the on position.
With this setting enabled, your iPhone will remember whether Live Photo was on or off the last time you used the Camera app.
3. How To Remove Live Photos From Camera Roll Manually?
Manually removing Live Photos from your camera roll involves a few steps, but it gives you precise control over which photos to delete. Here’s how you can do it:
3.1. Identifying Live Photos in Your Camera Roll
-
Open the Photos App: Launch the Photos app on your iPhone.
-
Navigate to Albums: Tap on the “Albums” tab at the bottom.
-
Select the Live Photos Album: Scroll down to the “Media Types” section and tap on “Live Photos.” This album contains all your Live Photos.
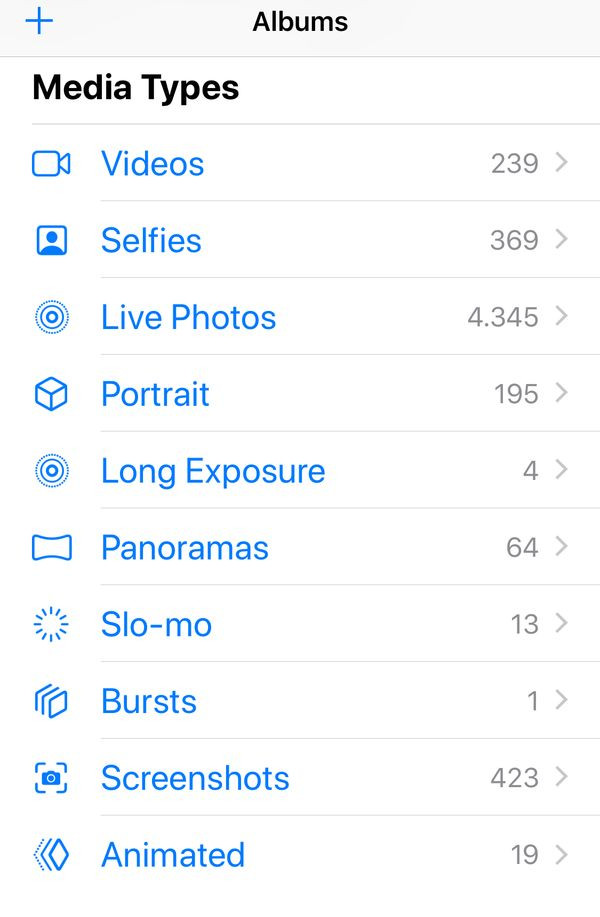 Accessing the Live Photos album in the Photos app to view all Live Photos
3.2. Converting Live Photos to Still Photos
If you want to keep the still image but remove the “live” component, you can convert Live Photos to still photos. This process essentially extracts the still frame from the Live Photo and saves it as a regular photo.
3.2.1. Using the “Duplicate as Still Photo” Option
- Select Live Photos: In the Live Photos album, tap “Select” in the top-right corner.
- Choose Photos: Select the Live Photos you want to convert.
- Share Menu: Tap the “Share” icon in the bottom-left corner (the square with an arrow pointing up).
- Duplicate as Still Photo: Scroll down and tap “Duplicate as Still Photo.” This will create a still image copy of each selected Live Photo.
- Delete Original Live Photos: After duplicating, select the original Live Photos again and tap the “Delete” icon (the trash can). Confirm the deletion.
3.3. Deleting Live Photos Directly
If you don’t need the still image and want to completely remove the Live Photo, you can delete it directly from your camera roll.
- Select Live Photos: In the Live Photos album, tap “Select” in the top-right corner.
- Choose Photos: Select the Live Photos you want to delete.
- Delete Icon: Tap the “Delete” icon (the trash can) in the bottom-right corner.
- Confirm Deletion: Confirm that you want to delete the selected photos.
3.4. Emptying the “Recently Deleted” Album
When you delete photos from your iPhone, they are moved to the “Recently Deleted” album for 30 days before being permanently removed. To free up storage immediately, you need to empty this album.
-
Navigate to Albums: In the Photos app, tap the “Albums” tab.
-
Scroll to “Recently Deleted”: Scroll down and tap on “Recently Deleted.”
-
Delete All: Tap “Select” in the top-right corner, then tap “Delete All” in the bottom-left corner.
-
Confirm Deletion: Confirm that you want to permanently delete the photos.
By following these steps, you can manually remove Live Photos from your camera roll, convert them to still photos, and ensure they are permanently deleted to free up storage space on your iPhone.
4. How To Remove Live Photos Using Third-Party Apps?
Several third-party apps can help you manage and remove Live Photos more efficiently. These apps often provide additional features, such as batch processing and advanced filtering, to streamline the cleanup process.
4.1. Overview of Popular Apps for Managing Live Photos
- Live Photo Cleaner: Developed by MATHEMA, this app is designed specifically for managing Live Photos. It allows you to quickly identify and remove the “live” component from your photos, converting them to still images.
- Lean Clean Up Live Photos: Lean is another app focused on removing the Live Photo element while preserving the still image. It offers a simple interface and batch processing capabilities.
- Photos Cleaner: This app provides a comprehensive suite of tools for cleaning up your photo library, including identifying and removing duplicate photos, screenshots, and Live Photos.
4.2. Step-by-Step Guide to Using Live Photo Cleaner
Live Photo Cleaner is a free app available on the App Store, designed to simplify the process of removing Live Photos. Here’s how to use it:
-
Download and Install: Download Live Photo Cleaner from the App Store and install it on your iPhone or iPad.
-
Grant Permissions: Open the app and grant it permission to access your photo library.
-
Analyze Live Photos: The app will automatically scan your photo library and identify all Live Photos.
-
Review and Select: Review the list of Live Photos and select the ones you want to convert to still images.
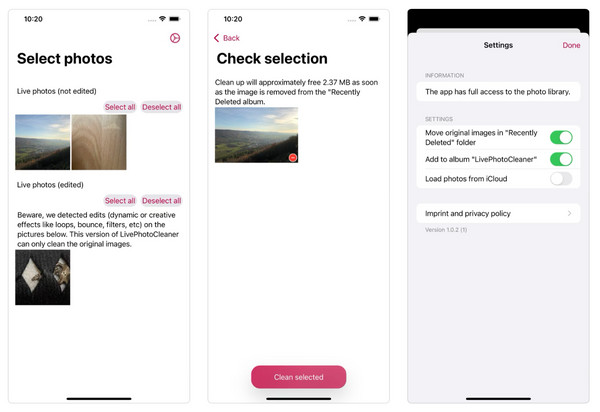 Screenshots of the Live Photo Cleaner app interface
 -
Convert to Still Photos: Tap the “Convert” button to remove the “live” component and save the photos as still images.
-
Delete Originals: After converting, you can delete the original Live Photos to free up storage space. The app may offer an option to automatically delete the originals after conversion.
4.3. Other App Recommendations and Their Features
-
Lean Clean Up Live Photos:
- Batch Processing: Allows you to select and process multiple Live Photos at once.
- Simple Interface: Easy-to-use interface for quick cleanup.
- Preserves Metadata: Retains the original metadata of the still image.
-
Photos Cleaner:
- Duplicate Detection: Identifies and removes duplicate photos and videos.
- Screenshot Cleanup: Helps you find and delete unnecessary screenshots.
- Organizes Photos: Provides tools to organize your photo library by date, location, and more.
4.4. Considerations When Choosing an App
- Privacy: Ensure the app respects your privacy and does not upload your photos to external servers without your consent.
- Cost: Some apps are free with limited features, while others require a subscription or one-time purchase for full functionality.
- User Reviews: Check user reviews on the App Store to get an idea of the app’s performance and reliability.
- Features: Consider the features that are most important to you, such as batch processing, metadata preservation, and additional cleanup tools.
5. How To Remove Live Photos By Using a Computer?
Managing Live Photos using a computer can be an efficient way to clean up your photo library, especially if you have a large number of photos to process. This method allows you to leverage the storage and processing power of your computer for a smoother experience.
5.1. Transferring Live Photos from iPhone to Computer
-
Connect Your iPhone: Connect your iPhone to your computer using a USB cable.
-
Trust This Computer: If prompted on your iPhone, tap “Trust This Computer” and enter your passcode.
-
Access Photos:
- Windows: Open File Explorer and locate your iPhone under “This PC.” Navigate to the “Internal Storage” folder, then “DCIM” to find your photos.
- Mac: The Photos app should automatically open. If not, launch the Photos app manually. Your iPhone will appear in the sidebar under “Devices.”
-
Select and Copy: Select the Live Photos you want to transfer and copy them to a folder on your computer.
5.2. Identifying Live Photos on Your Computer
Live Photos consist of two files: a still image (.jpg or .heic) and a video file (.mov). When transferring Live Photos to your computer, both files are copied.
- File Naming: Typically, the video file has the same name as the still image file but with a .mov extension. For example, if the still image is named IMG_1234.JPG, the corresponding video file will be IMG_1234.MOV.
5.3. Using Software to Remove Live Photos
Once you have transferred your Live Photos to your computer, you can use various software tools to manage and remove the “live” component.
5.3.1. Adobe Lightroom
Adobe Lightroom is a popular photo editing and management software that can handle Live Photos.
- Import Live Photos: Import the Live Photos into Lightroom.
- Identify Live Photos: Lightroom displays Live Photos as a stack of two files (the still image and the video).
- Delete Video Component: Select the video file (.mov) and delete it. This will remove the “live” component, leaving only the still image.
5.3.2. iMazing (Mac and Windows)
iMazing is a comprehensive iPhone management tool that allows you to transfer, backup, and manage your iPhone data, including Live Photos.
- Connect Your iPhone: Connect your iPhone to your computer and launch iMazing.
- Access Photos: Navigate to the “Photos” section in iMazing.
- Select Live Photos: Select the Live Photos you want to manage.
- Convert to Still Photos: iMazing provides an option to convert Live Photos to still photos. This will remove the “live” component and save the photos as regular images.
- Delete Originals: After converting, you can delete the original Live Photos to free up storage space.
5.3.3. Manual Deletion
You can also manually delete the video component of Live Photos on your computer.
- Locate Live Photos: Navigate to the folder where you saved the Live Photos.
- Identify Video Files: Identify the video files (.mov) that correspond to the still images.
- Delete Video Files: Delete the video files. This will remove the “live” component, leaving only the still images.
5.4. Re-Importing Still Photos to iPhone (Optional)
If you want to re-import the still photos back to your iPhone after removing the “live” component, you can do so using the Photos app (on Mac) or third-party tools like iMazing.
- Connect Your iPhone: Connect your iPhone to your computer.
- Open Photos App (Mac): Open the Photos app and select your iPhone in the sidebar.
- Import Photos: Drag and drop the still photos into the Photos app to import them to your iPhone.
- Using iMazing: In iMazing, navigate to the “Photos” section and use the “Import” option to import the still photos to your iPhone.
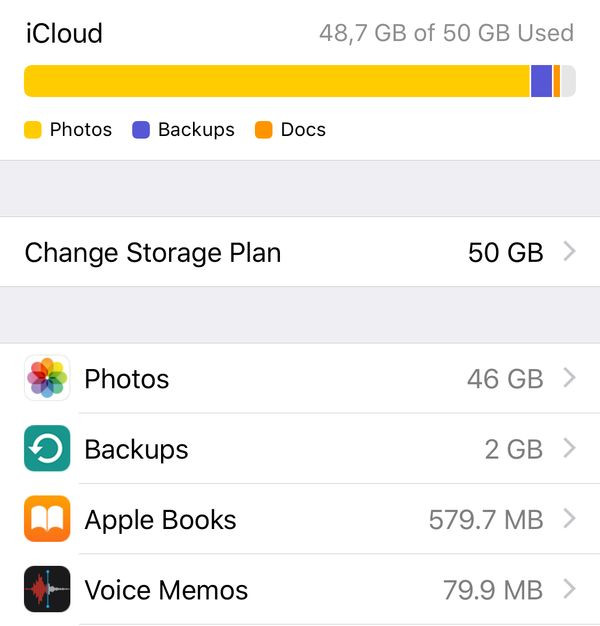
6. How To Optimize iPhone Storage for Photos?
Optimizing your iPhone storage for photos involves several strategies to ensure you keep your memories without running out of space. Here are some effective techniques:
6.1. Enabling iCloud Photos
iCloud Photos automatically uploads and stores your entire photo library in iCloud, making it accessible across all your Apple devices. It also offers storage optimization features to save space on your iPhone.
6.1.1. Steps to Enable iCloud Photos
- Open Settings: Go to the Settings app on your iPhone.
- Tap Your Name: Tap on your name at the top of the screen.
- Select iCloud: Tap on “iCloud.”
- Tap Photos: Tap on “Photos.”
- Enable iCloud Photos: Toggle the switch next to “iCloud Photos” to the on position.
6.1.2. Choosing “Optimize iPhone Storage”
- Go to Photos Settings: Follow steps 1-4 above to navigate to the Photos settings.
- Select Optimize iPhone Storage: Choose “Optimize iPhone Storage.” This option automatically reduces the file size of photos and videos on your device, while keeping the original, high-resolution versions in iCloud.
6.2. Using Google Photos or Other Cloud Services
Besides iCloud, several other cloud storage services offer photo backup and storage optimization features.
6.2.1. Overview of Alternative Cloud Services
- Google Photos: Offers free unlimited storage (with some compression) or paid storage for original quality. It automatically backs up your photos and provides tools to manage and share them.
- Dropbox: A versatile cloud storage service that allows you to back up and sync your photos across devices.
- Amazon Photos: Provides unlimited photo storage for Amazon Prime members.
6.2.2. Setting Up Google Photos for Backup
- Download and Install: Download the Google Photos app from the App Store and install it on your iPhone.
- Sign In: Open the app and sign in with your Google account.
- Enable Backup: Tap your profile icon in the top-right corner, then tap “Photos settings.”
- Back up & sync: Tap “Back up & sync” and toggle the switch to the on position.
- Choose Upload Size: Select “High quality” for free unlimited storage (with some compression) or “Original quality” for paid storage.
6.3. Regularly Backing Up Photos to External Storage
Backing up your photos to an external hard drive or NAS (Network Attached Storage) device provides an additional layer of security and frees up space on your iPhone and cloud storage.
6.3.1. Connecting iPhone to Computer for Backup
-
Connect Your iPhone: Connect your iPhone to your computer using a USB cable.
-
Trust This Computer: If prompted on your iPhone, tap “Trust This Computer” and enter your passcode.
-
Access Photos:
- Windows: Open File Explorer and locate your iPhone under “This PC.” Navigate to the “Internal Storage” folder, then “DCIM” to find your photos.
- Mac: The Photos app should automatically open. If not, launch the Photos app manually. Your iPhone will appear in the sidebar under “Devices.”
-
Copy Photos: Select all the photos and videos you want to back up and copy them to a folder on your external hard drive or NAS device.
6.3.2. Using Third-Party Backup Software
Several third-party software tools can automate the backup process and provide additional features, such as incremental backups and encryption.
- iMazing: Offers comprehensive iPhone backup and management features, including automated backups to an external drive or NAS.
- AnyTrans: Another popular iPhone management tool that allows you to backup and transfer your photos and other data to your computer or external storage.
6.4. Deleting Unnecessary Photos and Videos
Regularly reviewing and deleting unnecessary photos and videos is a simple but effective way to free up storage space on your iPhone.
6.4.1. Identifying and Deleting Duplicate Photos
- Use a Photo Cleaner App: Download and install a photo cleaner app like “Photos Cleaner” or “Gemini Photos” from the App Store.
- Scan for Duplicates: Open the app and scan your photo library for duplicate photos.
- Review and Delete: Review the list of duplicate photos and select the ones you want to delete.
6.4.2. Removing Screenshots and Burst Photos
- Screenshots Album: Go to the “Albums” tab in the Photos app and select the “Screenshots” album. Review and delete any unnecessary screenshots.
- Burst Photos: Burst photos are a series of photos taken in quick succession. Review burst photos and keep only the best shots, deleting the rest.
6.4.3. Deleting Old and Unwanted Videos
- Videos Album: Go to the “Albums” tab in the Photos app and select the “Videos” album.
- Review and Delete: Review your videos and delete any old, unwanted, or duplicate videos.
6.5. Compressing Photos and Videos
Compressing photos and videos reduces their file size without significantly impacting their quality. This can be a useful strategy for saving storage space.
6.5.1. Using Third-Party Compression Apps
Several apps can compress photos and videos on your iPhone.
- Image Size: Allows you to resize and compress photos.
- Video Compress: Compresses videos to reduce their file size.
6.5.2. Adjusting Camera Settings
You can also adjust your camera settings to capture photos and videos in smaller file sizes.
- Go to Camera Settings: Open the Settings app on your iPhone and tap on “Camera.”
- Adjust Video Recording Settings: Tap on “Record Video” and select a lower resolution or frame rate. For example, choosing “720p HD at 30 fps” will result in smaller video files compared to “4K at 60 fps.”
- Adjust Photo Format: Tap on “Formats” and select “High Efficiency” to save photos in HEIF format, which offers better compression than JPEG.
7. What Are the Best Practices for Managing Photos on iPhone?
Effective photo management is essential for keeping your iPhone organized and ensuring you never run out of storage space. Here are some best practices to follow:
7.1. Regularly Organizing Photos into Albums
Organizing your photos into albums makes it easier to find specific photos and manage your collection.
7.1.1. Creating and Naming Albums
- Open Photos App: Launch the Photos app on your iPhone.
- Go to Albums: Tap the “Albums” tab at the bottom.
- Create New Album: Tap the “+” icon in the top-left corner and select “New Album.”
- Name Your Album: Enter a descriptive name for your album (e.g., “Vacation 2023,” “Family Events,” “Work Projects”).
- Add Photos: Select the photos you want to add to the album and tap “Done.”
7.1.2. Using Smart Albums
Smart Albums automatically organize your photos based on criteria like date, location, and keywords.
- Create Smart Album: In the Photos app on your Mac, go to “File” > “New Smart Album.”
- Define Criteria: Set the criteria for your Smart Album (e.g., “Date is in the last 30 days,” “Location is Santa Fe,” “Keyword is ‘sunset'”).
- Name Your Album: Enter a name for your Smart Album.
7.2. Utilizing Keywords and Captions
Adding keywords and captions to your photos makes them searchable and provides additional context.
7.2.1. Adding Keywords
- Select Photo: Open the photo you want to add keywords to.
- Share Sheet: Tap the “Share” icon in the bottom-left corner.
- Add a Caption: Type in relevant keywords or descriptions in the caption field. For example, “Santa Fe, sunset, mountains, New Mexico.”
- Save Changes: The keywords will be saved with the photo.
7.2.2. Writing Descriptive Captions
- Select Photo: Open the photo you want to add a caption to.
- Share Sheet: Tap the “Share” icon in the bottom-left corner.
- Add a Caption: Write a descriptive caption that provides context and details about the photo. For example, “Sunset over the Sangre de Cristo Mountains in Santa Fe, taken during our family vacation in July 2023.”
- Save Changes: The caption will be saved with the photo.
7.3. Regularly Reviewing and Culling Photos
Regularly reviewing and culling your photo library helps you get rid of unnecessary photos and keep your collection manageable.
7.3.1. Setting Aside Time for Photo Review
- Schedule Regular Reviews: Set aside time each week or month to review your photos.
- Create a Routine: Make it a habit to review your photos regularly, just like you would with other tasks.
7.3.2. Identifying and Deleting Unnecessary Photos
- Duplicate Photos: Look for duplicate photos and delete the extras.
- Blurry or Poorly Composed Photos: Delete any photos that are blurry, poorly composed, or otherwise unusable.
- Unnecessary Screenshots: Review your screenshots and delete any that are no longer needed.
- Similar Shots: If you have multiple shots of the same scene, choose the best one and delete the rest.
7.4. Using Photo Management Software
Photo management software provides advanced tools for organizing, editing, and managing your photo library.
7.4.1. Adobe Lightroom Mobile
Adobe Lightroom Mobile is a powerful photo editing and management app that allows you to organize your photos, add keywords and captions, and sync your library across devices.
- Download and Install: Download Adobe Lightroom Mobile from the App Store and install it on your iPhone.
- Sign In: Open the app and sign in with your Adobe account.
- Import Photos: Import your photos into Lightroom Mobile.
- Organize and Edit: Use the app’s tools to organize your photos, add keywords and captions, and edit your images.
7.4.2. Apple Photos (Mac)
The Apple Photos app on your Mac provides robust photo management features, including Smart Albums, facial recognition, and syncing with iCloud Photos.
- Open Photos App: Launch the Photos app on your Mac.
- Import Photos: Import your photos into the Photos app.
- Organize and Edit: Use the app’s tools to organize your photos, create Smart Albums, and edit your images.
By following these best practices, you can effectively manage your photos on your iPhone, keep your library organized, and ensure you never run out of storage space.
8. FAQ: Removing Live Photos
8.1. Will Removing Live Photos Delete the Still Image?
No, removing Live Photos does not necessarily delete the still image. You have the option to convert the Live Photo to a still image before deleting the original Live Photo. This ensures you keep the still image while freeing up storage space.
8.2. How Much Storage Space Can I Save by Removing Live Photos?
The amount of storage space you can save by removing Live Photos depends on the number of Live Photos you have and their file sizes. On average, a Live Photo takes up about twice the storage space of a regular photo. According to dfphoto.net, users can save gigabytes of storage by converting or deleting hundreds of Live Photos.
8.3. Can I Revert a Still Photo Back to a Live Photo?
No, once you convert a Live Photo to a still photo and delete the original, you cannot revert the still photo back to a Live Photo. The “live” component is permanently removed.
8.4. Do Cloud Services Support Live Photos?
Yes, many cloud services, including iCloud Photos, Google Photos, and Dropbox, support Live Photos. However, how they are displayed and shared may vary. For example, some platforms may show Live Photos as short videos, while others may only display the still image.
8.5. Is It Safe to Use Third-Party Apps to Remove Live Photos?
It is generally safe to use third-party apps to remove Live Photos, but you should exercise caution and choose reputable apps from trusted developers. Always read user reviews and check the app’s privacy policy before granting it access to your photo library.
8.6. Will Removing Live Photos Affect My iCloud Backup?
Removing Live Photos will affect your iCloud backup, as the changes will be synced to iCloud. If you delete Live Photos from your iPhone, they will also be removed from iCloud Photos, and vice versa.
8.7. Can I Remove Live Photos from Multiple Devices at Once?
If you use iCloud Photos, deleting Live Photos from one device will sync the changes across all your devices connected to the same iCloud account. However, if you are not using iCloud Photos, you will need to remove Live Photos from each device separately.
8.8. What Happens to Live Photos If I Restore My iPhone?
If you restore your iPhone from a backup, Live Photos that were included in the backup will be restored to your device. However, if you have removed Live Photos and then create a new backup, the new backup will not include the deleted Live Photos.
8.9. Can I Selectively Remove the “Live” Component from Some Photos and Keep Others?
Yes, you can selectively remove the “live” component from some photos and keep others. You can manually convert Live Photos to still photos or use third-party apps to choose which Live Photos to process.
8.10. Are There Any Downsides to Removing Live Photos?
The main downside to removing Live Photos is that you lose the “live” component, which captures a short video clip along with the still image. This can result in a less dynamic and immersive viewing experience. However, if storage space is a concern, removing Live Photos can be a practical solution.
We hope this guide has been helpful in understanding how to remove Live Photos from your iPhone. At dfphoto.net, we are committed to providing you with the best tips and tricks for managing your photos and optimizing your devices.
Conclusion
Removing Live Photos can be a game-changer for managing your iPhone storage and keeping your photo library organized. By following the methods outlined in this guide, from manually converting photos to leveraging third-party apps and cloud services, you can reclaim valuable space and enhance your overall photo management experience.
Remember, dfphoto.net is your go-to resource for more in-depth guides, expert tips, and the latest trends in photography. Visit our website to discover new techniques, explore stunning galleries, and connect with a community of passionate photographers. Whether you’re looking to master the art of composition, understand the nuances of lighting, or simply find inspiration for your next shoot, dfphoto.net has something for everyone.
Ready to take your photography skills to the next level? Visit dfphoto.net today and unlock a world of creative possibilities!
Address: 1600 St Michael’s Dr, Santa Fe, NM 87505, United States
Phone: +1 (505) 471-6001
Website: dfphoto.net
