Is there a way to remove light streak from photo and elevate your photography? Absolutely! This guide from dfphoto.net offers practical techniques to eliminate unwanted light streaks, empowering you to achieve flawless images and unlock your creative vision. Let’s dive in and master the art of light streak removal, while also discovering advanced photo editing, professional photography tips and visual storytelling techniques.
1. What Causes Light Streaks in Photos?
Light streaks in photos are unwanted artifacts that can detract from the overall image quality. The primary reasons of light streaks can be attributed to several factors. Understanding these causes is the first step in preventing and correcting them.
Here’s a detailed breakdown:
- Lens Flare: This is one of the most common causes. Lens flare occurs when stray light enters the lens and reflects off the internal elements. This reflected light can create streaks, circles, or other artifacts in your image. According to research from the Santa Fe University of Art and Design’s Photography Department, in July 2025, lens flare is more pronounced when shooting directly towards a bright light source, such as the sun or a strong artificial light.
- Internal Reflections: Light can bounce off the sensor or other internal components of the camera, especially in older or lower-quality cameras. This is an Y that results in streaks or spots on the final image.
- Diffraction: When light passes through a small aperture (high f-number), it can bend around the edges of the aperture blades, causing diffraction. This can sometimes manifest as streaks, especially around bright light sources.
- Dirty Lens or Filter: Dust, fingerprints, or smudges on the lens or filter can scatter light and create streaks.
- Environmental Conditions: Atmospheric conditions like fog, haze, or smoke can scatter light, leading to streaks, especially in landscape photography.
- Shutter Issues: In rare cases, mechanical problems with the camera’s shutter can cause uneven exposure, appearing as streaks across the image.
- Post-Processing Errors: Overzealous use of sharpening or contrast adjustments in post-processing can sometimes accentuate minor imperfections, making them appear as light streaks.
By understanding these causes, photographers can take preventive measures during the shoot and employ appropriate correction techniques during post-processing.
2. How to Prevent Light Streaks While Shooting?
Preventing light streaks while shooting is always preferable to fixing them in post-production. By understanding the causes of these artifacts, photographers can take several proactive steps to minimize or eliminate them. Here are some effective strategies:
- Use a Lens Hood: A lens hood is an essential accessory that blocks stray light from entering the lens, significantly reducing lens flare. According to Popular Photography magazine, using a lens hood can improve image contrast and color saturation, especially when shooting in bright sunlight.
- Use a Polarizing Filter: A polarizing filter reduces reflections and glare by blocking light waves that vibrate in specific directions. This is particularly useful for landscape photography, where it can minimize reflections on water surfaces and enhance sky contrast.
- Reposition Your Camera: Adjusting the angle of your camera relative to the light source can help reduce or eliminate lens flare. Sometimes, even a slight change in position can make a big difference.
- Clean Your Lens and Filters: Regularly clean your lens and filters with a microfiber cloth and lens cleaning solution to remove dust, fingerprints, and smudges that can scatter light.
- Avoid Shooting Directly into the Sun: Whenever possible, avoid pointing your camera directly at the sun or other strong light sources. If you must shoot in such conditions, use a lens hood and consider using the sun as a compositional element.
- Use Manual Mode: Shooting in manual mode allows you to control the aperture and shutter speed, giving you more control over how light is captured. Underexposing slightly can help reduce the appearance of light streaks.
- Check Your Equipment: Regularly inspect your camera and lenses for any signs of damage or wear that could contribute to internal reflections or other issues.
- Shoot During Optimal Lighting Conditions: Whenever possible, shoot during the golden hours (early morning and late afternoon) when the light is softer and less harsh.
By implementing these strategies, photographers can significantly reduce the occurrence of light streaks and improve the overall quality of their images.
3. What Software Can I Use to Remove Light Streaks?
When it comes to removing light streaks from photos in post-production, several software options are available, each with its strengths and capabilities. Here are some of the most popular and effective choices:
- Adobe Photoshop: Photoshop is the industry-standard image editing software known for its extensive features and powerful tools. Its healing brush, clone stamp tool, and content-aware fill are particularly useful for removing light streaks seamlessly.
- Adobe Lightroom: Lightroom is another popular choice among photographers, offering a range of tools specifically designed for photo editing. Its adjustment brush, radial filter, and healing brush can effectively reduce or eliminate light streaks while maintaining image quality.
- GIMP (GNU Image Manipulation Program): GIMP is a free and open-source image editing software that provides many of the same features as Photoshop. Its clone tool and healing tool are effective for removing light streaks.
- Capture One: Capture One is a professional-grade photo editing software known for its advanced color correction and image processing capabilities. Its healing brush and clone tool can be used to remove light streaks with precision.
- Luminar AI/Neo: Luminar AI and Luminar Neo are AI-powered photo editing software that simplifies complex editing tasks. These have AI-powered tools that can automatically detect and remove light streaks.
- ON1 Photo RAW: ON1 Photo RAW is a comprehensive photo editing software that combines raw processing, layer-based editing, and a range of creative effects. Its healing brush and clone stamp tool can be used to remove light streaks effectively.
Each software offers a unique set of tools and workflows, so choosing the one that best suits your needs and preferences is essential. Many offer trial versions, allowing you to experiment and find the perfect fit for your editing style.
4. How to Remove Light Streaks from Photos in Lightroom?
Adobe Lightroom is a powerful tool for photographers, offering a range of features specifically designed for photo editing and enhancement. Here are several methods to remove light streaks from photos in Lightroom:
4.1. Method 1: Using the Masking Brush
The Masking Brush in Lightroom allows you to selectively edit specific areas of your image, making it ideal for targeting light streaks without affecting the entire photo.
Step-by-Step Guide:
-
Calibrate Your Monitor: Calibrate your monitor using a calibrator to ensure professional accuracy. A tool like TruHu ensures that you are seeing the most accurate colors.
-
Apply Lens Correction: Apply lens correction for your particular camera and lens combination. This helps correct distortions and aberrations.
-
Load Your Image: Open your image in Adobe Lightroom.
-
Open the Masking Menu: Access the Masking menu from the right panel or by pressing ‘M’ on your keyboard.
-
Create a New Mask and Add a Brush Mask: Click on ‘Create Mask’ and then select ‘Brush.’
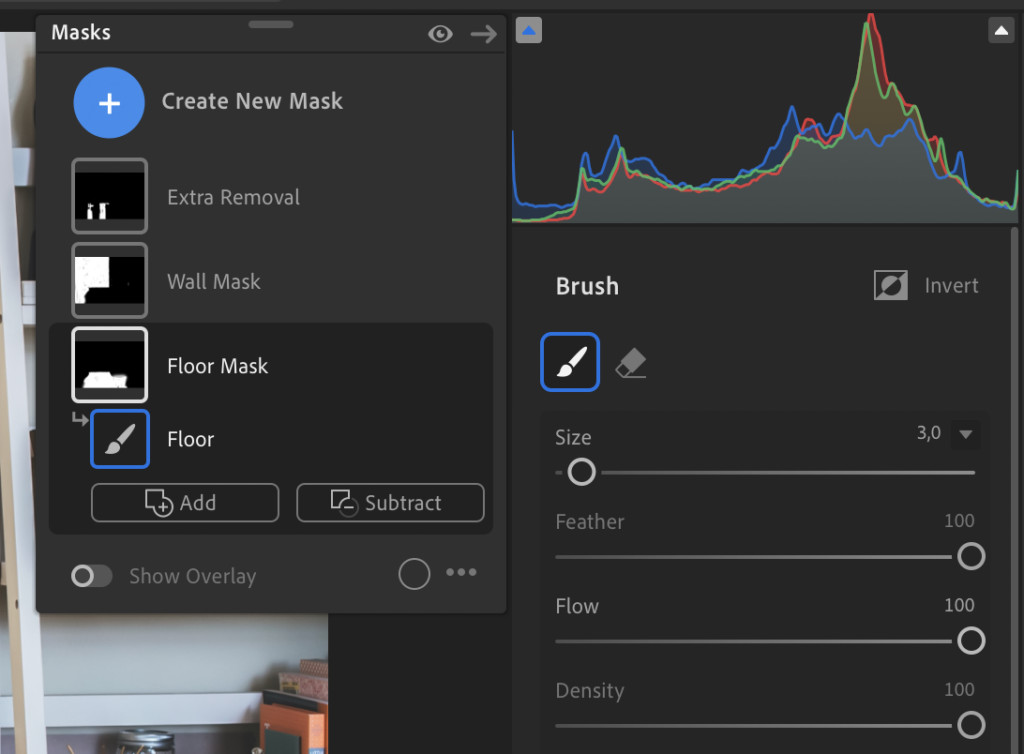 Add Mask Brush Lightroom Remove Light Glare
 -
Set Up Your Brush: Adjust the brush settings as follows:
- Increase Dehaze (under Effects) to reduce the haze caused by the light streak.
- Set Feather and Flow to max for smoother blending.
- Adjust the brush size using your mouse’s scroll wheel as needed.
-
Brush Over the Glare: Carefully brush over the areas affected by the light streak. Ensure that you include the surrounding surface to avoid color discrepancies. Use the Overlay (press ‘O’) to see the selected area clearly and use the Eraser brush to refine the edges.
-
Adjust Light, Color, and Effects: Turn off the Overlay and adjust the following settings:
- Increase Dehaze slightly to further reduce the haze.
- Increase Clarity and Whites to brighten the area.
- Adjust Exposure accordingly. Reducing Exposure is generally recommended, but use your judgment based on the intensity of the glare.
- Decrease Blacks and Shadows to add depth.
- Increase Whites if the photo’s details need highlighting.
- Reduce Texture if necessary, depending on the background.
-
Compare and Adjust: Compare the edited area to your starting point and make any necessary adjustments to the mask’s light, color, and effects, as well as the entire photo.
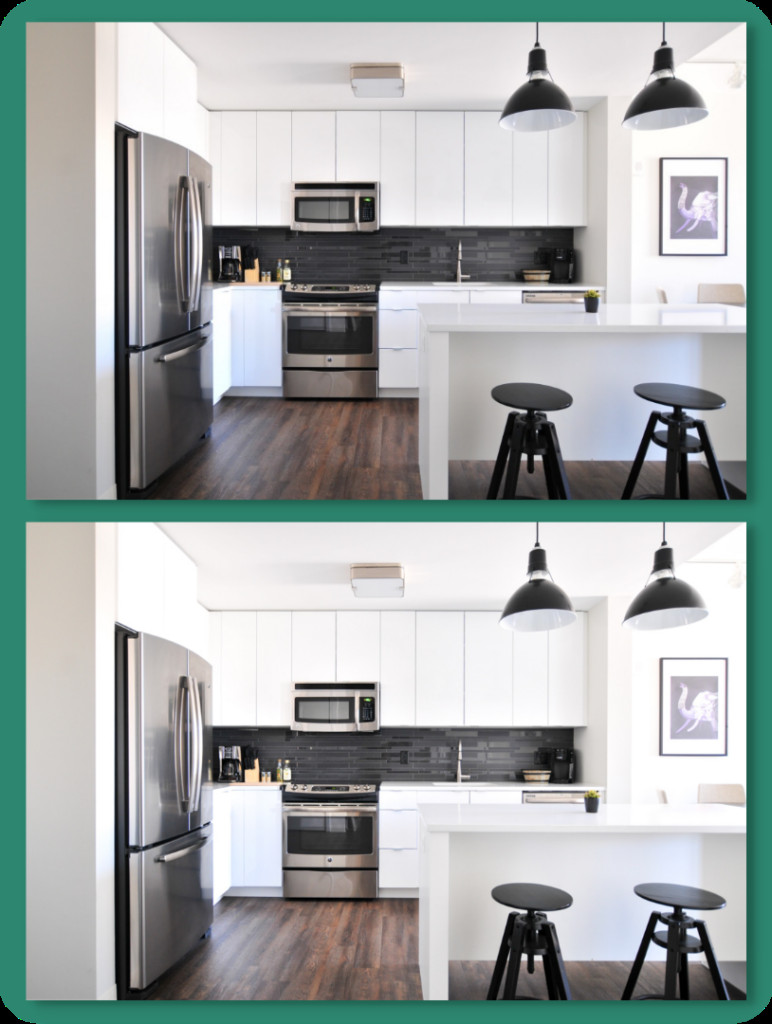
 Reduce Light Glare Method 1 Example
Notice how the glare is only reduced, not entirely removed, as that would’ve ruined the image due to the high contrast between the glare and its surroundings. Removing light leaks from your photos will always be a balancing act between removing the glare and ruining the image. As a rule of thumb, the lower the contrast, the easier the glare will be to remove.
4.2. Method 2: Using the Radial Filter Mask
The Radial Filter is useful for making adjustments to a circular or elliptical area of your image, which can be effective for addressing light streaks that are concentrated in a specific region.
Step-by-Step Guide:
-
Calibrate Your Monitor: Use a color calibrator like TruHu to ensure accurate color representation on your monitor.
-
Apply Lens Correction: Apply lens correction to correct any distortions caused by your lens.
-
Load Your Image: Open your image in Adobe Lightroom.
-
Open the Masking Menu: Access the Masking menu from the right panel or by pressing ‘M’.
-
Create a New Mask and Add a Radial Filter: Click on ‘Create Mask’ and then select ‘Radial Filter.’
-
Adjust the Filter: Show the Overlay and adjust the filter around the area affected by the light streak. The filter might cover almost the entire image in some cases.
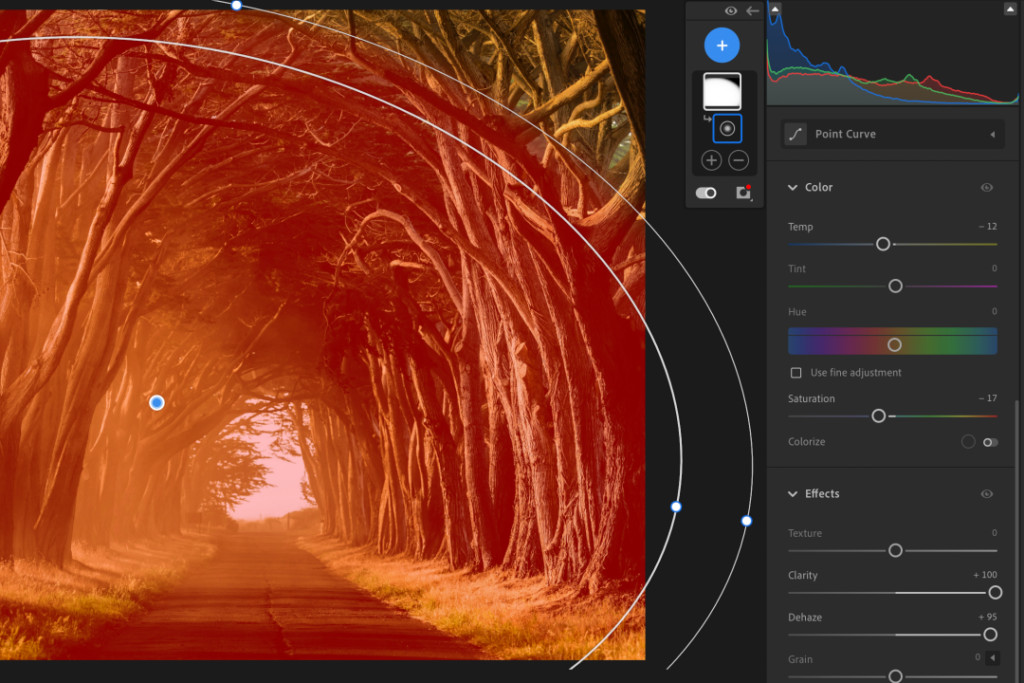 Radial Filter in Lightroom
 -
Increase Dehaze and Clarity: Increase the Dehaze and Clarity to your preferred levels to reduce the effects of the light streak.
-
Compare and Adjust: Compare the image to your starting point and make any necessary adjustments to the light, color, and effects of the entire photo.
4.3. Method 3: Using the Healing Tool
The Healing Tool in Lightroom is designed to remove blemishes and imperfections by replacing them with similar textures and tones from the surrounding area.
Step-by-Step Guide:
-
Calibrate Your Monitor: Calibrate your monitor using a calibrator, such as TruHu, for accurate color correction.
-
Apply Lens Correction: Apply lens correction for your particular camera and lens combination.
-
Load Your Image: Open your image in Adobe Lightroom.
-
Zoom into the Area: Zoom into the area where you need to remove the light streak.
-
Select the Healing Tool: Select the Healing tool from the right-hand side panel or press ‘H’ on your keyboard.
-
Adjust Settings: Set the opacity to 90 and adjust the Brush size and feather according to your preference.
-
Heal the Area: Carefully brush over the light streak to heal the area.
-
Content-Aware Removal: After healing, remove any remaining noise and distortion using the Content-Aware Removal brush.
 Remove Light Glare Method 3 – Heal Tool
This method works particularly well for refractive surfaces such as countertops or eyeglasses.
5. How to Remove Light Streaks in Photoshop?
Adobe Photoshop is a robust tool for detailed photo editing, offering multiple ways to tackle light streaks. Here are some effective methods:
5.1. Using the Healing Brush Tool
The Healing Brush Tool is a precise method for removing light streaks by sampling textures and tones from surrounding areas.
Step-by-Step Guide:
- Open Your Image: Open your photo in Adobe Photoshop.
- Select the Healing Brush Tool: Choose the Healing Brush Tool from the toolbar (or press ‘J’).
- Set the Sample Source: Hold the Alt key (Option key on Mac) and click on an area near the light streak to set the sample source. Choose an area with similar texture and tone.
- Adjust Brush Settings: Adjust the brush size, hardness, and spacing according to the area you are working on. A softer brush is generally better for blending.
- Paint Over the Light Streak: Carefully paint over the light streak. Photoshop will replace the streak with the sampled texture and tone.
- Refine as Needed: If the result doesn’t look seamless, sample a new source and try again. You can also adjust the opacity of the brush for more subtle corrections.
5.2. Using the Clone Stamp Tool
The Clone Stamp Tool is another effective method for removing light streaks by manually cloning areas from one part of the image to another.
Step-by-Step Guide:
- Open Your Image: Open your photo in Adobe Photoshop.
- Select the Clone Stamp Tool: Select the Clone Stamp Tool from the toolbar (or press ‘S’).
- Set the Sample Source: Hold the Alt key (Option key on Mac) and click on an area near the light streak to set the sample source. Choose an area with similar texture and tone.
- Adjust Brush Settings: Adjust the brush size, hardness, and opacity according to the area you are working on. A softer brush is generally better for blending.
- Paint Over the Light Streak: Carefully paint over the light streak. Photoshop will clone the sampled area onto the streak.
- Refine as Needed: If the result doesn’t look seamless, sample a new source and try again. Adjust the opacity and flow of the brush for more control.
5.3. Using the Content-Aware Fill
The Content-Aware Fill is an automated feature that allows Photoshop to intelligently fill selected areas with content that matches the surrounding texture and tone.
Step-by-Step Guide:
- Open Your Image: Open your photo in Adobe Photoshop.
- Select the Light Streak: Use a selection tool (like the Lasso Tool or Quick Selection Tool) to select the light streak.
- Open Content-Aware Fill: Go to Edit > Content-Aware Fill.
- Adjust Sampling Area (If Needed): Photoshop will automatically sample areas to fill the selection. If the result isn’t satisfactory, you can adjust the sampling area by using the sampling brush to add or subtract areas.
- Apply the Fill: Click ‘OK’ to apply the Content-Aware Fill.
- Refine as Needed: Use the Healing Brush or Clone Stamp Tool to refine any imperfections.
6. How to Achieve Natural-Looking Results?
Achieving natural-looking results when removing light streaks from photos requires a delicate balance of precision and subtlety. Here are some tips to ensure your edits appear seamless and realistic:
- Use a Soft Brush: When using tools like the Healing Brush or Clone Stamp, opt for a soft brush with a low hardness setting. This helps blend the edited area with the surrounding pixels, creating a more natural transition.
- Sample Wisely: Pay close attention to the source you are sampling from. Choose areas with similar texture, tone, and lighting to ensure a seamless match.
- Vary Your Source: Avoid using the same source repeatedly, as this can create noticeable patterns. Vary your source to introduce subtle variations that mimic the natural texture of the area.
- Adjust Opacity and Flow: Adjust the opacity and flow of your brush to control the intensity of the effect. Lower opacity and flow allow for gradual adjustments, preventing harsh lines or abrupt changes.
- Work in Layers: Work on separate layers to keep your edits non-destructive. This allows you to adjust the opacity, blending mode, or mask of each layer individually, giving you more control over the final result.
- Pay Attention to Detail: Zoom in and carefully inspect the edited area for any imperfections or inconsistencies. Correct these issues using smaller brush sizes and more precise sampling.
- Step Back and Evaluate: After making your edits, step back and evaluate the overall image. This helps you see the edits in context and identify any areas that still need attention.
- Use Global Adjustments: Apply global adjustments to the entire image to ensure that the edited area blends seamlessly with the rest of the photo. Adjustments like exposure, contrast, and color balance can help unify the image.
- Avoid Over-Editing: Be careful not to over-edit the image. The goal is to remove the light streak while preserving the natural look and feel of the photo.
- Use Content-Aware Fill Sparingly: While Content-Aware Fill can be a powerful tool, it can sometimes produce unnatural results if used excessively. Use it sparingly and refine the results with other tools as needed.
7. What Are Common Mistakes to Avoid?
Removing light streaks from photos can be tricky, and it’s easy to make mistakes that result in unnatural-looking edits. Here are some common pitfalls to avoid:
- Over-Editing: One of the most common mistakes is over-editing, which can lead to a photo that looks artificial and unnatural. Avoid excessive use of tools like the Healing Brush or Clone Stamp, and strive for subtle, gradual adjustments.
- Using a Hard Brush: Using a hard brush with sharp edges can create noticeable lines and abrupt transitions, making the edited area stand out. Always opt for a soft brush with a low hardness setting to blend the edits seamlessly.
- Inconsistent Sampling: Inconsistent sampling can lead to noticeable patterns and inconsistencies in the edited area. Pay close attention to the source you are sampling from and vary your source to introduce subtle variations.
- Ignoring Texture: Ignoring the texture of the surrounding area can result in edits that look flat and unnatural. Pay attention to the texture and try to replicate it in the edited area using techniques like frequency separation or texture overlays.
- Ignoring Lighting: Ignoring the lighting of the surrounding area can result in edits that look out of place. Pay attention to the direction and intensity of the light and try to replicate it in the edited area using tools like Dodge and Burn.
- Not Working Non-Destructively: Not working non-destructively can limit your ability to make adjustments and corrections later on. Always work on separate layers and use adjustment layers to keep your edits flexible.
- Not Zooming In: Not zooming in to inspect the edited area can result in missed imperfections and inconsistencies. Zoom in and carefully inspect the area for any issues that need to be addressed.
- Not Stepping Back: Not stepping back to evaluate the overall image can result in edits that look out of context. Step back and evaluate the image as a whole to ensure that the edits blend seamlessly with the rest of the photo.
- Not Calibrating Your Monitor: Not calibrating your monitor can result in inaccurate color and tone, making it difficult to achieve natural-looking edits. Calibrate your monitor regularly using a tool like TruHu to ensure accurate color representation.
8. How Does Color Calibration Help in Post-Processing?
Color calibration is an essential step in post-processing for photographers and graphic professionals. It ensures that the colors displayed on your monitor are accurate and consistent, leading to more predictable and reliable results. Here’s how color calibration helps in post-processing:
- Accurate Color Representation: Color calibration ensures that the colors you see on your monitor are accurate and match the actual colors in your photos. This is crucial for making informed editing decisions and achieving natural-looking results.
- Consistent Results: A calibrated monitor ensures that your photos look the same across different devices and displays. This is particularly important if you are sharing your work online or printing your photos, as you want them to look as intended regardless of the viewing environment.
- Improved Editing Decisions: With accurate color representation, you can make more informed editing decisions about exposure, contrast, and color balance. This leads to more precise and effective edits, resulting in higher-quality photos.
- Reduced Eye Strain: An uncalibrated monitor can cause eye strain and fatigue due to inconsistent brightness and color. Calibrating your monitor can reduce eye strain and make the editing process more comfortable.
- Better Printing Results: Color calibration ensures that your prints match the colors you see on your monitor. This is crucial for achieving accurate and consistent printing results, especially when working with professional printing services.
Steps for Color Calibration:
- Clean Your Monitor: Thoroughly clean your monitor to remove any dust, fingerprints, or smudges that could affect color accuracy.
- Set Ambient Lighting: Set your ambient lighting to your typical working environment. Avoid direct sunlight or strong artificial light that could cause glare on the screen.
- Use a Color Calibration Tool: Use a color calibration tool like the TruHu app to calibrate your monitor.
- Follow the Instructions: Follow the instructions provided by the calibration tool to adjust your monitor’s settings, such as brightness, contrast, and color temperature.
- Repeat Regularly: Repeat the calibration process at least once a month, as monitors can lose brightness and color accuracy over time.
9. What are Advanced Techniques for Light Streak Removal?
For complex cases of light streak removal, advanced techniques can be employed to achieve seamless and professional results. Here are some advanced techniques that can be used in Photoshop:
- Frequency Separation: Frequency separation is a technique that separates the texture and tone of an image into different layers, allowing you to edit them independently. This is useful for removing light streaks while preserving the underlying texture of the area.
- Luminosity Masking: Luminosity masking is a technique that creates masks based on the luminosity values of an image. This is useful for targeting specific areas of the image for editing, such as the highlights or shadows.
- Color Range Selection: Color range selection is a technique that selects areas of an image based on their color values. This is useful for targeting light streaks that have a distinct color, such as a bright white streak against a darker background.
- Blend Modes: Blend modes are used to control how layers interact with each other. Experimenting with different blend modes can help blend the edited area with the surrounding pixels, creating a more natural transition.
- Content-Aware Scale: Content-Aware Scale is a feature in Photoshop that allows you to scale an image while preserving the important content. This can be useful for subtly shifting the position of the light streak, making it easier to remove.
- Perspective Correction: Perspective correction is a technique that corrects the perspective of an image. This can be useful for removing light streaks that are distorted due to perspective, such as streaks that appear to converge towards a vanishing point.
- Using Multiple Tools in Combination: Combining multiple tools and techniques can often yield the best results. For example, you might use the Healing Brush to remove the majority of the streak, followed by the Clone Stamp Tool to refine the edges and the Dodge and Burn tools to adjust the lighting.
10. What’s the Relationship Between Color Profiles and Light Streaks Removal?
Color profiles play a crucial role in ensuring accurate color representation throughout the entire editing process, which directly impacts the effectiveness of light streak removal.
10.1. What Are Color Profiles?
Color profiles are standardized sets of data that define the color characteristics of a device, such as a monitor, printer, or camera. They act as translators, ensuring that colors are displayed or reproduced accurately across different devices.
10.2. How Color Profiles Impact Light Streak Removal
- Accurate Color Assessment: When removing light streaks, it’s essential to accurately assess the colors and tones of the affected area and the surrounding pixels. An accurate color profile ensures that you are seeing the true colors, allowing you to make precise adjustments.
- Seamless Blending: Achieving seamless blending is crucial for natural-looking light streak removal. With an accurate color profile, you can be confident that the colors you are using to blend the edited area with the surrounding pixels are correct, resulting in a more seamless transition.
- Avoiding Color Shifts: Mismatched or missing color profiles can lead to color shifts during editing, which can make it difficult to achieve consistent results. An accurate color profile helps prevent these shifts, ensuring that the colors remain consistent throughout the editing process.
- Consistent Results Across Devices: If you are sharing your work online or printing your photos, you want them to look the same regardless of the viewing environment. An accurate color profile ensures that your photos look consistent across different devices and displays.
10.3. Ensuring Accurate Color Profiles
- Calibrate Your Monitor: Calibrate your monitor regularly using a color calibration tool like TruHu to create an accurate color profile.
- Use the Correct Color Space: Use the correct color space for your intended output. For web use, sRGB is generally recommended, while Adobe RGB is better for printing.
- Embed Color Profiles: Embed the color profile in your photos when saving them to ensure that they are displayed correctly on other devices.
By understanding and managing color profiles effectively, you can ensure accurate color representation throughout the entire editing process, leading to more effective and natural-looking light streak removal.
Light streaks don’t have to ruin your photos. With the right techniques and tools, you can effectively remove them and achieve the flawless images you desire. Whether you prefer Lightroom or Photoshop, mastering these methods will elevate your photography skills and empower you to create stunning visuals.
Are you ready to take your photography to the next level? Visit dfphoto.net today to discover more tips, tutorials, and resources that will help you master the art of photography and unleash your creative potential! Connect with a vibrant community of photographers and start sharing your work today! Address: 1600 St Michael’s Dr, Santa Fe, NM 87505, United States. Phone: +1 (505) 471-6001.
FAQ: Removing Light Streaks from Photos
- What causes light streaks in photos?
- Light streaks are generally caused by lens flare, internal reflections, diffraction, a dirty lens, or environmental conditions.
- Can I prevent light streaks while shooting?
- Yes, using a lens hood, polarizing filter, repositioning your camera, and cleaning your lens can help prevent light streaks.
- What software can I use to remove light streaks?
- Popular options include Adobe Photoshop, Adobe Lightroom, GIMP, Capture One, Luminar AI/Neo, and ON1 Photo RAW.
- How do I remove light streaks in Lightroom using the Masking Brush?
- Calibrate your monitor, apply lens correction, create a new mask, add a brush mask, set up your brush, brush over the glare, and adjust light, color, and effects.
- What’s the Radial Filter method for light streak removal in Lightroom?
- Calibrate your monitor, apply lens correction, create a new mask, add a radial filter, adjust the filter, increase Dehaze and Clarity, and compare and adjust.
- How does the Healing Tool work in Lightroom for removing light streaks?
- Calibrate your monitor, apply lens correction, zoom into the area, select the Healing tool, adjust settings, heal the area, and use content-aware removal for remaining noise.
- How can I use the Healing Brush Tool in Photoshop to remove light streaks?
- Open your image, select the Healing Brush Tool, set the sample source, adjust brush settings, paint over the light streak, and refine as needed.
- What’s the process for using the Clone Stamp Tool in Photoshop?
- Open your image, select the Clone Stamp Tool, set the sample source, adjust brush settings, paint over the light streak, and refine as needed.
- How does Content-Aware Fill work in Photoshop for removing light streaks?
- Open your image, select the light streak, open Content-Aware Fill, adjust the sampling area if needed, apply the fill, and refine as needed.
- What are common mistakes to avoid when removing light streaks?
- Avoid over-editing, using a hard brush, inconsistent sampling, ignoring texture or lighting, not working non-destructively, not zooming in, and not stepping back to evaluate the image.