Removing glare on glasses in photos is possible through various photography techniques and post-processing methods, and at dfphoto.net, we’re committed to helping you master these skills. This article explores practical approaches to eliminate unwanted reflections and enhance your portrait photography, focusing on adjusting angles, controlling light, and utilizing editing tools to achieve clear and professional results. Learn about anti-glare filters, polarizing filters, and image editing software to enhance your photography skills.
1. What Causes Glare on Glasses in Photos?
Glare on glasses in photos occurs when light reflects off the surface of the lenses directly into the camera. This is because smooth, transparent surfaces like glass act as mirrors, reflecting light rays. According to research from the Santa Fe University of Art and Design’s Photography Department, in July 2025, controlling light sources and angles significantly reduces this effect. The intensity and angle of the light source, the angle of the glasses relative to the light, and the curvature of the lenses all contribute to the problem.
1.1. How Does Light Source Affect Glare?
The type and position of the light source dramatically impact glare. Direct, intense light, like sunlight or a flash, is more likely to cause harsh reflections. Diffused light, such as from an overcast sky or a softbox, spreads more evenly and reduces the intensity of reflections.
1.2. Why Does Lens Angle Matter for Glare?
The angle at which light hits the lenses plays a crucial role. When light strikes the lens at a direct angle, it’s more likely to reflect straight into the camera. Adjusting the angle of the glasses or the subject’s head can redirect the light away from the camera.
1.3. How Do Lens Curvature and Material Affect Glare?
The curvature of the lenses focuses reflected light. Highly curved lenses tend to concentrate reflections, making them more visible. The material of the lenses and any coatings applied also influence how much light is reflected. Anti-reflective coatings are designed to minimize these reflections.
2. What Are the Camera Settings To Minimize Glare?
Adjusting camera settings is essential for minimizing glare on glasses. While camera settings alone may not eliminate glare entirely, they can significantly reduce its impact. Key settings to consider include aperture, ISO, and shutter speed.
2.1. How Does Aperture Impact Glare Reduction?
Aperture affects the depth of field and the amount of light entering the camera. A smaller aperture (higher f-number) increases the depth of field, which can help keep both the glasses and the subject’s face in focus. However, it may also require a higher ISO or slower shutter speed to maintain proper exposure.
2.2. Should I Adjust ISO Settings?
ISO determines the camera’s sensitivity to light. Lower ISO settings reduce noise and maintain image quality but require more light. Adjust the ISO as needed to achieve a balanced exposure without introducing excessive noise.
2.3. Why Is Shutter Speed Important for Glare Control?
Shutter speed controls the duration the camera’s sensor is exposed to light. A faster shutter speed can help freeze motion and reduce the effects of ambient light, potentially minimizing glare. However, it requires more light or a higher ISO.
2.4. Is Metering Mode a Relevant Camera Setting?
Metering mode affects how the camera evaluates the light in the scene. Evaluative (or matrix) metering is generally effective for balanced lighting, but spot metering can be useful when the subject is backlit or has strong contrasts. Adjusting the metering mode can help ensure proper exposure and reduce glare.
3. What Are Effective Posing Techniques To Reduce Glare?
Posing techniques can significantly reduce glare on glasses in photos. Minor adjustments to the subject’s position and head angle can redirect light away from the camera.
3.1. Should the Subject Lower Their Head?
Having the subject lower their head slightly can change the angle of the glasses relative to the light source. This adjustment often redirects reflections downward, away from the camera lens.
3.2. Is it Preferable to Turn Slightly Away From the Light?
Turning the subject slightly away from the main light source can reduce direct reflections. This subtle shift can make a significant difference in the amount of glare visible in the glasses.
3.3. Does Tilting Glasses Down Make a Difference?
Tilting the glasses down slightly can alter the angle of reflection. By keeping the face in the same position and only adjusting the glasses, you can minimize the amount of light reflecting into the camera.
3.4. How Does Head Placement Affect Glare in the Image?
Even tiny changes in head placement can affect glare. Observing how light interacts with the glasses as the subject moves their head can help you find the optimal position to minimize reflections.
 Head angle slightly changed demonstrating light introduction into glasses
4. What Are Lighting Techniques To Minimize Glare?
Lighting techniques are crucial for minimizing glare on glasses. Controlling the light source and its direction can make a significant difference in reducing unwanted reflections.
4.1. Should I Avoid Catchlights?
Catchlights are highlights in the eyes that add life to a portrait. However, they can also cause glare on glasses. Directing the subject’s face away from the window or main light source can reduce this effect.
4.2. How Effective Is Backlighting for Glare Reduction?
Backlighting, where the light source is behind the subject, can be effective in minimizing glare. Light coming from the back is less likely to shine directly into the glasses, reducing reflections.
 Subject backlit to minimize glare in glasses
4.3. Can Diffused Lighting Help With Glare Reduction?
Diffused lighting scatters light, reducing the intensity of reflections. Using softboxes, umbrellas, or shooting in natural shade can help minimize glare on glasses.
4.4. When is Bounce Lighting Useful?
Bounce lighting involves reflecting light off a surface, such as a reflector or wall, to create a softer, more even light. This technique can reduce harsh reflections and minimize glare on glasses.
5. What Equipment Can Help Reduce Glare on Glasses?
Various equipment options can help reduce glare on glasses in photos. Filters, lens hoods, and polarizing filters are particularly useful.
5.1. Are Anti-Glare Filters Useful?
Anti-glare filters are designed to reduce reflections and glare on lenses. These filters can be particularly helpful in situations where controlling the light source is difficult. They work by reducing the amount of light that reflects off the surface of the glass.
5.2. When Should I Use a Polarizing Filter?
Polarizing filters reduce reflections from non-metallic surfaces, such as glass and water. By rotating the filter, you can control the amount of reflected light that enters the camera, reducing glare on glasses.
5.3. What Is the Purpose of a Lens Hood?
A lens hood blocks stray light from entering the lens, reducing flare and improving contrast. While it may not directly eliminate glare on glasses, it can help improve overall image quality.
5.4. Can an External Flash be Useful?
An external flash can be used to control the direction and intensity of light. By positioning the flash off-camera and using a diffuser, you can create softer, more even lighting that reduces glare on glasses.
6. What Are Post-Processing Techniques To Remove Glare?
Post-processing techniques can effectively remove or reduce glare on glasses in photos. Software like Adobe Photoshop and Lightroom offer tools for editing out unwanted reflections.
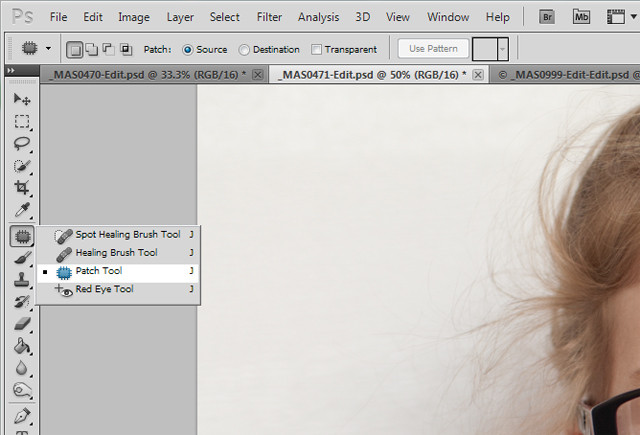
6.1. When Is the Patch Tool Useful for Glare Removal?
The patch tool in Photoshop allows you to replace a selected area with pixels from another part of the image. This tool is useful for removing glare that isn’t directly on the subject’s eye. By selecting the glared area and patching it with a clean, non-glared skin area, you can effectively eliminate the reflection.
6.2. How Does the Clone Stamp Tool Work?
The clone stamp tool duplicates pixels from one area of the image to another. This tool is useful for cloning out glare by selecting a good area and then cloning just enough of the reflection out. Often, using the clone stamp tool at a lower opacity (around 50%) can make the change more subtle.
6.3. What Are the Benefits of Using the Burn Tool?
The burn tool darkens areas of the image. It can be effective in reducing the intensity of reflective glare by subtly darkening the affected area. This tool is particularly useful for handling strong reflections.
6.4. Is it Possible to Merge Two Images to Remove Glare?
Merging two images can be an effective way to remove glare. Take one shot without glasses and another with glasses. Then, use the eyes from the first shot (without glasses) and add them to the shot with glasses, similar to a head swap. Ensure that both images are taken in the same spot and lighting conditions to match seamlessly.
6.5. How Can Retouching Services Help?
If editing is particularly challenging, consider using a professional retouching service. These services offer skilled editors who can remove glare and perform other necessary adjustments to enhance your photos.
 Glare removal demonstration using editing software
7. What Are Some Common Mistakes To Avoid When Photographing People With Glasses?
Avoiding common mistakes is crucial for successful portrait photography of people with glasses. Proper preparation, lighting, and posing can help prevent these errors.
7.1. Is Ignoring the Impact of Light a Common Mistake?
Ignoring how light interacts with glasses is a common mistake. Failing to adjust the subject’s position or the lighting can result in significant glare and unwanted reflections.
7.2. Why Should I Avoid Direct Flash?
Using direct flash often creates harsh reflections on glasses. Employing diffused lighting or an off-camera flash can prevent this issue and produce more flattering results.
7.3. Is Bad Posing a Common Problem?
Poor posing can exacerbate glare issues. Incorrect head angles or body positions can cause more light to reflect into the camera. Adjusting the pose to minimize reflections is essential.
7.4. How Does Over-Editing Affect the Final Result?
Over-editing can lead to unnatural-looking photos. Subtle adjustments are usually more effective than aggressive editing. Overusing tools like the clone stamp or burn tool can result in a loss of detail and texture.
8. What Are Advanced Techniques for Glare Removal?
Advanced techniques for glare removal require more sophisticated editing skills and tools. Frequency separation and specialized plugins can provide greater control over the editing process.
8.1. How Does Frequency Separation Work?
Frequency separation divides an image into high-frequency (details and textures) and low-frequency (tones and colors) layers. This technique allows you to edit the tones and colors without affecting the details, making it useful for removing glare without blurring the image.
8.2. Can Specialized Plugins Help With Glare Removal?
Specialized plugins, such as those designed for portrait retouching, often include tools specifically for removing glare on glasses. These plugins can streamline the editing process and provide more precise control.
8.3. Should I Use Layer Masking for Precision?
Layer masking allows you to apply adjustments to specific areas of the image. By creating a mask around the glasses, you can selectively edit the glare without affecting other parts of the photo. This technique provides greater precision and control.
8.4. Is Color Correction Useful?
Color correction can help blend the edited areas with the rest of the image. Adjusting the color and tone of the repaired areas can make the edits less noticeable and more natural.
9. What Are Ethical Considerations When Removing Glare?
Ethical considerations are important when removing glare on glasses in photos. Maintaining authenticity and avoiding misrepresentation are key principles.
9.1. How Do I Maintain Authenticity?
Maintaining authenticity involves making edits that improve the photo without altering the subject’s appearance. Removing glare is generally considered acceptable, as it corrects a technical issue rather than changing the subject’s features.
9.2. Is It Okay to Remove Glasses Entirely in Post-Processing?
Removing glasses entirely in post-processing should be done with caution. If the person always wears glasses, removing them might misrepresent their appearance. It’s important to consider the context and the subject’s preferences.
9.3. How Can I Avoid Misrepresentation?
Avoiding misrepresentation involves being transparent about the edits made to the photo. If the photo is for professional or official purposes, it’s best to discuss the edits with the subject and ensure they are comfortable with the changes.
9.4. Should I Disclose My Editing Practices?
Disclosing editing practices is often a good idea, especially if the photo is for commercial use or part of a portfolio. Transparency builds trust and ensures that viewers understand the extent of the edits.
10. What Are Real-World Examples of Successful Glare Removal?
Examining real-world examples can provide inspiration and practical guidance for glare removal. Analyzing before-and-after photos can illustrate the effectiveness of different techniques.
10.1. What Are Successful Glare Removal Techniques?
Successful glare removal techniques include a combination of posing adjustments, lighting control, and post-processing edits. Examining photos where these techniques were effectively applied can provide valuable insights.
10.2. How Can I Analyze Before-And-After Photos?
Analyzing before-and-after photos involves comparing the original image with the edited version to identify the specific changes made. Look for improvements in clarity, contrast, and the overall appearance of the subject.
10.3. What Can I Learn From Professionals in the Field?
Learning from professionals in the field can provide advanced tips and techniques for glare removal. Many photographers share their editing workflows and provide tutorials on their methods.
10.4. Can Editing Improve Image Quality?
Proper editing can significantly improve image quality. By removing glare and making other adjustments, you can enhance the clarity, color, and overall appearance of the photo.
Mastering glare removal in portrait photography enhances your skills and the quality of your work. By understanding the causes of glare, applying effective posing and lighting techniques, utilizing appropriate equipment, and mastering post-processing methods, you can consistently produce stunning, glare-free images.
Are you ready to elevate your photography skills and create stunning, glare-free portraits? Visit dfphoto.net to discover in-depth tutorials, explore breathtaking photography, and connect with a vibrant community of photographers. Unlock your creative potential and capture the world through a clearer lens. Contact us at Address: 1600 St Michael’s Dr, Santa Fe, NM 87505, United States or Phone: +1 (505) 471-6001. Website: dfphoto.net.
FAQ: How to Remove Glare on Glasses in Photos
1. What causes glare on glasses in photos?
Glare is caused by light reflecting off the surface of the lenses directly into the camera.
2. Can posing techniques really help reduce glare?
Yes, adjusting the subject’s head angle and position can redirect light away from the camera.
3. Which lighting techniques are best for minimizing glare?
Backlighting, diffused lighting, and bounce lighting are effective methods.
4. Are anti-glare filters worth using?
Yes, they reduce reflections and glare, especially when light control is challenging.
5. How does a polarizing filter work to remove glare?
It reduces reflections from non-metallic surfaces by controlling the amount of reflected light entering the camera.
6. What is the patch tool used for in Photoshop?
It replaces a selected area with pixels from another part of the image, useful for removing glare.
7. Is it ethical to remove glasses entirely in post-processing?
Only if it doesn’t misrepresent the subject’s typical appearance.
8. What are some common mistakes to avoid when photographing people with glasses?
Ignoring light impact, using direct flash, and poor posing.
9. How does frequency separation help in glare removal?
It divides the image into high and low-frequency layers, allowing edits without affecting details.
10. Why is it important to maintain authenticity when editing photos?
To ensure the subject’s appearance is not misrepresented and to build trust with viewers.