Removing a photo background in Word is a skill that can significantly enhance the visual appeal of your documents. In this comprehensive guide, dfphoto.net, we’ll explore various methods to achieve this, from using Word’s built-in tools to leveraging more advanced online solutions, ensuring your images look professional and polished. Whether you are a photographer, graphic designer, or enthusiast, understanding these techniques will help you elevate your photography and design skills. Let’s dive into effective background removal, image editing, and graphic design techniques.
1. Why Remove a Photo Background in Word?
1.1 Enhancing Visual Appeal
Removing a background can make an image stand out, focusing the viewer’s attention on the subject. This is particularly useful in presentations, reports, and marketing materials where you want to highlight specific elements.
1.2 Creating a Professional Look
Clean, background-free images give a polished and professional appearance, making your documents look more refined and credible. This is crucial for business communications and academic papers.
1.3 Seamless Integration
Removing backgrounds allows images to blend seamlessly with the rest of the document, regardless of the background color or design. This ensures visual consistency and coherence.
1.4 Versatility
Background removal opens up creative possibilities, such as placing the subject in different scenes or creating unique compositions. This is particularly useful for digital art and creative projects.
1.5 Improving Readability
A cluttered background can distract from the main content. Removing it ensures that the image complements the text and enhances overall readability.
2. Using Word’s Built-in Background Removal Tool
2.1 Accessing the Tool
Word has a built-in tool for removing backgrounds, which is suitable for images with clear, well-defined subjects. To access it:
- Insert the Image: Open your Word document and insert the image you want to edit.
- Select the Image: Click on the image to select it.
- Picture Format Tab: Go to the “Picture Format” tab in the toolbar.
- Remove Background: Click on the “Remove Background” option.
2.2 Understanding the Interface
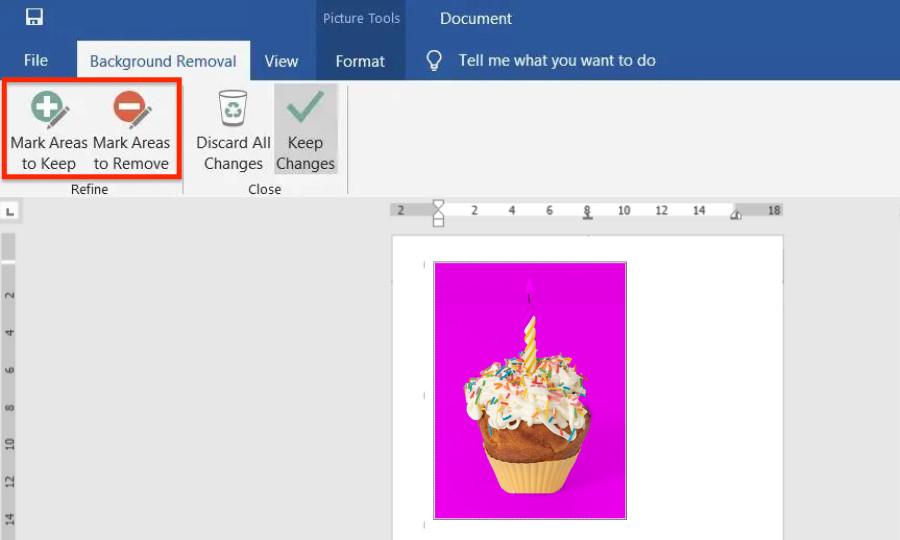
Once you click “Remove Background,” Word will attempt to automatically detect and highlight the background in magenta. The interface provides tools to refine this selection:
- Mark Areas to Keep: Use this tool (represented by a plus sign) to draw on areas you want to keep in the image.
- Mark Areas to Remove: Use this tool (represented by a minus sign) to mark areas you want to remove.
- Discard All Changes: Reverts to the original image if you make a mistake.
- Keep Changes: Applies the background removal.
2.3 Step-by-Step Guide for Word 2019, Word 2021, and Microsoft 365
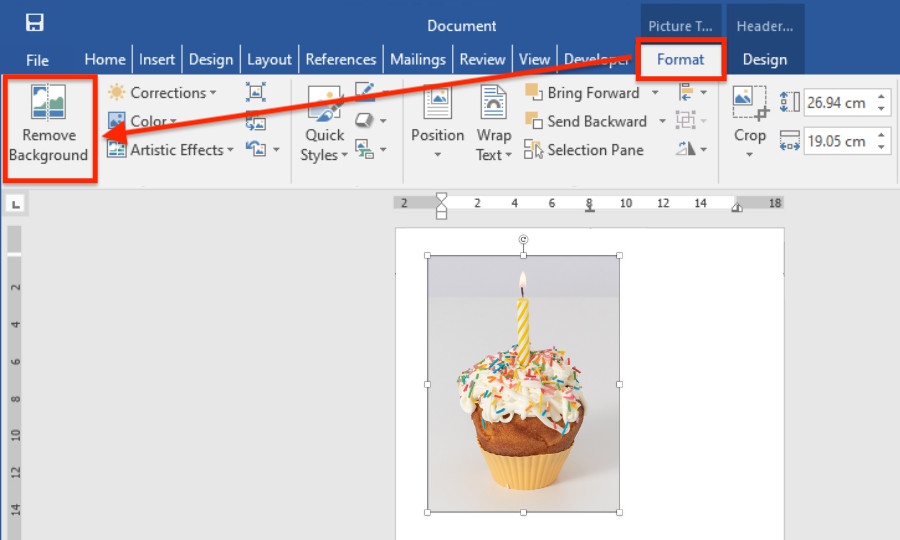
- Select the Picture: Click on the image to select it.
- Go to Picture Format: In the toolbar, select “Picture Format,” then click “Remove Background.”
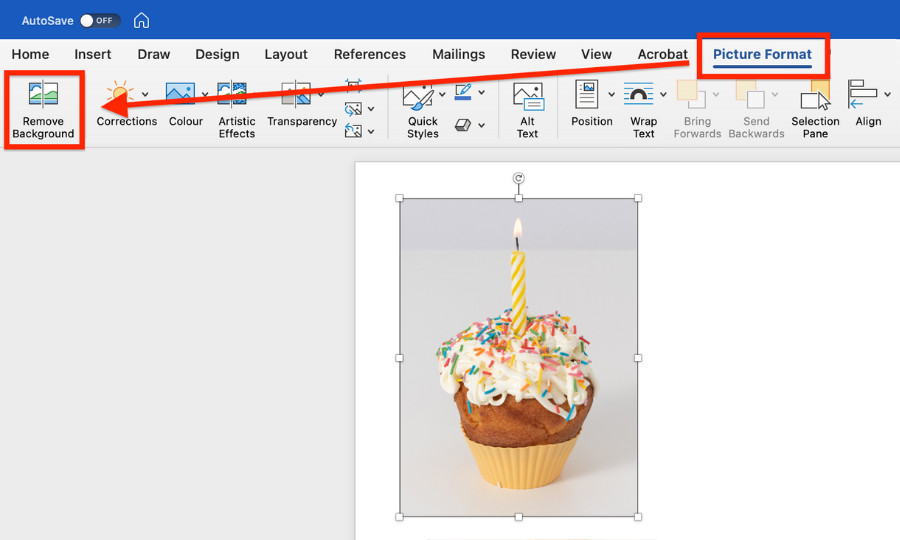 Removing picture background in Word 2019 using Picture Format Tab with Remove Background option highlighted
 - Adjust the Selection: The default background area is highlighted in magenta. Use the “Mark Areas to Keep” and “Mark Areas to Remove” tools to adjust the selection as needed.
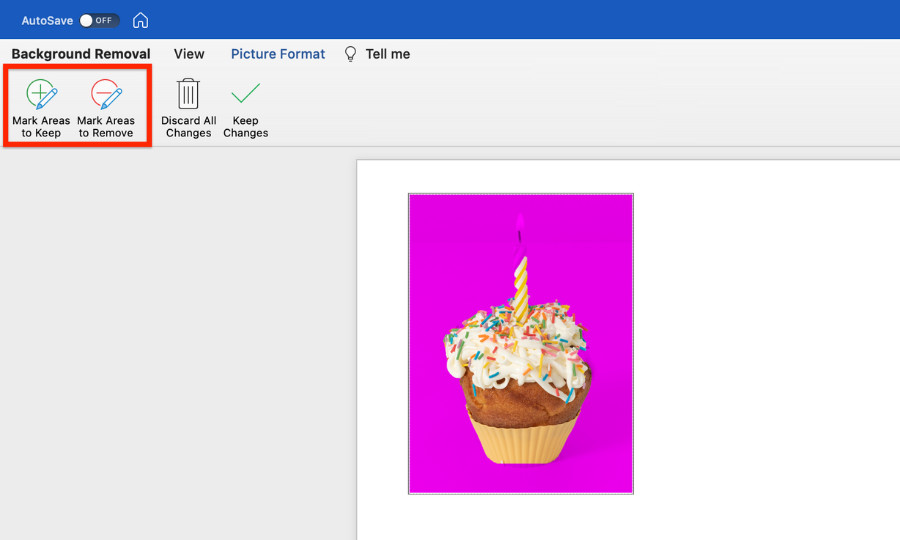 Adjusting the selection to remove the background in Word using "Mark Areas to Keep" and "Mark Areas to Remove" options
 - Keep Changes: Once you’ve finished, click “Keep Changes.”
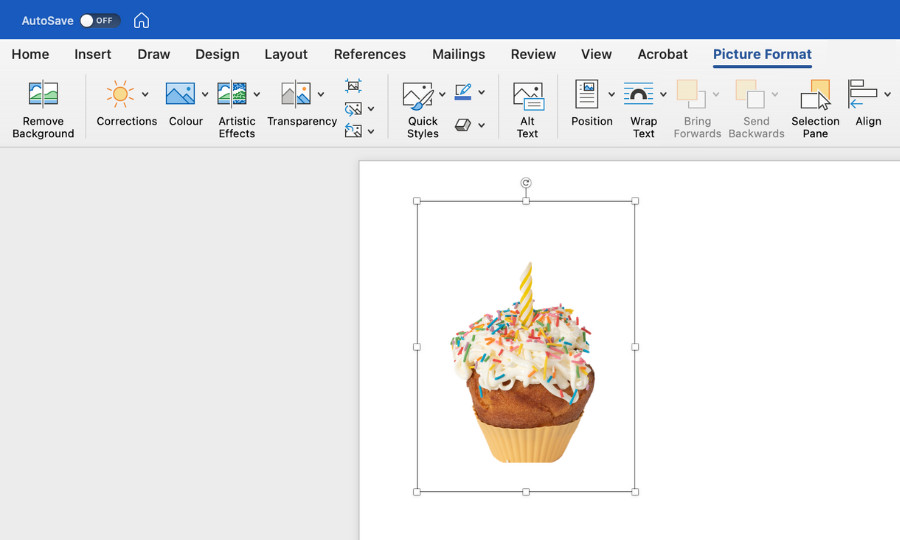 Finalizing the background removal in Word by clicking "Keep Changes"
2.4 Step-by-Step Guide for Word 2010, Word 2013, and Word 2016
- Select the Picture: Click on the image to select it.
- Go to Format: In the toolbar, select “Format,” then click “Remove Background.”
 Selecting the Format tab and choosing Remove Background in older versions of Word
 - Adjust the Selection: The default background area will be highlighted in magenta. Use the “Mark Areas to Keep” and “Mark Areas to Remove” options to adjust the selection.
 Using the "Mark Areas to Keep" and "Mark Areas to Remove" tools to refine background selection in Word
 - Keep Changes: Click “Keep Changes” to finalize the background removal.
 Completing the background removal process in Word by applying the changes
2.5 Tips for Best Results
- Use High-Resolution Images: Higher resolution images provide more detail for Word to work with, resulting in cleaner background removal.
- Clear Subject Definition: Images with a clear distinction between the subject and background will yield better results.
- Patience and Precision: Take your time to carefully mark areas to keep and remove. Zoom in for detailed work.
- Experiment: Don’t be afraid to undo and redo adjustments to find the best possible outcome.
3. Limitations of Word’s Background Removal Tool
3.1 Complexity
Word’s tool is best suited for simple images. It struggles with complex backgrounds, intricate details, or subjects with similar colors to the background.
3.2 Accuracy
The automatic detection is not always accurate, requiring manual adjustments that can be time-consuming and may still not produce perfect results.
3.3 Lack of Advanced Features
Word lacks advanced editing features such as feathering, transparency adjustments, and precise edge refinement, which are available in dedicated photo editing software.
3.4 Time-Consuming
For complex images, the manual adjustments can be very time-consuming, making it less efficient compared to specialized tools.
3.5 Dependence on Image Quality
The effectiveness of the tool heavily depends on the quality of the original image. Low-quality images may not yield satisfactory results.
4. Alternative Tools for Background Removal
4.1 Online Background Removers
Numerous online tools offer more advanced background removal capabilities. These tools often use AI and machine learning to provide more accurate and efficient results.
4.1.1 Icons8 Background Remover
Icons8 Background Remover is a web-based tool designed for precise and quick background removal. Unlike Word, it accurately identifies the edges of objects in images, making it a superior choice for complex images.
 Using Icons8 Background Remover to automatically remove the background from an image
How to Use Icons8 Background Remover:
- Go to Icons8 Background Remover: Navigate to the Icons8 Background Remover website.
- Upload Image: Click “Upload Image” and select the image from your computer.
- Automatic Removal: The tool automatically removes the background.
- Customize (Optional): Set a new background color or upload a new background photo.
- Download Image: Once finished, download the image.
Pros of Icons8 Background Remover:
- Speed: Delivers results in seconds.
- Accuracy: More precise than Word for complex images.
- Ease of Use: Simple and intuitive interface.
- Additional Features: Allows you to add new backgrounds or colors.
4.1.2 Adobe Spark
Adobe Spark is a free online tool that offers background removal among its many features. It’s user-friendly and provides good results for various types of images.
How to Use Adobe Spark:
- Go to Adobe Spark: Navigate to the Adobe Spark website.
- Upload Image: Upload your image to the platform.
- Automatic Removal: The tool automatically detects and removes the background.
- Download Image: Download the image with a transparent background.
Pros of Adobe Spark:
- Ease of Use: Simple and intuitive interface.
- Integration with Adobe Ecosystem: Seamlessly integrates with other Adobe products.
- Free to Use: Offers a free version with basic features.
4.1.3 Remove.bg
Remove.bg is a dedicated background removal tool that uses AI to automatically remove backgrounds with high precision.
How to Use Remove.bg:
- Go to Remove.bg: Navigate to the Remove.bg website.
- Upload Image: Upload your image to the platform.
- Automatic Removal: The tool automatically removes the background.
- Download Image: Download the image with a transparent background.
Pros of Remove.bg:
- High Precision: Excellent background removal accuracy.
- Speed: Fast processing time.
- API Integration: Offers API integration for developers.
4.2 Photo Editing Software
For professional-grade background removal, dedicated photo editing software offers advanced tools and precision control.
4.2.1 Adobe Photoshop
Adobe Photoshop is the industry-standard photo editing software, offering a wide range of tools for precise background removal.
Tools for Background Removal in Photoshop:
- Pen Tool: Creates precise paths around the subject for clean cuts.
- Magic Wand Tool: Selects areas based on color similarity.
- Quick Selection Tool: Quickly selects subjects with defined edges.
- Refine Edge: Smooths and refines the edges of selections for a natural look.
- Layer Masks: Non-destructive editing allows for easy adjustments.
How to Remove Background in Photoshop:
- Open Image: Open your image in Photoshop.
- Select Subject: Use a selection tool (e.g., Quick Selection Tool) to select the subject.
- Refine Edge: Use “Select and Mask” to refine the selection edges.
- Create Layer Mask: Create a layer mask to hide the background.
- Adjust and Refine: Adjust the mask as needed for a perfect result.
Pros of Adobe Photoshop:
- Professional-Grade Tools: Offers the most advanced editing capabilities.
- Precision Control: Provides precise control over every aspect of the image.
- Non-Destructive Editing: Layer masks allow for easy adjustments without altering the original image.
4.2.2 GIMP
GIMP (GNU Image Manipulation Program) is a free, open-source photo editing software that offers powerful background removal capabilities.
Tools for Background Removal in GIMP:
- Paths Tool: Creates precise paths around the subject for clean cuts.
- Fuzzy Select Tool: Selects areas based on color similarity.
- Foreground Select Tool: Selects the foreground object from the background.
- Layer Masks: Non-destructive editing allows for easy adjustments.
How to Remove Background in GIMP:
- Open Image: Open your image in GIMP.
- Select Subject: Use a selection tool (e.g., Foreground Select Tool) to select the subject.
- Refine Selection: Refine the selection to ensure accuracy.
- Add Layer Mask: Add a layer mask to hide the background.
- Adjust and Refine: Adjust the mask as needed for a perfect result.
Pros of GIMP:
- Free and Open-Source: No cost to use, making it accessible to everyone.
- Powerful Features: Offers a wide range of advanced editing capabilities.
- Customizable: Highly customizable interface and features.
4.2.3 Affinity Photo
Affinity Photo is a professional photo editing software that offers advanced background removal tools at a more affordable price than Adobe Photoshop.
Tools for Background Removal in Affinity Photo:
- Pen Tool: Creates precise paths around the subject for clean cuts.
- Selection Brush Tool: Quickly selects subjects with defined edges.
- Refine Selection: Smooths and refines the edges of selections for a natural look.
- Layer Masks: Non-destructive editing allows for easy adjustments.
How to Remove Background in Affinity Photo:
- Open Image: Open your image in Affinity Photo.
- Select Subject: Use a selection tool (e.g., Selection Brush Tool) to select the subject.
- Refine Selection: Use “Refine Edge” to refine the selection edges.
- Create Layer Mask: Create a layer mask to hide the background.
- Adjust and Refine: Adjust the mask as needed for a perfect result.
Pros of Affinity Photo:
- Professional Features: Offers advanced editing capabilities similar to Photoshop.
- Affordable Price: Lower cost compared to Adobe Photoshop.
- User-Friendly Interface: Intuitive and easy-to-navigate interface.
5. Optimizing Images for Word Documents
5.1 Image Resolution
Use images with a resolution of at least 300 DPI (dots per inch) for printing and 150 DPI for digital documents. High-resolution images ensure clarity and detail.
5.2 File Format
Save images in JPEG format for photographs and PNG format for images with transparent backgrounds or graphics with sharp lines and text.
5.3 Image Size
Compress images to reduce file size without sacrificing quality. Large image files can slow down Word and make the document unwieldy.
5.4 Cropping and Resizing
Crop and resize images to fit the layout of your document. Use Word’s built-in tools or photo editing software to adjust the dimensions as needed.
5.5 Image Placement
Place images strategically to enhance the visual appeal and readability of your document. Use text wrapping options to integrate images seamlessly with the text.
6. Advanced Techniques for Background Removal
6.1 Using Channels in Photoshop
Channels in Photoshop can be used for precise background removal, especially when there is a strong contrast between the subject and background.
How to Use Channels:
- Open Image: Open your image in Photoshop.
- Go to Channels Panel: Open the “Channels” panel (Window > Channels).
- Identify Contrast: Find the channel with the most contrast between the subject and background (usually Blue or Green).
- Duplicate Channel: Duplicate the channel with the best contrast.
- Adjust Levels: Adjust the levels (Image > Adjustments > Levels) to increase the contrast in the duplicated channel.
- Create Selection: Use the adjusted channel to create a selection.
- Create Layer Mask: Create a layer mask to hide the background.
- Adjust and Refine: Adjust the mask as needed for a perfect result.
6.2 Frequency Separation
Frequency separation is a technique used to separate the texture and tone of an image, making it easier to edit and refine details.
How to Use Frequency Separation for Background Removal:
- Duplicate Layer: Duplicate the background layer twice.
- Apply Gaussian Blur: Apply a Gaussian Blur (Filter > Blur > Gaussian Blur) to the bottom layer (low frequency) to blur out the details.
- Apply High Pass: Apply a High Pass filter (Filter > Other > High Pass) to the top layer (high frequency) to retain the details.
- Change Blend Mode: Change the blend mode of the high-frequency layer to “Linear Light.”
- Create Selection: Use selection tools to select the background.
- Apply Mask: Apply a mask to remove the selected background.
- Adjust and Refine: Adjust the mask as needed for a perfect result.
6.3 Color Range Selection
Color range selection allows you to select areas of an image based on color. This is useful when the background has a consistent color.
How to Use Color Range Selection:
- Open Image: Open your image in Photoshop.
- Go to Select > Color Range: Open the “Color Range” dialog box.
- Select Color: Use the eyedropper tool to select the background color.
- Adjust Fuzziness: Adjust the “Fuzziness” slider to refine the selection.
- Create Selection: Click “OK” to create the selection.
- Create Layer Mask: Create a layer mask to hide the background.
- Adjust and Refine: Adjust the mask as needed for a perfect result.
7. Common Mistakes to Avoid
7.1 Over-Editing
Avoid over-editing the image, which can result in a fake or unnatural appearance. Use subtle adjustments to achieve a natural look.
7.2 Poor Edge Refinement
Pay attention to edge refinement to avoid jagged or pixelated edges. Use tools like “Refine Edge” in Photoshop to smooth and refine the edges.
7.3 Ignoring Shadows and Highlights
Maintain realistic shadows and highlights to preserve the depth and dimension of the image. Adjust the shadows and highlights to blend the subject seamlessly with the new background.
7.4 Using Low-Resolution Images
Avoid using low-resolution images, which can result in a blurry or pixelated final product. Use high-resolution images for the best results.
7.5 Inconsistent Lighting
Ensure that the lighting of the subject matches the lighting of the new background. Adjust the brightness, contrast, and color balance to create a cohesive and realistic image.
8. Case Studies
8.1 Business Presentation
Scenario: A marketing team needs to create a presentation showcasing their new product.
Challenge: The product images have cluttered backgrounds that distract from the main subject.
Solution: Use Icons8 Background Remover to quickly remove the backgrounds from the product images. Optimize the images for the presentation by resizing them and saving them in PNG format.
Result: The presentation looks professional and engaging, with a clear focus on the product.
8.2 Academic Paper
Scenario: A student needs to include images in their research paper.
Challenge: The images have inconsistent backgrounds that make the paper look unprofessional.
Solution: Use Word’s built-in background removal tool for simple images and GIMP for more complex images. Ensure the images are high-resolution and properly cited.
Result: The research paper looks polished and credible, with consistent and professional images.
8.3 E-commerce Website
Scenario: An e-commerce business needs to update their product listings with clean, professional images.
Challenge: The product images have distracting backgrounds that do not showcase the products effectively.
Solution: Use Adobe Photoshop to remove the backgrounds from the product images. Use the Pen Tool and Layer Masks for precise background removal. Optimize the images for the website by resizing them and saving them in JPEG format.
Result: The product listings look professional and appealing, with a clear focus on the products, leading to increased sales.
9. The Future of Background Removal
9.1 AI and Machine Learning
The future of background removal is heavily influenced by advancements in AI and machine learning. These technologies are making background removal more accurate, efficient, and accessible.
9.2 Real-Time Background Removal
Real-time background removal is becoming increasingly common in video conferencing and live streaming applications. This technology allows users to remove their backgrounds in real-time without the need for post-processing.
9.3 Integration with Mobile Devices
Background removal is being integrated into mobile devices, allowing users to quickly and easily remove backgrounds from photos and videos on the go.
9.4 Enhanced Precision and Control
Future background removal tools will offer enhanced precision and control, allowing users to fine-tune their results with greater accuracy.
9.5 Automation
Automation will play a key role in the future of background removal, with AI-powered tools automatically detecting and removing backgrounds with minimal user input.
10. dfphoto.net: Your Resource for Photography and Editing
At dfphoto.net, we are dedicated to providing you with the best resources and tutorials for photography and photo editing. Whether you are a beginner or a professional, our website offers a wealth of information to help you improve your skills and create stunning images.
10.1 Explore Our Tutorials
Discover a wide range of tutorials on various photography techniques, including composition, lighting, and post-processing. Our tutorials are designed to be easy to follow and packed with practical tips and advice.
10.2 View Our Image Galleries
Get inspired by our curated collections of stunning photographs from talented photographers around the world. Our image galleries showcase a variety of genres and styles, providing endless inspiration for your own photography.
10.3 Join Our Community
Connect with other photographers and share your work in our online community. Get feedback, exchange ideas, and collaborate on projects.
10.4 Stay Updated
Stay updated with the latest news and trends in the world of photography. Our blog features articles on new equipment, software updates, and industry events.
10.5 Enhance Your Skills
Enhance your skills and take your photography to the next level with dfphoto.net. Whether you are looking to master background removal or explore new creative techniques, we have the resources you need to succeed.
Ready to take your photography and photo editing skills to the next level? Visit dfphoto.net today to explore our tutorials, view our image galleries, and join our community.
Address: 1600 St Michael’s Dr, Santa Fe, NM 87505, United States
Phone: +1 (505) 471-6001
Website: dfphoto.net
FAQ: Removing Photo Backgrounds in Word
1. Can I remove a photo background directly in Microsoft Word?
Yes, Microsoft Word has a built-in tool to remove photo backgrounds. Select the image, go to the “Picture Format” tab, and click “Remove Background.” However, this tool works best with simple images that have clearly defined subjects.
2. What are the limitations of using Word to remove a photo background?
Word’s background removal tool is limited in accuracy and struggles with complex images. It lacks advanced features like edge refinement and transparency adjustments, making it less effective compared to dedicated photo editing software.
3. What is the best way to remove backgrounds from complex images?
For complex images, using dedicated photo editing software like Adobe Photoshop or online tools such as Icons8 Background Remover and Remove.bg is recommended. These tools offer more precision and advanced features for better results.
4. How does Icons8 Background Remover compare to Word’s background removal tool?
Icons8 Background Remover is more precise and faster than Word’s tool, especially for complex images. It uses AI to accurately identify object edges, providing a cleaner and quicker background removal process.
5. Is there a free alternative to Adobe Photoshop for removing photo backgrounds?
Yes, GIMP (GNU Image Manipulation Program) is a free, open-source photo editing software that offers powerful background removal capabilities, comparable to Adobe Photoshop.
6. What file format should I use for images with transparent backgrounds in Word?
For images with transparent backgrounds, save them in PNG format. PNG supports transparency and ensures that the image maintains its quality when inserted into Word documents.
7. How can I improve the accuracy of background removal in Photoshop?
To improve accuracy in Photoshop, use tools like the Pen Tool and Layer Masks for precise selections. Additionally, use the “Refine Edge” feature to smooth and refine the edges of your selections.
8. What is frequency separation, and how can it help with background removal?
Frequency separation is a technique that separates the texture and tone of an image, making it easier to edit and refine details. It can be used to precisely remove backgrounds by working on different frequency layers.
9. What are some common mistakes to avoid when removing photo backgrounds?
Common mistakes include over-editing, poor edge refinement, ignoring shadows and highlights, using low-resolution images, and creating inconsistent lighting. Avoiding these mistakes ensures a natural and professional-looking result.
10. How can I stay updated with the latest photography and photo editing techniques?
Stay updated by following dfphoto.net for tutorials, image galleries, and community discussions. Additionally, follow industry blogs, attend workshops, and experiment with new tools and techniques.