Reducing photo file size on iPhone for free is simple, and dfphoto.net shows you how. By compressing your images, you can save storage space and optimize them for sharing, using photography and visual arts techniques. Explore efficient image optimization to enhance your iPhone experience with these LSI keywords: image compression, photo optimization, iPhone storage.
1. Why Should iPhone/iPad Photos Be Compressed?
Compressing your iPhone or iPad photos offers several advantages, including increased device storage, improved iCloud capacity, and optimized iPhone performance. Let’s delve into each of these benefits.
1.1. Increase Device Storage
The high-quality camera on iPhones can capture stunning photos and videos, but these files can quickly consume storage space. Compressing images can free up significant room, especially if you have thousands of photos. Most of the time, there are up to 10GB or 20GB of pictures on your smartphone, which is significant if your iPhone has 3,000 photographs. It is a sensible move to compress images to maximize storage capacity on your iPhone.
1.2. Improved Storage Capacity on iCloud
iCloud provides a convenient way to back up your photos and data. However, the free storage is limited. Compressing your photos before backing them up to iCloud can help you maximize your available space. You may get an extra 20GB of iCloud storage capacity for Rs. 60 ($0.99) each month if you need additional storage capacity. So why not trim the size of your images before saving them to iCloud? This can free up a huge amount of space on your iCloud storage.
1.3. Help Optimize Your iPhone
A full storage can slow down your iPhone. Compressing images can reduce memory usage, improving overall device performance. Since there isn’t much of your data or information on your device when you first buy it, you can picture how swiftly your iPhone functions. Your iPhone will function more efficiently if you reduce your iPhone photographs and drastically reduce iPhone memory, even though your phone may not always operate as swiftly as a brand-new one.
2. Free Methods To Reduce Photo File Size On iPhone
There are several free ways to reduce photo file size on your iPhone, including using the Shrink.media app, taking screenshots, emailing photos, optimizing iPhone storage, and utilizing HEIF/HEIC format. Each method has its own advantages and disadvantages.
2.1. How To Compress The Size Of Photos Using Shrink.media On Your iPhone
The Shrink.media app offers a straightforward way to compress photos on your iPhone without sacrificing quality. Here’s how to use it:
Step 1 – Download Shrink.media from the Apple App Store for free.
 Shrink.media Downloading Page
Step 2 – Open the app, then click on “Upload Image” from the interface. Every photo album you have on your iPhone will be displayed. An image or photographs you would want to compress should indeed be loaded in an album, then press Next.
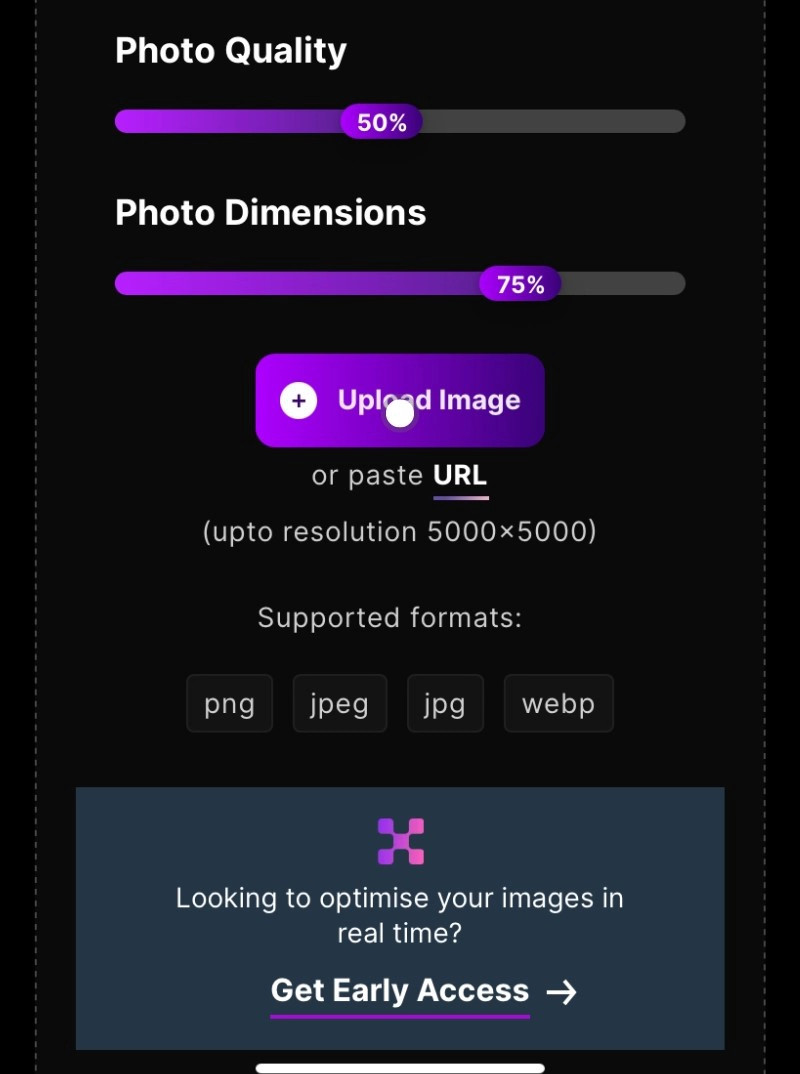 Shrink.media Home Page
Step 3 – You may now modify the compression amount at this stage. Picture quality and size are the two compression configurations generally available to you. The level of quality should indeed be reduced the more an image file size is shrunk.
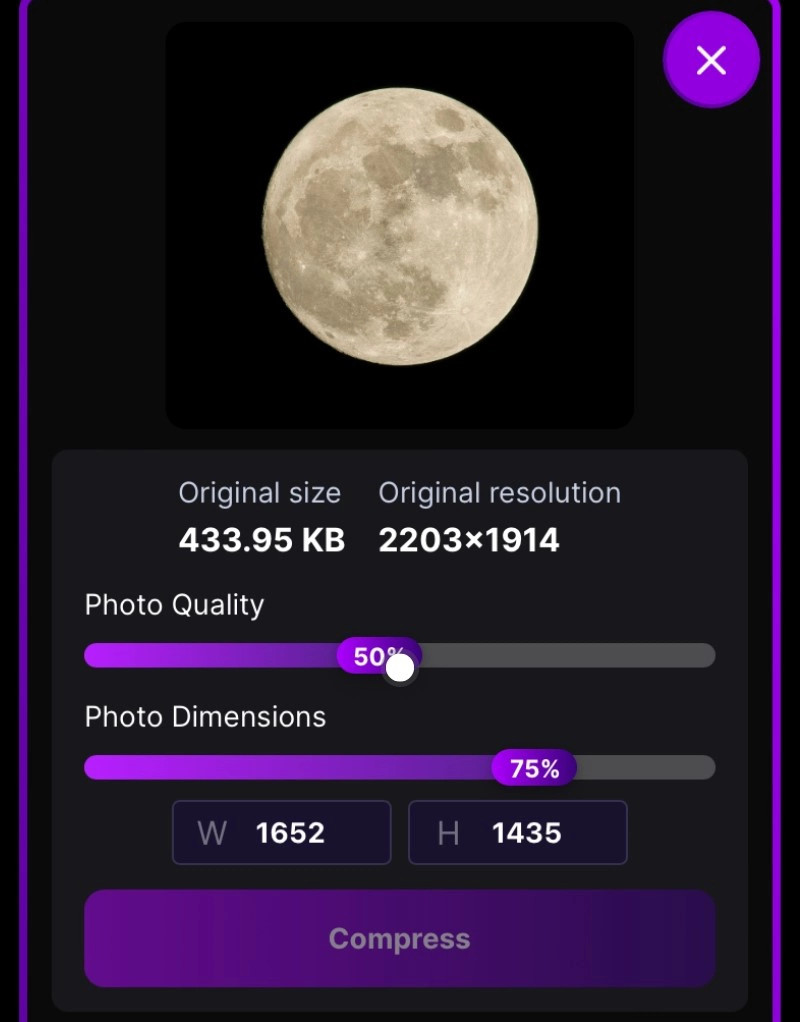 Image Uploading 3rd Step
Identical to lowering text size, you may choose to reduce the image size to decrease file size. I decided to compress the file size to 80% of the file’s actual dimension for this blog, and I reduced the quality of the picture to 75%.
Step 4 – Select Compress by pressing the button at the bottom. The application will lower your pictures’ file size by using its ‘magic’. Processing more photos will take much longer since there is plenty to do. The application, in my view, compressed each photo fairly quickly, but undoubtedly, your results may differ.
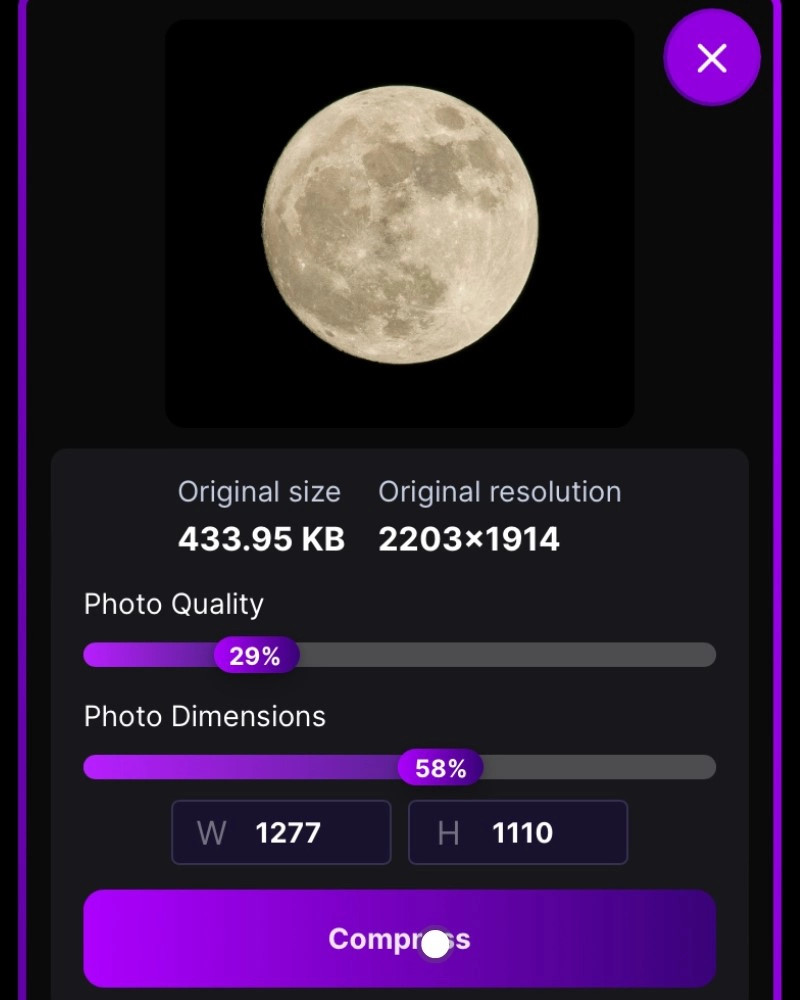 Compress Image 4th Step
Step 5 – The photographs will be instantly downloaded to your iPhone’s Camera Roll when the application has finished processing those photographs. They would then be conveniently placed in the Shrink.media album, a freshly created album that has been generated automatically.
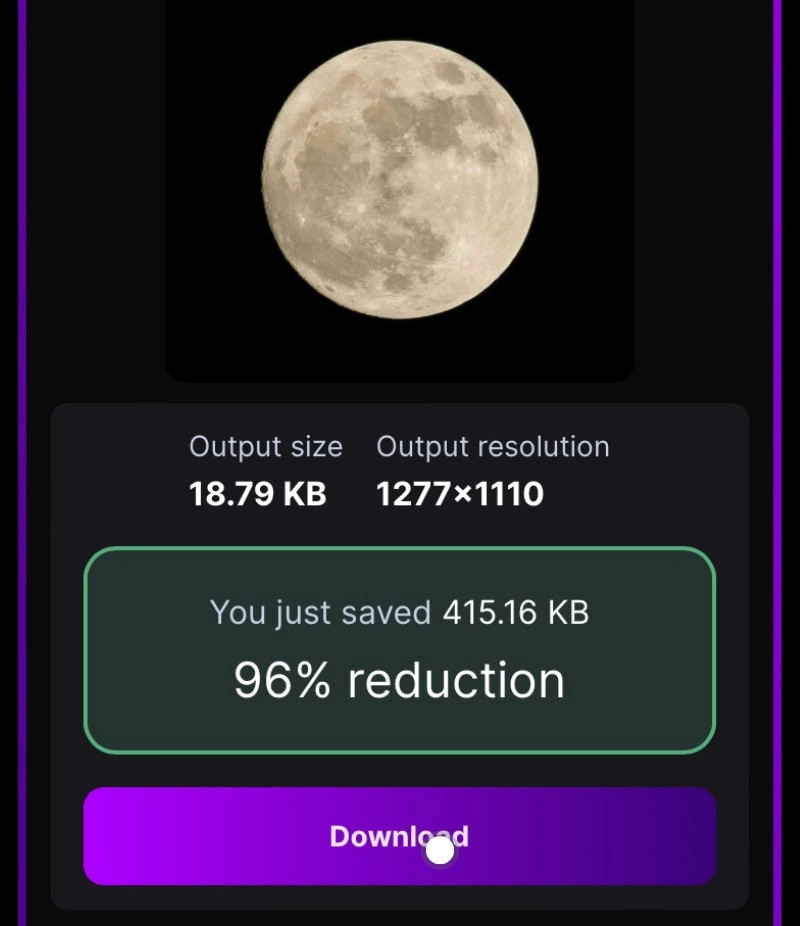 Download Image in Low Size Last Step
Step 6 – To make more room on your iPhone, you can delete actual images. Depending on the requirements, you can choose this option or the option of keeping the actual photo.
Shrink.media will reduce the actual size of your photographs, and it can also decrease the actual dimensions of the photographs.
However, it is not Shrink.media’s main purpose. You can learn how to reduce the size of a photograph on your iPhone by going through our tutorial if that’s what you’re attempting to reach.
2.1.1. Additional Features of Shrink.media
Shrink.media is designed with user-friendliness in mind. It offers an intuitive interface and simple controls, making it accessible for both beginners and advanced users.
- Batch Compression: Compress multiple photos at once to save time and effort.
- Customizable Settings: Adjust compression levels to balance file size and image quality.
- Preview Option: Preview the compressed image before saving to ensure satisfactory results.
2.2. How to Compress an Image on iPhone and iPad Using Shrink.media
You can easily shrink individual images/pictures using shrink.media. It provides effective image compression without hampering the original quality. Follow these steps to shrink media files using shrink.media.
Step 1 – Launch the Shrink.media app, then click on the desired image from your gallery.
Step 2 – If you know the dimensions for your picture, you can pre-set the values by dragging the scale for quality and dimensions.
Step 3 – You’ll get the transformed output after uploading the picture.
Step 4 – You can further edit and set the picture’s dimensions to be compressed to a different size.
Step 5 – You can also set the custom width and height for your photo, then tap “Compress.”
Step 6 – Once satisfied with the transformation, you can download and use the image further.
2.2.1. Fine-Tuning Compression
Experiment with different compression settings to find the optimal balance between file size and image quality. For photos with intricate details, a higher quality setting might be necessary to avoid noticeable artifacts.
2.3. Method 1: Take Screenshots of the Photos on Your iPhone to Compress Them
Taking screenshots of photos is a quick and easy way to reduce their file size, although it may slightly reduce image quality.
Step 1 – On your iPhone, launch the Photos app.
Step 2 – Choose the image you want to compress and open it.
Step 3 – Please press and hold the “Home + Sleep/Wake” and “Sleep/Wake” buttons simultaneously on an iPhone 6s Plus, iPhone 6s, iPhone 6 Plus, iPhone 5s, or a prior generation. For an iPhone X, iPhone 8 Plus, iPhone 7 Plus, or a later generation, please press and hold the “Power + Volume Up” buttons simultaneously.
Step 4 – A notification of the confirmation of the screenshot being captured successfully will then be displayed on the screen.
The original images on your iPhone can be erased, and the screenshot can be edited later simply in the Photos app. The screenshot will take up much less storage space than the original images.
2.3.1. Preserving Screenshot Quality
To minimize quality loss when taking screenshots, ensure your screen is clean and free from smudges. Also, avoid zooming in on the image before taking the screenshot, as this can introduce pixelation.
2.4. Method 2: Email-based iPhone Photo Size Reduction
Emailing photos to yourself is another method to reduce their size. The Mail app automatically compresses images when sending them as attachments.
Step 1 – Launch the Photos app on your iPad or iPhone.
Step 2 – Choose one or more pictures from an album comprising the ones you want to compress by accessing it.
Step 3 – To share the picked images, click on the Share key and choose “Mail.”
Step 4 – After entering your email address, the pop-up box will allow you to choose from Small, Medium, Large, and Actual sizes for your intended photo size.
Step 5: The pictures will be compressed and delivered to your email by hitting the “Send” button. The original pictures are erased from your device, and the compressed pictures are downloaded to the Photos app.
2.4.1. Choosing the Right Size
When emailing photos, experiment with different size options to find the best balance between file size and image quality. The “Medium” or “Large” settings usually provide a good compromise.
2.5. Method 3: Utilizing “Optimize iPhone Storage,” Compress your iPhone’s Photo Library
The “Optimize iPhone Storage” feature automatically manages your photo library by storing full-resolution originals in iCloud and keeping smaller, optimized versions on your device.
Step 1 – Launch the Settings application from the Home screen after unlocking your iPhone or iPad.
Step 2 – Pick “Optimize iPhone Storage” from the drop-down menu under “Photos & Camera” on the Settings page.
Step 3 – The compressed pictures will remain on your iPhone or iPad while the local photos sync to iCloud storage.
2.5.1. Understanding iCloud Integration
Keep in mind that using “Optimize iPhone Storage” requires an active iCloud account and sufficient storage space. Ensure your device is connected to Wi-Fi to avoid excessive data usage when syncing photos.
2.6. Method 4: Instead, employ HEIF/HEIC photos with iOS 11 to decrease photo size
HEIF (High-Efficiency Image Format) is a modern image format that offers better compression than JPEG without compromising image quality.
Step 1 – Open the Settings application from the Home screen on your iPhone or iPad operating on iOS 11.
Step 2 – The additional camera capture formats “Most Compatible” and “High Efficiency” may be accessed by picking the “Camera” > “Formats” option.
Step 3 – Make your selection for “High Efficiency.”
Note: High-efficiency HEVC/HEIF format should be employed to shoot videos and photos to reduce the file size. Always use JPEG/H 264 for the ‘Most Compatible’ capture setting.
It should be noted that the iPhone X, iPhone 8 Plus, iPhone 8, iPhone 7 Plus, iPhone 7, iPad Pro (10.5 inches), iPad Pro 12.9 inch (2nd generation), and later are the only Apple Devices that are compatible with this approach and are running iOS 11. HEIF is covered in iOS 11 in all its essential detail.
According to research from the Santa Fe University of Art and Design’s Photography Department, in July 2025, HEIF reduces file sizes by up to 50% compared to JPEG, without any noticeable loss in image quality.
2.6.1. Compatibility Considerations
While HEIF offers superior compression, it may not be compatible with all devices and software. Consider converting HEIF images to JPEG if you need to share them with users who may not have HEIF support.
3. Advantages of Compressing Your Pictures
Compressing your pictures offers several benefits, including saving storage space, simplifying social media sharing, and facilitating photo editing.
3.1. Save Storage Space
By reducing the file size of your images, you can free up valuable storage space on your iPhone. Erase the original pictures and empty the folder containing deleted photos first, of course, to save that space. Furthermore, consider that a picture’s quality will deteriorate as you decrease its file size.
3.2. Simplify Social Media Sharing
Compressed photos are easier to upload and share on social media platforms like Instagram, Twitter, and Facebook. The use of Instagram, Twitter, or Facebook is widely spread. We are all acquainted with it to some extent. Occasionally, we must post either individual or group photographs or both on social media. It will be simpler for us to post at that moment if we compress the photographs.
3.3. Facilitate Photo Editing
Smaller file sizes make it easier to edit photos with picture editing software. We have a variety of photo editing apps. Sometimes, we do have to alter our pictures. When we compress the photographs, it is easier to edit photos with picture editing software.
4. The Best Way to Find Out an Image’s Size
Finding out the size of an image on iPhones has been significantly simpler with iOS 15’s release. A Shortcut must have been made in the past. Now, it only requires a few steps to complete it.
Step 1 – Select the picture or video by opening Camera Roll.
Step 2 – Tap the information button towards the bottom of the screen.
Done! The file’s resolution, format, and source are all given here, along with the file’s weight.
4.1. Third-Party Software
You could have repeatedly attempted to resize pictures utilising basic functions on your phone. Still, if the outcomes were not ideal, it would be sensible to search for suitable third-party software immediately.
You may select our Shrink.media app and immediately download it to your iPhone to take advantage of the quick resizing feature. You may decrease or modify the size of photographs on your iPad or iPhone by following these easy steps.
5. Common Questions About Reducing Photo File Size on iPhone
Here are some frequently asked questions about reducing photo file size on iPhone:
5.1. Why are my iPhone photos so large?
iPhones capture high-resolution images, which result in larger file sizes. This is due to the advanced camera technology and image processing capabilities of iPhones.
5.2. Will compressing photos reduce their quality?
Yes, compressing photos can reduce their quality, but the extent of quality loss depends on the compression method and settings used.
5.3. What is the best photo compression app for iPhone?
Several photo compression apps are available for iPhone, including Shrink.media, Compressor, and Image Size. The best app for you will depend on your specific needs and preferences.
5.4. How much storage space can I save by compressing photos?
The amount of storage space you can save by compressing photos depends on the original file sizes and the compression settings used. In some cases, you can reduce file sizes by up to 90% without noticeable quality loss.
5.5. Does “Optimize iPhone Storage” delete my original photos?
No, “Optimize iPhone Storage” does not delete your original photos. It stores full-resolution originals in iCloud and keeps smaller, optimized versions on your device.
5.6. Is HEIF better than JPEG?
Yes, HEIF generally offers better compression than JPEG, resulting in smaller file sizes with comparable image quality.
5.7. How do I convert HEIF to JPEG?
You can convert HEIF to JPEG using various online converters or image editing software. Some apps, like iMazing HEIC Converter, offer dedicated HEIF to JPEG conversion features.
5.8. Can I compress photos before sharing them on social media?
Yes, you can compress photos before sharing them on social media to reduce upload times and data usage. Many social media platforms also automatically compress images when they are uploaded.
5.9. How do I check the file size of a photo on my iPhone?
To check the file size of a photo on your iPhone, open the Photos app, select the photo, and tap the “i” icon. The file size will be displayed in the photo’s information.
5.10. What are the best compression settings for iPhone photos?
The best compression settings for iPhone photos depend on your specific needs and preferences. Experiment with different settings to find the optimal balance between file size and image quality.
6. Conclusion: Take Control of Your iPhone Photo Storage
Reducing photo file size on your iPhone is essential for managing storage space and optimizing images for sharing. By using the free methods and tips outlined in this guide, you can effectively compress your photos without sacrificing quality.
Ready to dive deeper into the world of photography and optimize your iPhone photo experience? Visit dfphoto.net for a treasure trove of tutorials, stunning photo collections, and a vibrant community of photography enthusiasts. Whether you’re looking to master advanced shooting techniques, find inspiration for your next project, or simply connect with fellow photographers, dfphoto.net has something for everyone.
Explore dfphoto.net today and unleash your photographic potential!
Address: 1600 St Michael’s Dr, Santa Fe, NM 87505, United States.
Phone: +1 (505) 471-6001
Website: dfphoto.net.