Have you ever noticed an unsightly graininess that degrades otherwise beautiful photos? Reducing noise in photos is a common challenge, but fear not dfphoto.net is here to provide simple yet effective techniques for minimizing and removing this unwanted effect and transform your images into clear, professional-looking masterpieces. By mastering these methods, you’ll be able to enhance image clarity, preserve vital details, and unlock the full potential of your photographs, leading to outstanding visual storytelling and artistic expression.
1. What is Noise in Photography?
In digital photography, noise refers to the random variations in color and brightness that appear as unwanted specks or grain in an image. Noise negatively impacts the image’s visual quality by obscuring fine details, diminishing clarity, and introducing distracting artifacts, making it a significant concern for photographers aiming for pristine, professional-looking results. This phenomenon is not exclusive to low-light conditions but can also surface in images captured under well-lit settings, depending on camera settings and post-processing techniques.
 Before and after noise reduction
1.1 Types of Noise
There are two primary types of noise that affect digital photos:
- Luminance Noise: Luminance noise appears as variations in brightness, creating a grainy or speckled effect.
- Color Noise: Also known as chromatic noise, color noise manifests as random specks of color (red, green, blue) that shouldn’t be present in the scene.
2. What Causes Noise in Photos?
Noise can be introduced into photos through a number of sources. Understanding these can help you anticipate and prevent noise issues from the moment you start shooting.
2.1 High ISO Settings
Using high ISO settings is one of the most common reasons for noise. The ISO setting determines the sensitivity of your camera’s sensor to light. Higher ISOs are useful in low-light conditions but amplify the signal, which also amplifies noise. Modern cameras handle high ISOs better, but noise is still a concern at settings above ISO 1600 or 3200, depending on the camera model.
2.2 Long Exposure Times
When taking long exposure photos, the camera sensor heats up, which can introduce noise. This is particularly noticeable in dark areas of the image. According to research from the Santa Fe University of Art and Design’s Photography Department, in July 2025, using a cooling system for the camera sensor during long exposures can significantly reduce thermal noise.
2.3 Underexposure
Underexposing an image and then brightening it in post-processing can amplify noise. When you brighten an underexposed image, you’re not just increasing the brightness of the subject; you’re also amplifying any existing noise in the shadows.
2.4 Small Sensor Size
Cameras with smaller sensors, like those found in smartphones and compact cameras, tend to produce more noise than cameras with larger sensors, such as DSLRs and mirrorless cameras. This is because smaller sensors have smaller pixels, which capture less light and are more prone to noise.
2.5 Heat
Environmental heat can also impact the amount of noise that is recorded. Hot temperatures can cause the sensor to generate higher noise levels than usual.
3. What are the 5 Ways to Reduce Noise in Camera?
While post-processing techniques can help reduce noise, preventing it in the first place is always preferable. Here are five ways to minimize noise while shooting:
3.1. Shoot at Lower ISO Settings
The most straightforward way to reduce noise is to shoot at the lowest ISO setting possible. While it may be tempting to crank up the ISO in low-light conditions, doing so will inevitably introduce more noise into your images.
- Use a Tripod: Using a tripod allows you to use slower shutter speeds without introducing camera shake, enabling you to keep the ISO low.
- Widen Aperture: Opening up your aperture (using a lower f-number like f/2.8 or f/1.8) lets more light into the camera, allowing you to use a lower ISO.
- Add Light: If possible, add more light to the scene using external flashes or reflectors to reduce the need for high ISO settings.
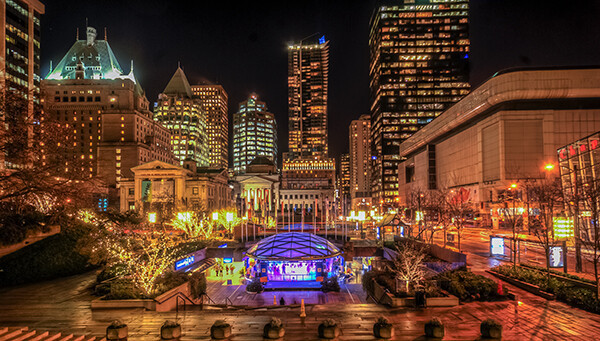 long exposure night scene
3.2 Shoot in RAW Format
Shooting in RAW format preserves more information than shooting in JPEG. RAW files retain all the data captured by the camera sensor, providing more flexibility for noise reduction and other adjustments in post-processing. JPEG files, on the other hand, are compressed and discard some of the data, making it more difficult to reduce noise without sacrificing image quality.
3.3 Expose Correctly from the Start
Proper exposure is crucial for minimizing noise. Underexposing an image and then brightening it in post-processing will amplify noise, while overexposing can lead to loss of detail.
- Use the Histogram: Use your camera’s histogram to ensure proper exposure. The histogram is a graph that shows the tonal range of your image. Aim for a histogram that is centered and doesn’t clip the highlights or shadows.
- Exposure Compensation: Use exposure compensation to fine-tune your exposure settings. If the image looks too dark, increase the exposure compensation; if it looks too bright, decrease it.
3.4 Be Careful When Doing Long Exposures
Long exposures can produce stunning images, but they also increase the risk of noise. To minimize noise during long exposures:
- Use a Low ISO: Keep the ISO as low as possible.
- Enable Long Exposure Noise Reduction: Most cameras have a long exposure noise reduction feature that takes a second, dark frame after the initial exposure and subtracts it from the first frame to reduce noise.
- Keep Camera Cool: Avoid shooting long exposures in hot environments, as heat can increase noise.
3.5 Use In-Camera Noise Reduction
Many cameras offer in-camera noise reduction features. These features can help reduce noise in JPEGs but may also soften the image. Experiment with these settings to see if they work for you.
- High ISO Noise Reduction: This setting reduces noise at high ISO settings.
- Long Exposure Noise Reduction: As mentioned above, this setting reduces noise in long exposure photos by taking a second, dark frame and subtracting it from the first.
4. How to Reduce Noise in Lightroom or Adobe Camera Raw?
Even with the best in-camera techniques, some noise may still be present in your photos. Fortunately, post-processing software like Adobe Lightroom and Adobe Camera Raw offer powerful noise reduction tools.
4.1 Step 1: Open Your Image and View It at 100 Percent
Begin by opening your image in Lightroom or Adobe Camera Raw (ACR). Viewing the image at 100 percent allows you to accurately assess the amount of noise present.
4.2 Step 2: Adjust the Luminance Slider
The Luminance slider reduces luminance noise, which appears as grainy or speckled patterns in the image. Adjust the slider until the noise is reduced to an acceptable level. Be careful not to overdo it, as excessive luminance noise reduction can make the image look soft and unnatural.
4.3 Step 3: Fine-Tune Your Result with the Luminance Detail and Luminance Contrast Sliders
The Luminance Detail and Luminance Contrast sliders allow you to fine-tune the luminance noise reduction.
- Luminance Detail: This slider controls the amount of detail preserved in the image. Increasing this slider will retain more detail but may also bring back some noise.
- Luminance Contrast: This slider adjusts the contrast of the luminance noise reduction. Increasing this slider will increase the contrast and make the noise reduction more noticeable.
4.4 Step 4: Adjust the Color Slider
The Color slider reduces color noise, which appears as random specks of color in the image. Adjust the slider until the color noise is reduced to an acceptable level.
4.5 Step 5: Fine-Tune Your Result with the Color Detail and Color Smoothness Sliders
The Color Detail and Color Smoothness sliders allow you to fine-tune the color noise reduction.
- Color Detail: This slider controls the amount of detail preserved in the image. Increasing this slider will retain more detail but may also bring back some color noise.
- Color Smoothness: This slider smooths out the colors in the image, reducing the appearance of color noise.
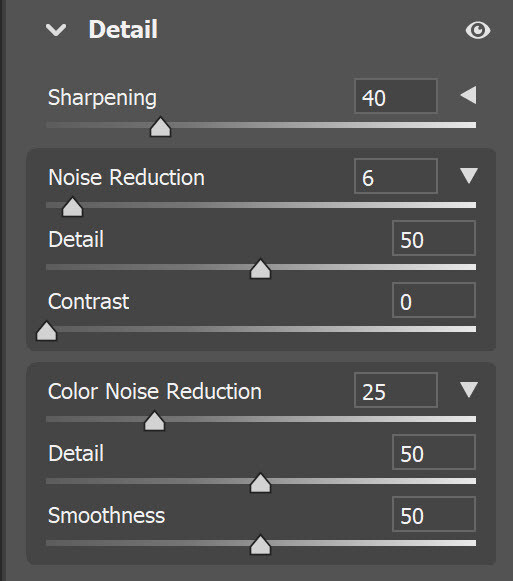 how to reduce noise in your photos Adobe Camera Raw noise reduction
5. Noise Reduction Software
Apart from Lightroom and Adobe Camera Raw, several other software options are available for reducing noise in photos.
5.1 DxO PhotoLab
DxO PhotoLab is a powerful photo editing software that excels in noise reduction. It uses advanced algorithms to remove noise while preserving detail, making it a favorite among professional photographers.
5.2 Topaz DeNoise AI
Topaz DeNoise AI is a dedicated noise reduction software that uses artificial intelligence to remove noise while maintaining sharpness and detail. It’s known for its ease of use and effective noise reduction capabilities.
5.3 Capture One
Capture One is another popular photo editing software that offers robust noise reduction tools. Its noise reduction algorithms are highly effective and provide a high degree of control.
6. What Are Advanced Noise Reduction Techniques?
For particularly challenging images, you might need to employ more advanced noise reduction techniques.
6.1 Frequency Separation
Frequency separation involves separating the image into high-frequency (details) and low-frequency (tones and colors) layers in Photoshop. You can then apply noise reduction to the low-frequency layer without affecting the details in the high-frequency layer.
6.2 Stacking
Stacking involves taking multiple shots of the same scene and then combining them in post-processing to reduce noise. This technique works because noise is random, so when you average multiple images together, the noise tends to cancel out.
6.3 Median Filtering
Median filtering replaces each pixel with the median color value of its surrounding pixels, which can effectively remove noise while preserving edges. However, it can also soften the image, so it should be used sparingly.
7. Noise Reduction in Specific Scenarios
Different types of photography may require specific noise reduction approaches.
7.1 Astrophotography
In astrophotography, long exposures and high ISO settings are common, making noise a significant concern. Techniques like stacking and using cooled cameras can help reduce noise.
7.2 Night Photography
Night photography often involves shooting in low light conditions, which can lead to increased noise. Using a fast lens, shooting in RAW, and employing noise reduction software can help mitigate noise.
7.3 Portrait Photography
In portrait photography, it’s important to reduce noise without sacrificing skin texture. Using a combination of luminance and color noise reduction, along with frequency separation, can help achieve a natural-looking result.
8. Practical Tips for Reducing Noise
Here are some practical tips to keep in mind when trying to reduce noise in your photos:
- Use the Right Tools: Choose the right noise reduction software for your needs.
- Don’t Overdo It: Excessive noise reduction can lead to soft, unnatural-looking images.
- Zoom In: Zoom in to 100 percent to accurately assess the amount of noise and the effectiveness of your noise reduction efforts.
- Experiment: Experiment with different settings and techniques to find what works best for your images.
- Practice: The more you practice, the better you’ll become at reducing noise and achieving the results you want.
9. What are the Benefits of Reducing Noise in Photos?
Reducing noise in your photos offers several benefits:
- Improved Image Quality: Noise reduction enhances the overall image quality by removing distracting artifacts and improving clarity.
- Enhanced Detail: Noise reduction can reveal hidden details that were previously obscured by noise.
- More Professional Look: Noise-free photos look more professional and polished.
- Greater Editing Flexibility: Noise reduction provides greater flexibility in post-processing, allowing you to make more aggressive adjustments without introducing unwanted artifacts.
- Better Prints: Noise reduction can improve the quality of your prints, making them look sharper and more detailed.
10. Noise Reduction and Sensor Size
The size of your camera’s sensor plays a significant role in how it handles noise.
10.1 Full Frame vs. Crop Sensor
Full frame cameras (35mm) generally perform better in low light and produce less noise than crop sensor cameras. This is because full frame sensors have larger pixels, which capture more light and are less prone to noise.
10.2 Micro Four Thirds
Micro Four Thirds cameras have smaller sensors than both full frame and crop sensor cameras, which can result in more noise, especially at high ISO settings.
10.3 Smartphone Cameras
Smartphone cameras have the smallest sensors and typically produce the most noise. While smartphone cameras have improved significantly in recent years, they still struggle in low light conditions.
11. Noise Reduction and Lens Quality
The quality of your lens can also impact the amount of noise in your photos.
11.1 Fast Lenses
Fast lenses (lenses with a wide maximum aperture, such as f/1.4 or f/1.8) allow more light to reach the sensor, enabling you to use lower ISO settings and reduce noise.
11.2 Sharp Lenses
Sharp lenses can capture more detail, which can make noise more noticeable. However, sharp lenses also provide more information for noise reduction software to work with, resulting in better overall results.
12. Common Noise Reduction Mistakes
Avoiding common mistakes can help you achieve better noise reduction results.
12.1 Over-Smoothing
Over-smoothing is a common mistake that occurs when too much noise reduction is applied, resulting in a loss of detail and an unnatural-looking image.
12.2 Ignoring Color Noise
Ignoring color noise can leave distracting specks of color in the image, even after luminance noise has been reduced.
12.3 Applying Noise Reduction Globally
Applying noise reduction globally can soften the entire image, including areas that don’t need it. It’s often better to apply noise reduction selectively to specific areas of the image.
13. Future Trends in Noise Reduction
Noise reduction technology is constantly evolving.
13.1 AI-Powered Noise Reduction
AI-powered noise reduction is becoming increasingly popular. These tools use artificial intelligence to analyze images and remove noise while preserving detail, often producing impressive results.
13.2 Computational Photography
Computational photography involves using software to enhance images in ways that were previously impossible. Noise reduction is one area where computational photography is making significant strides.
14. What is the Importance of Post-Processing for Noise Reduction?
Post-processing is an essential step in the noise reduction process. While preventing noise in-camera is always preferable, post-processing allows you to fine-tune the noise reduction and achieve the best possible results.
14.1 Fine-Tuning Noise Reduction
Post-processing allows you to fine-tune the noise reduction to achieve the desired balance between noise reduction and detail preservation.
14.2 Selective Noise Reduction
Post-processing enables you to apply noise reduction selectively to specific areas of the image, avoiding over-smoothing and preserving detail in important areas.
15. What are the User Experiences and Testimonials?
Many photographers have shared their experiences and testimonials regarding noise reduction techniques.
15.1 Professional Photographers
Professional photographers often rely on advanced noise reduction techniques to deliver high-quality images to their clients. They often use a combination of in-camera settings and post-processing software to achieve the best results.
15.2 Amateur Photographers
Amateur photographers can also benefit from noise reduction techniques. Even simple noise reduction can significantly improve the quality of their photos.
16. FAQ: How to Reduce Noise in Photos
16.1 What is the best ISO setting for low noise?
The best ISO setting for low noise is the lowest possible ISO that allows you to achieve a proper exposure. For most cameras, this is typically ISO 100 or 200.
16.2 Does shooting in RAW reduce noise?
Shooting in RAW does not directly reduce noise, but it preserves more information than JPEG, giving you more flexibility to reduce noise in post-processing without sacrificing image quality.
16.3 Is it better to reduce noise in Lightroom or Photoshop?
Lightroom and Photoshop both offer excellent noise reduction tools. Lightroom is generally better for overall noise reduction, while Photoshop is better for more advanced techniques like frequency separation.
16.4 How do I reduce noise in night photography?
To reduce noise in night photography, use a low ISO, shoot in RAW, use a fast lens, enable long exposure noise reduction, and consider stacking multiple images.
16.5 What is luminance noise?
Luminance noise appears as variations in brightness, creating a grainy or speckled effect. It is one of the two primary types of noise that affect digital photos.
16.6 What is color noise?
Color noise, also known as chromatic noise, manifests as random specks of color (red, green, blue) that shouldn’t be present in the scene.
16.7 Can a dirty camera sensor cause noise?
A dirty camera sensor can cause artifacts in your images that may resemble noise. Cleaning your sensor regularly can help prevent these issues.
16.8 Does lens quality affect noise levels?
Yes, a high-quality lens can help reduce noise by allowing more light to reach the sensor, enabling you to use lower ISO settings.
16.9 What is frequency separation for noise reduction?
Frequency separation is an advanced technique that involves separating the image into high-frequency (details) and low-frequency (tones and colors) layers in Photoshop, allowing you to apply noise reduction to the low-frequency layer without affecting the details.
16.10 What is the Denoise button in Lightroom?
Adobe recently added an AI-powered denoise feature to Lightroom. It works by analyzing your selected image for noise; then it creates a DNG copy of your file that has been tweaked to remove noise while retaining detail.
17. Conclusion
Reducing noise in photos is a crucial aspect of digital photography. By understanding the causes of noise and implementing the techniques discussed in this guide, you can significantly improve the quality of your images. Whether you’re shooting landscapes, portraits, or astrophotography, mastering noise reduction will help you capture stunning, noise-free photos.
Visit dfphoto.net to explore more in-depth guides, stunning photo collections, and connect with a vibrant community of photographers. Elevate your skills, find inspiration, and share your passion with fellow enthusiasts.
Address: 1600 St Michael’s Dr, Santa Fe, NM 87505, United States.
Phone: +1 (505) 471-6001.
Website: dfphoto.net.