In today’s digital world, images are essential for engaging content online. However, high-resolution photos can significantly slow down website loading times, impacting user experience and SEO rankings. Learning how to reduce photo file size is a crucial skill for anyone involved in web content creation, digital marketing, or photography. This guide will explore effective techniques to compress your images without sacrificing visual quality, ensuring your website remains fast and visually appealing.
Choosing the right image format is the first step in controlling file size. The three most common web image formats are JPEG, GIF, and PNG, each with unique strengths and weaknesses in terms of compression and image characteristics. Understanding these differences is key to effective image optimization.
Understanding JPEG Compression: Balancing Quality and File Size
JPEG (or JPG) is a popular format, especially for photographs and images with complex colors and gradients. JPEG utilizes lossy compression, which means it reduces file size by discarding some image data. The level of compression is controlled by a “quality” setting in image editing software.
When you save a JPEG, you’ll typically encounter quality options presented as:
- Presets: Low, Medium, High, Maximum.
- Numerical Range: 0-12 (or similar), where higher numbers mean better quality.
- Percentage: 0-100%, with 100% being the highest quality.
The key to optimizing JPEGs is to find the lowest quality setting that still provides acceptable visual results for your intended purpose. A practical approach is to start with a higher quality setting and gradually decrease it, visually inspecting the image at each step. If you notice unwanted artifacts or a significant drop in quality, revert to the last acceptable setting.
Consider the image’s purpose. For detailed botanical encyclopedias, high quality is paramount to preserve fine details. But for casual social media posts or website decorations, lower quality, smaller files are perfectly adequate.
Let’s examine the impact of different JPEG quality settings on a flower photo:
 Daylily flower and buds at 100% quality
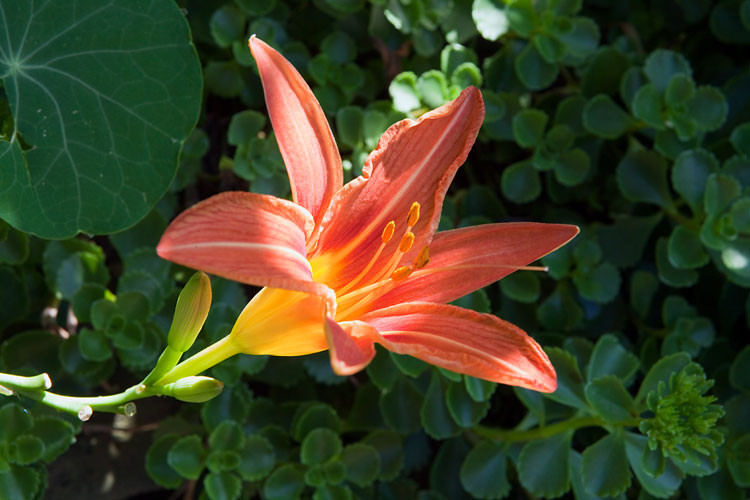
100% quality JPEG example, resulting in the largest file size for maximum detail.
At 100% quality, the file size is 103 KB. This setting is rarely necessary for web use and results in unnecessarily large files.
 Daylily flower and buds at 80% quality
80% quality JPEG example, showing minimal visual difference from 100% but significantly reduced file size.
Reducing the quality to 80% yields a 48 KB file. Visually, the image is almost indistinguishable from the 100% version, demonstrating significant file size reduction with negligible quality loss.
 Daylily flower and buds at 60% quality
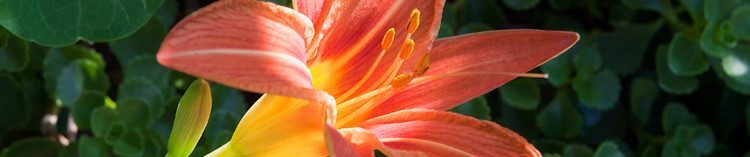
60% quality JPEG example, maintaining good visual quality with a further reduction in file size for faster loading.
At 60% quality, the file size drops to 28 KB. Most viewers would still perceive this image as high quality, while it loads considerably faster – approximately four times faster than the 100% quality version.
 Daylily flower and buds at 40% quality
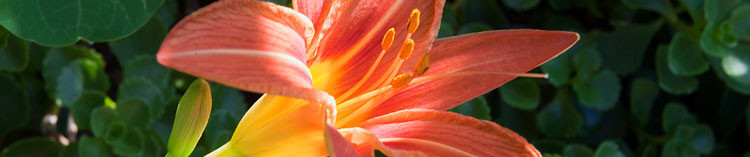
40% quality JPEG example, demonstrating acceptable quality for many web uses with a small file size for optimal performance.
A 40% quality setting results in a 17 KB file. For many general web applications, this quality level remains acceptable and offers a substantial file size reduction, loading five times faster than the original.
 Daylily flower and buds at 20% quality
20% quality JPEG example, showing noticeable degradation and artifacts due to aggressive compression.
Dropping to 20% quality (12 KB) introduces noticeable image degradation and artifacts, making it less suitable for most visual purposes.
 Daylily flower and buds at 0% quality
0% quality JPEG example, illustrating severe blockiness and quality loss from maximum compression.
Finally, 0% quality (7 KB) shows extreme blockiness and severe quality loss, making it unacceptable for almost any application.
Sample photo from FCIT’s collection of stock plant photos on the ClipPix ETC website.
Another technique to reduce JPEG file size is blurring. Images with fewer sharp details and edges compress more efficiently. Blurring can be particularly useful for background images where crisp detail is not essential. You can selectively blur parts of an image, such as the background, to achieve file size savings while maintaining focus on the main subject.
Consider this day lily photo with a detailed background. At 60% JPEG quality, it is 77 KB.
 Day lily with sharp background
Original daylily photo with a sharp background, resulting in a larger file size at 60% JPEG quality.
By blurring the background in an image editor like Photoshop, and keeping the flower sharp, we can significantly reduce the file size. Exporting the blurred version at the same 60% quality yields a file size of only 54 KB – a 30% reduction.
 Day lily with blurred background
Daylily photo with a blurred background, achieving a smaller file size at the same 60% JPEG quality while enhancing focus on the subject.
This technique not only reduces file size but also enhances the image aesthetically by drawing more attention to the flower.
Important Note on JPEG and Lossy Compression: JPEG is a lossy format. Each time you save a JPEG, you lose some image quality. For archival purposes or if you anticipate future edits, always save your original image in a lossless format like TIFF or PSD. Export to JPEG only for web use. Avoid repeatedly saving and re-saving a JPEG file, as this will progressively degrade the image quality, similar to photocopying a photocopy. Always revert to your original, uncompressed file for editing.
GIF Compression: Optimizing Palettes for Simple Graphics
GIF (Graphics Interchange Format) is traditionally used for simple graphics with limited colors and solid areas. While PNG-8 can often achieve similar or better results with smaller file sizes, understanding GIF compression remains valuable.
GIF images are limited to a 256-color palette. Significantly reducing the color palette can dramatically reduce GIF file size. Aim for color palette sizes close to powers of 2: 256, 128, 64, 32, 16, 8, 4, or 2. For instance, reducing a 33-color image to a 32-color palette will yield substantial savings, while reducing from 32 to 31 colors offers minimal further reduction.
Refer to resources like “What is bit depth?” for detailed explanations of color depth and its impact.
When saving a GIF, consider these settings:
- Number of Colors: Select the lowest acceptable color count.
- Dithering: If you notice “banding” (unwanted color steps) in gradients, dithering can help smooth transitions. “Diffusion” dither is often most effective. However, banding suggests GIF might not be the optimal format for that image.
- Transparency: If your image requires transparent areas, ensure the “transparency” option is selected.
Settings like “Web snap” and “Matte” are largely obsolete due to advancements in monitor technology and are generally safe to ignore. For transparency issues, PNG is often a superior alternative to GIF.
GIFs are also widely known for animation, though PNG is increasingly capable in this area as well.
 Dancing robot GIF example
Animated GIF example showcasing its traditional use for simple animations.
Sample graphic from FCIT’s collection of robot illustrations on the TIM website.
PNG Compression: Versatility of Lossless and Lossy Options
PNG (Portable Network Graphics) has gained significant popularity and is now widely used online, often surpassing JPEG and GIF. PNG offers both lossless (PNG-24) and lossy (PNG-8) compression options, combining the strengths of both JPEG and GIF.
PNG-8 is similar to GIF, best suited for graphics with few colors and solid areas like logos. The primary advantage of PNG-8 over GIF is typically smaller file sizes for comparable images.
PNG-24 is analogous to JPEG in its suitability for photographs and complex images with many colors. However, PNG-24 employs lossless compression. This means no image data is discarded, resulting in higher quality but larger file sizes compared to JPEGs at similar visual quality.
Exporting as PNG-8: The settings are similar to GIF:
- Number of Colors: Choose from palette sizes like 2, 4, 8, 16, 32, 64, 128, or 256.
- Dithering: Use if banding occurs in gradients.
- Transparency: Select if transparency is needed.
The key difference is that PNG-8 generally provides better compression than GIF.
Consider this cartoon exported as a 32-color GIF, resulting in a 13.6 KB file size.
 Cartoon saved as GIF example
Cartoon graphic saved as a GIF, demonstrating file size for simple graphics in GIF format.
Exporting the same cartoon as a 32-color PNG with identical settings reduces the file size to 10.2 KB – a 25% file size saving.
Cartoon saved as PNG example
Cartoon graphic saved as a PNG, showcasing smaller file size compared to GIF for similar visual content.
Sample graphic from FCIT’s collection of tech cartoons on the TIM website.
Exporting as PNG-24: Being lossless, PNG-24 offers minimal quality settings. No image information is discarded during compression. This results in excellent image quality but potentially large file sizes.
A photo of macaws saved as PNG-24 can be 400 KB.
 Photo saved as PNG-24 example
High-quality photo saved as PNG-24, illustrating the larger file size associated with lossless compression.
The same photo saved as a maximum quality (100%) JPEG is 259 KB.
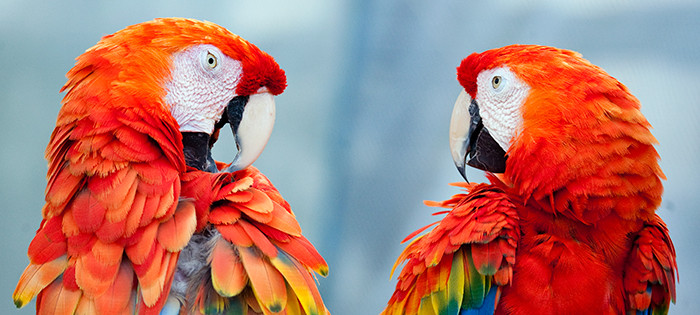 Photo saved as maximum quality JPEG example
Photo saved as maximum quality JPEG, showing a smaller file size than PNG-24 but with lossy compression.
At a high quality (60%) JPEG setting, the file size dramatically reduces to just 69 KB.
 Photo saved as high quality JPEG example
Photo saved as high quality JPEG, demonstrating significant file size reduction with acceptable visual quality for web use.
Sample photo from FCIT’s collection of stock animal photos on the ClipPix ETC website.
Why Choose PNG-24 over JPEG Despite Larger File Sizes?
Despite potentially larger file sizes compared to JPEGs, PNG-24 offers several compelling advantages:
- Transparency: PNG-24 supports transparency, which JPEG does not.
- Lossless Quality: For scenarios where image quality is paramount and no data loss is acceptable, PNG-24 is essential. Even “maximum quality” JPEGs involve some data loss.
- Sharp Details: PNG-24 excels at preserving sharp details, making it ideal for screenshots containing text or line art where JPEG compression can introduce unwanted “smudging.”
Conclusion: Choosing the Right Format and Compression for Optimal Web Performance
Mastering how to reduce photo file size involves understanding image formats and compression techniques. JPEG, GIF, and PNG each have specific applications. JPEG is excellent for photographs where some quality loss is acceptable for smaller file sizes. GIF is suitable for simple graphics with limited colors, though often superseded by PNG-8. PNG provides versatility with PNG-8 for lossy compression similar to GIF but with better efficiency, and PNG-24 for lossless quality when needed.
By carefully selecting the appropriate format and compression settings, you can significantly reduce your image file sizes, improve website loading speed, enhance user experience, and boost your SEO performance. Always consider the trade-off between file size and image quality, and choose the optimal balance for your specific needs.
Related Pages:
What is the difference between bitmap and vector images?
What is bit depth?