Accidentally deleted precious memories from your iPhone? Don’t panic! dfphoto.net is here to guide you through simple yet effective methods to recover your deleted photos on your iPhone, ensuring those valuable moments aren’t lost forever. Whether it’s retrieving them from the Recently Deleted album, restoring from an iCloud backup, or utilizing third-party recovery tools, we provide detailed, step-by-step instructions to help you reclaim your cherished photos. Plus, learn preventive measures to safeguard your images from future mishaps and enhance your overall digital photo management.
1. Understanding Photo Deletion on Your iPhone
Before diving into recovery methods, it’s essential to understand how your iPhone handles deleted photos. When you delete a photo, it doesn’t immediately disappear from your device. Instead, it moves to the “Recently Deleted” album, where it remains for 30 days. This grace period gives you a chance to recover accidentally deleted photos. Photos are permanently erased after this 30-day window, making recovery more challenging but still potentially possible with specialized tools.
1.1. What Happens When You Delete a Photo?
Deleting a photo on your iPhone sends it to the Recently Deleted album, a temporary holding space. The iPhone’s operating system marks the data as available for overwriting. Until new data overwrites the storage space, the photo remains recoverable.
1.2. The 30-Day Grace Period
Apple provides a 30-day grace period for photos in the Recently Deleted album. This feature is a safety net, allowing you to restore photos you didn’t mean to delete. According to Apple Support, this feature is designed to prevent accidental data loss and give users a chance to review their deleted items.
1.3. Permanent Deletion and Its Implications
After 30 days in the Recently Deleted album, photos are permanently deleted from your iPhone. This means they are removed from your device’s storage and iCloud (if iCloud Photos is enabled). While the photos are no longer directly accessible, they might still be recoverable using advanced data recovery techniques, although success isn’t guaranteed.
2. Immediate Steps to Take After Deletion
Acting quickly after realizing you’ve deleted a photo is crucial. The longer you wait, the higher the chance that new data will overwrite the deleted photo, reducing the likelihood of successful recovery. Here are the immediate steps you should take:
2.1. Stop Using Your iPhone Immediately
To prevent overwriting the deleted photo’s data, stop using your iPhone as soon as possible. Avoid taking new photos, downloading apps, or any other activity that writes data to your device’s storage.
2.2. Check the Recently Deleted Album
Your first step should always be to check the Recently Deleted album in the Photos app. Here’s how:
- Open the Photos app on your iPhone.
- Tap the Albums tab at the bottom of the screen.
- Scroll down to the Utilities section and tap Recently Deleted.
- If prompted, use Face ID, Touch ID, or your passcode to unlock the album.
- Look for the deleted photos and videos.
2.3. Assess Your Backup Situation
Consider your backup habits. Do you regularly back up your iPhone to iCloud or a computer? Knowing your backup situation will guide your next steps. If you have a recent backup, you can restore your entire device to recover the deleted photos.
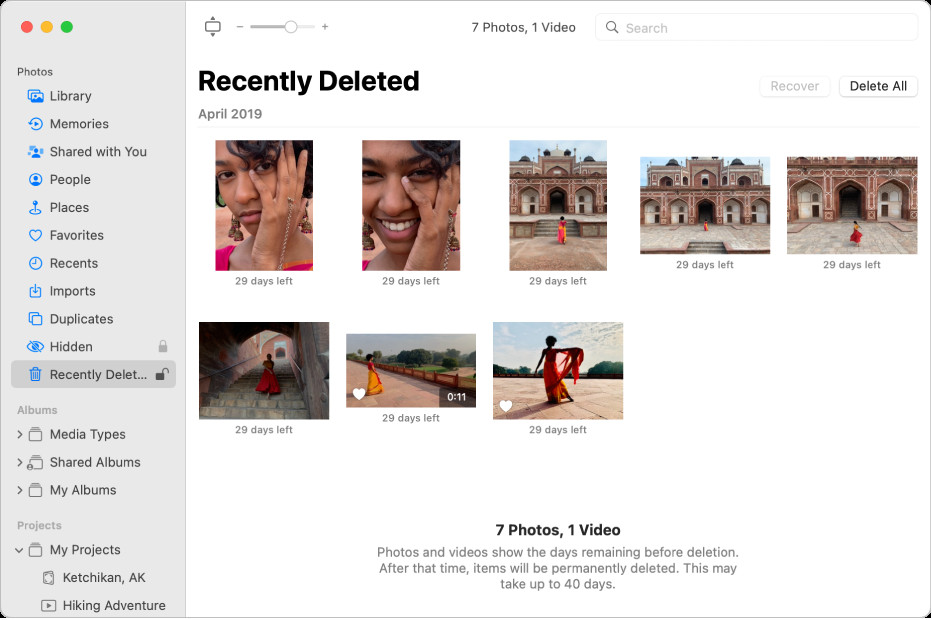
3. Recovering Photos from the Recently Deleted Album
The Recently Deleted album is the first place you should look to recover deleted photos. It’s the simplest and most direct method, provided the photos are still within the 30-day grace period.
3.1. Step-by-Step Guide to Recovery
- Open the Photos App: Launch the Photos app on your iPhone.
- Navigate to Albums: Tap the Albums tab at the bottom of the screen.
- Find Recently Deleted: Scroll down to the Utilities section and tap Recently Deleted.
 Recently Deleted Album on iPhone
- Unlock the Album: Use Face ID, Touch ID, or your passcode to unlock the album if required.
- Select Photos: Tap Select in the upper-right corner of the screen.
- Choose Photos to Recover: Tap on each photo or video you want to recover. A checkmark will appear on the selected items.
- Recover: Tap Recover at the bottom-right corner of the screen.
- Confirm: Tap Recover Photo to confirm the recovery. If you want to recover all items, tap Recover All.
3.2. What If the Photos Aren’t in the Album?
If you can’t find your deleted photos in the Recently Deleted album, they have likely been permanently deleted. This means you’ll need to explore other recovery methods, such as restoring from a backup or using data recovery software.
4. Restoring Photos from iCloud Backup
If you have iCloud Photos enabled, your photos are automatically backed up to iCloud. Restoring from an iCloud backup can recover photos that have been permanently deleted from your iPhone.
4.1. Checking If iCloud Photos Is Enabled
Before attempting to restore from iCloud, ensure that iCloud Photos is enabled on your device. Here’s how:
- Open the Settings app on your iPhone.
- Tap on your Apple ID at the top of the screen.
- Tap iCloud.
- Tap Photos.
- Check if iCloud Photos is toggled on.
4.2. Steps to Restore from iCloud Backup
Restoring from an iCloud backup involves erasing your iPhone and restoring it from a previous backup. Follow these steps carefully:
- Back Up Your Current Data: Before erasing your iPhone, back up any current data to avoid losing it. Go to Settings > Your Name > iCloud > iCloud Backup and tap Back Up Now.
- Erase Your iPhone: Go to Settings > General > Transfer or Reset iPhone > Erase All Content and Settings. Follow the prompts to erase your device.
- Restore from iCloud Backup: After your iPhone restarts, follow the setup instructions until you reach the Apps & Data screen.
- Choose Restore from iCloud Backup, and sign in with your Apple ID.
- Select the most recent backup from the list and wait for the restoration process to complete.
4.3. Limitations and Considerations
- Complete Device Restore: Restoring from an iCloud backup restores your entire device, not just the photos. This means all your apps, settings, and other data will be reverted to the state of the backup.
- Time-Consuming: The restoration process can take a significant amount of time, depending on the size of the backup and your internet connection speed.
- Data Loss: Any data created on your iPhone after the backup date will be lost.
5. Recovering Photos from iTunes/Finder Backup
If you regularly back up your iPhone to a computer using iTunes (or Finder in macOS Catalina and later), you can restore your photos from these backups.
5.1. Ensuring You Have a Recent Backup
Before proceeding, ensure you have a recent backup that contains the deleted photos. Connect your iPhone to your computer and check the backup date in iTunes or Finder.
5.2. Steps to Restore from iTunes/Finder Backup
- Connect Your iPhone: Connect your iPhone to the computer you used to create the backup.
- Open iTunes/Finder: Open iTunes (or Finder if you’re using macOS Catalina or later).
- Select Your Device: In iTunes, click the device icon near the top-left corner. In Finder, select your iPhone from the Locations list in the sidebar.
- Restore Backup: In iTunes, click Restore Backup. In Finder, click Restore iPhone.
- Choose Backup: Select the most recent backup from the list and enter the password if prompted.
- Wait for Restoration: Wait for the restoration process to complete. Your iPhone will restart, and the data from the backup will be restored.
5.3. Advantages and Disadvantages Compared to iCloud
- Advantages:
- Faster Restoration: Restoring from a computer backup is generally faster than restoring from iCloud.
- No Internet Dependency: You don’t need an internet connection to restore from a computer backup.
- Disadvantages:
- Requires Computer Access: You need access to the computer where the backup is stored.
- Full Device Restore: Similar to iCloud, restoring from a computer backup restores your entire device.
6. Using Third-Party Data Recovery Software
If you don’t have a backup or the photos have been permanently deleted from the Recently Deleted album, third-party data recovery software can help. These tools scan your iPhone’s storage to find recoverable data.
6.1. Overview of Available Software Options
Several reputable data recovery software options are available for iPhone, including:
- EaseUS MobiSaver: Known for its user-friendly interface and high recovery rate. According to EaseUS, MobiSaver can recover data directly from iOS devices and iCloud/iTunes backups.
- Dr.Fone – Data Recovery (iOS): A comprehensive tool that supports various data types, including photos, messages, and contacts. Dr.Fone claims a high success rate in recovering data from iOS devices.
- iMyFone D-Back: Offers multiple recovery modes and supports a wide range of iOS devices and data types. iMyFone states that D-Back can recover data lost due to various reasons, including accidental deletion and system crashes.
- Tenorshare UltData: Specializes in recovering data from iOS devices, iCloud, and iTunes backups. Tenorshare highlights UltData’s ability to recover data even without a backup.
6.2. Step-by-Step Guide to Using Data Recovery Software
While the exact steps may vary depending on the software, here’s a general guide:
- Download and Install: Download and install the data recovery software on your computer.
- Connect Your iPhone: Connect your iPhone to your computer using a USB cable.
- Trust the Computer: If prompted, tap Trust on your iPhone to allow the computer to access your device.
- Select Recovery Mode: Choose the recovery mode (e.g., Recover from iOS Device, Recover from iCloud Backup, Recover from iTunes Backup).
- Scan Your iPhone: Start the scanning process. The software will scan your iPhone’s storage for recoverable data.
- Preview Recoverable Photos: After the scan, preview the recoverable photos.
- Select Photos to Recover: Select the photos you want to recover.
- Recover Photos: Choose a location on your computer to save the recovered photos and start the recovery process.
6.3. Success Rates and Limitations
- Success Rates: The success rate of data recovery software depends on various factors, including the time since deletion, the amount of data written to the device, and the software’s effectiveness.
- Limitations:
- Overwritten Data: If the data has been overwritten, recovery may not be possible.
- Software Cost: Most data recovery software requires a paid license for full functionality.
- Potential Risks: Downloading and using third-party software carries potential risks, such as malware or privacy concerns.
7. Preventing Future Photo Loss
Prevention is better than cure. Taking proactive steps to protect your photos can save you from the stress and potential data loss associated with accidental deletion.
7.1. Regularly Back Up Your iPhone
Regularly backing up your iPhone is the most effective way to protect your photos and other data. You can back up your device to iCloud or a computer using iTunes/Finder.
- iCloud Backup: Enable iCloud Backup in Settings > Your Name > iCloud > iCloud Backup. Ensure your iPhone is connected to Wi-Fi and regularly backs up automatically.
- iTunes/Finder Backup: Connect your iPhone to your computer and use iTunes or Finder to create a backup.
7.2. Using iCloud Photos Effectively
iCloud Photos automatically syncs your photos and videos across all your Apple devices. Enabling iCloud Photos ensures that your photos are safely stored in the cloud.
- Enable iCloud Photos: Go to Settings > Your Name > iCloud > Photos and toggle on iCloud Photos.
- Optimize Storage: Choose Optimize iPhone Storage to save space on your device. iCloud Photos will store full-resolution photos in the cloud and keep smaller, device-optimized versions on your iPhone.
7.3. Organizing and Managing Your Photo Library
Keeping your photo library organized can help prevent accidental deletion and make it easier to find and manage your photos.
- Create Albums: Organize your photos into albums based on events, locations, or themes.
- Use Smart Albums: Use smart albums to automatically organize photos based on criteria like date, location, or keywords.
- Regularly Review and Delete: Regularly review your photo library and delete any unwanted or duplicate photos to keep it clutter-free.
7.4. Being Careful When Deleting Photos
Take extra care when deleting photos to avoid accidental deletion.
- Double-Check Before Deleting: Always double-check the photos you’re about to delete.
- Use the Favorites Feature: Mark important photos as favorites to quickly identify them and avoid accidental deletion.
8. Understanding iPhone Storage and Data Overwriting
Understanding how your iPhone stores data and how data overwriting works can help you appreciate the importance of acting quickly after deleting a photo.
8.1. How iPhone Storage Works
iPhones use flash memory to store data. When you delete a file, the operating system marks the storage space as available for new data. The deleted file remains on the storage until new data overwrites it.
8.2. The Concept of Data Overwriting
Data overwriting is the process of writing new data to the storage space occupied by a deleted file. Once the data is overwritten, the original file becomes unrecoverable. The more you use your iPhone after deleting a photo, the higher the chance that the data will be overwritten.
8.3. Implications for Photo Recovery
The risk of data overwriting underscores the importance of taking immediate action after deleting a photo. Stopping iPhone usage and using data recovery software promptly can significantly increase your chances of successful recovery.
9. Alternative Solutions and Professional Help
If you’ve tried all the above methods and still can’t recover your photos, alternative solutions and professional help are available.
9.1. Contacting Apple Support
Apple Support can provide guidance and assistance with data recovery. They may offer solutions or direct you to authorized service providers.
9.2. Using Professional Data Recovery Services
Professional data recovery services specialize in recovering data from damaged or inaccessible storage devices. These services use advanced techniques and equipment to recover data that would otherwise be unrecoverable.
9.3. When to Consider Professional Help
Consider professional data recovery services if:
- The photos are critically important.
- You’ve tried all other recovery methods without success.
- Your iPhone has physical damage.
10. dfphoto.net: Your Resource for Photography Tips and Solutions
At dfphoto.net, we’re committed to providing you with the best tips, tricks, and solutions for all your photography needs. Whether you’re looking to recover lost photos, learn new photography techniques, or find inspiration for your next project, we’ve got you covered.
Explore our website for in-depth articles, tutorials, and resources to enhance your photography skills and protect your precious memories. Join our community of photography enthusiasts and share your experiences, ask questions, and discover new perspectives.
10.1. Discover More on dfphoto.net
- Photography Tutorials: Enhance your skills with our step-by-step guides on various photography techniques.
- Equipment Reviews: Find the best cameras, lenses, and accessories to suit your needs.
- Inspirational Galleries: Explore stunning photography from around the world and find inspiration for your own work.
10.2. Connect With Our Community
- Forums: Join our forums to connect with fellow photographers, share your work, and ask questions.
- Social Media: Follow us on social media for the latest updates, tips, and inspiration.
10.3. Contact Us
Have questions or need further assistance? Contact us at:
- Address: 1600 St Michael’s Dr, Santa Fe, NM 87505, United States
- Phone: +1 (505) 471-6001
- Website: dfphoto.net
We’re here to help you make the most of your photography journey!
FAQ: Recovering Deleted Photos on iPhone
1. Where do deleted photos go on iPhone?
When you delete a photo on your iPhone, it’s moved to the “Recently Deleted” album in the Photos app, where it stays for 30 days before being permanently deleted. This feature gives you a chance to recover accidentally deleted photos within that period.
2. How do I recover permanently deleted photos from my iPhone?
If your photos have been permanently deleted (i.e., they’re no longer in the “Recently Deleted” album), you can try restoring your iPhone from an iCloud or iTunes/Finder backup, assuming you had one created before the deletion. Alternatively, you can use third-party data recovery software to scan your iPhone for recoverable data.
3. Can I recover deleted photos without a backup?
Yes, you can attempt to recover deleted photos without a backup using third-party data recovery software. These tools scan your iPhone’s storage to find recoverable data, but the success rate varies depending on factors like the time since deletion and whether the data has been overwritten.
4. How do I restore photos from iCloud backup?
To restore photos from an iCloud backup, you need to erase your iPhone and restore it from a previous backup. Go to Settings > General > Transfer or Reset iPhone > Erase All Content and Settings. After your iPhone restarts, follow the setup instructions until you reach the Apps & Data screen, then choose Restore from iCloud Backup and sign in with your Apple ID.
5. How do I restore photos from iTunes/Finder backup?
Connect your iPhone to the computer you used to create the backup, open iTunes (or Finder in macOS Catalina and later), select your device, and click Restore Backup (or Restore iPhone in Finder). Choose the most recent backup from the list and wait for the restoration process to complete.
6. What is iCloud Photos, and how does it help with photo recovery?
iCloud Photos is a service that automatically syncs your photos and videos across all your Apple devices and stores them in the cloud. If you have iCloud Photos enabled, your photos are safely backed up, and you can restore them to your iPhone if they’re accidentally deleted.
7. What should I do immediately after deleting a photo by accident?
Immediately stop using your iPhone to prevent overwriting the deleted photo’s data. Then, check the “Recently Deleted” album in the Photos app to see if you can recover the photo from there.
8. How can I prevent accidental photo deletion in the future?
To prevent accidental photo deletion, regularly back up your iPhone to iCloud or a computer, enable iCloud Photos, organize your photo library into albums, and double-check before deleting any photos.
9. Is it safe to use third-party data recovery software?
Using third-party data recovery software carries potential risks, such as malware or privacy concerns. Research reputable software options and download them from trusted sources to minimize these risks.
10. When should I seek professional data recovery services for iPhone photos?
Consider professional data recovery services if the photos are critically important, you’ve tried all other recovery methods without success, or your iPhone has physical damage. These services have advanced techniques and equipment to recover data that may be otherwise unrecoverable.