Have you accidentally deleted precious photos from your “Recently Deleted” album? Don’t panic. dfphoto.net is here to guide you through the recovery process with expert tips and techniques to restore your cherished memories. Learn how to retrieve those photos and ensure your valuable moments are safe. Get ready to dive into practical solutions and safeguard your digital treasures, exploring data recovery strategies, backup solutions, and preventative measures, ensuring the longevity of your photographic memories.
1. Understanding the Recently Deleted Album
What Is the Purpose of the Recently Deleted Album?
The Recently Deleted album serves as a safety net, holding photos and videos for a limited time before permanent deletion. This feature allows users to recover accidentally deleted items, providing a window of opportunity to undo mistakes. It’s essentially a temporary holding place, giving you a chance to review and restore files you didn’t mean to erase.
How Long Do Photos Stay in the Recently Deleted Album?
Photos typically remain in the Recently Deleted album for 30 days. After this period, they are automatically and permanently deleted from your device and iCloud. Understanding this 30-day window is crucial for timely recovery efforts. According to Apple Support, this timeframe allows users ample time to realize and rectify accidental deletions.
What Happens When Photos Are Deleted From the Recently Deleted Album?
Once photos are deleted from the Recently Deleted album, they are no longer easily recoverable through standard methods. These photos are purged from your device and iCloud, making direct restoration impossible without advanced recovery techniques or backups. This permanent deletion underscores the importance of regular backups and prompt action when realizing a deletion error.
2. Immediate Steps to Take After Realizing Photos Are Deleted
Why Is It Important to Act Quickly?
Acting quickly is critical because the longer you wait, the lower the chances of successful recovery. When data is deleted, the space it occupied is marked as available, and new data can overwrite the old. Immediate action minimizes the risk of this overwriting, increasing the likelihood of retrieving your photos.
Should You Stop Using Your Device Immediately?
Yes, it’s highly advisable to stop using your device immediately. Continued use can lead to new data being written over the deleted photos, making recovery more difficult or impossible. Avoid taking new photos, downloading files, or performing any actions that might write data to the device’s storage.
What Are the First Steps to Check?
Begin by checking the Recently Deleted album in your Photos app. Sometimes, photos might have been moved there accidentally. If the photos are not in the Recently Deleted album, check any cloud storage services you use, such as iCloud, Google Photos, or Dropbox, to see if the photos were backed up there.
3. Recovering Photos From the Recently Deleted Album
How to Access the Recently Deleted Album on iPhone and iPad
To access the Recently Deleted album on your iPhone or iPad:
- Open the Photos app.
- Tap the Albums tab.
- Scroll down to the Utilities section.
- Tap on the Recently Deleted album.
How to Restore Photos From the Recently Deleted Album on iPhone and iPad
To restore photos from the Recently Deleted album on your iPhone or iPad:
- Open the Recently Deleted album.
- Tap Select in the upper-right corner.
- Select the photos you want to recover.
- Tap Recover at the bottom.
- Confirm by tapping Recover Photo(s).
How to Access the Recently Deleted Album on Mac
To access the Recently Deleted album on your Mac:
- Open the Photos app.
- Look for Recently Deleted in the sidebar. If you don’t see the sidebar, click View > Show Sidebar.
How to Restore Photos From the Recently Deleted Album on Mac
To restore photos from the Recently Deleted album on your Mac:
- Open the Recently Deleted album.
- Select the photos you want to recover.
- Click Recover in the upper-right corner.
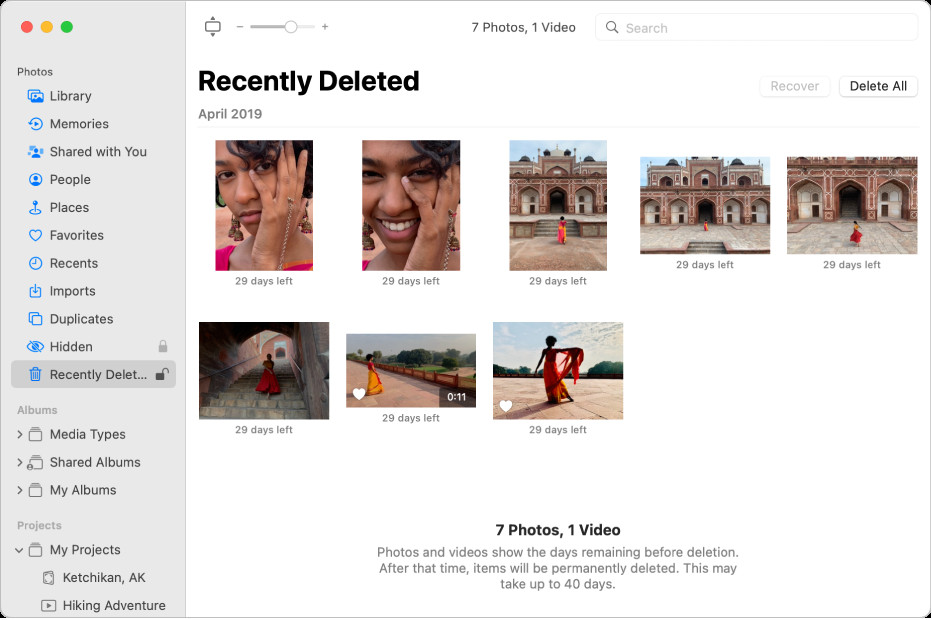 The Photos window showing Recently Deleted selected in the sidebar and recently deleted items on the right.
4. Using iCloud to Recover Deleted Photos
How to Check If iCloud Photos Is Enabled
To check if iCloud Photos is enabled on your iPhone or iPad:
- Open the Settings app.
- Tap your name at the top.
- Tap iCloud.
- Tap Photos.
- Check if iCloud Photos is toggled on.
How to Recover Photos From iCloud.com
To recover photos from iCloud.com:
- Go to iCloud.com and sign in with your Apple ID.
- Click on the Photos icon.
- Click Recently Deleted in the sidebar.
- Select the photos you want to recover.
- Click Recover.
What If Photos Are Not Showing Up in iCloud?
If photos are not showing up in iCloud, ensure that iCloud Photos is enabled on all your devices and that they are connected to Wi-Fi. Also, check your iCloud storage to ensure you have enough space. Sometimes, photos may take time to sync, so be patient and check again later.
5. Data Recovery Software for iPhone and Mac
What Is Data Recovery Software?
Data recovery software is designed to scan your device’s storage for recoverable files. It can often find files that have been deleted but not yet overwritten, providing a chance to restore them. This software is particularly useful when photos are no longer in the Recently Deleted album.
Top Data Recovery Software Options for iPhone
Some popular data recovery software options for iPhone include:
- EaseUS MobiSaver: Known for its user-friendly interface and deep scanning capabilities.
- Dr.Fone – Data Recovery (iOS): Offers a range of features, including recovery from iCloud and iTunes backups.
- iMyFone D-Back: Can recover various types of data, including photos, messages, and contacts.
Top Data Recovery Software Options for Mac
Popular data recovery software options for Mac include:
- Disk Drill: A comprehensive tool that can recover data from various storage devices.
- Stellar Data Recovery: Known for its advanced scanning algorithms and ability to recover data from damaged drives.
- EaseUS Data Recovery Wizard for Mac: Offers a simple interface and effective recovery capabilities.
How to Use Data Recovery Software: A General Guide
Here’s a general guide on using data recovery software:
- Download and Install: Download and install the data recovery software on your computer.
- Connect Your Device: Connect your iPhone or storage device to your computer.
- Select the Drive: Launch the software and select the drive or device you want to scan.
- Scan for Lost Data: Start the scanning process. The software will search for recoverable files.
- Preview and Recover: Preview the found files and select the photos you want to recover.
- Save the Recovered Files: Choose a safe location to save the recovered files, preferably on an external drive to avoid overwriting other data.
6. Recovering From iTunes or Finder Backups
How to Check If You Have iTunes or Finder Backups
To check if you have iTunes or Finder backups on your Mac:
- Open Finder.
- Click Go in the menu bar, then choose Go to Folder.
- Type
~/Library/Application Support/MobileSync/Backup/and press Return. - This folder contains your iTunes/Finder backups.
How to Restore Your iPhone From an iTunes or Finder Backup
To restore your iPhone from an iTunes or Finder backup:
- Connect your iPhone to your computer.
- Open Finder (or iTunes on older macOS versions).
- Select your iPhone when it appears.
- Click Restore Backup.
- Choose the most relevant backup from the list and click Restore.
- Follow the on-screen instructions to complete the process.
What to Do If the Backup Is Encrypted
If the backup is encrypted, you’ll need to enter the password you set when creating the backup. If you’ve forgotten the password, you may not be able to restore the backup. Apple provides guidance on how to reset your backup password if you forget it, but this process can be complex and may result in data loss.
7. Using Time Machine on Mac
What Is Time Machine?
Time Machine is Apple’s built-in backup software for Mac. It automatically backs up your entire system, including photos, to an external hard drive.
How to Use Time Machine to Restore Photos
To use Time Machine to restore photos:
- Connect your Time Machine backup drive to your Mac.
- Open the Photos app.
- Open Time Machine by clicking the Time Machine icon in the menu bar or by finding it in the Applications folder.
- Navigate through the timeline to find a backup that contains the photos you want to restore.
- Select the photos and click Restore.
Restoring an Entire Photos Library From Time Machine
To restore an entire Photos library from Time Machine:
- Quit the Photos app.
- Open Finder and go to the Pictures folder.
- Open Time Machine.
- Navigate to the date of the backup you want to restore.
- Select the Photos Library and click Restore.
8. Prevention Tips to Avoid Future Photo Loss
The Importance of Regular Backups
Regular backups are crucial for preventing data loss. Backups ensure that you have a copy of your photos in case of accidental deletion, device failure, or other unforeseen events.
Setting Up Automatic Backups With iCloud
To set up automatic backups with iCloud:
- Open the Settings app on your iPhone or iPad.
- Tap your name at the top.
- Tap iCloud.
- Tap iCloud Backup.
- Toggle iCloud Backup on.
Using Google Photos for Backup
Google Photos offers free, unlimited storage for photos (compressed quality) or paid storage for original quality. To use Google Photos for backup:
- Download and install the Google Photos app on your iPhone or iPad.
- Sign in with your Google account.
- Enable Backup & Sync in the app settings.
Best Practices for Managing and Organizing Photos
- Organize Photos Into Albums: Create albums to categorize your photos by date, event, or subject.
- Use Descriptive File Names: When importing photos to your computer, use descriptive file names that include the date and a brief description.
- Regularly Review and Delete Unnecessary Photos: Periodically review your photo library and delete any duplicate or low-quality photos.
- Store Photos in Multiple Locations: Keep copies of your photos in multiple locations, such as your computer, an external hard drive, and a cloud storage service.
9. Understanding Data Overwriting
What Is Data Overwriting?
Data overwriting occurs when new data is written to the same storage location as old data, effectively replacing the old data. This process makes the overwritten data very difficult, if not impossible, to recover.
How Does It Affect Photo Recovery?
When you delete a photo, the space it occupied is marked as available for new data. If new data is written to that space before you attempt recovery, the photo may be overwritten and unrecoverable.
Tips to Minimize the Risk of Overwriting
- Stop Using the Device: As mentioned earlier, stop using the device immediately after realizing photos have been deleted.
- Avoid Downloading or Installing New Apps: Downloading or installing new apps can write data to the device’s storage, increasing the risk of overwriting.
- Do Not Take New Photos or Videos: Taking new photos or videos will also write data to the device’s storage.
10. Professional Data Recovery Services
When to Consider Professional Services
Consider professional data recovery services when:
- The photos are critically important and irreplaceable.
- You have tried data recovery software without success.
- The storage device is physically damaged.
- You are not comfortable performing advanced recovery techniques yourself.
What to Look For in a Data Recovery Service
When choosing a data recovery service, look for:
- Experience and Expertise: Choose a service with a proven track record and experienced technicians.
- Cleanroom Environment: Ensure the service has a cleanroom environment for handling physically damaged devices.
- Data Confidentiality: Verify that the service has strict data confidentiality policies.
- Cost and Turnaround Time: Get a clear estimate of the cost and turnaround time before proceeding.
Popular Data Recovery Services
Some popular data recovery services include:
- DriveSavers: A well-known and reputable service with extensive experience.
- Ontrack: Offers a range of data recovery services for various devices and storage media.
- Secure Data Recovery: Specializes in secure data recovery and data destruction services.
11. Legal and Ethical Considerations
Respecting Copyright Laws
When recovering photos, it’s essential to respect copyright laws. Only recover photos that you own or have permission to use. Recovering and using copyrighted photos without permission can lead to legal issues.
Privacy Concerns When Recovering Photos
Be mindful of privacy concerns when recovering photos, especially if they contain sensitive or personal information. Ensure that you handle the recovered photos securely and do not share them without consent.
Ethical Use of Data Recovery Techniques
Use data recovery techniques ethically and responsibly. Do not use them to recover data from devices or storage media that you do not own or have permission to access.
12. Advanced Techniques for Photo Recovery
Using Disk Imaging
Disk imaging involves creating an exact copy of a storage device, including all data and file structures. This technique can be useful for preserving the original state of the device and preventing further data loss.
File Carving Techniques
File carving is a data recovery technique that involves scanning a storage device for file headers and footers to identify and recover files, even if the file system is damaged or corrupted.
Hex Editors and Data Analysis
Hex editors allow you to view and edit the raw data on a storage device. Advanced users can use hex editors to analyze data structures and manually recover files.
13. Specific Scenarios and Solutions
Recovering Photos From a Water-Damaged Device
If your device has been damaged by water, immediately turn it off and remove the battery (if possible). Take it to a professional data recovery service as soon as possible. They have specialized equipment and techniques for recovering data from water-damaged devices.
Recovering Photos From a Broken Screen Device
If your device has a broken screen but is otherwise functional, you may be able to connect it to a computer and transfer the photos. If that’s not possible, a professional repair service may be able to replace the screen and recover the photos.
Recovering Photos From a Factory Reset Device
Recovering photos from a device that has been factory reset is very difficult, but not always impossible. Data recovery software may be able to find some recoverable files, but the chances of success are lower than with a simple deletion.
14. Future Trends in Photo Recovery
AI-Powered Data Recovery
Artificial intelligence (AI) is increasingly being used in data recovery to improve the accuracy and efficiency of the recovery process. AI algorithms can analyze data patterns and identify recoverable files more effectively than traditional methods.
Cloud-Based Recovery Solutions
Cloud-based recovery solutions allow you to recover data from remote servers and storage devices. These solutions can be useful for recovering data from devices that are physically inaccessible or damaged.
Advancements in Storage Technology
Advancements in storage technology, such as solid-state drives (SSDs) and NVMe drives, are posing new challenges for data recovery. However, new techniques and tools are being developed to address these challenges.
15. Maintaining a Photo Archive
Creating a System for Organizing Digital Photos
Creating a system for organizing digital photos is essential for maintaining a photo archive. Use a consistent naming convention, organize photos into folders and albums, and add metadata such as dates, locations, and descriptions.
Archiving to Physical Media
Consider archiving your photos to physical media such as DVDs or Blu-ray discs. Store the discs in a safe and dry place.
Using Cloud Services for Long-Term Storage
Use cloud services for long-term storage of your photos. Choose a reputable service with strong security and reliability. Regularly back up your photos to the cloud to ensure that they are protected against data loss.
16. Conclusion: Protecting Your Cherished Memories
Recap of Key Recovery Methods
Recovering deleted photos can be achieved through various methods, including checking the Recently Deleted album, using iCloud, employing data recovery software, restoring from iTunes/Finder backups, and utilizing Time Machine on Mac. Each method has its advantages and may be more suitable depending on the situation.
Emphasizing the Importance of Prevention
Prevention is always better than cure. Regularly backing up your photos, organizing them effectively, and being careful when deleting files can save you a lot of time and effort in the long run.
Final Thoughts on Keeping Your Photos Safe
Your photos are precious memories that should be protected. By following the tips and techniques outlined in this guide, you can minimize the risk of photo loss and ensure that your cherished memories are safe for years to come.
Ready to take control of your photography journey? Visit dfphoto.net today to explore our comprehensive guides, discover stunning photo collections, and connect with a vibrant community of fellow photography enthusiasts!
Address: 1600 St Michael’s Dr, Santa Fe, NM 87505, United States
Phone: +1 (505) 471-6001
Website: dfphoto.net
FAQ: Recovering Deleted Photos
1. Can I recover photos deleted from the Recently Deleted album?
Yes, it is possible to recover photos deleted from the Recently Deleted album, but it requires acting quickly. The longer you wait, the lower the chances of successful recovery due to data overwriting. Use data recovery software or check backups as soon as possible.
2. How long do photos stay in the Recently Deleted album?
Photos typically stay in the Recently Deleted album for 30 days. After this period, they are permanently deleted from your device and iCloud.
3. Is iCloud Photos a reliable backup solution?
Yes, iCloud Photos is a reliable backup solution as it automatically keeps every photo and video you take in iCloud, allowing you to access your library from any device. Ensure it is enabled and properly configured for optimal backup.
4. What should I do immediately after realizing I accidentally deleted photos?
Immediately stop using your device to prevent data overwriting, check the Recently Deleted album, and then explore cloud backups or data recovery software options.
5. Can data recovery software retrieve permanently deleted photos?
Data recovery software can often retrieve permanently deleted photos if they have not been overwritten by new data. The success rate depends on how quickly you act and the condition of the storage device.
6. How can I prevent future photo loss?
Prevent future photo loss by setting up regular backups with iCloud, Google Photos, or external drives, organizing your photos effectively, and being cautious when deleting files.
7. What is data overwriting and how does it affect photo recovery?
Data overwriting occurs when new data is written to the same storage location as old data, making the old data very difficult, if not impossible, to recover. It directly affects photo recovery by reducing the chances of retrieving deleted photos.
8. When should I consider professional data recovery services?
Consider professional data recovery services when the photos are critically important, you have tried data recovery software without success, the storage device is physically damaged, or you are not comfortable performing advanced recovery techniques yourself.
9. How do I check if iCloud Photos is enabled on my iPhone?
To check if iCloud Photos is enabled, go to Settings > Your Name > iCloud > Photos and verify that the iCloud Photos toggle is on.
10. What are the ethical considerations when recovering photos?
When recovering photos, respect copyright laws, be mindful of privacy concerns, and use data recovery techniques ethically. Only recover photos that you own or have permission to use, and handle sensitive information securely.