Losing precious photos from your digital camera can be a stressful experience. But don’t panic! With the right tools and techniques, it’s often possible to recover those cherished memories. At dfphoto.net, we’re dedicated to providing you with the most effective solutions for digital image retrieval and visual storytelling. Whether it’s accidental deletion, card formatting, or unexpected errors, understanding the recovery process can save your valuable photographic work. This comprehensive guide will help you navigate the world of photo recovery, ensuring you can restore your lost digital treasures.
1. Understanding Digital Camera Photo Loss
Digital cameras are essential tools for capturing our lives, from professional shoots to family vacations. However, data loss can occur for various reasons. Before diving into recovery methods, it’s important to understand common causes of photo loss to prevent future incidents.
1.1. Common Causes of Photo Loss
- Accidental Deletion: Mistakenly pressing the delete button is a frequent cause of losing photos.
- Memory Card Formatting: Formatting a memory card without backing up the photos will erase all data.
- Memory Card Corruption: Improper handling, such as removing the card while the camera is on, can corrupt the card.
- Virus or Malware: Connecting your memory card to an infected computer can lead to data corruption.
- Power Failure: Camera shutting down unexpectedly due to low battery during a write process.
1.2. The Importance of Immediate Action
Once you realize your photos are missing, it’s crucial to act quickly. Avoid using the camera or memory card to prevent new data from overwriting the lost files. Overwriting makes data recovery significantly more difficult, if not impossible.
2. Initial Steps Before Attempting Recovery
Before you start the recovery process, there are some essential steps to take to maximize your chances of success.
2.1. Stop Using the Memory Card
As mentioned earlier, cease using the memory card immediately. Every new photo taken or data written to the card reduces the likelihood of recovering the lost images.
2.2. Remove the Memory Card and Store It Safely
Carefully remove the memory card from the camera and store it in a safe place, away from extreme temperatures, moisture, and magnetic fields.
2.3. Determine the Type of Data Loss
Understanding the nature of the data loss helps in selecting the appropriate recovery method.
- Deleted Photos: Photos were intentionally or accidentally deleted.
- Formatted Card: The memory card was formatted, erasing all data.
- Corrupted Card: The memory card is damaged or showing errors.
3. Methods to Recover Photos from Digital Camera
There are several methods to recover your precious photos. Each option has its pros and cons, so consider your situation and technical expertise when choosing a method.
3.1. Check for Backups
The first step should always be to check if you have a backup of your photos. Regular backups can save you from the stress of data loss.
3.1.1. External Hard Drives
If you regularly back up your photos to an external hard drive, connect it to your computer and locate the backup files.
3.1.2. Cloud Storage
Cloud services like Google Photos, Dropbox, and iCloud offer automatic photo backups. Check these services to see if your photos are stored there.
3.1.3. Computer Backups
Check your computer’s backup system (like Time Machine on macOS or Windows Backup) to see if you have a recent backup of your photos.
3.2. Using Photo Recovery Software
If you don’t have a backup, photo recovery software is your next best option. These tools scan your memory card for recoverable files.
3.2.1. MiniTool Photo Recovery
MiniTool Photo Recovery is a user-friendly software designed to recover photos, videos, and audio files from various storage devices, including digital camera memory cards. It supports multiple file formats and offers a straightforward recovery process.
Steps to Recover Photos Using MiniTool Photo Recovery:
-
Download and Install: Download and install MiniTool Photo Recovery from the official website.
MiniTool Windows Photo Recovery
-
Connect Memory Card: Connect your digital camera to your PC or insert the SD card into a card reader connected to your computer.
-
Launch the Software: Launch MiniTool Photo Recovery and click “Start”.
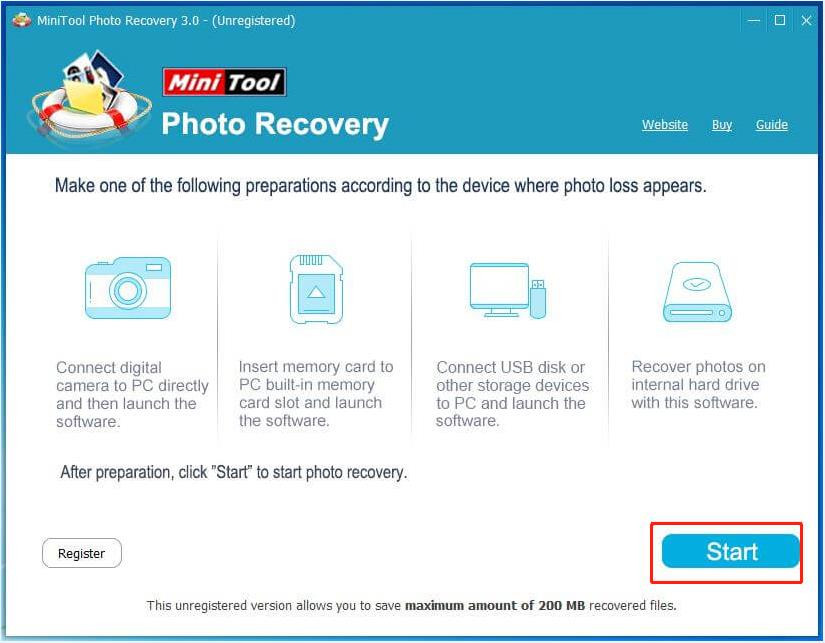 click Start
Alternative Text: Screenshot of MiniTool Photo Recovery software interface, highlighting the “Start” button to initiate the photo recovery process.
-
Select Memory Card: Choose the memory card from the list of available drives and click “Scan”.
-
Preview and Recover: After the scan, preview the found photos and select the ones you want to recover. Click “Save” and choose a destination folder to store the recovered photos.
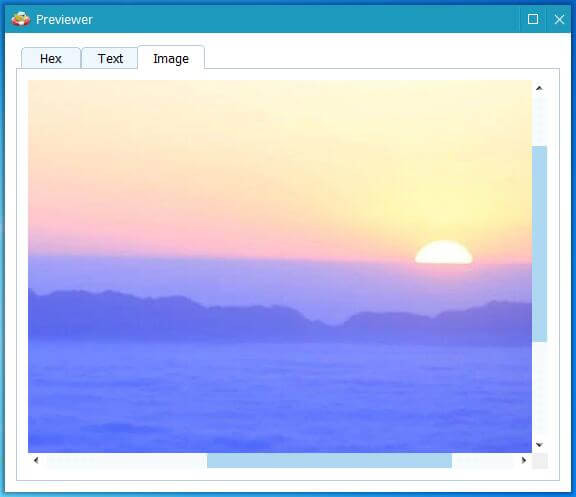 preview found photos
Alternative Text: Screenshot displaying preview of recoverable photos in MiniTool Photo Recovery, showing selection and save options.
Note: The free version of MiniTool Photo Recovery allows you to recover up to 200 MB of data. For unlimited recovery, you may need to upgrade to a paid version.
3.2.2. MiniTool Power Data Recovery
MiniTool Power Data Recovery is a comprehensive data recovery tool that can recover various file types, including photos, videos, documents, and more. It supports multiple storage devices and offers advanced scanning options.
Steps to Recover Photos Using MiniTool Power Data Recovery:
-
Download and Install: Download and install MiniTool Power Data Recovery from the official website.
MiniTool Power Data Recovery
-
Connect Memory Card: Connect your digital camera to your PC or use a card reader to connect the SD card.
-
Launch the Software: Launch MiniTool Power Data Recovery.
-
Select Memory Card: In the main window, select the memory card and click “Scan”.
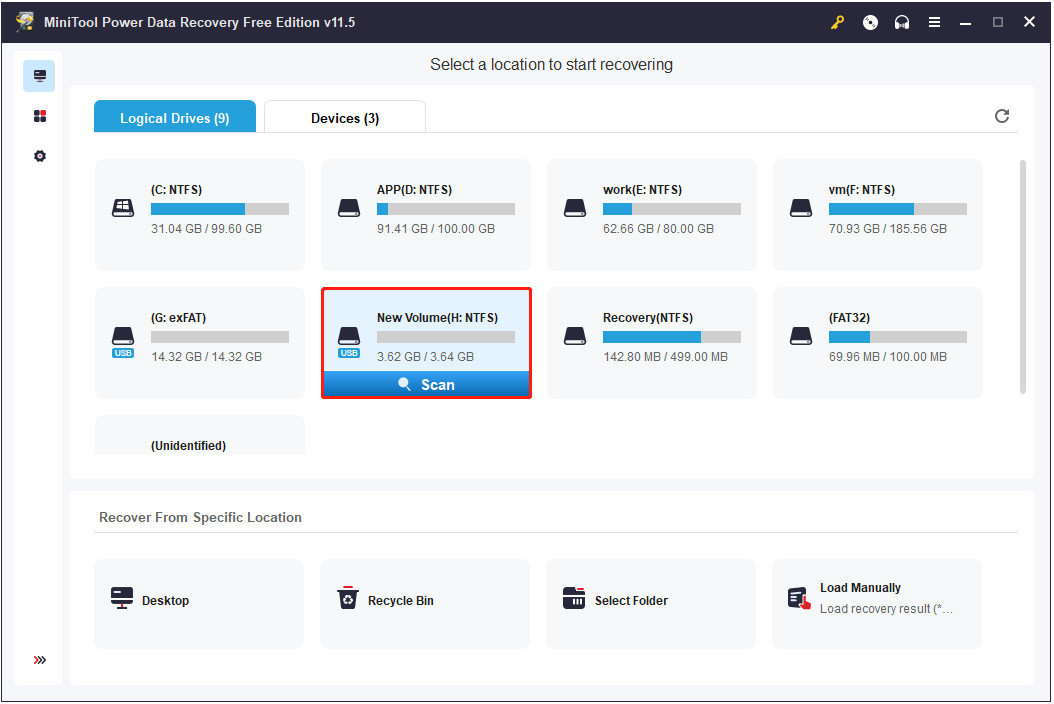 scan the target drive
Alternative Text: Screenshot of MiniTool Power Data Recovery interface, demonstrating the selection of the SD card and initiating the scan process.
-
Preview and Recover: After the scan, preview the found photos and select the ones you want to recover. Click “Save” and choose a destination folder.
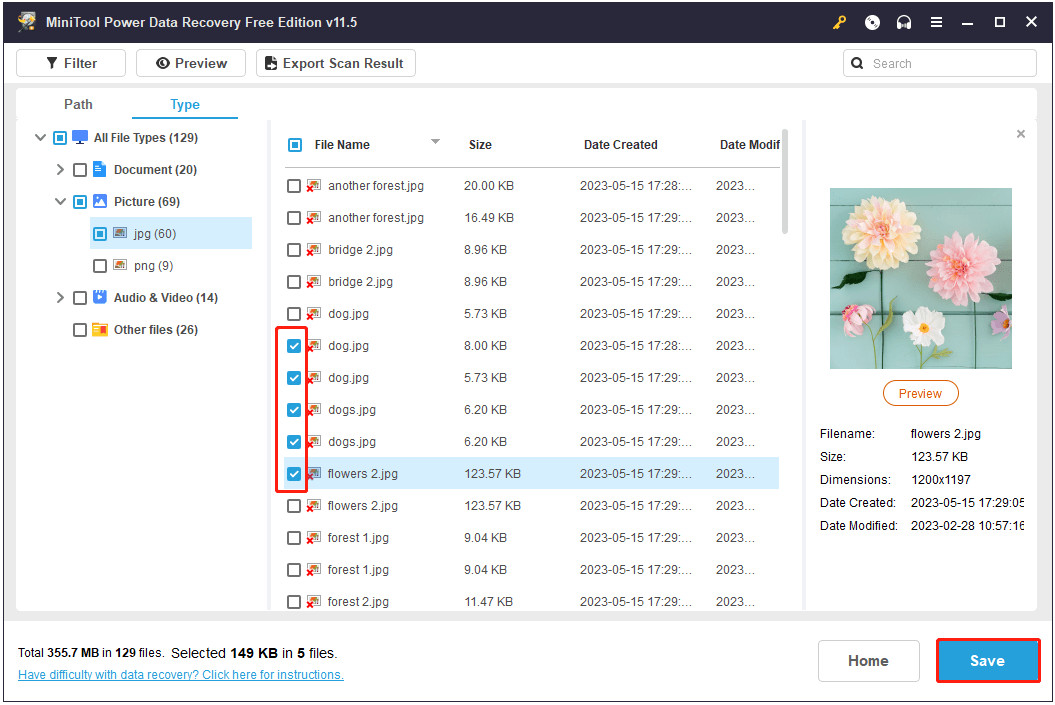 store all wanted files
Alternative Text: Screenshot illustrating the selection of recovered files and saving them to a specified location using MiniTool Power Data Recovery.
Note: The free version of MiniTool Power Data Recovery allows you to recover up to 1 GB of data. For unlimited recovery, consider upgrading to a paid version.
3.2.3. Other Recommended Photo Recovery Software
- Recuva: A free and easy-to-use tool for basic photo recovery needs.
- EaseUS Data Recovery Wizard: A powerful tool with advanced features for more complex recovery scenarios.
- Stellar Photo Recovery: Specifically designed for photo recovery, with support for a wide range of file formats.
3.3. Professional Data Recovery Services
If the above methods fail, consider using a professional data recovery service. These services have specialized equipment and expertise to recover data from severely damaged storage devices.
3.3.1. When to Consider Professional Services
- Physically Damaged Card: If the memory card is physically broken or damaged.
- Severe Data Corruption: If the data is severely corrupted and software cannot recover it.
- Important Data: If the photos are extremely valuable and you cannot afford to lose them.
3.3.2. Finding a Reputable Service
Research and choose a reputable data recovery service. Look for reviews, certifications, and a clear explanation of their recovery process.
4. Step-by-Step Guide: Recovering Deleted Photos
Let’s walk through a detailed step-by-step guide on how to recover deleted photos using MiniTool Photo Recovery.
4.1. Preparing for the Recovery Process
4.1.1. Download and Install the Software
Visit the MiniTool website and download MiniTool Photo Recovery. Follow the installation instructions to install the software on your computer.
4.1.2. Connect Your Digital Camera or Memory Card
Connect your digital camera to your computer using a USB cable. Alternatively, remove the memory card from the camera and insert it into a card reader connected to your computer.
4.1.3. Launch MiniTool Photo Recovery
Open the MiniTool Photo Recovery software.
4.2. Scanning the Memory Card
4.2.1. Select the Memory Card
In the main interface, you will see a list of available drives. Select the memory card that contained your lost photos.
4.2.2. Configure Scan Settings (Optional)
Click on the “Settings” button to configure the scan settings. Here, you can specify the file types you want to recover (e.g., JPG, PNG, RAW). This can speed up the scanning process by focusing on specific file formats.
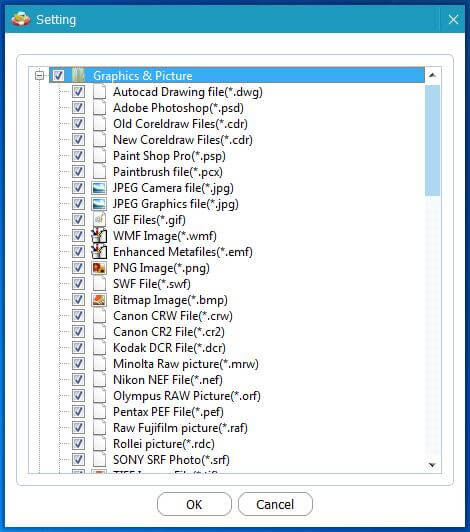 specify needed file types
Alternative Text: Screenshot displaying the settings options in MiniTool Photo Recovery, showing how to select specific graphic and picture file types for scanning.
4.2.3. Start the Scan
Click the “Scan” button to start scanning the memory card for lost photos.
4.3. Previewing and Recovering Photos
4.3.1. Browse the Scan Results
Once the scan is complete, you will see a list of recoverable files. You can browse the files by folder or file type.
4.3.2. Preview the Photos
Select a photo to preview it. This helps you identify the photos you want to recover.
4.3.3. Select the Photos to Recover
Check the boxes next to the photos you want to recover. You can select individual photos or entire folders.
4.3.4. Choose a Save Location
Click the “Save” button and choose a location on your computer to save the recovered photos. It’s important to select a different drive than the one you are recovering from to avoid overwriting data.
4.3.5. Complete the Recovery
Click “OK” to start the recovery process. The software will copy the selected photos to the specified location.
5. Tips for Preventing Future Photo Loss
Prevention is always better than cure. Here are some tips to help you avoid losing your precious photos in the future.
5.1. Regular Backups
5.1.1. Implement a Backup Strategy
Create a schedule for backing up your photos regularly. This could be weekly, monthly, or after every major photo shoot.
5.1.2. Use Multiple Backup Locations
Use a combination of backup locations, such as external hard drives, cloud storage, and network-attached storage (NAS) devices.
5.2. Proper Memory Card Handling
5.2.1. Safely Eject Memory Cards
Always use the “safely remove hardware” option when ejecting a memory card from your computer.
5.2.2. Avoid Removing Cards During Data Transfer
Never remove the memory card from the camera or computer while data is being transferred.
5.2.3. Use High-Quality Memory Cards
Invest in high-quality memory cards from reputable brands to reduce the risk of corruption.
5.3. Camera Maintenance
5.3.1. Keep Camera Firmware Updated
Ensure your camera’s firmware is up to date to prevent compatibility issues and data corruption.
5.3.2. Monitor Battery Life
Avoid using the camera when the battery is low, as this can lead to data loss.
5.4. Virus Protection
5.4.1. Install Antivirus Software
Install reliable antivirus software on your computer to protect against malware and viruses that can corrupt your photos.
5.4.2. Scan Memory Cards
Regularly scan your memory cards for viruses before transferring photos to your computer.
6. Understanding File Formats and Recovery
Different file formats may require specific recovery approaches. Here’s a brief overview of common photo file formats and recovery considerations.
6.1. JPEG (JPG)
JPEG is the most common image format, known for its compression efficiency. Most recovery tools handle JPEG files effectively.
6.2. RAW Formats (CR2, NEF, ARW, etc.)
RAW formats contain unprocessed data directly from the camera sensor. These files are larger and require specialized recovery tools that support RAW formats.
6.3. PNG
PNG is a lossless image format, often used for graphics and images with text. Recovery of PNG files is generally straightforward.
6.4. TIFF
TIFF is another lossless format, often used for high-quality images and archival purposes. Recovery tools typically support TIFF files.
7. Optimizing Your Workflow for Photo Preservation
A well-organized workflow can significantly reduce the risk of photo loss and simplify the recovery process if it occurs.
7.1. Importing Photos
7.1.1. Use a Consistent Naming Convention
When importing photos, use a consistent naming convention to organize your files. This makes it easier to locate and manage your photos.
7.1.2. Verify the Transfer
After importing, verify that all photos have been transferred correctly before formatting the memory card.
7.2. Organizing Photos
7.2.1. Use Folders and Metadata
Organize your photos into folders based on date, event, or project. Use metadata (tags, keywords, descriptions) to add additional information to your photos.
7.2.2. Regularly Review and Cull Photos
Regularly review your photo library and cull unwanted or duplicate photos. This reduces clutter and makes it easier to manage your files.
7.3. Editing and Post-Processing
7.3.1. Use Non-Destructive Editing
Use non-destructive editing techniques in software like Adobe Lightroom or Capture One. This allows you to make changes to your photos without altering the original files.
7.3.2. Save Edited Versions Separately
Save edited versions of your photos as separate files to preserve the original, unedited versions.
8. Advanced Recovery Techniques
For more challenging data loss scenarios, consider these advanced recovery techniques.
8.1. Disk Imaging
Creating a disk image of your memory card can help in severe data loss situations. A disk image is a sector-by-sector copy of the card, which can be analyzed for recoverable files.
8.2. Hex Editors
Hex editors allow you to examine the raw data on your memory card. This requires technical expertise but can be useful for recovering data from corrupted files.
8.3. Data Carving
Data carving is a technique used to recover files based on their file headers and footers. This can be effective when the file system is damaged.
9. The Role of dfphoto.net in Photo Recovery
At dfphoto.net, we are committed to providing you with the best resources and information for all your photography needs, including photo recovery.
9.1. Expert Articles and Tutorials
We offer a wide range of articles and tutorials on photo recovery, covering various topics and techniques.
9.2. Community Support
Join our community forums to ask questions, share your experiences, and get help from other photographers.
9.3. Recommended Software and Services
We provide recommendations for reliable photo recovery software and services, based on our research and testing.
Visit dfphoto.net to explore our resources and connect with a community of passionate photographers. Our address is 1600 St Michael’s Dr, Santa Fe, NM 87505, United States. You can reach us at +1 (505) 471-6001.
10. Real-World Scenarios and Solutions
Here are some real-world scenarios and solutions for photo recovery:
10.1. Scenario 1: Accidental Deletion During a Photoshoot
Problem: You accidentally deleted several important photos during a professional photoshoot.
Solution: Immediately stop using the camera. Use MiniTool Photo Recovery to scan the memory card. Preview and recover the deleted photos.
10.2. Scenario 2: Formatted Memory Card After a Vacation
Problem: You formatted your memory card after a vacation without backing up the photos.
Solution: Do not write any new data to the card. Use MiniTool Power Data Recovery to perform a deep scan of the formatted card. Recover the lost photos.
10.3. Scenario 3: Corrupted Memory Card During a Trip
Problem: Your memory card became corrupted during a trip, and you cannot access the photos.
Solution: Try using a different card reader. If that doesn’t work, use a professional data recovery service to recover the photos.
FAQ: How to Recover Photos from Digital Camera
Can I recover deleted photos from a digital camera?
Yes, it is possible to recover deleted photos from a digital camera as long as the data has not been overwritten. Use photo recovery software like MiniTool Photo Recovery or MiniTool Power Data Recovery to scan the memory card and recover the lost photos.
How does photo recovery software work?
Photo recovery software works by scanning the storage device (e.g., memory card) for traces of deleted files. When a file is deleted, it is not immediately erased from the storage device. Instead, the space it occupied is marked as available for new data. Photo recovery software can identify and recover these deleted files before they are overwritten.
Is it safe to use photo recovery software?
Yes, most reputable photo recovery software is safe to use. However, it is important to download the software from a trusted source to avoid malware or viruses. Also, avoid saving the recovered files to the same drive you are recovering from, as this can overwrite the remaining deleted files.
What should I do if the photo recovery software doesn’t work?
If the photo recovery software doesn’t work, try using a different recovery tool or consider using a professional data recovery service. Professional services have specialized equipment and expertise to recover data from severely damaged storage devices.
How can I prevent photo loss in the future?
To prevent photo loss in the future, implement a regular backup strategy, handle memory cards properly, keep your camera firmware updated, and use antivirus software to protect against malware.
What are the best practices for handling memory cards?
Best practices for handling memory cards include safely ejecting them from the computer, avoiding removing them during data transfer, using high-quality memory cards, and storing them in a safe place away from extreme temperatures, moisture, and magnetic fields.
How do I choose the right photo recovery software?
When choosing photo recovery software, consider factors such as the supported file formats, the ease of use, the scanning speed, and the recovery success rate. Read reviews and compare different tools before making a decision.
What is the difference between MiniTool Photo Recovery and MiniTool Power Data Recovery?
MiniTool Photo Recovery is specifically designed for recovering photos, videos, and audio files, while MiniTool Power Data Recovery is a more comprehensive data recovery tool that can recover various file types. MiniTool Power Data Recovery may be more effective for complex data loss scenarios.
How much does it cost to recover photos from a digital camera?
The cost of photo recovery can vary depending on the method used. Photo recovery software typically ranges from free to several hundred dollars for a professional license. Professional data recovery services can cost several hundred to several thousand dollars, depending on the complexity of the recovery.
What are the common signs of a corrupted memory card?
Common signs of a corrupted memory card include error messages, inability to access the card, slow performance, and missing files. If you experience any of these signs, stop using the card immediately and try to recover the data using photo recovery software.
Losing photos from your digital camera can be a distressing experience, but with the right knowledge and tools, recovery is often possible. Remember to act quickly, use reliable recovery software, and implement preventive measures to protect your precious memories. Visit dfphoto.net for more resources and support to enhance your photography journey. Our experts at dfphoto.net in Santa Fe, NM, are here to guide you every step of the way. Don’t hesitate to reach out at +1 (505) 471-6001 for personalized assistance.
