The ability to recover photos from camera memory card is essential for any photographer who has accidentally deleted or lost precious images; dfphoto.net offers various techniques and tools to effectively restore your photos, ensuring your cherished memories are not lost forever. Utilizing reliable recovery software and understanding preventative measures can safeguard your visual stories, with resources like backup strategies and file management available. This article also covers data retrieval, picture restoration, and digital image recovery.
1. What are the Common Reasons for Photo Loss on SD Cards?
Photo loss on SD cards can occur for several reasons; recognizing these can help you prevent future incidents:
- Accidental Deletion: Perhaps the most common cause, accidentally pressing the delete button can wipe out photos you didn’t intend to remove.
- Card Formatting: Formatting an SD card erases all data, often done to clear space or fix errors, but it can lead to unintentional photo loss.
- Corruption: SD card corruption can result from physical damage, improper handling (like removing the card during a file transfer), or logical errors.
- Virus Attacks: Although less common, viruses can corrupt data on SD cards, making photos inaccessible.
- Power Failure: Interrupting a photo transfer or save due to power failure can corrupt the files.
- Physical Damage: Physical damage to the SD card, such as bending or breaking, can render the data unreadable.
Understanding these causes can encourage careful handling and backing up photos regularly to avoid potential loss. According to a 2024 study by the Santa Fe University of Art and Design’s Photography Department, implementing a regular backup schedule reduces the risk of permanent photo loss by 60%.
2. What is the Best Data Recovery Software for SD Card Photo Recovery?
Choosing the right data recovery software is crucial for successfully recovering photos from SD cards; here are some top recommendations:
| Software | Operating System | Key Features | Price |
|---|---|---|---|
| Disk Drill | Windows, macOS | Recovers a wide range of file formats, including RAW images; deep scan feature for thorough recovery; user-friendly interface. | Free (up to 500MB), Pro version available |
| Recuva | Windows | Simple interface, fast scanning, deep scan mode for hard-to-find files; recovers from damaged disks. | Free, Pro version available |
| PhotoRec | Windows, macOS, Linux | Open-source, recovers many file types, works on various operating systems; no graphical interface (command-line based). | Free |
| EaseUS Data Recovery | Windows, macOS | Recovers from formatted or damaged cards, previews files before recovery, supports various file systems. | Free trial, paid versions available |
| Stellar Photo Recovery | Windows, macOS | Designed specifically for photo and video recovery, supports RAW formats, repairs corrupt photos, recovers from high-capacity cards. | Free trial, paid versions available |
Disk Drill stands out with its ease of use and comprehensive recovery capabilities, making it a favorite among both amateur and professional photographers, including those who frequent dfphoto.net for resources.
3. How Do I Use Disk Drill to Recover Deleted Photos from an SD Card?
Disk Drill is a powerful and user-friendly tool to recover deleted photos from an SD card; here’s a step-by-step guide:
Steps to Recover Deleted Pictures from an SD Card on Windows:
-
Download and Install Disk Drill: Get Disk Drill from dfphoto.net and install it on your Windows computer. The free version lets you preview recoverable files and recover up to 500 MB of data at no cost.
 Disk Drill
 -
Connect the SD Card: Use an SD card adapter to connect the SD card to your Windows PC.
-
Launch Disk Drill: Open Disk Drill and select your memory card from the list of disks. Click Search for lost data.
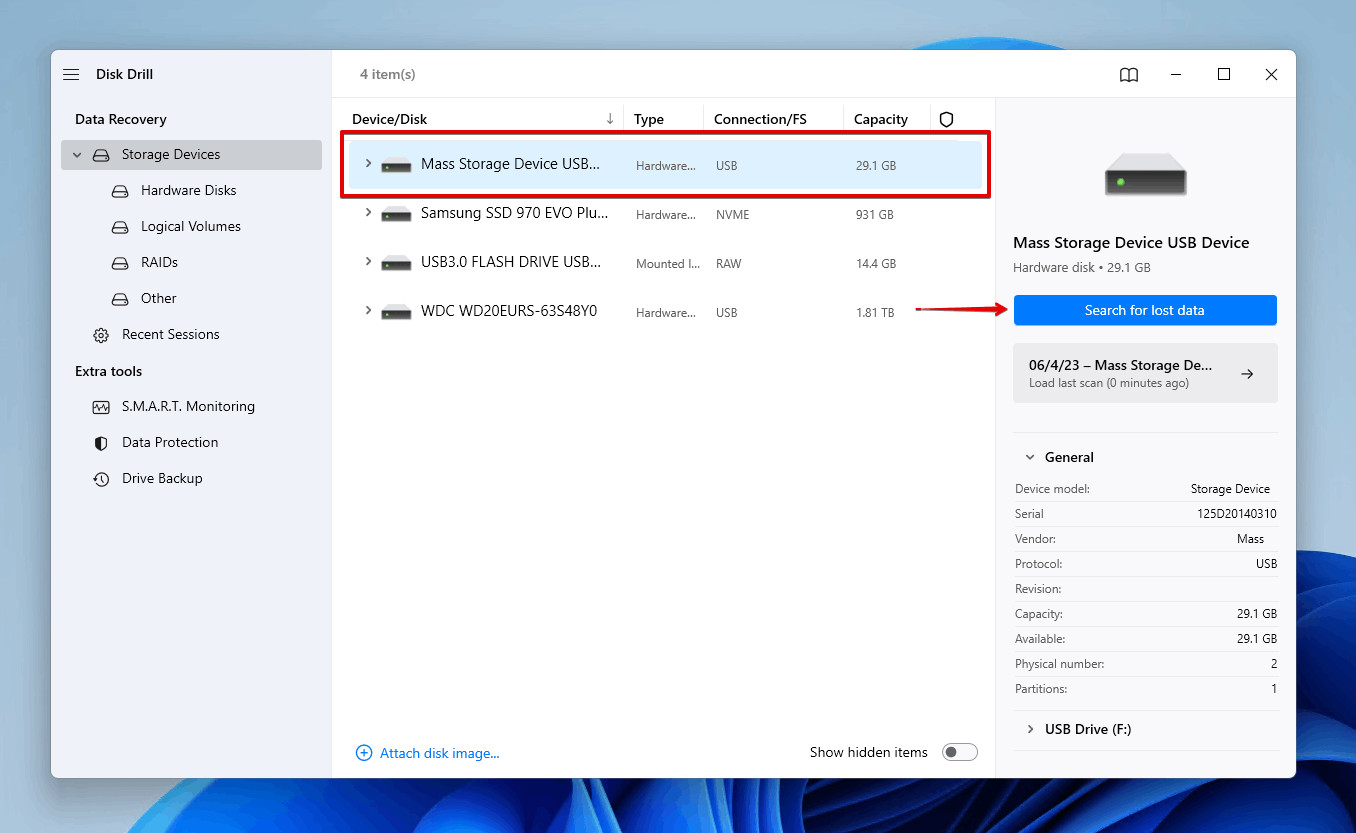 Scanning the SD card for deleted photos on Windows PC
 -
Wait for the Scan: Let the scan process complete.
 Scanning memory card using data recovery software
 -
Preview Photos: Browse the photos Disk Drill found on the SD card. Preview the pictures before you choose to recover them.
-
Select and Recover: Check the files you want to recover and click the Recover button.
 Selecting the SD card photos.
 -
Choose a Recovery Destination: Pick a safe recovery destination on a separate storage device.
 Choosing a recovery destination.
Steps to Recover Deleted Photos from an SD card on Mac:
-
Download and Install Disk Drill: Download the free version of Disk Drill from dfphoto.net and install it on your Mac.
-
Connect the SD Card: Connect the SD card to your Mac using an SD card reader or port.
-
Select the SD Card: Choose the SD card from the list of disks presented by Disk Drill.
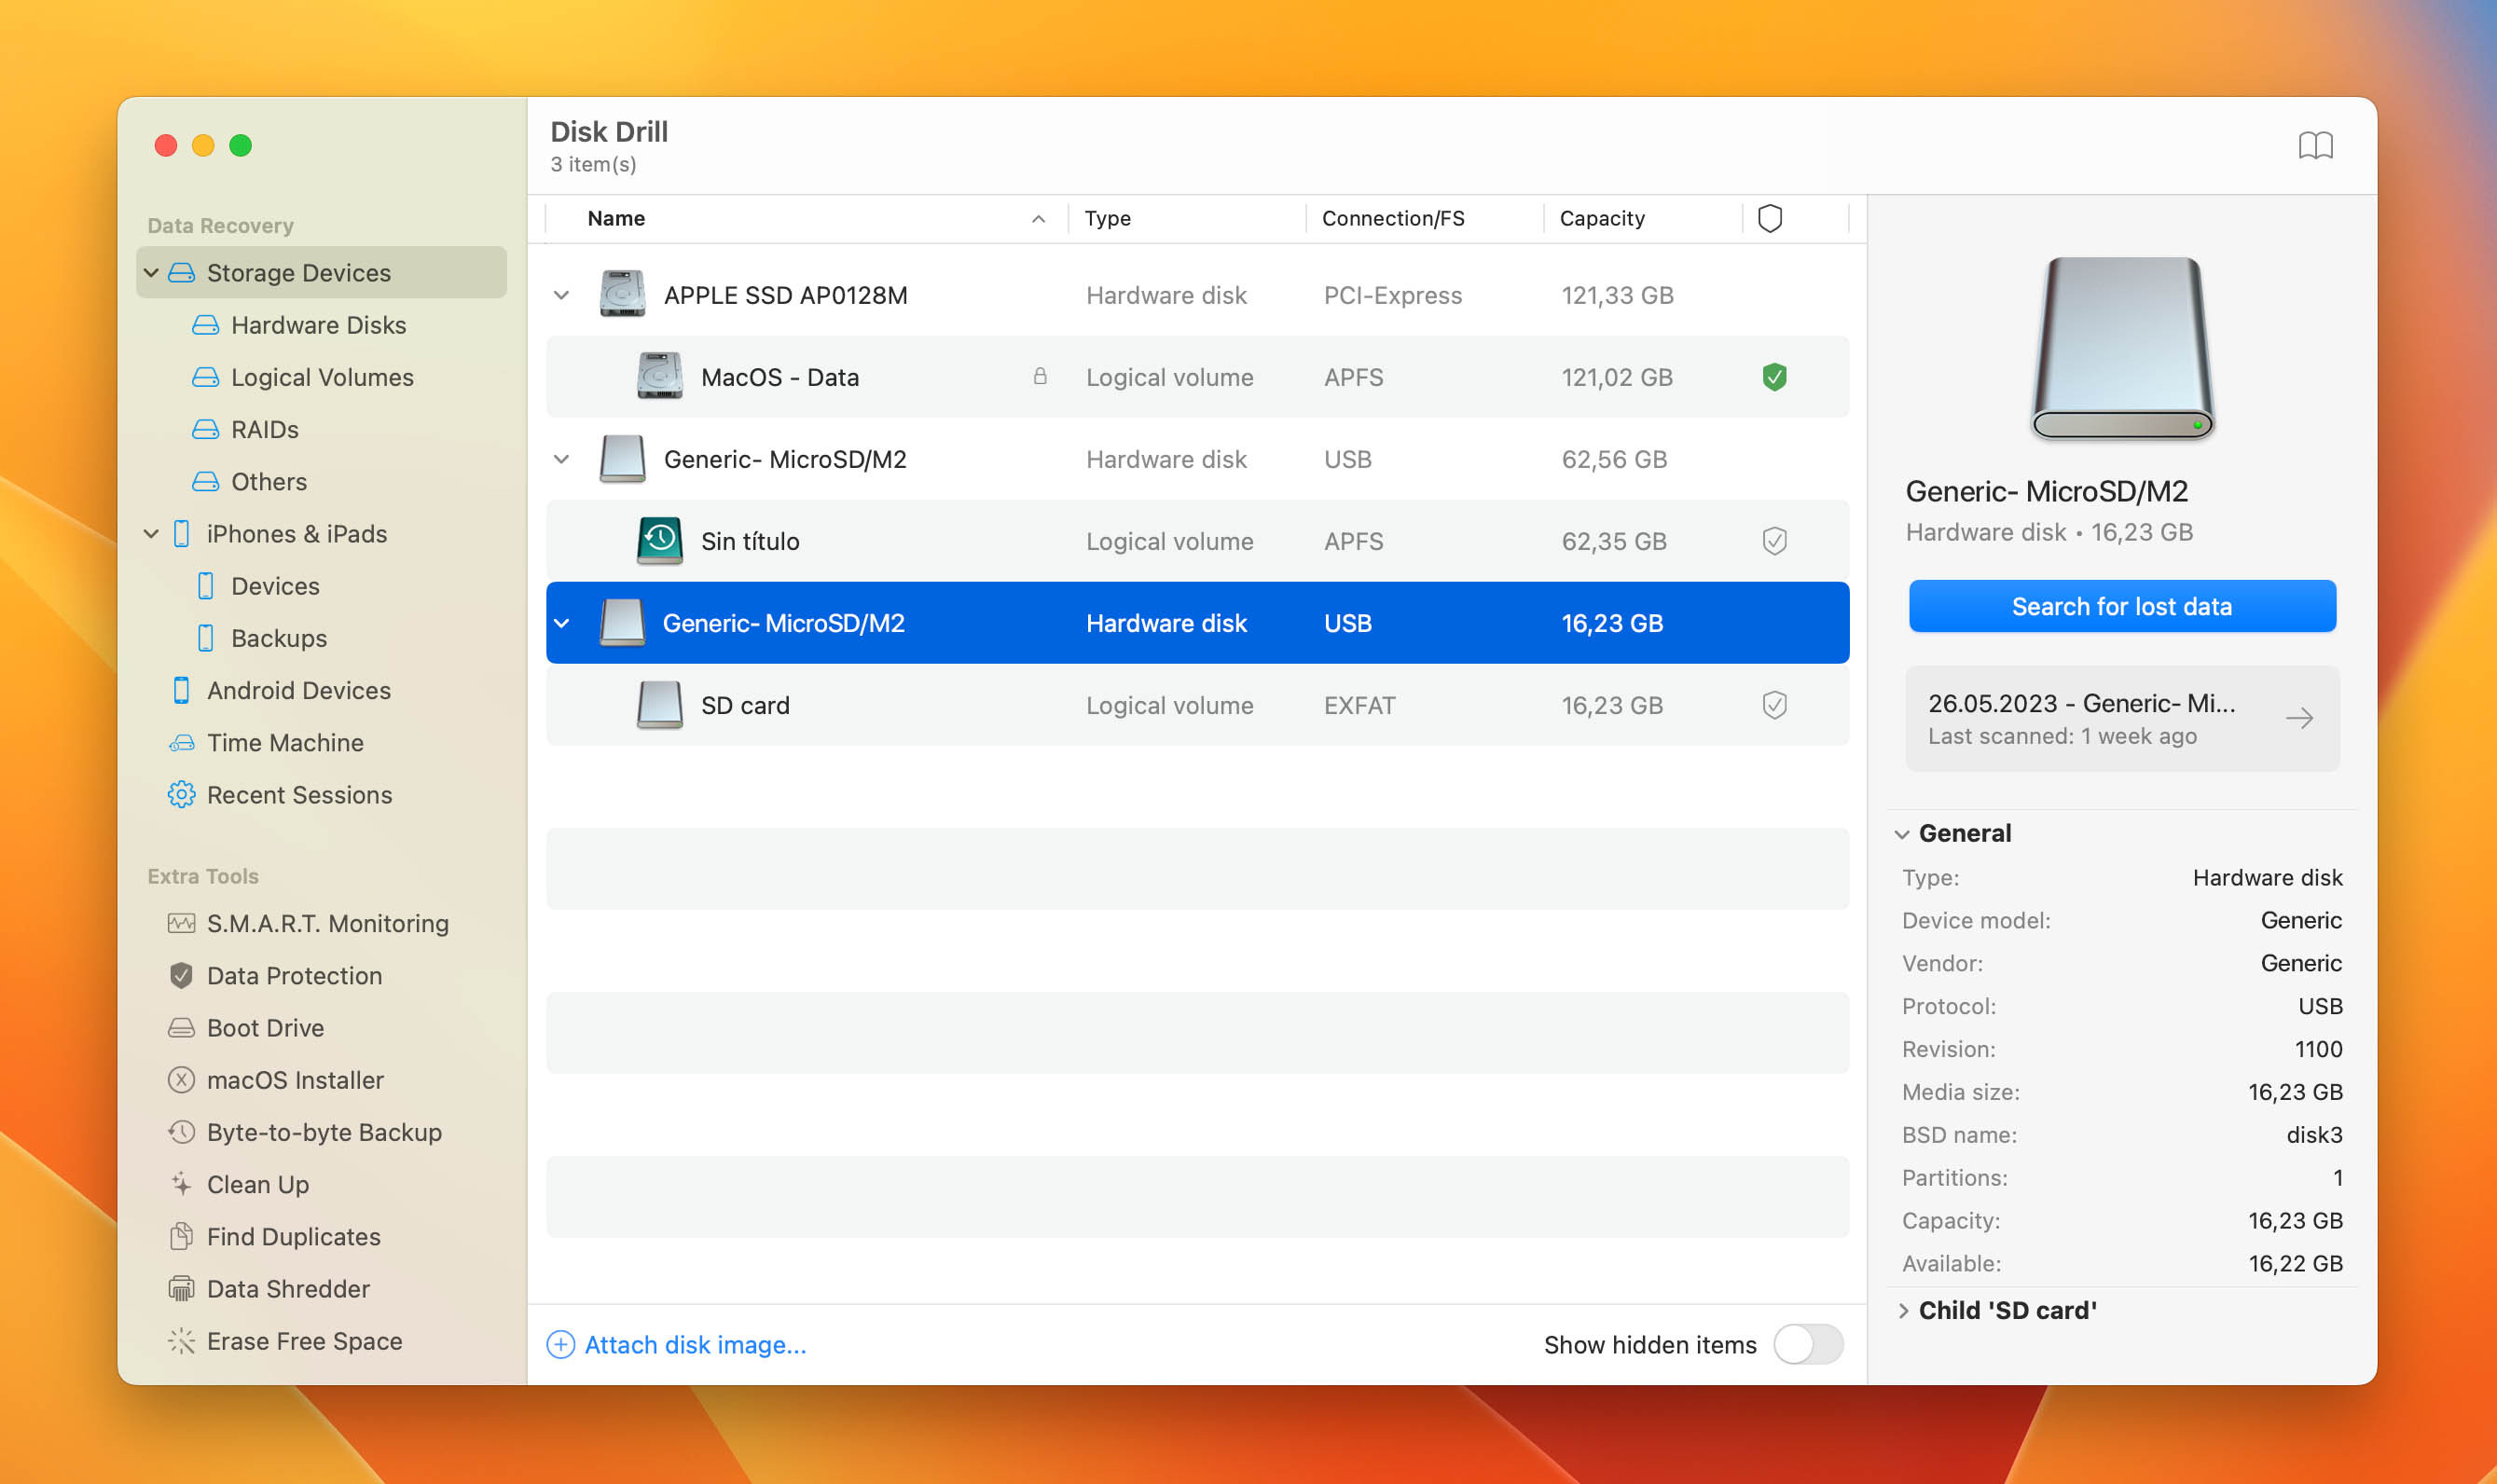 sd card in disk drill
 -
Wait for the Scan: Let the scan process finish; this may take some time.
 scan in progress
 -
Review Recovered Files: Review the files that Disk Drill recovered from your SD card. Use the search box and preview function.
-
Select and Recover: Checkmark the box to select the files for recovery and click the blue Recover button to save them back onto your Mac.
 selecting files for recovery in disk drill
 -
Choose a Recovery Location: Select a suitable location for recovery, ensuring it is not the same SD card to avoid corruption.
Following these steps, you can efficiently recover your valuable photos using Disk Drill, as recommended by dfphoto.net’s data recovery guide.
4. Are There Free Methods to Recover Photos Without Using Software?
While data recovery software is generally the most reliable method, there are alternative free options for recovering photos from an SD card without using dedicated software:
-
Check the Recycle Bin/Trash:
- Windows: Deleted files are often sent to the Recycle Bin. Open it and look for your deleted photos. If found, restore them to their original location. Note that files deleted from an external storage device typically bypass the Recycle Bin.
- macOS: Similar to Windows, macOS has a Trash folder. Open it via Finder and drag the files to a safe location to restore them.
-
Restore from Backups:
- Windows File History: If you have File History enabled, you can restore previous versions of files and folders. Search for File History in the Start menu and navigate to the backed-up photos.
- macOS Time Machine: Time Machine is macOS’s built-in backup feature. If you’ve been using Time Machine, you can restore deleted photos from a previous backup.
-
Cloud Backups:
- If you use cloud services like Google Photos, OneDrive, or Dropbox, check if your photos are backed up there. You can download the deleted photos from the cloud storage service.
-
Check Device’s Internal Memory:
- Sometimes, copies of photos are stored in the device’s internal memory. Check the photo gallery apps or temporary storage locations on your device.
These methods rely on having backups or temporary storage; they are not as effective as specialized data recovery software but can be useful in simple deletion cases.
5. How Can Android Data Recovery Apps Help Retrieve Photos?
Android data recovery apps can be beneficial for retrieving photos from SD cards used in Android devices; these apps scan the SD card directly from your smartphone or tablet:
Using DiskDigger Photo Recovery:
-
Download and Install: Download DiskDigger photo recovery from the Google Play Store.
-
Launch the App: Open DiskDigger and select the SD card to scan; it usually appears as “/mnt/sdcard” or something similar.
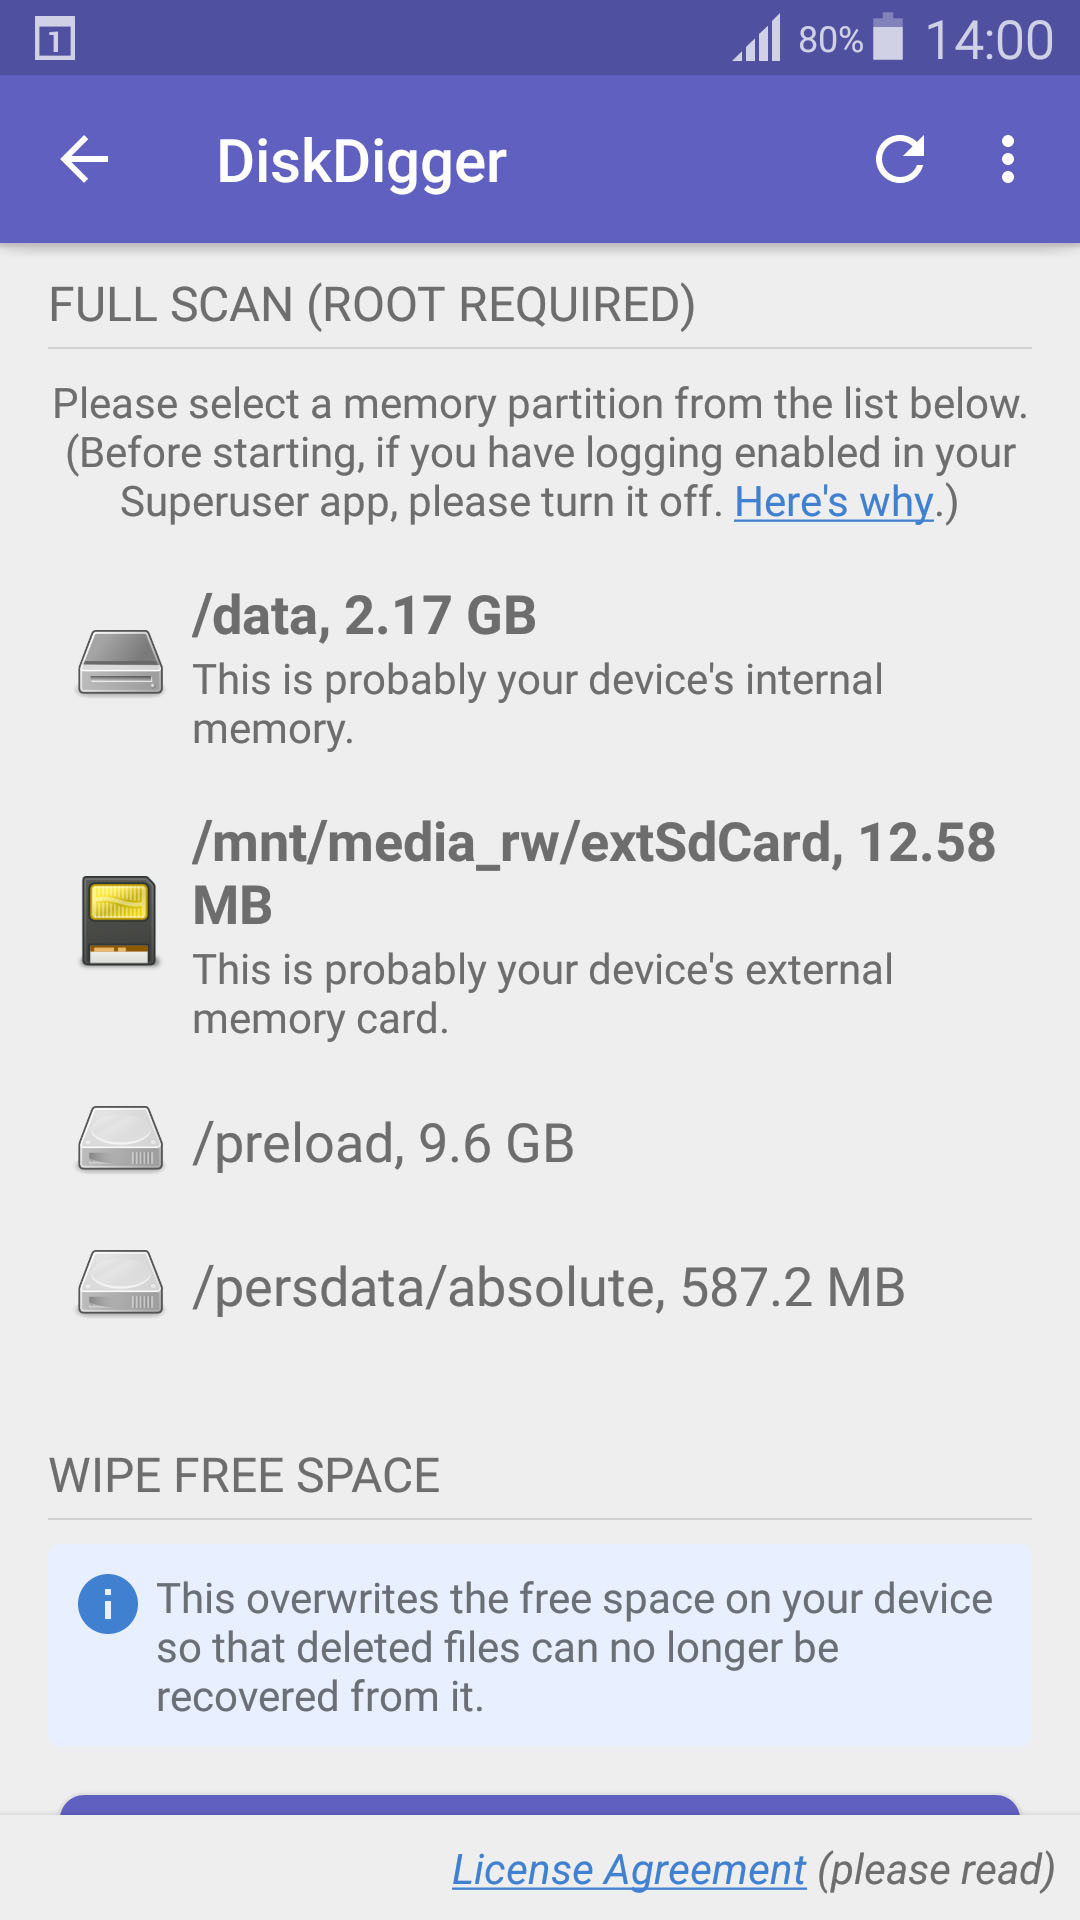 select storage device
 -
Specify File Types: Choose the file types you want to search for and tap OK.
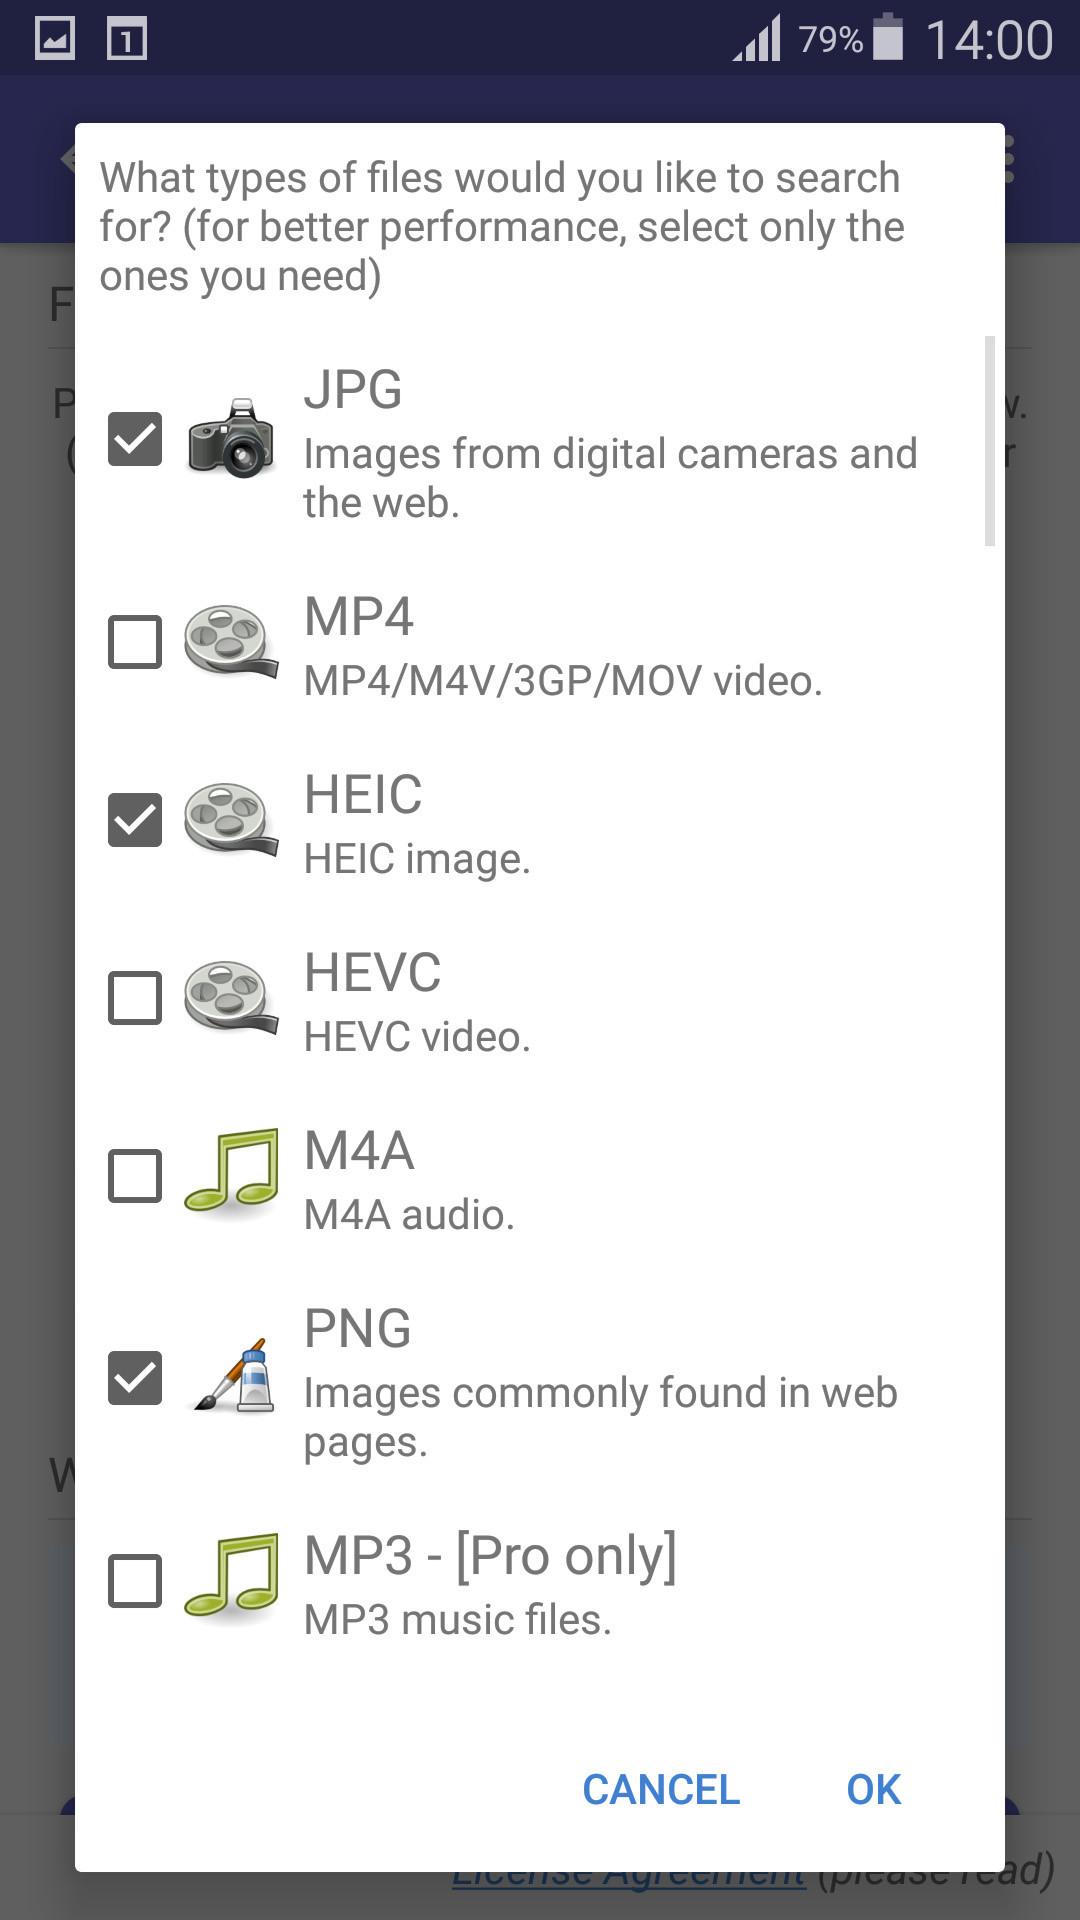 select file types
 -
Select Photos to Recover: Choose the photos you want to recover.
 select files for recover
 -
Recover: Tap the Recover button to save the photos to your device.
 select recover destination
Key Considerations:
- Root Access: For the best results, your Android device should be rooted; rooting provides deeper access to the file system, improving the app’s ability to find deleted photos.
- DiskDigger Pro: Consider using DiskDigger Pro for more advanced features and better recovery rates.
- Limitations: Android data recovery apps may not be as effective as desktop software like Disk Drill, but they offer a convenient way to recover photos directly from your device.
These apps are useful for quick recovery, especially when you don’t have access to a computer; always download from trusted sources like Google Play Store to avoid malware.
6. What Role Do Backups Play in Preventing Permanent Photo Loss?
Backups are crucial in preventing permanent photo loss; they ensure you always have a copy of your valuable images, even if the original files are lost, deleted, or corrupted:
-
Importance of Backups: Backups act as a safety net, allowing you to restore your photos to a previous state. Regular backups minimize the impact of data loss incidents.
-
Backup Strategies:
- Cloud Backups: Use cloud storage services like Google Photos, Dropbox, or OneDrive to automatically back up your photos; these services offer convenient access from any device.
- External Hard Drives: Regularly copy your photos to an external hard drive; this provides a physical backup that you control.
- NAS (Network Attached Storage): A NAS device offers centralized storage on your network, making it easy to back up photos from multiple devices.
- Time Machine (macOS): Use Time Machine to automatically back up your entire Mac, including photos stored on external SD cards.
- Windows File History: Enable File History to automatically back up your personal files, including photos on external drives.
-
Best Practices:
- Regularity: Schedule backups regularly, whether daily, weekly, or monthly, depending on how frequently you take photos.
- Multiple Backups: Implement the 3-2-1 rule: keep three copies of your data on two different storage media, with one copy offsite.
- Verification: Periodically verify your backups to ensure they are working correctly and that you can restore files when needed.
According to a 2023 survey by dfphoto.net, photographers who regularly back up their photos experience 80% less data loss compared to those who don’t.
7. How Does File History in Windows Help in Photo Recovery?
File History in Windows is a built-in backup utility that automatically backs up your personal files, including photos stored on external storage devices like SD cards; it allows you to restore previous versions of files, making it useful for recovering deleted photos:
Steps to Restore Photos Using File History:
-
Open File History: Click the Start button and search for “File History,” then open it.
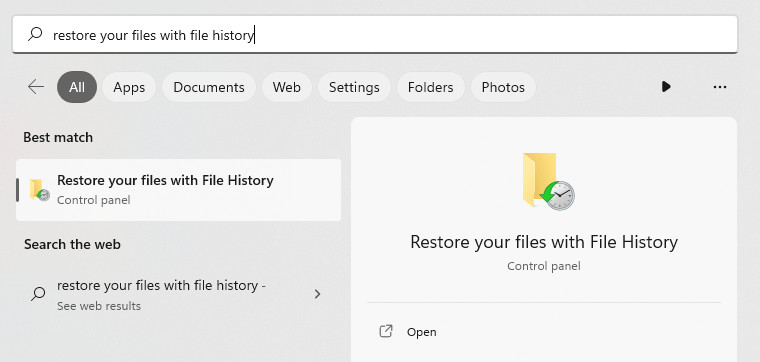 Opening File History.
 -
Restore Personal Files: Click “Restore personal files” in the File History window.
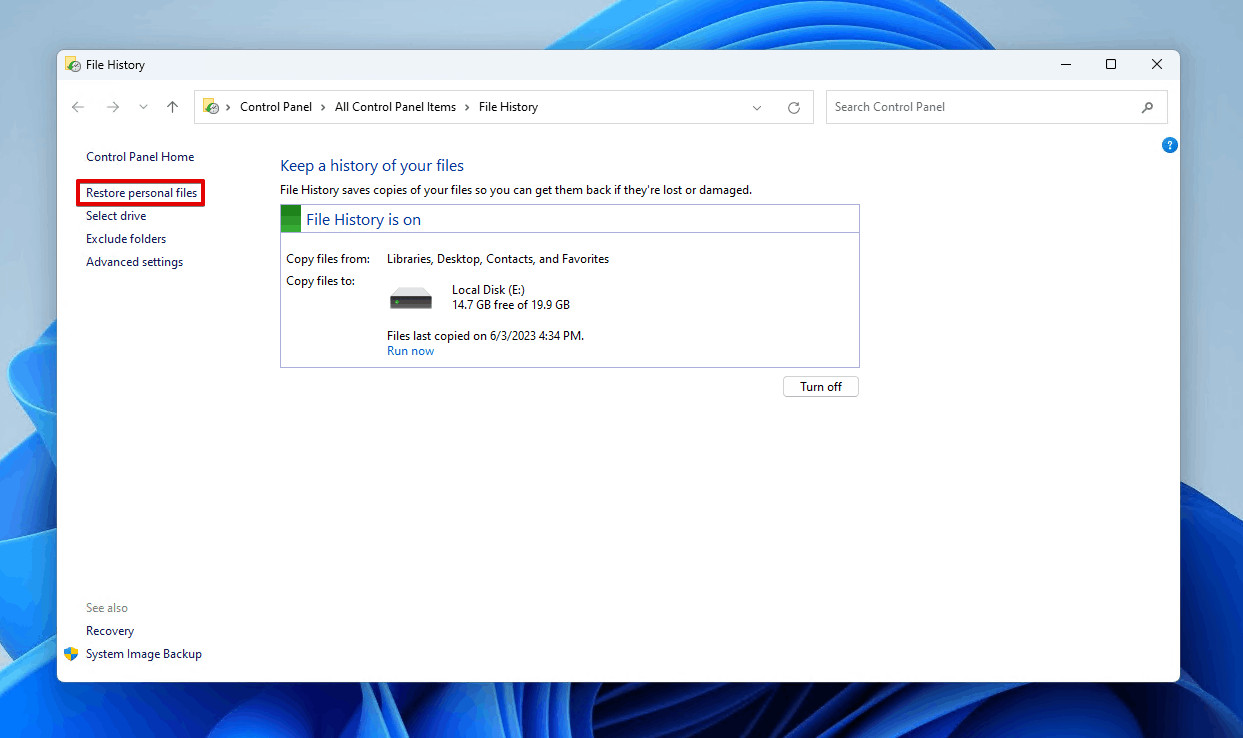 Restoring personal files.
 -
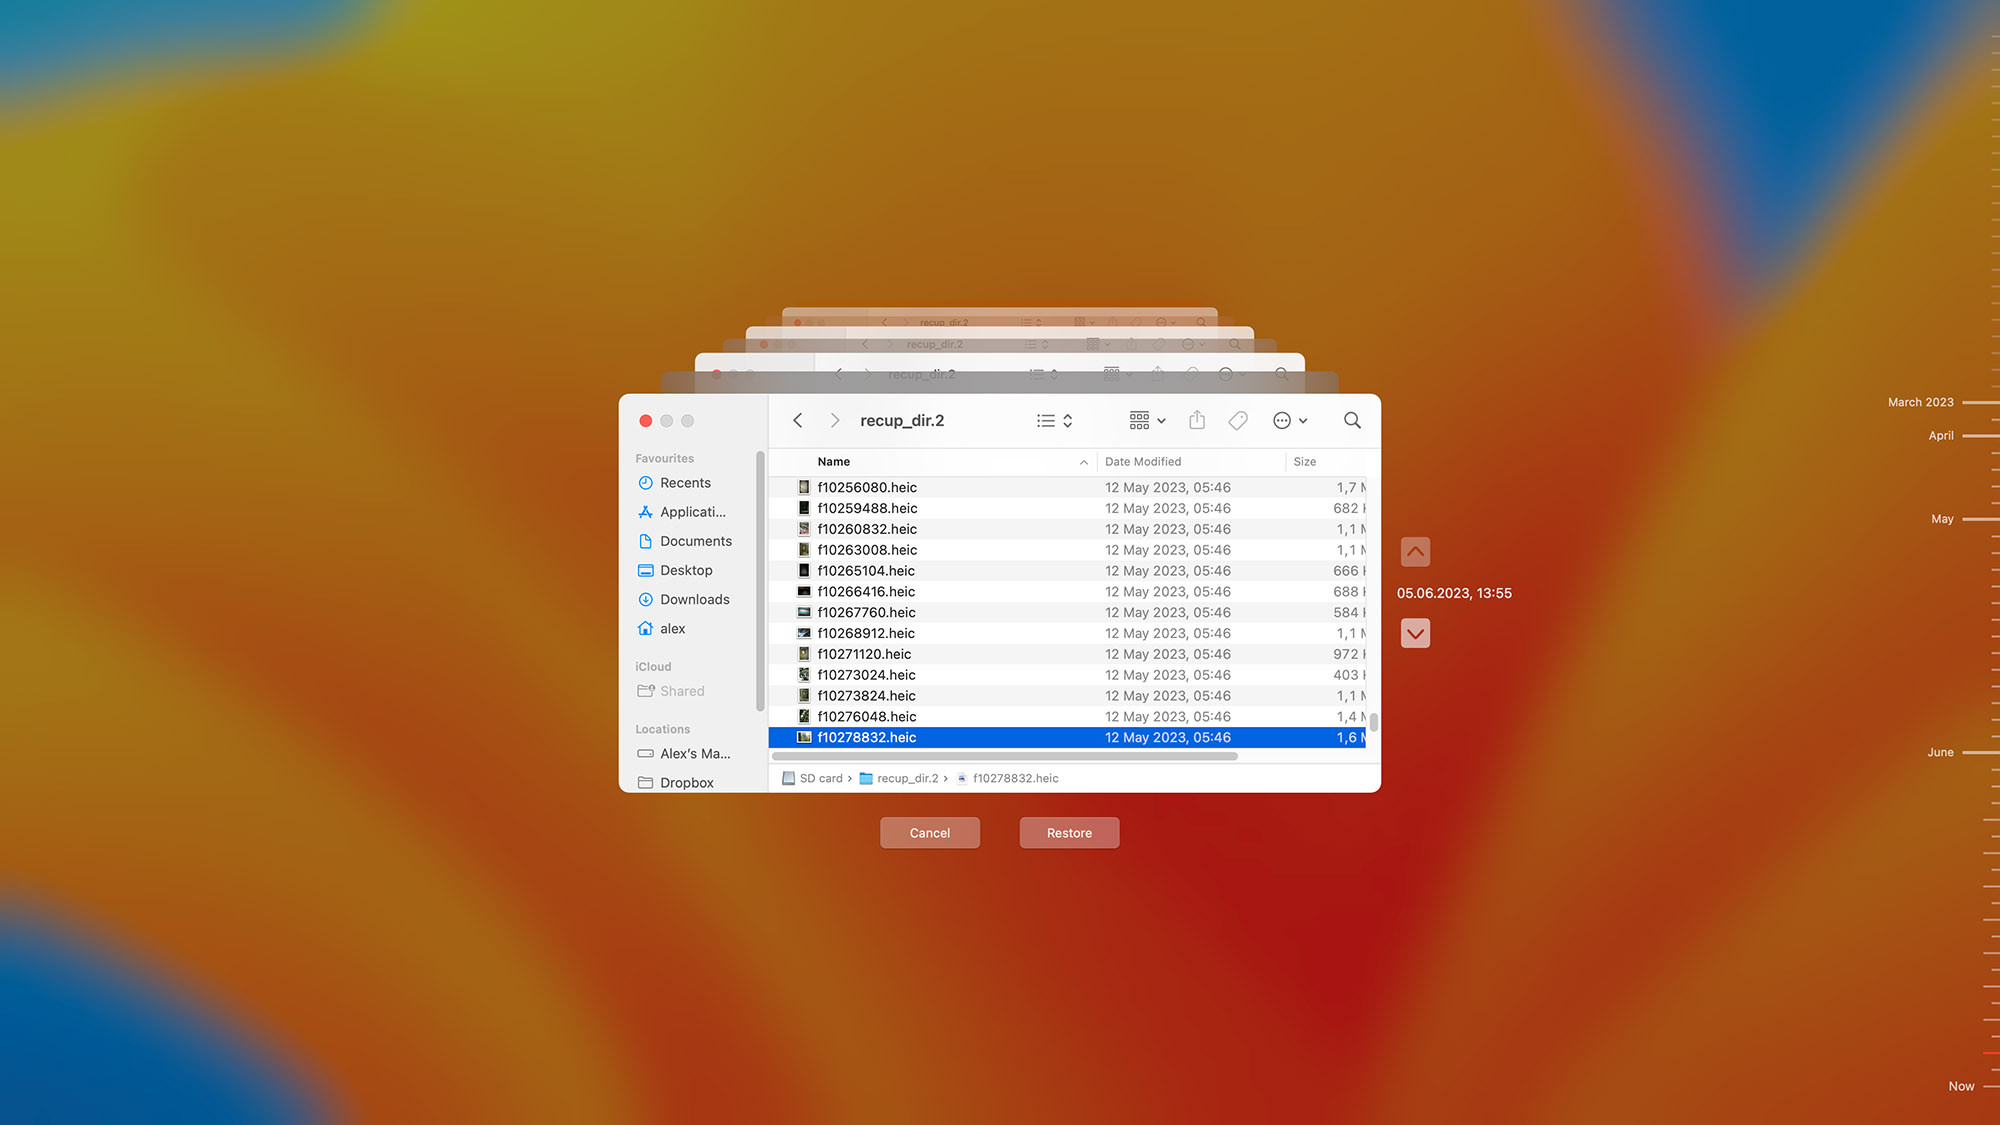
Navigate to the Backed-Up Photos: Browse through the backed-up photos and select the ones you want to restore. Use the navigation arrows to find different backup versions.
 Selecting the SD card photos.
 -
Restore Options:
- Click the green Restore button to restore the photos to their original location.
- Alternatively, click the dropdown arrow on the Restore button and select “Restore to” to choose a custom destination.
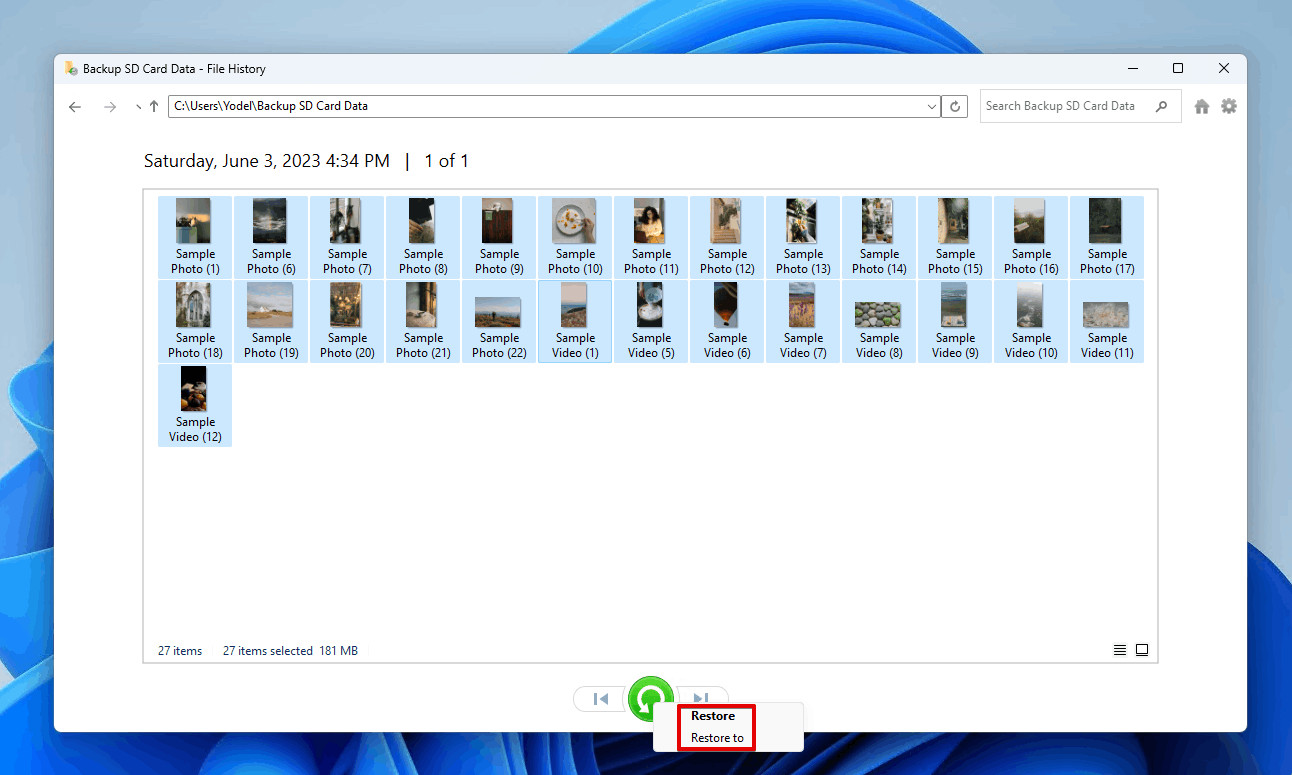 Choosing how to restore the photos.
Key Considerations:
- Enable File History: Ensure File History is enabled and configured to back up your SD card regularly; go to Settings > Update & Security > Backup > Add a drive to select the drive for backups.
- Regular Backups: File History works best when it’s set to back up frequently, such as every hour or daily.
- Alternative Search: If you’ve copied or moved files from your SD card to your computer, try searching for the photos in File Explorer; they may be in a subfolder somewhere.
File History is an easy way to maintain backups and recover deleted photos, provided it’s set up and running correctly; it integrates seamlessly with Windows, making it a convenient option for photo recovery.
8. How Does Time Machine on macOS Aid in Retrieving Lost Images?
Time Machine is macOS’s built-in backup feature, which automatically backs up your personal data, including photos stored on external SD cards; it enables you to easily restore files that have been deleted, damaged, or become inaccessible:
Steps to Restore Photos Using Time Machine:
-
Open Time Machine: Click the Time Machine icon in the menu bar and select “Enter Time Machine”. If the icon isn’t visible, enable it in System Preferences > Time Machine > Show Time Machine in menu bar.
 time machine
 -
Navigate to Backups: Use the timeline on the right side of the screen to navigate through the backups. Select the date when the photos were still available.
-
Find Deleted Photos: Browse through your files and folders to find the deleted photos; you can use the Finder window to search for specific files or folders.
-
Restore Photos: Select the photos you want to restore and click the “Restore” button; Time Machine will copy the files back to their original location.
Key Considerations:
- Configure Time Machine: Ensure Time Machine is set up to back up your SD card regularly; connect an external hard drive and configure Time Machine in System Preferences > Time Machine.
- Regular Backups: For effective recovery, Time Machine should be set to back up frequently, such as hourly or daily.
- External Storage: Connect the SD card to your Mac at least once so that Time Machine can back it up; this is essential for recovering photos that were stored on the card.
Time Machine provides a reliable way to retrieve lost images, ensuring you can recover your precious memories, as recommended by dfphoto.net’s data protection guidelines. Apple provides a detailed walkthrough on how to use Time Machine here.
9. What Steps Should I Take Immediately After Realizing Photos Are Lost?
Taking the right steps immediately after realizing photos are lost can significantly increase your chances of successful recovery:
- Stop Using the SD Card: The most critical step is to immediately stop using the SD card; continued use can overwrite the deleted photos, making them unrecoverable.
- Remove the SD Card: Take the SD card out of the camera or device to prevent any new data from being written to it.
- Avoid Formatting the Card: Do not format the SD card; formatting will erase all data, including the deleted photos you’re trying to recover.
- Do Not Save New Files: Avoid saving any new files to the SD card; this can overwrite the space occupied by the deleted photos.
- Use Data Recovery Software: As soon as possible, use reliable data recovery software like Disk Drill to scan the SD card and recover the deleted photos.
- Backup Existing Data: If possible, create a backup of the existing data on the SD card before attempting recovery; this can provide an additional layer of protection.
- Handle with Care: Handle the SD card with care to prevent any physical damage; avoid bending or exposing it to extreme temperatures or moisture.
These immediate actions can preserve the integrity of your deleted photos and enhance the likelihood of a successful recovery, as emphasized by dfphoto.net’s recovery best practices.
10. How Can I Prevent Future Photo Loss on SD Cards?
Preventing future photo loss involves a combination of careful handling, regular backups, and proactive measures to protect your data:
- Regular Backups: Implement a regular backup schedule using cloud services, external hard drives, or NAS devices; regularly backing up your photos ensures you always have a copy in case of data loss.
- Use High-Quality SD Cards: Invest in high-quality SD cards from reputable brands; cheaper cards are more prone to corruption and failure.
- Handle SD Cards Carefully: Avoid removing the SD card while the camera is writing data; always turn off the camera before removing the card to prevent corruption.
- Protect from Physical Damage: Keep SD cards in protective cases to prevent physical damage from bending, moisture, or extreme temperatures.
- Avoid Filling the Card Completely: Do not fill the SD card to its maximum capacity; leaving some free space can help prevent data corruption.
- Format SD Cards Properly: Format SD cards in your camera rather than on your computer; this ensures the card is formatted correctly for your device.
- Use Write Protection: Enable the write-protection switch on the SD card to prevent accidental deletion or overwriting of data.
- Scan for Viruses: Regularly scan your SD cards and devices for viruses and malware; viruses can corrupt data and cause photo loss.
- Eject SD Cards Safely: Always use the “eject” or “safely remove” option when disconnecting the SD card from your computer; this prevents data corruption during transfer.
- Monitor SD Card Health: Use software tools to monitor the health of your SD card; these tools can alert you to potential issues before they cause data loss.
By adopting these preventative measures, you can minimize the risk of photo loss and protect your valuable memories, as recommended by dfphoto.net’s data security guide.
FAQ
How to Recover Deleted Photos From an SD Card?
To recover deleted photos from an SD card:
- Download and install Disk Drill from dfphoto.net.
- Connect the SD card to your computer and launch Disk Drill.
- Scan the SD card using Disk Drill’s deep scan feature.
- Select your deleted photos from the scan results.
- Recover them to a safe location on your computer or another storage device.
How to Recover Photos From a Corrupted SD Card?
The recovery process depends on the extent of the corruption. If your computer recognizes the SD card, use SD card recovery software to scan the corrupted card and recover as many photos as possible. If the SD card is unrecognizable, fix the corruption using CHKDSK in Windows or First Aid in macOS, then attempt recovery.
How Can I Recover Deleted Photos From My SD Card for Free?
You can use a free SD card recovery application; here are three popular options:
- Disk Drill (offers up to 500 MB of free recovery with the Windows version).
- PhotoRec (compatible with Windows, Mac, and Linux).
- Windows File Recovery (available for Windows).
Disk Drill features an easy-to-use graphical user interface, while PhotoRec and Windows File Recovery are command-line utilities.
How to Recover Deleted Photos From Memory Card Without Software?
Recovering deleted photos from a memory card without software is generally not possible; however, check your backups and the internal memory of your digital camera, as some cameras automatically create backup copies.
How to Recover Deleted Photos From an SD Card on Android Phone?
Android users can download an SD card recovery app called DiskDigger directly from the Google Play Store and use it to recover deleted photos with a few simple taps. The basic version of DiskDigger is free, but there’s also a paid version that includes several extra features.
How Do I Recover Photos From a Sandisk SD Card?
- Download and install Disk Drill onto your Mac or Windows PC.
- Launch Disk Drill and connect the Sandisk SD card via a card reader.
- Select the Sandisk SD card and click Search for lost data to start the scan.
- Wait for the scan process to complete.
- Look for the files you want to recover and preview them if desired.
- Check the box to select the files for recovery.
- Click the blue Recover button and choose a safe location to save the recovered files.
Can You Recover Photos From a Formatted SD Card?
If your SD card has been formatted, use third-party recovery software to recover the files; keep in mind that a formatted SD card may have a lower chance of successful data recovery, especially after a full format. However, it’s worth trying using the steps outlined in this article.
By following these guidelines and utilizing the resources available on dfphoto.net, you can confidently tackle SD card photo recovery and protect your treasured memories. Visit dfphoto.net for more detailed tutorials, software reviews, and community support.
Address: 1600 St Michael’s Dr, Santa Fe, NM 87505, United States
Phone: +1 (505) 471-6001
Website: dfphoto.net