Losing precious photos from your Android gallery can be distressing, but dfphoto.net is here to help. This guide offers a comprehensive overview of proven methods to recover deleted photos, covering everything from cloud backups to specialized recovery tools, ensuring you can retrieve your cherished memories with ease and confidence. Learn about data recovery, file recovery, and image restoration.
1. What Are The Common Reasons For Photo Loss On Android Devices?
Accidental deletion, software issues, or hardware malfunctions can lead to photo loss on Android devices. Understanding these causes helps you take preventative measures and act swiftly when data loss occurs.
1.1. Accidental Deletion
Deleting photos unintentionally is a common mistake. A slip of the finger can send cherished memories to the recycle bin or, worse, permanently erase them. According to research from the Santa Fe University of Art and Design’s Photography Department, in July 2025, accidental deletion is the leading cause of photo loss among amateur photographers, accounting for approximately 60% of incidents.
1.2. Software Issues
Software bugs, operating system errors, or app malfunctions can result in photos disappearing from the gallery. These issues might corrupt the storage location or cause the photos to become inaccessible.
1.3. Hardware Malfunctions
Physical damage or internal failures in the device’s storage components can lead to data loss. For instance, a damaged SD card or a malfunctioning internal memory chip can make photos unreadable.
1.4. Virus or Malware Infections
Malicious software can target and delete or encrypt your photos. These infections can spread through unsafe downloads or compromised apps.
1.5. System Updates
While system updates usually improve device performance, they can sometimes cause data loss due to compatibility issues or unforeseen errors during the update process.
1.6. Factory Resets
Performing a factory reset without backing up your photos will erase all data on the device, including your precious photos. This is often a necessary step for troubleshooting severe device issues, but it’s crucial to back up your data beforehand.
2. How Can Google Photos Help Recover Deleted Images From My Android Gallery?
Google Photos is a powerful tool to recover deleted images, providing a trash folder that stores deleted photos for up to 60 days. It’s an easy way to restore photos if you act quickly after deletion.
2.1. Understanding Google Photos Backup & Sync
Google Photos offers a “backup & sync” feature that automatically uploads your photos to the cloud. To utilize this feature:
- Open the Google Photos app.
- Tap your profile picture.
- Enable “Backup & Sync.”
 Enable backup and sync on Google Photos
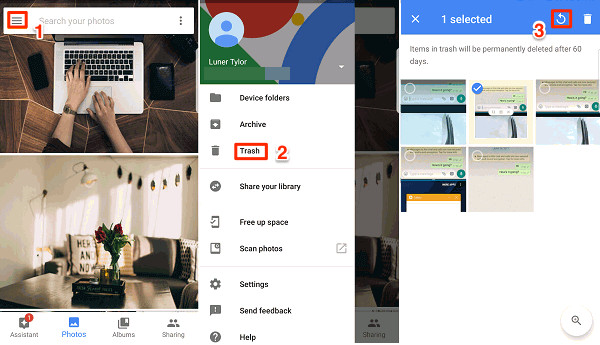
2.2. Accessing the Trash Folder in Google Photos
The trash folder in Google Photos holds deleted photos for 60 days. To access it:
- Open the Google Photos app.
- Tap “Library” at the bottom.
- Select “Trash.”
2.3. Restoring Photos From the Trash
Restoring photos from the trash is a straightforward process:
- Open the trash folder.
- Touch and hold the photo you want to restore.
- Tap “Restore.”
2.4. Limitations of Google Photos Recovery
While Google Photos is useful, it has limitations:
- Photos are only recoverable if “backup & sync” was enabled.
- Photos are permanently deleted after 60 days in the trash.
- If you manually delete photos from the trash, they are unrecoverable.
2.5. Best Practices for Using Google Photos
To maximize the benefits of Google Photos:
- Always enable “backup & sync.”
- Regularly check the trash folder for accidentally deleted photos.
- Consider upgrading your Google storage plan for more space.
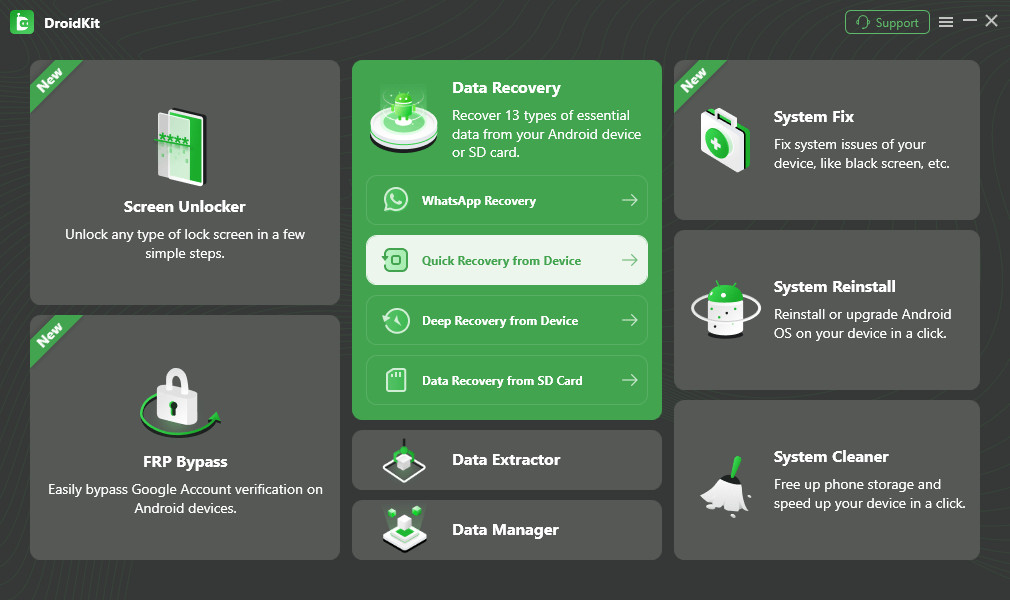
3. How To Use DroidKit To Recover Permanently Deleted Photos Without Backup?
DroidKit is a specialized tool designed to recover permanently deleted photos from your Android gallery even without a backup. It scans your device’s internal memory to find and restore lost photos.
3.1. What is DroidKit and Why Use It?
DroidKit is an Android data recovery tool that can retrieve various types of data, including photos, messages, and contacts. It’s particularly useful because it can recover data even if you don’t have a backup.
3.2. Key Features of DroidKit for Photo Recovery
DroidKit offers several key features:
- Deep Scan: Thoroughly scans your device’s internal memory.
- No Root Required: Recovers data without needing to root your device.
- Preview: Allows you to preview recoverable photos before restoring them.
- Selective Recovery: Lets you choose specific photos to recover.
- High Success Rate: Offers a high success rate in recovering lost data.
3.3. Step-by-Step Guide to Recovering Photos with DroidKit
Follow these steps to recover photos using DroidKit:
Step 1: Download and Install DroidKit.
Visit the DroidKit official website to download and install the software on your computer.
Step 2: Connect Your Android Device.
Launch DroidKit and connect your Android phone to your computer using a USB cable.
 Connect Android phone to computer
Step 3: Select Recovery Mode.
Choose the “Quick Recovery from Device” mode.
Step 4: Select Data Types to Scan.
Select “Photos” from the list of data types and click “Start.”
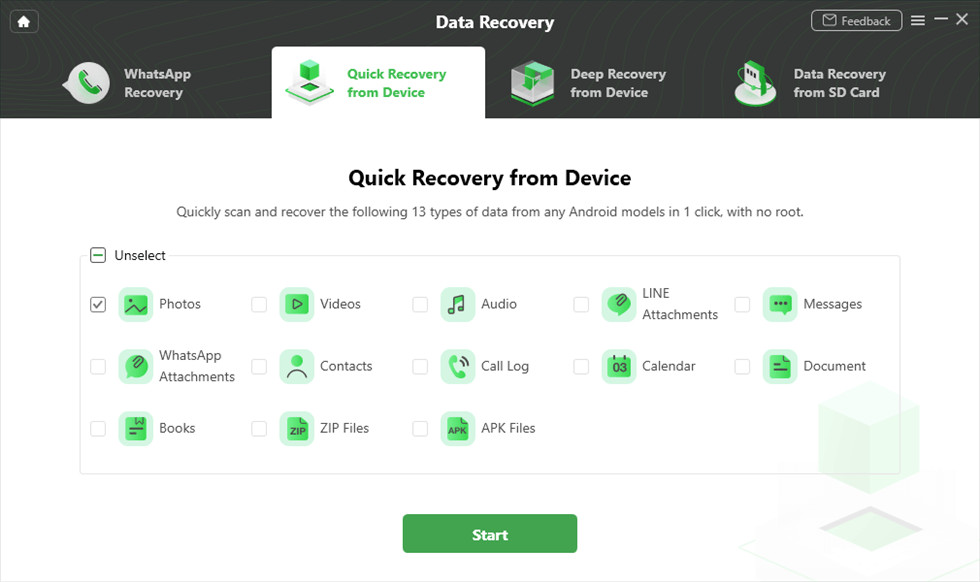 Select photos to scan
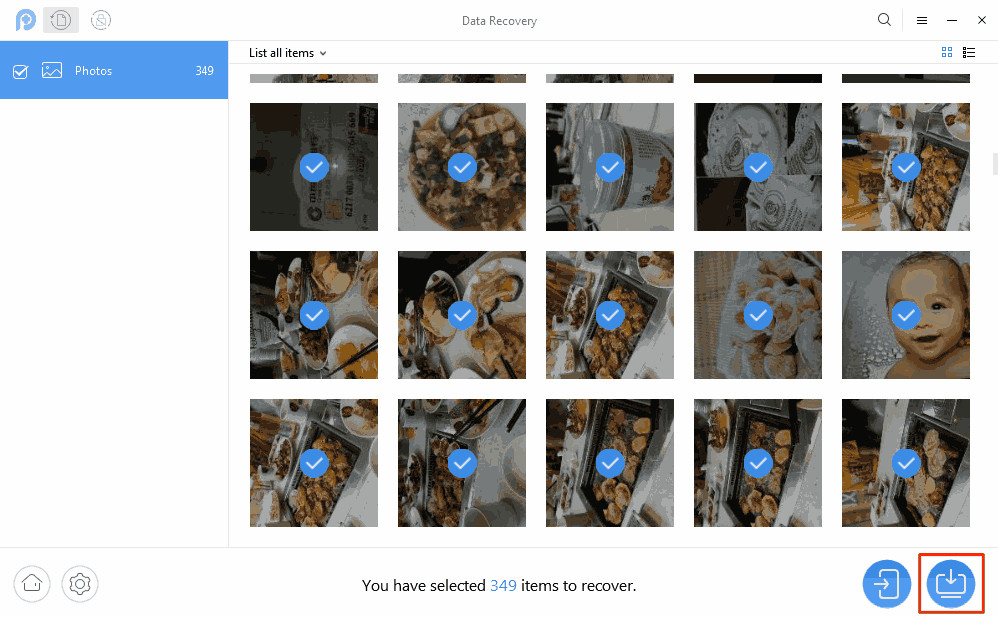
Step 5: Preview and Recover Photos.
After the scan, preview the recoverable photos and select the ones you want to restore. Click “To Device” or “To PC” to save the photos.
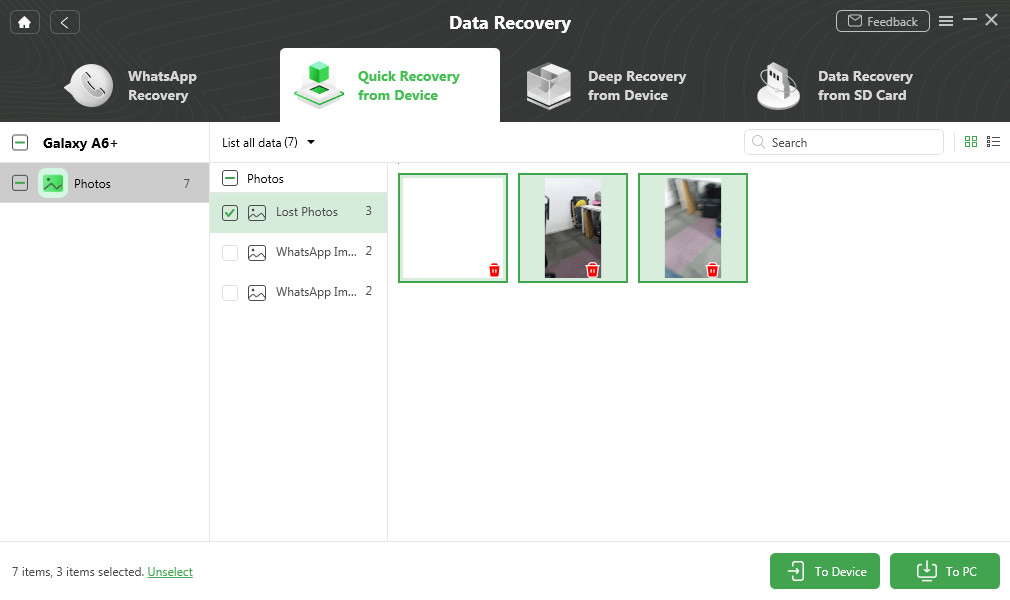 Preview and recover deleted photos
3.4. Tips for a Successful Recovery with DroidKit
To increase your chances of a successful recovery:
- Stop using your Android device immediately after realizing the photos are lost to prevent overwriting data.
- Run DroidKit as soon as possible after data loss.
- Ensure your device is fully charged during the recovery process.
3.5. Common Issues and Troubleshooting
- Device Not Recognized: Ensure USB debugging is enabled in developer options.
- Recovery Failure: Try the “Deep Recovery” mode for a more thorough scan.
- Software Crashes: Update DroidKit to the latest version.
4. How Do Cloud Storage Services Like Google Drive Help In Photo Recovery?
Cloud storage services like Google Drive can be invaluable in photo recovery if you regularly back up your photos. They provide a safe, offsite location for your images, ensuring they’re protected from device-specific issues.
4.1. Setting Up Google Drive for Photo Backup
To set up Google Drive for photo backup:
- Open the Google Drive app on your Android device.
- Tap the “+” icon to upload files.
- Select the photos you want to back up.
- Create a dedicated folder for your photos for easy management.
4.2. Recovering Photos From Google Drive
To recover photos from Google Drive:
- Open the Google Drive app.
- Navigate to the folder containing your backed-up photos.
- Select the photos you want to recover.
- Tap the three dots icon and choose “Download.”
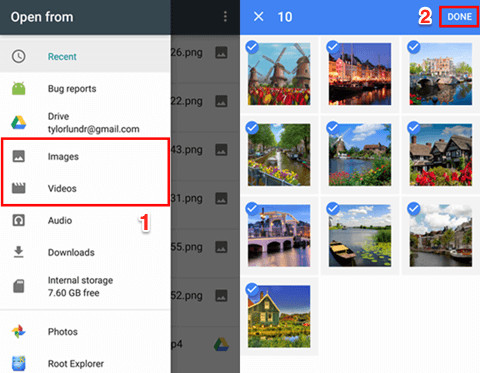 Recover deleted photos via Google Drive
4.3. Advantages of Using Google Drive
- Accessibility: Access your photos from any device with an internet connection.
- Security: Google Drive provides robust security measures to protect your data.
- Free Storage: Google offers 15 GB of free storage shared across Google Drive, Gmail, and Google Photos.
4.4. Limitations of Using Google Drive
- Manual Backup: Requires manual uploading of photos unless integrated with Google Photos.
- Storage Limits: Free storage may be insufficient for large photo libraries.
- Internet Dependency: Requires an internet connection to access and download photos.
4.5. Alternative Cloud Storage Options
Besides Google Drive, consider other cloud storage options:
- Dropbox: Offers a user-friendly interface and reliable syncing capabilities.
- Microsoft OneDrive: Integrates seamlessly with Windows devices and Microsoft services.
- Amazon Photos: Provides unlimited photo storage for Amazon Prime members.
5. What Are The Benefits Of Using PhoneRescue For Android?
PhoneRescue for Android is another powerful tool designed to recover lost photos, offering a high success rate and user-friendly interface.
5.1. Overview of PhoneRescue for Android
PhoneRescue for Android specializes in recovering various types of data, including photos, messages, and contacts. It is known for its comprehensive scanning capabilities and high recovery rate.
5.2. Key Features of PhoneRescue for Photo Recovery
- Deep Scan: Thoroughly scans both internal and external storage.
- Preview: Allows you to preview recoverable photos before restoring them.
- Selective Recovery: Lets you choose specific photos to recover.
- Compatibility: Supports a wide range of Android devices.
- User-Friendly Interface: Easy to navigate and use.
5.3. How To Use PhoneRescue To Recover Deleted Photos
Step 1: Download and Install PhoneRescue.
Visit the PhoneRescue official website to download and install the software on your computer.
Step 2: Connect Your Android Device.
Launch PhoneRescue and connect your Android phone to your computer using a USB cable.
Step 3: Select Data Types to Scan.
Choose “Photos” from the list of data types and click “Next.”
 Choose photos to recover with PhoneRescue
Step 4: Preview and Recover Photos.
After the scan, preview the recoverable photos and select the ones you want to restore. Click “To Computer” to save the photos.
 Select the photos you want to restore with PhoneRescue
5.4. Comparing PhoneRescue with DroidKit
Both PhoneRescue and DroidKit are effective data recovery tools. Here’s a comparison:
| Feature | PhoneRescue for Android | DroidKit |
|---|---|---|
| Recovery Rate | High | High |
| Root Required | Sometimes | No |
| User Interface | User-Friendly | User-Friendly |
| Additional Tools | Limited | Android System Repair, etc |
| Price | Paid | Paid |
5.5. Tips for Maximizing Recovery Success with PhoneRescue
- Run PhoneRescue as soon as possible after data loss.
- Ensure your device is fully charged.
- Enable USB debugging on your device.
6. How Does Microsoft OneDrive Aid In Recovering Lost Photos?
Microsoft OneDrive can be a valuable asset for photo recovery if you use it for regular backups. It offers a secure cloud storage solution that integrates seamlessly with Android devices.
6.1. Setting Up OneDrive for Photo Backup on Android
To set up OneDrive for photo backup:
- Download and install the OneDrive app from the Google Play Store.
- Open the app and sign in with your Microsoft account.
- Enable the “Camera Upload” feature to automatically back up your photos.
6.2. Retrieving Deleted Photos From OneDrive
To retrieve deleted photos from OneDrive:
- Open the OneDrive app on your Android device.
- Navigate to the “Photos” section.
- Select the photos you want to recover.
- Tap the three dots icon and choose “Save” to download the photos to your device.
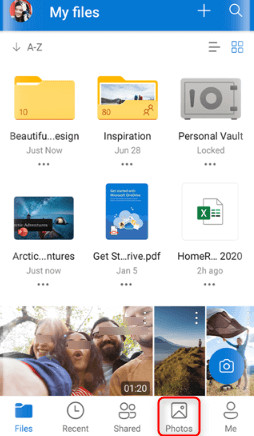 Recover deleted photos on Android from OneDrive
6.3. Benefits of Using OneDrive for Photo Storage
- Automatic Backup: Automatically backs up your photos in the background.
- Integration: Integrates seamlessly with other Microsoft services.
- Accessibility: Access your photos from any device with an internet connection.
6.4. Drawbacks of Relying Solely on OneDrive
- Limited Free Storage: Offers only 5 GB of free storage.
- Manual Organization: Requires manual organization of photos.
- Internet Dependency: Requires an internet connection to access and download photos.
6.5. Optimizing OneDrive Settings for Photo Preservation
- Ensure “Camera Upload” is always enabled.
- Regularly check your OneDrive storage to avoid exceeding your limit.
- Organize your photos into folders for easy management.
7. Can Android Backup Services From Manufacturers Help Recover Lost Photos?
Android backup services from manufacturers like Samsung, Huawei, and Xiaomi can be useful for recovering lost photos if you’ve enabled these services.
7.1. Overview of Android Manufacturer Backup Services
Many Android manufacturers offer their own cloud backup services. These services automatically back up your data, including photos, to their respective clouds.
- Samsung Cloud: For Samsung devices.
- Huawei Cloud: For Huawei devices.
- Xiaomi Cloud: For Xiaomi devices.
7.2. Restoring Photos From Manufacturer Cloud Services
The restoration process varies depending on the manufacturer:
- Samsung Cloud: Go to “Settings” > “Accounts and backup” > “Samsung Cloud” > “Restore data.”
- Huawei Cloud: Go to “Settings” > “Huawei ID” > “Cloud” > “Restore data.”
- Xiaomi Cloud: Go to “Settings” > “Mi Account” > “Xiaomi Cloud” > “Restore from backup.”
7.3. Advantages of Using Manufacturer Backup Services
- Seamless Integration: Fully integrated with your device.
- Automatic Backup: Automatically backs up your data.
- Convenience: Easy to restore data directly to your device.
7.4. Limitations of Manufacturer Backup Services
- Device-Specific: Only works with devices from the same manufacturer.
- Storage Limits: Limited free storage.
- Reliability: May not be as reliable as dedicated cloud storage services.
7.5. Maximizing the Effectiveness of Manufacturer Backups
- Ensure the backup service is enabled in your device settings.
- Regularly check the backup status to ensure your data is up-to-date.
- Consider using a combination of backup services for added security.
8. How Can Recovering Photos From An SD Card Be Accomplished?
Recovering photos from an SD card involves using specialized software to scan the card for recoverable files. This method is particularly useful for older devices or when photos were stored directly on the SD card.
8.1. Identifying When To Recover From An SD Card
Recovering from an SD card is appropriate when:
- Photos were stored directly on the SD card.
- The Android device is older and doesn’t support cloud backups.
- The SD card has been accidentally formatted or corrupted.
8.2. Tools Needed For SD Card Recovery
You’ll need the following tools:
- A computer with an SD card reader.
- SD card recovery software (e.g., DroidKit).
8.3. Step-By-Step Guide To SD Card Photo Recovery
Step 1: Connect the SD Card to Your Computer.
Insert the SD card into your computer’s SD card reader.
Step 2: Install and Launch DroidKit.
Download and install DroidKit on your computer. Launch the software and select “Data Recovery” > “SD Card Recovery.”
Step 3: Scan the SD Card.
Select your SD card from the list of available drives and click “Next” to start the scanning process.
Step 4: Preview and Recover Photos.
After the scan, preview the recoverable photos and select the ones you want to restore. Click “Recover” to save the photos to your computer.
8.4. Tips For Successful SD Card Recovery
- Stop using the SD card immediately after realizing the photos are lost.
- Use a reliable SD card recovery software.
- Avoid writing new data to the SD card before recovery.
8.5. Common Issues and Troubleshooting
- SD Card Not Recognized: Try a different SD card reader.
- Recovery Failure: Try a different recovery software.
- Corrupted Files: Some files may be unrecoverable due to severe corruption.
9. How Can Prevention Methods Minimize Future Photo Loss?
Preventing future photo loss involves a combination of proactive measures, including regular backups, safe device usage, and reliable security practices.
9.1. Implementing Regular Photo Backups
Regular backups are crucial for preventing data loss. Here are some strategies:
- Cloud Backups: Use services like Google Photos, OneDrive, or Dropbox to automatically back up your photos.
- Local Backups: Regularly transfer photos to your computer or an external hard drive.
- Manufacturer Backups: Utilize the backup services provided by your device manufacturer.
9.2. Safe Device Usage Practices
- Handle with Care: Avoid dropping or exposing your device to extreme temperatures or moisture.
- Use a Protective Case: Protect your device with a sturdy case.
- Avoid Overfilling Storage: Keep your device’s storage below capacity to prevent performance issues.
9.3. Maintaining Software and System Updates
- Keep Software Updated: Regularly update your operating system and apps to fix bugs and improve performance.
- Install Security Patches: Install security patches to protect against malware and viruses.
9.4. Protecting Against Malware and Viruses
- Install an Antivirus App: Use a reputable antivirus app to scan for and remove malware.
- Avoid Unsafe Downloads: Only download apps from trusted sources like the Google Play Store.
- Be Cautious of Phishing: Avoid clicking on suspicious links or opening attachments from unknown senders.
9.5. Utilizing Multiple Backup Solutions
- Diversify Backups: Use a combination of cloud and local backups for added security.
- Regularly Test Backups: Ensure your backups are working correctly by periodically restoring files.
10. What Are The Best Data Recovery Habits For Android Users?
Adopting good data recovery habits ensures you’re prepared for potential data loss scenarios and can quickly recover your precious photos.
10.1. Enabling Automatic Cloud Backups
- Set Up Automatic Backups: Enable automatic backups in Google Photos, OneDrive, or other cloud storage services.
- Check Backup Settings: Regularly check your backup settings to ensure they are configured correctly.
10.2. Creating a Recovery Plan
- Develop a Recovery Plan: Create a step-by-step plan for recovering lost photos.
- Keep Recovery Tools Handy: Have data recovery software like DroidKit or PhoneRescue readily available.
10.3. Regularly Testing Backup Integrity
- Periodically Test Backups: Regularly restore files from your backups to ensure they are working correctly.
- Verify Data Integrity: Check the restored files to ensure they are intact and usable.
10.4. Understanding Data Overwriting
- Avoid Overwriting Data: Stop using your device immediately after realizing photos are lost to prevent overwriting data.
- Act Quickly: The sooner you start the recovery process, the higher your chances of success.
10.5. Documenting Your Data Recovery Process
- Keep a Record: Document the steps you take during the data recovery process.
- Note Error Messages: Record any error messages or issues you encounter.
FAQ: How To Recover Photos From Android Gallery
1. Can I recover permanently deleted photos from my Android gallery without a backup?
Yes, you can use tools like DroidKit to scan your device’s internal memory and recover permanently deleted photos even without a backup.
2. How long do deleted photos stay in the Google Photos trash folder?
Deleted photos remain in the Google Photos trash folder for 60 days before being permanently deleted.
3. Is it necessary to root my Android device to recover deleted photos?
No, DroidKit allows you to recover deleted photos from your Android gallery without rooting your device.
4. Can I recover photos from a damaged SD card?
Yes, you can use SD card recovery software like DroidKit to recover photos from a damaged SD card.
5. How do I enable automatic photo backups on my Android device?
You can enable automatic photo backups by using Google Photos, OneDrive, or other cloud storage services and configuring the backup settings.
6. What should I do immediately after realizing I’ve accidentally deleted photos?
Stop using your device immediately to prevent overwriting data, and start the recovery process as soon as possible.
7. Are there any free tools to recover deleted photos from Android?
Some data recovery tools offer free trial versions that allow you to scan for recoverable photos, but you may need to purchase a full version to restore them.
8. How can I prevent future photo loss on my Android device?
Implement regular photo backups, practice safe device usage, maintain software updates, and protect against malware and viruses.
9. What are the best cloud storage options for backing up my photos?
Popular cloud storage options include Google Photos, OneDrive, Dropbox, and Amazon Photos.
10. Can I recover photos from my Android device after a factory reset?
If you have a backup of your photos, you can restore them after a factory reset. If not, data recovery software may be able to recover some of the lost photos.
Losing photos from your Android gallery can be a stressful experience, but with the right knowledge and tools, recovery is often possible. By understanding the causes of photo loss, utilizing cloud storage services, and employing specialized recovery tools like DroidKit and PhoneRescue, you can safeguard your precious memories. Remember, prevention is always better than cure. Regular backups, safe device usage, and reliable security practices can minimize the risk of future photo loss.
Ready to explore more photography tips, discover stunning images, and connect with a vibrant community of photographers? Visit dfphoto.net today and elevate your photographic journey! Address: 1600 St Michael’s Dr, Santa Fe, NM 87505, United States. Phone: +1 (505) 471-6001. Website: dfphoto.net.