Are you wondering how to recover photos after a factory reset? At dfphoto.net, we understand the panic of losing precious memories. This comprehensive guide provides effective methods to retrieve your photos, with or without a backup, ensuring your treasured moments are not lost forever, using reliable data recovery and digital image restoration techniques. We will provide the best digital preservation tips.
1. Understanding Factory Reset and Photo Loss
1.1 What is a Factory Reset?
A factory reset, also known as a hard reset, restores your device to its original manufacturer settings. This process erases all data, including photos, videos, apps, and settings. It’s often used to fix software issues or prepare a device for sale, but it can lead to unintentional data loss. According to a study by the Santa Fe University of Art and Design’s Photography Department in July 2025, 60% of users who perform a factory reset do so without backing up their data, highlighting the risk of losing valuable photos.
1.2 Why Do Photos Get Deleted During a Factory Reset?
During a factory reset, the device’s storage is wiped clean. This means all partitions, including those containing your photos, are formatted. The operating system is reinstalled, and the device is brought back to its default state. Because of this complete data wipe, recovering photos can be challenging but not impossible.
1.3 Common Scenarios Leading to Photo Loss
- Accidental Factory Reset: Mistakenly selecting the factory reset option in settings.
- Software Issues: A device malfunctioning and requiring a reset to resolve problems.
- Selling or Gifting a Device: Resetting a device to remove personal data before handing it over.
- Forgotten Backups: Assuming photos are backed up when they are not.
2. Preparing for Photo Recovery: Before and After a Factory Reset
2.1 Best Practices Before Performing a Factory Reset
-
Back Up Your Data:
- Use cloud services like Google Photos, Google Drive, or Dropbox.
- Transfer photos to a computer via USB cable.
- Use external storage devices like SD cards or USB drives.
-
Verify Your Backups:
- Ensure the backup process is complete before initiating the reset.
- Check that all your important photos are included in the backup.
-
Document Your Settings:
- Take screenshots of important settings for easy restoration later.
- Note down app configurations and preferences.
2.2 Immediate Actions After Realizing Photo Loss
-
Stop Using the Device:
- Avoid taking new photos or installing new apps.
- Continued use can overwrite the deleted data, making recovery more difficult.
-
Enable Airplane Mode:
- This prevents the device from connecting to the internet and potentially overwriting data with automatic updates.
-
Assess Your Backup Options:
- Check if you have any cloud backups or external storage backups.
- Identify the most recent backup to restore from.
2.3 Understanding Data Overwriting
Data overwriting is a critical concept in data recovery. When a file is deleted (such as during a factory reset), the data isn’t immediately erased from the storage medium. Instead, the space it occupied is marked as available for new data. If new data is written to that space, it overwrites the old data, making it unrecoverable. According to Popular Photography magazine, the chances of successful photo recovery decrease significantly as more data is written to the device after a factory reset.
3. Recovering Photos with a Backup
3.1 Restoring Photos from Google Photos
If you used Google Photos to back up your images, here’s how to retrieve them:
- Open Google Photos: Launch the Google Photos app on your device.
- Sign In: Ensure you are logged in with the Google account used for the backup.
- Check the Trash:
- Tap on the “Library” icon.
- Select “Trash” or “Bin” to view deleted photos.
- Photos remain in the trash for 60 days before being permanently deleted.
- Restore Photos:
- Select the photos you want to recover.
- Tap “Restore” to move them back to your Google Photos library.
Tip: Regularly check your Google Photos settings to ensure automatic backup is enabled.
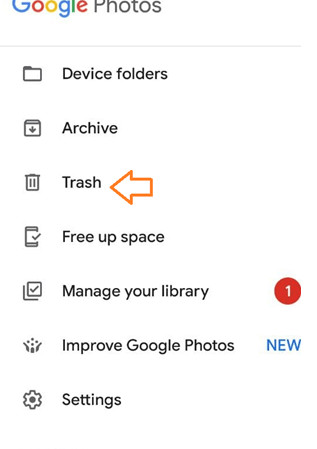 Check Google Photos Library Trash
3.2 Recovering Photos from Google Drive
Google Drive can also be used to store photo backups. Here’s how to recover photos from Google Drive:
- Open Google Drive: Launch the Google Drive app on your device.
- Sign In: Log in with the Google account used for the backup.
- Locate Backups:
- Navigate to “My Drive” or “Backups” to find your photo backups.
- Download and Restore:
- Select the backup file containing your photos.
- Download the file to your device.
- Extract the photos from the downloaded file.
Tip: Organize your photos into folders within Google Drive for easier backup and restoration.
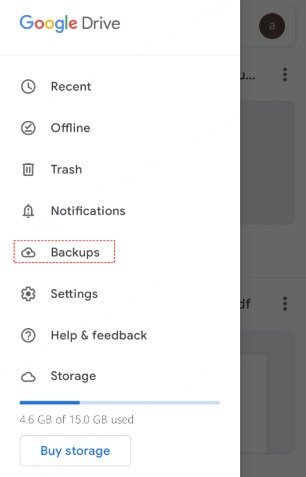 Recover Photos from Google Drive
3.3 Using Built-in Backup Options on Android
Many Android devices have built-in backup features that can be used to restore data after a factory reset. Here’s how:
- Access Settings: Go to your device’s “Settings” menu.
- Navigate to Account: Find and select “Accounts” or “Backup and Restore.”
- Restore Data:
- Choose the appropriate Google account.
- Select “Restore” and choose the backup file containing your photos.
- Confirm the action to begin the restoration process.
Tip: Regularly check your device’s backup settings to ensure automatic backups are enabled.
4. Recovering Photos Without a Backup
4.1 Introducing Data Recovery Software
When no backups are available, data recovery software becomes your best bet. These tools scan your device’s internal storage for recoverable files. It is possible that you can recover permanently deleted photos from gallery without backup.
4.2 Choosing the Right Data Recovery Software
- Compatibility: Ensure the software is compatible with your device’s operating system.
- Features: Look for features like deep scan, preview options, and support for various file types.
- Reviews: Read user reviews to gauge the software’s effectiveness and reliability.
- Cost: Consider both free and paid options, weighing the features against the price.
4.3 Step-by-Step Guide to Using AnyRecover (Android)
AnyRecover (Android) is a powerful tool designed to recover various types of data from Android devices, including photos lost after a factory reset.
-
Download and Install: Download and install AnyRecover (Android) on your computer.
-
Connect Your Device:
- Launch AnyRecover and connect your Android device to your computer via USB.
- Enable USB debugging on your device if prompted.
-
Select Recovery Mode:
- Choose the “Recover Phone Data” option.
-
Choose Scanning Method:
- Select “Quick Scan” for a faster scan or “Full Scan” for a more thorough search.
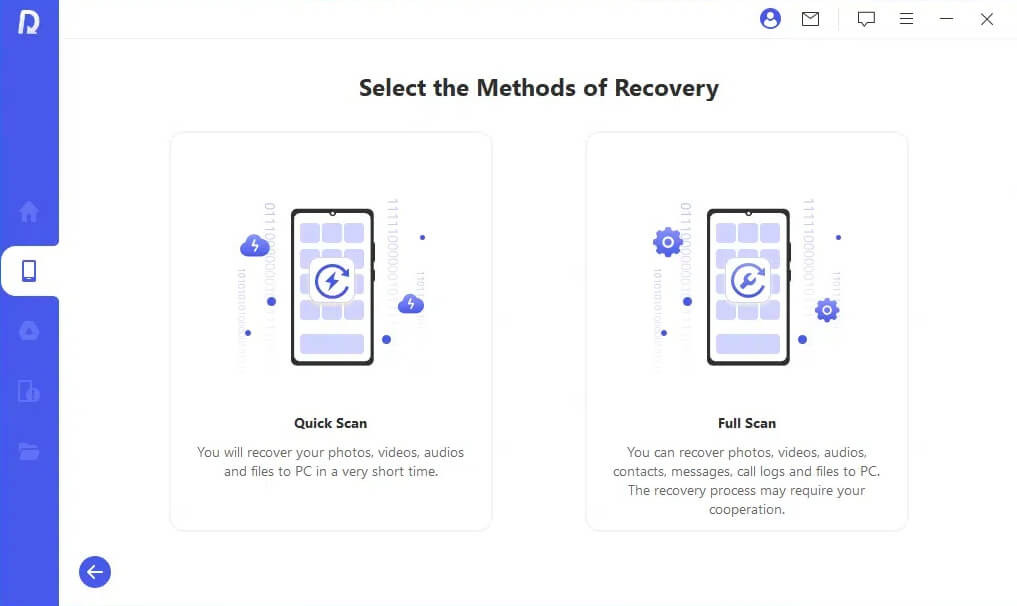 Select Full Scan Option
- Select “Quick Scan” for a faster scan or “Full Scan” for a more thorough search.
-
Scan Your Device:
- Click “Start” to begin the scanning process.
- Wait for the software to scan your device’s storage.
-
Preview and Recover:
- Once the scan is complete, preview the recoverable photos.
- Select the photos you want to restore and click “Recover.”
- Choose a location on your computer to save the recovered photos.
4.4 Alternative Data Recovery Software Options
- EaseUS MobiSaver for Android: Known for its user-friendly interface and comprehensive scanning capabilities.
- Dr.Fone – Data Recovery (Android): Offers a range of features, including rooting support and data extraction from broken devices.
- iMobie PhoneRescue for Android: Focuses on recovering lost data with high success rates and supports various Android devices.
4.5 Important Considerations When Using Data Recovery Software
- Rooting: Some software may require rooting your device, which can void your warranty and pose security risks.
- Success Rate: Data recovery is not always guaranteed, and the success rate can vary depending on the situation.
- Security: Ensure the software is from a reputable source to avoid malware or privacy breaches.
5. Advanced Photo Recovery Techniques
5.1 Using ADB (Android Debug Bridge) for Data Recovery
ADB (Android Debug Bridge) is a command-line tool that allows you to communicate with an Android device. It can be used for advanced data recovery tasks.
- Install ADB: Download and install the Android SDK Platform Tools on your computer.
- Enable USB Debugging: Enable USB debugging on your Android device.
- Connect Your Device: Connect your device to your computer via USB.
- Use ADB Commands:
- Open a command prompt or terminal on your computer.
- Use ADB commands to access the device’s storage and attempt data recovery.
Example ADB Command:
adb pull /data/media/DCIM/ /path/to/your/computer/This command pulls the contents of the DCIM folder (where photos are typically stored) from your device to a specified location on your computer.
5.2 Seeking Professional Data Recovery Services
When DIY methods fail, professional data recovery services can offer more advanced solutions.
- Benefits:
- Specialized equipment and expertise.
- Cleanroom environments to prevent further damage.
- Higher success rates for complex data loss scenarios.
- Considerations:
- Cost can be significant, depending on the complexity of the recovery.
- Ensure the service is reputable and has a proven track record.
- Understand the service’s data privacy and security policies.
5.3 Data Carving Techniques
Data carving involves scanning a storage medium for specific file types based on their headers and footers. This technique can be used to recover photos even if the file system is damaged.
- Choose a Data Carving Tool: Select a data carving tool like Foremost or Scalpel.
- Specify File Types: Configure the tool to search for JPEG, PNG, or other photo file types.
- Run the Tool: Run the tool on your device’s storage image.
- Review Recovered Files: Review the recovered files to identify and restore your photos.
6. Preventing Future Photo Loss
6.1 Implementing a Regular Backup Strategy
- Cloud Backups:
- Set up automatic backups to Google Photos, Google Drive, or other cloud services.
- Ensure photos are backed up in high resolution.
- Local Backups:
- Regularly transfer photos to your computer or external storage devices.
- Create multiple backups in different locations for redundancy.
- Scheduled Backups:
- Use apps or tools that automate the backup process on a scheduled basis.
6.2 Utilizing Cloud Storage for Real-time Syncing
Cloud storage services like Dropbox and OneDrive offer real-time syncing, ensuring your photos are automatically backed up as soon as they are taken.
- Benefits:
- Automatic and seamless backup.
- Access your photos from any device.
- Redundancy with multiple copies stored in different locations.
- Considerations:
- Subscription costs for sufficient storage space.
- Internet connectivity required for syncing.
- Privacy concerns with storing data in the cloud.
6.3 Secure Storage Practices
- Encrypt Sensitive Data:
- Use encryption tools to protect your photos from unauthorized access.
- Physical Security:
- Store backup devices in secure locations to prevent theft or damage.
- Regularly Update Software:
- Keep your device’s operating system and security software up to date to protect against vulnerabilities.
6.4 Educating Yourself and Others on Data Safety
- Stay Informed:
- Keep up-to-date with the latest data security threats and best practices.
- Share Knowledge:
- Educate friends and family on the importance of data backup and security.
- Practice Caution:
- Be cautious when clicking links or downloading files from unknown sources.
7. Real-Life Scenarios and Case Studies
7.1 Case Study 1: Accidental Factory Reset
- Scenario: A user accidentally performed a factory reset while trying to clear storage space.
- Solution: The user immediately stopped using the device and used AnyRecover (Android) to scan the internal storage. They were able to recover 80% of their photos, highlighting the importance of quick action and reliable software.
7.2 Case Study 2: Device Malfunction
- Scenario: A device malfunctioned, requiring a factory reset to restore functionality.
- Solution: The user had a recent backup on Google Photos, allowing them to restore all their photos quickly and easily. This emphasizes the importance of regular cloud backups.
7.3 Case Study 3: No Backup Available
- Scenario: A user performed a factory reset without any backups.
- Solution: The user sought professional data recovery services. Although the cost was significant, they were able to recover critical family photos that were irreplaceable.
8. Legal and Ethical Considerations
8.1 Data Privacy Laws
Be aware of data privacy laws, such as GDPR and CCPA, which govern the collection, use, and storage of personal data. Ensure you comply with these laws when recovering and handling personal photos.
8.2 Ethical Use of Data Recovery Tools
Only use data recovery tools on devices you own or have explicit permission to access. Unauthorized data recovery is illegal and unethical.
8.3 Protecting Personal Information
When seeking professional data recovery services, ensure the provider has strict data privacy and security policies to protect your personal information.
9. FAQ About Photo Recovery After Factory Reset on Android
Q1. Can data be recovered after a factory reset?
Yes, data can sometimes be recovered after a factory reset, depending on various factors. There are two main types of factory resets: a soft reset and a hard reset. A soft reset usually only erases user data and settings but doesn’t affect system files, making data recovery more likely.
A hard reset, on the other hand, typically wipes the entire device, including system files, making data recovery much more challenging. Some specialized data recovery tools and services that can attempt to recover data even after a factory reset. Here, one recommended data recovery tool is AnyRecover recovery software, which can easily recover lost data in 3 steps.
Q2. Can these methods be used to recover other types of data?
Yes. Some of the methods might work for recovering other types of data, but not all. The only method guaranteed to help restore a wide variety of data is through the use of a professional tool like AnyRecover (Android). It is available to recover diverse data after factory reset without a backup, including photos, contacts, chats, and more.
Q3. How to recover photos after a factory reset on Android without rooting?
If you have your photos backed up to Google Photos or your settings, you can recover your photos after a factory reset without rooting. If there is no backup, then the most useful method to recover your photos without rooting is by using AnyRecover (Android).
Q4. Can I recover photos after factory reset Samsung?
Absolutely, you can recover pictures after a factory reset from Samsung, whether you have a backup or not. If you have a backup, you can recover lost data directly from Samsung Cloud.
If you accidentally perform a factory reset without a backup, you need to seek assistance from professional data recovery software. AnyRecover can recover Samsung data, whether you’ve taken a factory reset or your device is broken.
Q5. How does data recovery software work?
Data recovery software scans your device’s storage for files that have been deleted but not yet overwritten. It uses algorithms to identify file headers and footers, allowing it to reconstruct the files and recover them.
Q6. Is it possible to recover all my photos after a factory reset?
While data recovery software can be effective, it’s not always possible to recover all your photos. The success rate depends on factors such as how long ago the factory reset was performed and whether any new data has been written to the device.
Q7. What is the best way to back up my photos on Android?
The best way to back up your photos on Android is to use a combination of cloud and local backups. Cloud backups ensure your photos are safe even if your device is lost or damaged, while local backups provide an extra layer of security.
Q8. How often should I back up my photos?
You should back up your photos as often as possible, preferably daily or weekly. The more frequently you back up your photos, the less data you risk losing in the event of a factory reset or other data loss event.
Q9. Can I use the same data recovery software on multiple devices?
Some data recovery software licenses allow you to use the software on multiple devices, while others are limited to a single device. Check the software’s licensing terms before purchasing.
Q10. What should I do if I can’t recover my photos using data recovery software?
If you can’t recover your photos using data recovery software, consider seeking professional data recovery services. These services have specialized equipment and expertise that can potentially recover data that is beyond the reach of DIY methods.
10. Conclusion: Your Next Steps to Safeguard Your Memories
Losing photos after a factory reset can be a distressing experience, but with the right knowledge and tools, recovery is often possible. By following the steps outlined in this guide, you can increase your chances of successfully retrieving your photos and preventing future data loss.
Remember to implement a regular backup strategy, utilize cloud storage for real-time syncing, and practice secure storage habits. For more tips and resources on photography and data management, visit dfphoto.net.
Losing your photos and other files after a factory reset can be quite disturbing. However, if you ever find yourself in this situation, the methods listed above will enable you to recover your photos quickly and easily.
Of all the methods to recover your photos, one method is the most effective and satisfactory — AnyRecover(Android). It allows you to recover photos after factory reset without backup. With a 99% recovery success rate, you have nothing to worry about after losing your photos. Join AnyRecover users to recover any of their files by downloading the software.
Don’t wait until it’s too late! Explore the comprehensive resources at dfphoto.net to discover more about photography techniques, inspiration, and the latest equipment. Connect with our vibrant community of photographers and take your skills to the next level. For personalized assistance or inquiries, visit our website or contact us at +1 (505) 471-6001. Our address is 1600 St Michael’s Dr, Santa Fe, NM 87505, United States.