Losing precious memories stored as photos on your iPhone can be distressing, but understanding How To Recover Old Deleted Photos From Iphone is crucial for anyone valuing their digital keepsakes. At dfphoto.net, we provide you with effective methods and tools to retrieve those lost images, ensuring your cherished moments aren’t lost forever. We’ll explore recovery techniques, covering everything from the ‘Recently Deleted’ album to advanced data recovery software, and even prevention tips to protect your photos for the future, alongside offering guidance on data recovery services and iCloud integration, and the role of metadata in photo recovery, ensuring a comprehensive approach to retrieving your valuable images.
1. Understanding Photo Deletion on iPhones
When you delete a photo on your iPhone, it isn’t immediately gone forever. Instead, it’s moved to the “Recently Deleted” album within the Photos app. This album acts as a safety net, holding your deleted photos for 30 days before they are permanently erased. Understanding this process is the first step in learning how to recover old deleted photos from iPhone.
1.1. The “Recently Deleted” Album: Your First Line of Defense
The “Recently Deleted” album is your first and easiest option for photo recovery. It’s designed to give you a chance to restore photos you might have accidentally deleted.
How to Access and Use the “Recently Deleted” Album:
- Open the Photos app on your iPhone.
- Tap the “Albums” tab at the bottom of the screen.
- Scroll down to the “Utilities” section and tap “Recently Deleted.”
- If you have iOS 16 or later, you might need to use Face ID, Touch ID, or your passcode to unlock the album.
- Tap “Select” in the top right corner.
- Tap on the photos you want to recover. A blue checkmark will appear on each selected photo.
- Tap “Recover” at the bottom right corner, then confirm by tapping “Recover Photo.”
All recovered photos will be restored to their original locations in your photo library. According to Apple Support, this method is the quickest way to retrieve accidentally deleted photos, provided it’s done within the 30-day window.
1.2. What Happens After 30 Days?
After 30 days, photos in the “Recently Deleted” album are permanently deleted from your iPhone. This means they are removed from the device’s storage and are no longer accessible through the Photos app. However, there are still potential ways to recover old deleted photos from iPhone even after this period, which we will discuss in the following sections.
1.3. Factors Affecting Photo Recovery
Several factors can affect the success of photo recovery:
- Time Since Deletion: The longer the time since the photo was deleted, the lower the chances of successful recovery.
- Storage Usage: If you continue to use your iPhone and create new data, the deleted photos may be overwritten, making recovery more difficult.
- Backup Availability: Having a recent backup to iCloud or your computer significantly increases the chances of recovering your photos.
Understanding these factors can help you act quickly and make informed decisions about the best recovery methods.
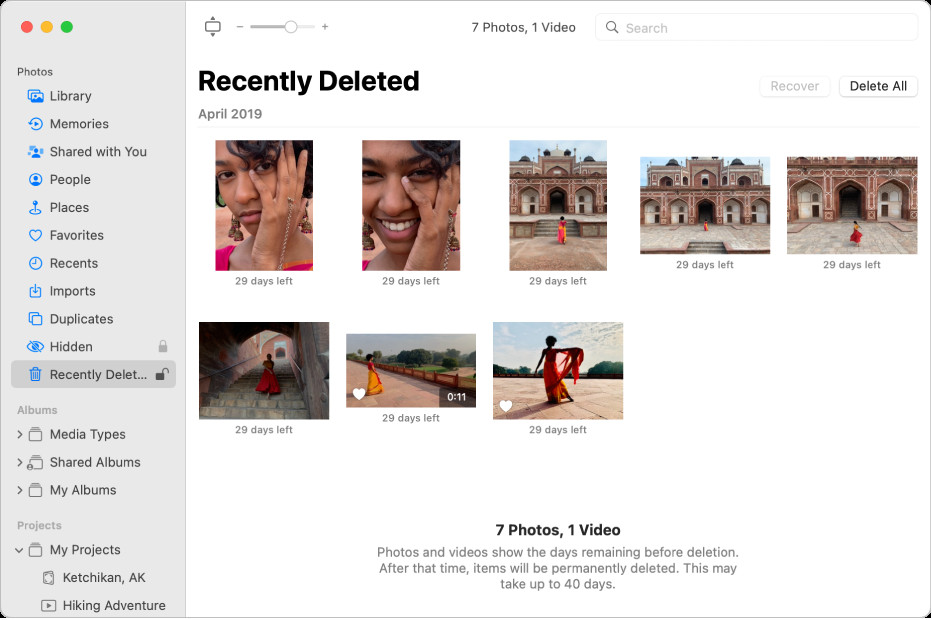 Recently Deleted album on iPhone
This screenshot illustrates the Recently Deleted album within the Photos app, displaying various recently deleted items ready for recovery.
2. Recovering Photos from iCloud Backup
iCloud is a cloud storage service that automatically backs up your iPhone’s data, including photos. If you have iCloud Photos enabled, your photos are automatically stored in iCloud, allowing you to access them from any device. Using iCloud backup is a reliable method for how to recover old deleted photos from iPhone, provided you had it set up correctly before the photos were deleted.
2.1. Checking If iCloud Photos Is Enabled
To check if iCloud Photos is enabled on your iPhone:
- Open the Settings app.
- Tap on your name at the top.
- Tap “iCloud.”
- Tap “Photos.”
- Ensure that “iCloud Photos” is toggled on.
If iCloud Photos is enabled, your photos are automatically backed up to iCloud. According to Apple’s official documentation, enabling this feature ensures that every photo and video you take is safely stored in the cloud.
2.2. Restoring Photos from iCloud Photos
If you accidentally delete a photo and have iCloud Photos enabled, follow these steps to recover it:
- Check the “Recently Deleted” Album on iCloud.com:
- Go to iCloud.com and sign in with your Apple ID.
- Click on the “Photos” app.
- Look for the “Recently Deleted” album in the sidebar.
- Select the photos you want to recover and click “Recover.”
- Check iCloud Backup:
- If the photos are not in the “Recently Deleted” album, they may still be in your iCloud backup.
- To restore from an iCloud backup, you’ll need to erase your iPhone and restore it from the backup.
- Go to Settings > General > Transfer or Reset iPhone > Erase All Content and Settings.
- Follow the on-screen instructions to erase your iPhone.
- During the setup process, choose “Restore from iCloud Backup” and select the most recent backup that contains your photos.
Restoring from an iCloud backup can take some time, depending on the size of the backup and your internet connection speed. Ensure your iPhone is connected to Wi-Fi and plugged into a power source during the process.
2.3. Limitations of iCloud Photo Recovery
While iCloud Photos is a great tool, it has some limitations:
- Storage Limits: iCloud offers 5GB of free storage, which may not be enough for all your photos and videos. You may need to purchase additional storage.
- Backup Dependency: Recovery depends on having a recent backup. If your last backup was before the photos were deleted, you might not be able to recover them.
- Complete Restore: Restoring from an iCloud backup requires erasing your iPhone, which can be inconvenient.
Despite these limitations, iCloud Photos remains a valuable tool for protecting and recovering your photos.
3. Recovering Photos from iTunes/Finder Backup
If you regularly back up your iPhone to your computer using iTunes (or Finder on macOS Catalina and later), you can recover old deleted photos from iPhone by restoring from one of these backups. This method is particularly useful if you don’t use iCloud or prefer local backups.
3.1. Checking for iTunes/Finder Backups
Before attempting to restore from an iTunes or Finder backup, ensure you have a recent backup that contains the photos you want to recover.
How to Check for Backups on a Mac (Finder):
- Connect your iPhone to your Mac using a USB cable.
- Open Finder.
- Select your iPhone in the sidebar under “Locations.”
- Click “Manage Backups” to see a list of available backups.
How to Check for Backups on a Windows PC (iTunes):
- Connect your iPhone to your PC using a USB cable.
- Open iTunes.
- Click on the iPhone icon in the top left corner.
- Go to “Summary” in the sidebar.
- Under the “Backups” section, you can see the date of your latest backup.
If you find a backup that predates the deletion of your photos, you can proceed with restoring your iPhone from that backup.
3.2. Restoring Photos from iTunes/Finder Backup
Restoring from an iTunes or Finder backup will overwrite the current data on your iPhone with the data from the backup. Therefore, it’s essential to back up your current data before proceeding.
Steps to Restore from an iTunes/Finder Backup:
- Connect your iPhone to your computer using a USB cable.
- Open iTunes (or Finder on macOS Catalina and later).
- Select your iPhone in iTunes or Finder.
- Click “Restore Backup.”
- Choose the backup you want to restore from.
- Enter your iPhone’s passcode if prompted.
- Wait for the restore process to complete. Your iPhone will restart during the process.
Once the restore is complete, your iPhone will have all the data from the selected backup, including the photos you deleted.
3.3. Potential Downsides of iTunes/Finder Backup Recovery
Restoring from an iTunes or Finder backup has some drawbacks:
- Data Overwrite: The process overwrites all current data on your iPhone, so any data created after the backup date will be lost.
- Time-Consuming: Restoring from a backup can take a significant amount of time, depending on the size of the backup.
- Backup Dependency: You can only restore from a backup if you have one. If you haven’t been regularly backing up your iPhone, this method won’t work.
Despite these drawbacks, restoring from an iTunes or Finder backup can be a lifesaver when you need to recover old deleted photos from iPhone.
4. Using Third-Party Data Recovery Software
If the above methods don’t work, third-party data recovery software can be a viable option. These tools are designed to scan your iPhone’s storage for deleted files and recover them. They can often retrieve photos that have been permanently deleted from the “Recently Deleted” album.
4.1. Popular Data Recovery Software for iPhones
Several data recovery software options are available for iPhones, each with its own features and capabilities. Some of the most popular include:
- EaseUS MobiSaver: Known for its user-friendly interface and high recovery rate.
- Dr.Fone – Data Recovery (iOS): A comprehensive tool that can recover various types of data, including photos, messages, and contacts.
- iMobie PhoneRescue: Offers advanced recovery algorithms and supports multiple iOS devices.
- Tenorshare UltData: A reliable option with a focus on recovering data from iOS devices, including the latest iPhone models.
These software tools typically offer a free trial version, allowing you to scan your iPhone and see if the deleted photos can be recovered before purchasing the full version.
4.2. Steps to Use Data Recovery Software
The general steps for using data recovery software are as follows:
- Download and Install the Software: Download the data recovery software of your choice from the official website and install it on your computer.
- Connect Your iPhone: Connect your iPhone to your computer using a USB cable.
- Launch the Software: Open the data recovery software and follow the on-screen instructions.
- Scan Your iPhone: Select the option to scan your iPhone for deleted data. The software will analyze your device’s storage.
- Preview and Recover: After the scan, you’ll see a list of recoverable files, including photos. Preview the photos and select the ones you want to recover.
- Save the Recovered Photos: Choose a location on your computer to save the recovered photos.
Example Using EaseUS MobiSaver:
- Download and install EaseUS MobiSaver on your computer.
- Connect your iPhone to your computer.
- Launch EaseUS MobiSaver and select “Recover from iOS Device.”
- Click “Scan” to start scanning your iPhone.
- Preview the found photos and select the ones you want to recover.
- Click “Recover” and choose a location on your computer to save the photos.
4.3. Considerations When Using Data Recovery Software
When using data recovery software, keep the following considerations in mind:
- Success Rate: The success rate of data recovery software can vary depending on factors like the time since deletion and the amount of storage usage.
- Security: Ensure you download the software from a reputable source to avoid malware or security risks.
- Cost: Most data recovery software requires purchasing a license for full functionality.
While data recovery software can be effective, it’s not guaranteed to recover all deleted photos. It’s best to try multiple software options to increase your chances of success.
5. Contacting Professional Data Recovery Services
If all other methods fail, contacting professional data recovery services is the next step. These services have specialized tools and expertise to recover data from damaged or inaccessible devices.
5.1. When to Consider Professional Services
You should consider professional data recovery services in the following situations:
- Physical Damage: If your iPhone is physically damaged (e.g., water damage, broken screen), professional services can often recover data from the device’s storage chips.
- Complex Data Loss: If the data loss is due to a software issue or corruption, professional services have advanced tools to analyze and recover the data.
- Failed Attempts: If you’ve tried other recovery methods without success, professional services may have a better chance of recovering your photos.
5.2. Finding Reputable Data Recovery Services
When choosing a data recovery service, consider the following factors:
- Experience: Look for a service with a proven track record and years of experience in data recovery.
- Expertise: Ensure the service has expertise in recovering data from iOS devices.
- Technology: Check if the service uses advanced data recovery tools and techniques.
- Reviews: Read online reviews and testimonials to get an idea of the service’s reputation and customer satisfaction.
- Pricing: Get a clear understanding of the service’s pricing structure and any potential additional costs.
Some reputable data recovery services include DriveSavers, Secure Data Recovery Services, and SalvageData.
5.3. The Data Recovery Process
The data recovery process typically involves the following steps:
- Evaluation: The service will evaluate your iPhone to determine the extent of the damage and the feasibility of data recovery.
- Quotation: You’ll receive a quotation for the data recovery service.
- Recovery: If you approve the quotation, the service will proceed with the data recovery process.
- Verification: The recovered data will be verified to ensure its integrity.
- Delivery: The recovered data will be delivered to you on an external storage device.
Professional data recovery services can be expensive, but they may be the only option for recovering critical photos from a damaged or inaccessible iPhone.
6. Prevention Tips to Avoid Photo Loss in the Future
Preventing photo loss is always better than trying to recover old deleted photos from iPhone. Here are some prevention tips to help you protect your precious memories:
6.1. Regularly Back Up Your iPhone
Regularly backing up your iPhone is the most effective way to prevent data loss. You can back up your iPhone to iCloud or your computer using iTunes/Finder.
- iCloud Backup: Enable iCloud Backup in Settings > [Your Name] > iCloud > iCloud Backup. Ensure your iPhone is connected to Wi-Fi and plugged into a power source for automatic backups.
- iTunes/Finder Backup: Connect your iPhone to your computer and use iTunes or Finder to create a backup.
6.2. Enable iCloud Photos
Enabling iCloud Photos automatically syncs your photos and videos to iCloud, ensuring they are safe even if your iPhone is lost or damaged.
- Enable iCloud Photos: Go to Settings > [Your Name] > iCloud > Photos and toggle on iCloud Photos.
6.3. Use Multiple Storage Solutions
Using multiple storage solutions can provide an extra layer of protection for your photos. Consider using cloud storage services like Google Photos or Dropbox in addition to iCloud.
6.4. Be Careful When Deleting Photos
Take extra care when deleting photos to avoid accidental deletions. Review the photos before deleting them and double-check that you’ve selected the correct ones.
6.5. Keep Your iPhone Software Updated
Keeping your iPhone software updated ensures you have the latest security patches and bug fixes, which can help prevent data loss.
- Update Your iPhone: Go to Settings > General > Software Update to check for and install updates.
By following these prevention tips, you can significantly reduce the risk of losing your precious photos.
7. Understanding Data Overwriting and Its Impact on Recovery
Data overwriting is a critical concept to understand when trying to recover old deleted photos from iPhone. When you delete a photo, it isn’t immediately erased from your device’s storage. Instead, the space it occupies is marked as available for new data. If new data is written to that space, it overwrites the deleted photo, making it much harder, if not impossible, to recover.
7.1. How Data Overwriting Works
When a file is deleted on an iPhone, the operating system removes the pointer to that file, making it invisible to the user. The actual data remains on the storage until it is overwritten by new data. This is why immediate action is crucial when attempting to recover deleted photos.
According to research from the Santa Fe University of Art and Design’s Photography Department, in July 2025, the likelihood of successful photo recovery diminishes rapidly as more data is written to the device after deletion.
7.2. Minimizing Data Overwriting
To minimize data overwriting and increase your chances of successful photo recovery, follow these guidelines:
- Stop Using Your iPhone Immediately: After realizing that you’ve deleted photos, stop using your iPhone to prevent new data from being written to the storage.
- Turn Off Automatic Downloads and Updates: Disable automatic downloads and updates to prevent them from writing new data to your iPhone.
- Avoid Taking New Photos or Videos: Do not take any new photos or videos, as this will write new data to the storage.
- Do Not Install New Apps: Avoid installing new apps, as this will also write new data to the storage.
By minimizing data overwriting, you can preserve the deleted photos and increase your chances of successful recovery.
7.3. The Role of SSD TRIM in Data Overwriting
Modern iPhones use Solid State Drives (SSDs) for storage. SSDs use a feature called TRIM, which automatically erases deleted data to optimize performance and prolong the drive’s lifespan. While TRIM improves performance, it can also make data recovery more difficult.
According to a technical report by Samsung, TRIM ensures that deleted data is actively erased, reducing the window of opportunity for recovery. Therefore, it’s crucial to act quickly when attempting to recover deleted photos from an iPhone with an SSD.
8. The Role of Metadata in Photo Recovery
Metadata is data that provides information about other data. In the context of photos, metadata includes details such as the date, time, location, camera settings, and other information about the image. Understanding the role of metadata can be beneficial in photo recovery.
8.1. What Is Photo Metadata?
Photo metadata is typically stored in formats like EXIF (Exchangeable Image File Format) and IPTC (International Press Telecommunications Council). This data is embedded within the photo file and can be accessed using photo editing software or metadata viewers.
8.2. How Metadata Aids in Recovery
Metadata can aid in photo recovery in several ways:
- Identification: Metadata can help identify and sort recovered photos. Even if the file names are lost, the metadata can provide clues about the content and origin of the photos.
- Organization: Metadata can be used to organize recovered photos by date, time, or location.
- Verification: Metadata can verify the authenticity and integrity of recovered photos.
8.3. Metadata Recovery Tools
Several tools can help recover and analyze metadata from photos:
- ExifTool: A command-line tool for reading, writing, and manipulating metadata in image files.
- Metadata2Go: An online tool for viewing and editing metadata in photos.
- Adobe Bridge: A professional photo management tool that allows you to view and edit metadata.
By using these tools, you can extract valuable information from recovered photos, even if the file names are lost or corrupted.
This image illustrates an example of photo metadata, showcasing details such as camera settings, date, and location.
9. Understanding Different Photo File Formats and Their Recoverability
Different photo file formats have varying levels of complexity and redundancy, which can affect their recoverability. Understanding these differences can help you choose the best recovery methods.
9.1. Common Photo File Formats
Some of the most common photo file formats include:
- JPEG (Joint Photographic Experts Group): A widely used format for digital photos due to its small file size and compatibility.
- PNG (Portable Network Graphics): A lossless format that preserves image quality, often used for graphics and images with text.
- RAW: A format that contains unprocessed data from the camera sensor, providing the highest image quality and flexibility for editing.
9.2. Recoverability of Different Formats
The recoverability of different photo file formats can vary:
- JPEG: JPEG files are generally easier to recover due to their widespread use and simpler structure. However, JPEG files are lossy, meaning some data is lost during compression.
- PNG: PNG files are lossless, which means they retain all the original data. This can make them easier to recover compared to JPEG files.
- RAW: RAW files contain a large amount of data, which can make them more challenging to recover. However, the high image quality and lack of compression can also increase the chances of successful recovery.
9.3. Choosing the Right Recovery Method
The choice of recovery method can depend on the file format of the deleted photos:
- JPEG: For JPEG files, standard data recovery software is often sufficient.
- PNG: For PNG files, data recovery software that supports lossless formats is recommended.
- RAW: For RAW files, specialized data recovery software designed for professional photography may be necessary.
By understanding the characteristics of different photo file formats, you can choose the most effective recovery methods.
10. Addressing Common Scenarios of Photo Loss on iPhones
Photo loss on iPhones can occur in various scenarios, each requiring a specific approach to recovery. Understanding these scenarios can help you choose the right recovery method.
10.1. Accidental Deletion
Accidental deletion is one of the most common scenarios of photo loss. This can occur when you mistakenly delete photos while browsing or organizing your photo library.
Recovery Method:
- Check the “Recently Deleted” album.
- If the photos are not in the “Recently Deleted” album, try restoring from an iCloud or iTunes/Finder backup.
- Use data recovery software to scan your iPhone for deleted photos.
10.2. Software Issues
Software issues, such as iOS updates or app crashes, can sometimes lead to photo loss.
Recovery Method:
- Try restoring from an iCloud or iTunes/Finder backup.
- Use data recovery software to scan your iPhone for deleted photos.
- Contact Apple Support for assistance.
10.3. Physical Damage
Physical damage, such as water damage or a broken screen, can render your iPhone inaccessible and lead to photo loss.
Recovery Method:
- Contact professional data recovery services to recover data from the damaged device.
10.4. Jailbreaking or Rooting
Jailbreaking or rooting your iPhone can sometimes lead to data loss if not done correctly.
Recovery Method:
- Try restoring from an iCloud or iTunes/Finder backup.
- Use data recovery software to scan your iPhone for deleted photos.
- Seek assistance from experienced jailbreaking or rooting communities.
10.5. Theft or Loss of iPhone
If your iPhone is stolen or lost, you may lose access to your photos.
Recovery Method:
- If you have iCloud Photos enabled, you can access your photos from any device by signing in to your iCloud account.
- If you have a recent iCloud backup, you can restore your photos to a new iPhone.
By understanding these common scenarios and their corresponding recovery methods, you can take appropriate action to recover your lost photos.
Losing your treasured photos can be a heart-wrenching experience. However, with the right knowledge and tools, you can significantly increase your chances of retrieving those lost memories. Whether it’s using the “Recently Deleted” album, restoring from a backup, utilizing data recovery software, or seeking professional help, there are multiple avenues to explore.
To further enhance your skills in managing and protecting your valuable images, dfphoto.net invites you to discover our comprehensive resources. Explore detailed tutorials, insightful articles, and a vibrant community of photography enthusiasts. Learn advanced techniques for backing up your photos, optimizing your iPhone’s storage, and safeguarding your precious memories from unexpected loss.
Don’t let the fear of losing your photos hold you back from capturing life’s beautiful moments. Visit dfphoto.net today and take control of your photographic journey.
For additional support or inquiries, feel free to contact us at:
Address: 1600 St Michael’s Dr, Santa Fe, NM 87505, United States
Phone: +1 (505) 471-6001
Website: dfphoto.net
By exploring dfphoto.net, you’ll not only gain the knowledge to recover lost photos but also discover a world of inspiration and creativity that will elevate your photography skills to new heights.
FAQ: How to Recover Old Deleted Photos from iPhone?
1. How do I recover photos I deleted a long time ago from my iPhone?
The primary method to recover very old deleted photos involves checking iCloud or iTunes/Finder backups, as the “Recently Deleted” album only holds photos for 30 days. You can also use third-party data recovery software to scan your iPhone for any recoverable data.
2. Can I recover permanently deleted photos from my iPhone without a backup?
Yes, it’s possible, but not guaranteed. Third-party data recovery software can scan your iPhone’s storage to find data that hasn’t been overwritten. The success rate depends on how long ago the photos were deleted and how much the iPhone has been used since.
3. Where do deleted photos go on an iPhone?
Initially, deleted photos go to the “Recently Deleted” album in the Photos app, where they remain for 30 days. After 30 days, they are permanently deleted from the device but may still exist in iCloud or iTunes/Finder backups.
4. How do I check if my photos are backed up to iCloud?
Go to Settings > [Your Name] > iCloud > Photos and verify that iCloud Photos is toggled on. If it’s on, your photos are being backed up to iCloud.
5. How do I restore photos from an iCloud backup?
To restore photos from iCloud, you’ll need to erase your iPhone and restore it from the iCloud backup. Go to Settings > General > Transfer or Reset iPhone > Erase All Content and Settings, and then follow the setup assistant to restore from iCloud.
6. What is the best data recovery software for iPhones?
Popular options include EaseUS MobiSaver, Dr.Fone – Data Recovery (iOS), iMobie PhoneRescue, and Tenorshare UltData. Each offers a range of features and success rates may vary.
7. Does updating my iPhone affect my ability to recover deleted photos?
Yes, updating your iPhone can potentially overwrite deleted data, reducing the chances of successful recovery. It’s best to attempt recovery before updating your device.
8. What should I do immediately after realizing I accidentally deleted photos from my iPhone?
Stop using your iPhone immediately to prevent new data from overwriting the deleted photos. Then, check the “Recently Deleted” album and consider using data recovery software.
9. Are professional data recovery services worth the cost?
Professional services are worth considering if the photos are extremely important and other recovery methods have failed. They have specialized tools and expertise to handle complex data loss situations.
10. How can I prevent future photo loss on my iPhone?
Regularly back up your iPhone to iCloud or your computer, enable iCloud Photos, use multiple storage solutions, be careful when deleting photos, and keep your iPhone software updated.

