Losing precious photos can be a distressing experience. Whether it’s accidental deletion, a device malfunction, or simply not knowing where your images have gone, the feeling of losing those visual memories can be upsetting. Fortunately, in many cases, those lost photos are recoverable. This guide provides a comprehensive overview of How To Recover Lost Photos, covering various scenarios and devices, ensuring you have the best chance of retrieving your valuable memories.
Check Your Recently Deleted or Recycle Bin
The first and easiest place to look for lost photos is in your device’s equivalent of a recycle bin. Most operating systems and photo applications have a temporary holding place for deleted files before they are permanently erased.
Recovering Photos from the Recently Deleted Album on iPhone and iPad
If you use an iPhone or iPad and the Apple Photos app, deleted photos and videos are moved to the “Recently Deleted” album for 30 days. Here’s how to recover them:
- Open the Photos app on your iPhone or iPad.
- Scroll down to the Utilities section and tap Recently Deleted. You might need to use Face ID or Touch ID to unlock this album.
- Browse through the deleted photos and videos.
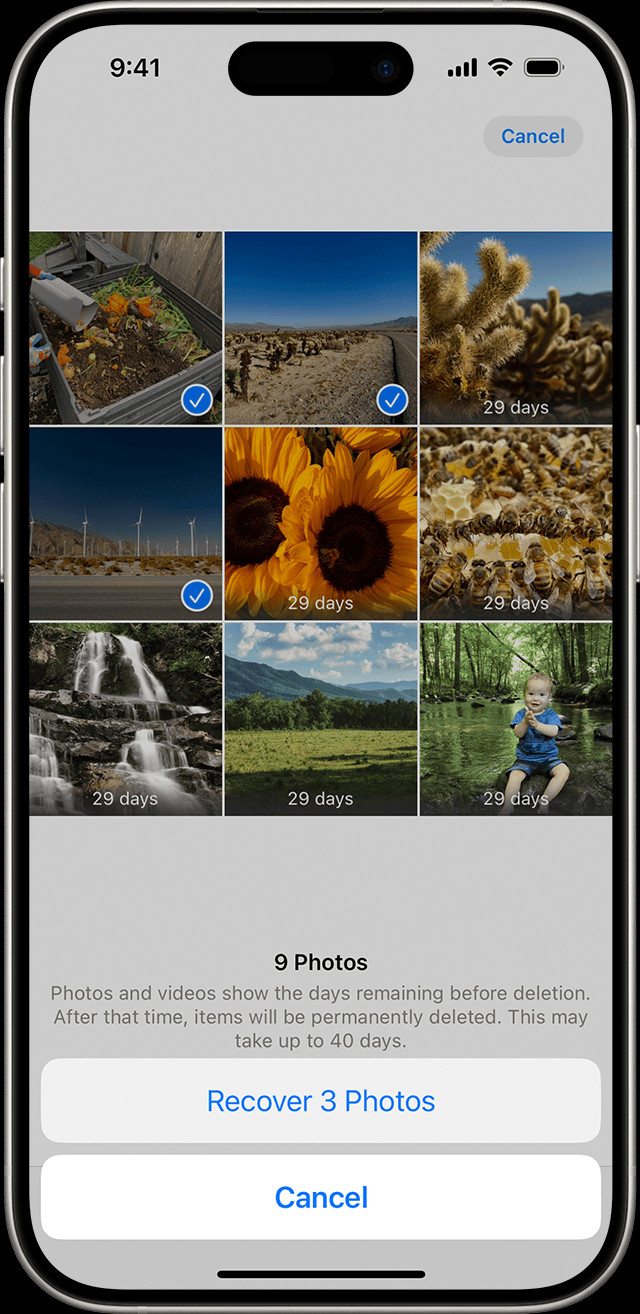
- To recover a single photo or video, tap on it and then tap Recover.
- To recover multiple items, tap Select, choose the photos and videos you want to recover, tap the More button (usually represented by three dots), and then tap Recover.
- Confirm your action to restore the selected photos and videos back to your main Photos library.
 The Recently Deleted album in Photos on iPhone
Restoring Photos from the Recycle Bin on Windows
On a Windows computer, deleted files, including photos, are typically sent to the Recycle Bin. To recover photos from the Recycle Bin:
- Double-click the Recycle Bin icon on your desktop.
- Locate the deleted photo files you want to recover. You can sort by date deleted or file type to help find your photos.
- Right-click on the photo(s) you wish to recover.
- Select Restore. This will return the photos to their original location on your computer.
Retrieving Photos from the Trash on macOS
Mac users can find their recently deleted photos in the Trash. Here’s how to recover them:
- Click on the Trash icon in your Dock.
- Find the photos you wish to recover. You can use the search function or sort by date deleted.
- Drag the photos out of the Trash and onto your desktop or into another folder, or right-click and select Put Back to restore them to their original location.
Unhide Photos in Hidden Albums
Sometimes photos aren’t actually lost but are hidden from the main view. Both Apple Photos and other gallery apps allow you to hide photos for privacy.
Unhiding Photos on iPhone and iPad
In the Apple Photos app, you can unhide photos from the Hidden album:
- Open the Photos app.
- Scroll down to the Utilities section and tap Hidden. You may need to use Face ID or Touch ID to access the Hidden album.
- Browse the photos in the Hidden album.
- Select the photo or video you want to unhide.
- Tap the More button (three dots icon) and select Unhide. The photo will be moved back to your main Photos library and visible in albums like Recents and All Photos.
Showing Hidden Photos on Mac
To unhide photos on a Mac:
- Open the Photos app.
- In the menu bar at the top, click View, then select Show Hidden Photo Album.
- In the sidebar, under Albums, you will now see Hidden. Select it and click View Album. In macOS Ventura or later, you might need to use Touch ID or your login password.
- Select the photo you want to unhide.
- Control-click (right-click) the photo and choose Unhide Photo. Alternatively, you can go to the menu bar, click Image, and select Unhide Photo.
Check Cloud Photo Services
Many users utilize cloud services to back up their photos. If you use a cloud service like iCloud Photos, Google Photos, or others, your photos might be safely stored there.
Recovering Photos from iCloud Photos
If you use iCloud Photos, ensure it’s enabled and check if your missing photos are stored in the cloud.
- Verify iCloud Photos is turned on:
- On iPhone or iPad: Go to Settings > [Your Name] > iCloud > Photos and ensure Sync this [Device] is turned on.
- On Mac: Open Photos, then go to Photos > Settings (or Preferences in older macOS versions) from the menu bar. Click the iCloud tab and ensure iCloud Photos is selected.
- Check iCloud.com:
- Go to iCloud.com in a web browser and sign in with your Apple ID.
- Click on Photos.
- Browse your photo library to see if your missing photos are present. Also, check the Recently Deleted album on iCloud.com, accessible from the sidebar in Photos.
Restoring Photos from Google Photos
If you use Google Photos, follow these steps to check for and recover your photos:
- Open the Google Photos app or go to photos.google.com in a web browser.
- Sign in to your Google account.
- Check the Trash/Bin. In the app or website menu, look for “Bin” or “Trash”. Deleted items are kept here for 60 days before permanent deletion.
- Select the photos you want to recover and click Restore. They will be returned to your Google Photos library.
- Also, ensure that backup and sync are enabled in the Google Photos app settings on your devices to prevent future loss and ensure photos are backed up to the cloud.
Explore Shared Photo Libraries
If you are part of a shared photo library, especially in ecosystems like Apple’s iCloud Shared Photo Library or similar features in other services, ensure you are viewing the correct library view.
Switching Between Personal and Shared Library in iCloud Photos
In iOS 16 and later, and iPadOS 16.1 and later, you can switch between Personal and Shared Libraries:
- Open the Photos app.
- Tap the profile button in the upper-right corner.
- In the Library View Options section, choose between Both Libraries, Personal Library, or Shared Library to ensure you are viewing the correct photo source.
Data Recovery Software for Memory Cards and Hard Drives
If your photos were stored on a memory card, USB drive, or an external hard drive, and you cannot find them in recycle bins or cloud backups, data recovery software might be necessary. These tools can often recover files that have been deleted but not yet overwritten.
Popular data recovery software options include:
- Recuva: A free and user-friendly option for Windows.
- EaseUS Data Recovery Wizard: Available for Windows and macOS, offering a free version for limited recovery and paid versions for more advanced features.
- Disk Drill: A powerful recovery tool for macOS and Windows, also with free and paid versions.
- PhotoRec: A free, open-source tool that is particularly effective for photo recovery from memory cards.
When using data recovery software:
- Stop using the device: As soon as you realize photos are lost on a memory card or drive, stop using it to prevent overwriting the deleted data.
- Install recovery software: Download and install data recovery software on your computer.
- Select the drive to scan: Connect the memory card or external drive to your computer and select it in the recovery software.
- Start the scan: Initiate a scan for lost files. Deep scans can find more files but take longer.
- Preview and recover: Once the scan is complete, preview the recoverable photos and select the ones you want to recover. Choose a different drive to save the recovered photos to avoid overwriting any more data on the original source.
Professional Data Recovery Services
In situations where data is severely corrupted, the storage device is physically damaged, or DIY software methods fail, professional data recovery services are an option. These services have specialized tools and expertise to recover data from complex situations. However, they can be costly, and success isn’t always guaranteed.
Preventing Future Photo Loss
To minimize the risk of losing photos in the future, consider these preventative measures:
- Regular Backups: Regularly back up your photos to multiple locations. Use a combination of local backups (external hard drives, NAS) and cloud backups (iCloud Photos, Google Photos, Dropbox, etc.).
- Enable Cloud Sync: Keep cloud sync features enabled on your devices so that photos are automatically backed up as soon as they are taken.
- Handle Storage Media Carefully: Treat memory cards and external drives with care to avoid physical damage or data corruption.
- Double-Check Before Deleting: Be cautious when deleting photos, especially when bulk deleting. Always double-check you’ve selected the correct images before confirming deletion.
Losing photos can be a setback, but by following these steps, you significantly increase your chances of recovery. Remember to act quickly and methodically when you realize photos are missing, and always prioritize preventative measures to safeguard your precious memories.
