Accidentally deleting precious photos from your iPhone can be a distressing experience. Whether it’s a cherished memory or an important image, the thought of losing it forever can be unsettling. Fortunately, Apple provides built-in mechanisms to recover deleted photos, offering a safety net to retrieve your lost memories. This guide will walk you through the step-by-step process of how to recover deleted photos from your iPhone, ensuring you can restore your valuable images with ease.
The most common and straightforward method to recover deleted photos on your iPhone is by utilizing the “Recently Deleted” album. This album acts as a temporary recycle bin for your photos, holding deleted images for 30 days before permanent deletion. This grace period gives you ample time to recover any photos you might have deleted by mistake. Beyond the Recently Deleted album, if you use iCloud Photos, understanding how it syncs across devices is crucial for photo recovery. Let’s explore the methods to get your photos back.
Recovering Deleted Photos from the Recently Deleted Album on iPhone
If you’ve recently deleted photos from your iPhone, the first place you should check is the “Recently Deleted” album within the Photos app. Here’s how you can recover your photos from there:
-
Open the Photos App: Locate and tap the Photos app icon on your iPhone’s home screen.
-
Navigate to the Albums Tab: At the bottom of the Photos app screen, you’ll see several tabs. Tap on the “Albums” tab.
-
Find the Recently Deleted Album: Scroll down within the Albums tab until you find the “Utilities” section. Within this section, you’ll see the “Recently Deleted” album. Tap on it.
-
Unlock the Album (iOS 16 and Later): If you are running iOS 16, iPadOS 16.1, or a later version, the Recently Deleted album is locked for security. You will need to use Face ID or Touch ID to unlock and access the contents of this album. This added security feature prevents unauthorized access to your recently deleted photos.
-
Select Photos for Recovery: Once inside the Recently Deleted album, you will see thumbnails of the photos and videos you’ve deleted in the last 30 days. Tap on “Select” located in the top right corner of the screen.
-
Choose Photos to Recover: Now, tap on each photo or video that you wish to recover. A blue checkmark will appear on the selected items. If you want to recover all the items in the album, you can tap “Recover All” at the bottom of the screen.
-
Recover Photos: After selecting the photos you want to retrieve, tap the “Recover” button at the bottom right corner of the screen.
-
Confirm Recovery: A confirmation prompt will appear, asking “Recover Photo?”. Tap “Recover Photo” to confirm and restore the selected photos back to your main Photos Library. They will be placed back in your Library in chronological order, as if they were never deleted.
 Photos window showing Recently Deleted selected in the sidebar and recently deleted items on the right
Image alt: iPhone Photos app Recently Deleted album interface showing selection of photos to recover.
Recovering Deleted Photos from iCloud.com
If you have iCloud Photos enabled, your photos are automatically synced and stored in iCloud. This means that even if you delete a photo from your iPhone, it might still be recoverable from iCloud.com, especially if it has been more than 30 days since deletion from your device and the photos are no longer in the Recently Deleted album on your iPhone. Here’s how to recover photos from iCloud.com:
-
Access iCloud.com: Open a web browser on your computer and go to iCloud.com.
-
Sign in to iCloud: Log in to iCloud using your Apple ID and password, the same Apple ID associated with your iPhone and iCloud Photos.
-
Open Photos on iCloud: Once logged in, you will see various iCloud apps. Click on the “Photos” icon.
-
Navigate to Recently Deleted: In the Photos app on iCloud.com, look for the sidebar on the left. If you don’t see the sidebar, click the sidebar icon, which is typically located in the top corner. In the sidebar, click on the “Recently Deleted” album.
-
Select Photos to Recover: You will see the photos and videos you’ve recently deleted that are still available for recovery. Select the photos or videos you want to recover by clicking on them. You can select multiple items.
-
Recover Photos: After selecting the desired photos, click the “Recover” button that appears at the top of the iCloud Photos window. The recovered photos will be restored to your iCloud Photos library and will sync back to your iPhone and other devices connected to iCloud Photos.
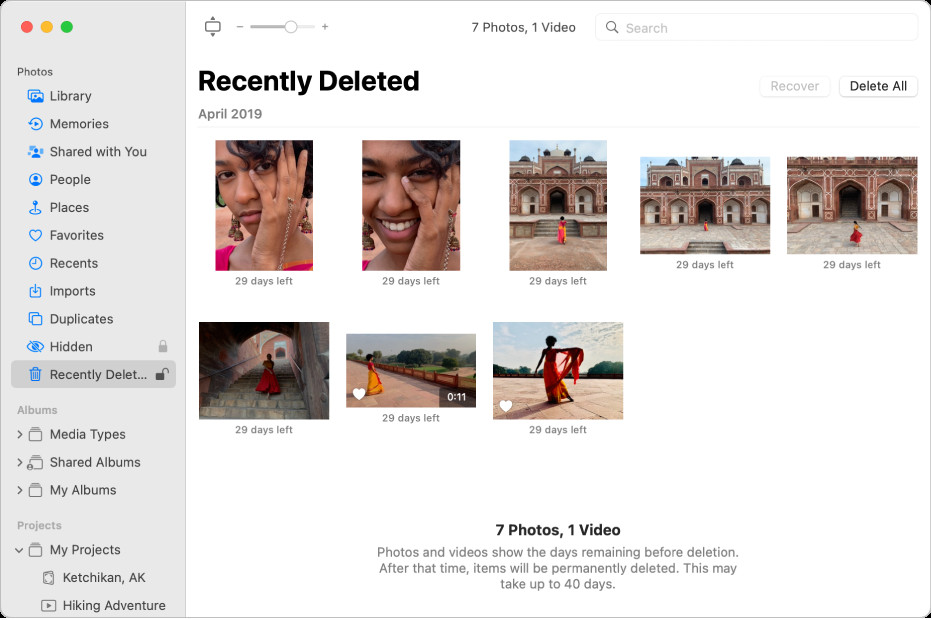
Restoring Photos from Recently Deleted on Mac
If you also use a Mac and have iCloud Photos enabled, you can also recover deleted photos from the Recently Deleted album on your Mac’s Photos app. The process is quite similar to recovering on iPhone or iCloud.com:
-
Open the Photos App on Mac: Open the Photos application on your Mac. It is usually found in your Applications folder.
-
Go to Recently Deleted: In the Photos app on your Mac, find the “Recently Deleted” album in the sidebar. It’s located under the “Albums” section.
-
Unlock if Locked: If the Recently Deleted album is locked, you’ll see a lock icon. Use Touch ID or enter your password to unlock and access the album.
-
Select Photos: Browse through the recently deleted items. Select the photos you wish to restore. You can select multiple photos by holding down the Command key while clicking.
-
Click Recover: Once you have selected the photos, click the “Recover” button. This will restore the photos back to your Photos Library on your Mac, and if iCloud Photos is enabled, they will sync back to your iPhone and other devices.
Image alt: Photos app icon on macOS, indicating the application for managing photos on Mac computers.
Recovering Photos from Time Machine Backup (Mac Users)
For Mac users who utilize Time Machine for backups, there’s an additional layer of recovery even after photos are permanently deleted from iCloud and the Recently Deleted album. Time Machine allows you to restore your entire system or specific files from a previous point in time. If you have a Time Machine backup set up before the photos were deleted, you can potentially recover them.
-
Open Time Machine: Connect your Time Machine backup drive to your Mac. Open Time Machine through the Time Machine icon in the menu bar or by searching for “Time Machine” in Spotlight.
-
Enter Time Machine: Once Time Machine is open, it will show you a Finder window going back in time. Navigate to a date before you deleted the photos.
-
Find Your Photos Library: Go to your Pictures folder and locate your Photos Library (usually named “Photos Library.photoslibrary”).
-
Restore Photos Library: Select your Photos Library and click “Restore.” Time Machine will copy the Photos Library from that backup date back to your Pictures folder, replacing the current library.
-
Open Photos App: After restoration, open the Photos app. It will now contain the photos as they were on the date of the Time Machine backup. Be aware that any photos added after that backup date and before the deletion might be lost in this process, so proceed with caution and ensure you back up your current library if needed.
Tips to Prevent Photo Loss on iPhone
While recovering deleted photos is possible, prevention is always better than cure. Here are a few tips to minimize the risk of losing your precious photos on your iPhone:
- Enable iCloud Photos: Ensure iCloud Photos is enabled in your iPhone settings. This automatically backs up your photos to iCloud, making them accessible across devices and recoverable in case of deletion or device issues.
- Regular Backups: Regularly back up your iPhone to iCloud or your computer using iTunes or Finder. This ensures you have a recent copy of all your data, including photos, that you can restore from if needed.
- Be Cautious When Deleting: Take a moment to review photos before deleting them, especially when deleting in bulk. Accidental deletions are common, so double-checking can save you trouble.
- Utilize Favorites and Albums: Organize your photos using Favorites and Albums. This not only helps in better management but also reduces the chances of accidentally deleting important photos mixed in with less important ones.
Conclusion
Losing photos from your iPhone, whether accidentally or due to a system issue, doesn’t have to be permanent. By understanding how to use the Recently Deleted album, iCloud Photos, and Time Machine backups, you can effectively recover your deleted photos and safeguard your precious memories. Regularly backing up your iPhone and practicing caution when deleting photos are crucial steps in preventing photo loss. With the methods outlined in this guide, you are well-equipped to handle photo recovery on your iPhone and ensure your visual memories are preserved.
